Table of Contents
Advertisement
Advertisement
Table of Contents

Related Manuals for ICT Protege WX


Summary of Contents for ICT Protege WX
- Page 1 Protege WX Integrated System Controller Configuration Guide...
- Page 2 Protege® Logo are registered trademarks of Integrated Control Technology Limited. All other brand or product names are trademarks or registered trademarks of their respective holders. Copyright © Integrated Control Technology Limited 2003-2022. All rights reserved. Last Published: 20-Jul-22 4:45 PM Protege WX Integrated System Controller | Configuration Guide...
-
Page 3: Table Of Contents
System Settings | Adaptor - USB Ethernet System Settings | Configuration System Settings | Options System Settings | Email Settings System Settings | Custom Reader Format System Settings | Security Enhancement Operators Changing Operator Passwords Protege WX Integrated System Controller | Configuration Guide... - Page 4 Backing Up and Restoring Controller Programming Upgrading Application Software and Module Firmware Hardware Configuration Setting the IP Address from a Keypad Temporarily Defaulting the IP Address Defaulting a Controller Disclaimer and Warranty Protege WX Integrated System Controller | Configuration Guide...
-
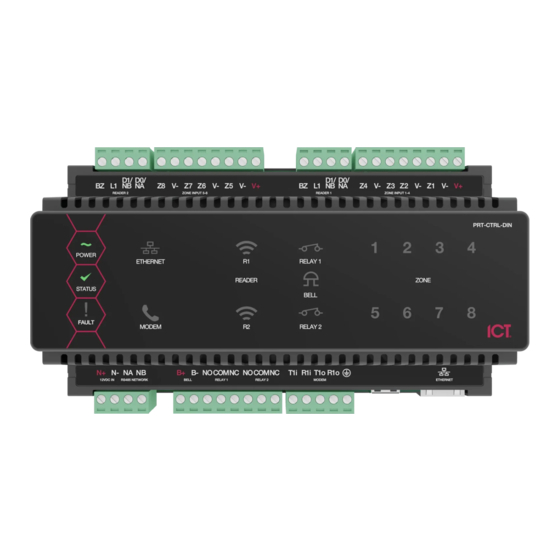
Page 5: Introduction
Protege WX DIN Rail Single Door Controller About This Module The Protege WX controller is the central processing unit responsible for the control of security, access control and building automation in the Protege WX system. It communicates with all system modules, stores all configuration and transaction information, processes all system communication, and reports alarms and system activity to a monitoring station or remote computer. - Page 6 Current Features The current features of the Protege WX controllers include: Features PRT-WX-DIN-IP PRT-WX-DIN PRT-WX-DIN-1D Internal industry standard 10/100 ethernet 32 Bit RISC processor with 2GB total memory Encrypted module network using RS-485 communication NIST Certified AES 128, 192 and 256 Bit encryption Factory loaded HTTPS certificate...
-
Page 7: Configuring A Controller Via The Web Interface
Choose a Password for the admin operator. The password cannot be blank or 'admin' and must comply with password policy requirements. Verify Password. very secure password is recommended for the admin operator (see Creating a Secure Password). Protege WX Integrated System Controller | Configuration Guide... -
Page 8: Browsing To One-Door Controllers
Click Advanced... Click Accept the Risk and Continue. The browser will present the controller's login screen. In future, you should be able to browse to this controller using this Firefox user profile. Protege WX Integrated System Controller | Configuration Guide... -
Page 9: Creating A Secure Password
Your details are passed to the web registration service. Once registration is complete you will be prompted to download your license (*.lic) file. Return to Protege WX. Click Browse to select the license file and activate your Protege WX license. Set the Controller Time Navigate to Scheduling | Time. -
Page 10: Configuring The Ip Address
Programming the IP address, subnet mask, and default gateway requires knowledge of the network and subnet that the system is connected to. You should always consult the network or system administrator before programming these values. Protege WX Integrated System Controller | Configuration Guide... -
Page 11: Setting Up Integrated Ddns
Navigate to the System Settings. In the Adaptor - Onboard Ethernet tab, select the Enable DDNS checkbox. Enter the Hostname and DDNS Server. Enter the Username and Password that you used to sign up to No-IP. Protege WX Integrated System Controller | Configuration Guide... -
Page 12: Setting Up An Https Connection
For older controllers not equipped with a default certificate, ICT strongly recommends that all live Protege sites establish an HTTPS connection between the controller web interface and the web browser. This is especially important if the controller can be accessed on-site via a router, or externally via the internet. - Page 13 Controller Default Gateway In order for the controller to send and receive external communications via the router, its default gateway needs to be set to the router's internal IP address. Protege WX Integrated System Controller | Configuration Guide...
-
Page 14: Third-Party Certificate
Different certificate authorities may have different requirements. For example, some CAs do not require manual validation of domain names, allowing you to skip the certificate authentication stage. It is recommended that you carefully note all requirements for your chosen CA before beginning. Protege WX Integrated System Controller | Configuration Guide... - Page 15 If you need help when obtaining and loading a third-party certificate, consult your IT support. ICT Technical Support cannot assist with this process. Creating a Private Key and Certificate Signing Request To begin, it is necessary to generate the private/public encryption key pair which will be the basis for the HTTPS encryption.
- Page 16 Scroll to the Certificate File section. Click Install Certificate and browse to the .pfx certificate file to install it on the controller. Enter the export password that you created when generating the certificate file. Protege WX Integrated System Controller | Configuration Guide...
-
Page 17: Self-Signed Certificate
-export -certpbe PBE-SHA1-3DES -keypbe PBE-SHA1-3DES -nomac -out [name].pfx -inkey [name].key -in [name].crt Enter the passphrase assigned above when prompted. Create an export password when prompted. This will be required when installing the certificate on the controller. Protege WX Integrated System Controller | Configuration Guide... - Page 18 HTTPS web page. The connection is still encrypted, but the browser has flagged the certificate as untrustworthy as it lacks third-party validation. In addition, one-door controllers may require additional steps to access the web interface. For more information, see Browsing to One-Door Controllers (page 8). Protege WX Integrated System Controller | Configuration Guide...
-
Page 19: Additional Controller Programming
The onboard reader is programmed in exactly the same way as any other reader module. It can be thought of as if it were a normal reader expander module on a separate circuit board. The onboard reader of a Protege WX controller is programmed as a reader expander with an address of 1. -
Page 20: Programming Controller Inputs
Enabling duplex inputs will not change the programming of any existing inputs. These must be reprogrammed to match the new addressing scheme. Two-Door Controllers The following table indicates the position and resistor configuration corresponding to each input address for two- door controllers: Input Address Position Resistor Protege WX Integrated System Controller | Configuration Guide... -
Page 21: Trouble Inputs
CP001:12 Reserved CP001:13 Module Communication Module Loss System CP001:14 Module Network Security Module Security System CP001:15 Reserved CP001:16 Reserved CP001:17 Reserved CP001:18 Reserved CP001:19 Reserved CP001:20 Ethernet Link Lost Hardware Fault System Protege WX Integrated System Controller | Configuration Guide... - Page 22 Installer Logged In Hardware Fault System CP001:29 System restarted Hardware Fault System CP001:30 PoE Connection Lost (legacy PoE model only) Power Fault General CP001:31 Output Over-Current Failure (legacy PoE model only) Power Fault General Protege WX Integrated System Controller | Configuration Guide...
-
Page 23: Configuring The Cellular Modem Connection
For cellular modem information and programming instructions, see the Protege DIN Rail Cellular Modem Installation Manual Protege DIN Rail Cellular Modem Configuration Guide, available from the ICT website. Protege WX Integrated System Controller | Configuration Guide... -
Page 24: Maintaining Your System
Display Color: Select the display color used for the web interface. This selection will persist whenever this operator logs in to the controller with the same web browser. ⦁ Logout: Log out and return to the login screen. ⦁ Change Password: Change the password used by this operator. Protege WX Integrated System Controller | Configuration Guide... -
Page 25: System Settings
For older controllers not equipped with a default certificate, ICT strongly recommends that all live Protege sites establish an HTTPS connection between the controller web interface and the web browser. This is especially important if the controller can be accessed onsite via a router, or externally via the internet. -
Page 26: System Settings | Adaptor - Onboard Ethernet
USB Ethernet ⦁ Enable USB Ethernet*: This option configures the controller to communicate via an ethernet adaptor connected to its USB port. This is used for connection to the Protege DIN Rail Cellular Modem. Protege WX Integrated System Controller | Configuration Guide... - Page 27 Current Technology: The cellular technology that the cellular modem is connected with. ⦁ Internet Connection Status: Identifies whether the cellular modem's internet connection is valid. ⦁ IP Address: The IP address assigned to the cellular modem by the network provider. Protege WX Integrated System Controller | Configuration Guide...
-
Page 28: System Settings | Configuration
This occurs one minute after the trouble input has been activated. ⦁ Enable UL Operation Mode: When this option is enabled, the Protege WX system runs in UL compliance mode. This setting has the following effects:... -
Page 29: System Settings | Email Settings
⦁ SMTP Port: The port used for outgoing mail connections. Typical numbers include 25 and 587. ⦁ Use SSL: When this option is enabled, Protege WX will use TLS 1.2 to transmit emails to the SMTP server. Both the host OS and the SMTP server must support TLS 1.2, and the SMTP Port above must be changed to a TLS- enabled port (e.g. -
Page 30: System Settings | Custom Reader Format
PINs with 7 digits, then 8 digits, then 5 digits, and finally 4 digits. ⦁ Minimum PIN length: The minimum number of digits (options between 1-8) that will be permitted when manually entering PINs and when PINs are automatically generated. Protege WX Integrated System Controller | Configuration Guide... - Page 31 Interface will immediately expire on first use. The user will be required to set their own permanent PIN when next logging in at a keypad. This ensures that only the user knows their PIN. Protege WX Integrated System Controller | Configuration Guide...
-
Page 32: Operators
Roles To control access to the Protege WX system, each operator must be assigned a role. The role determines which pages are visible to the operator when they are logged in. If an option is enabled, that page will be visible. If it is disabled, the page is hidden. -
Page 33: Password Policy
The Protege WX interface provides a simple export tool for backing up the system to a proprietary encrypted backup file (*.bak). This file works as a snapshot of your current system, enabling you to later restore and retain the programming at the same point as you exported it. -
Page 34: Upgrading Application Software And Module Firmware
This option should only be selected at the direction of ICT Technical Support . Click Upload Firmware to browse to the firmware file (.bin format) supplied by ICT, and open the file to install the firmware on the selected module. -
Page 35: Hardware Configuration
[Enter]. You must then restart the controller, either through the menu [4], [2], [2] or by cycling the power, for the settings to take effect. Protege WX Integrated System Controller | Configuration Guide... -
Page 36: Temporarily Defaulting The Ip Address
RS485 NETWORK 12VDC OUT INPUT 2 INPUT 1 RELAY 1 N+ N- NA NB 12VDC IN/OUT RS485 NETWORK ETHERNET Power up the controller. Wait for the status indicator to begin flashing steadily. Protege WX Integrated System Controller | Configuration Guide... - Page 37 Remember to change the subnet of your PC or laptop to match the subnet of the controller. Remove the wire link(s) and power cycle the controller again. You can now connect to the controller using the configured IP address. Protege WX Integrated System Controller | Configuration Guide...
-
Page 38: Defaulting A Controller
N+ N- NA NB 12VDC IN/OUT RS485 NETWORK ETHERNET Power up the controller. Wait for the status indicator to begin flashing steadily. Remove the wire links before making any changes to the controller's configuration. Protege WX Integrated System Controller | Configuration Guide... - Page 39 Reset the controller's IP address to its previous value. Reconfigure any additional network settings. Reinstall previously installed custom HTTPS certificates. Restore any other system settings as required by your site configuration. Protege WX Integrated System Controller | Configuration Guide...
-
Page 40: Disclaimer And Warranty
Integrated Control Technology Ltd nor its employees shall be liable under any circumstances to any party in respect of decisions or actions they may make as a result of using this information. In accordance with the ICT policy of enhanced development, design and specifications are subject to change without notice. - Page 41 In accordance with the ICT policy of enhanced development, design and specifications are subject to change without notice.
Need help?
Do you have a question about the Protege WX and is the answer not in the manual?
Questions and answers