Table of Contents
Advertisement
Quick Links
Advertisement
Chapters
Table of Contents

Related Manuals for ICT PRT-WX-DIN


Summary of Contents for ICT PRT-WX-DIN
- Page 1 PRT-WX-DIN Using Protege WX Programming Reference Manual...
-
Page 2: Input Types | Options
Protege® Logo are registered trademarks of Integrated Control Technology Limited. All other brand or product names are trademarks or registered trademarks of their respective holders. Copyright © Integrated Control Technology Limited 2003-2022. All rights reserved. Last Published: 14-Feb-22 2:51 PM PRT-WX-DIN | Using Protege WX | Programming Reference Manual... -
Page 3: Table Of Contents
Creating an Area Pulse Times Configuring Schedules and Holidays Creating Holiday Groups Creating and Editing Schedules Schedules and Multiple Time Spans Rules for Schedules and Holidays Monitoring Your System Viewing Events PRT-WX-DIN | Using Protege WX | Programming Reference Manual... -
Page 4: Input Types | Options
Credential Types User CSV Import Monitoring Menu Reporting | Event Reports Common Reporting Scenarios Event Reports | Users Event Reports | Doors Event Reports | Areas Reporting | Central Station Report PRT-WX-DIN | Using Protege WX | Programming Reference Manual... - Page 5 Outputs | Options Output Groups Keypad Groups Menu Groups Menu Groups | Keypad Groups Menu Groups | Options Trouble Inputs Trouble Inputs | Areas and Input Types Trouble Inputs | Options PRT-WX-DIN | Using Protege WX | Programming Reference Manual...
- Page 6 Analog Expanders | Channel 1-4 Input Expanders Output Expanders Reader Expanders Reader Expanders | Reader 1-2 Reader Expanders | Reader 1-2 Options Smart Readers Smart Readers | Reader Expander Addressing Automation Menu Automation | General PRT-WX-DIN | Using Protege WX | Programming Reference Manual...
- Page 7 Modules that are Offline Areas Requiring Rearming due to Input Changes Areas with the Tamper Area Disarmed Inputs Assigned an Area but no Input Type Items that Can't Fit in the Database PRT-WX-DIN | Using Protege WX | Programming Reference Manual...
-
Page 8: Introduction
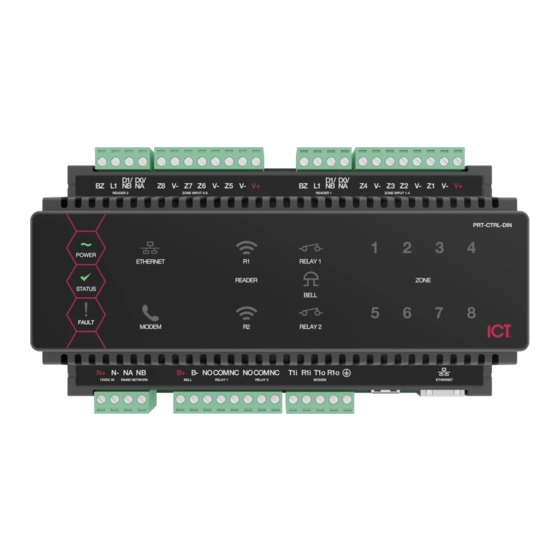
The Controller is the central processing unit responsible for the control of security, access control and automation in the Protege WX System, and is available in the following models. The Protege WX DIN Rail Integrated System Controller (PRT-WX-DIN) has 2 reader ports that can be ⦁... -
Page 9: What This Manual Covers
Undertake an optional training course to unlock the advanced mode features including building automation, programmable functions and elevator control. To find out more about training and unlocking advanced mode, please contact ICT. PRT-WX-DIN | Using Protege WX | Programming Reference Manual... -
Page 10: System Expansion And Capacities
Outputs Floors Elevator Cars Programmable Functions 248* Keypads Reader Expanders Input Expanders Output Expanders Analog Expanders * Floors, Elevator Cars, and Programmable Functions are only available in Protege WX Advanced mode. PRT-WX-DIN | Using Protege WX | Programming Reference Manual... -
Page 11: Technical Specifications
UL/ULC 0° to 49°C (32° to 120°F) : EU EN -10° to 55°C (14° to 131°F) Storage Temperature -10˚ to 85˚C (14˚ to 185˚F) Humidity 0%-93% non-condensing, indoor use only (relative humidity) PRT-WX-DIN | Using Protege WX | Programming Reference Manual... - Page 12 If combining reader technologies, they must be connected on separate ports. The ICT implementation of OSDP conforms to a subset of the OSDP functionality. For specifications and reader configuration, refer to AN-254 Configuring OSDP Readers, available from the ICT website.
-
Page 13: Getting Started
As a guideline, a secure password should include these features: Minimum 8 characters in length ⦁ Combination of upper and lower case letters ⦁ Combination of numbers and letters ⦁ Inclusion of special characters ⦁ PRT-WX-DIN | Using Protege WX | Programming Reference Manual... -
Page 14: Signing In
To Automatically Activate Your License: Click Download License. Your details are passed to the ICT web registration service, then your license is activated automatically. Important: The automatic activation process requires an internet connection on the workstation you are using to connect to the controller. -
Page 15: Configuring The Ip Address
Programming the IP address, subnet mask, and default gateway requires knowledge of the network and subnet that the system is connected to. You should always consult the network or system administrator before programming these values. PRT-WX-DIN | Using Protege WX | Programming Reference Manual... -
Page 16: Setting Up Integrated Ddns
Enter the Username and Password that you used to sign up to No-IP. Save your settings. Confirm that the controller is externally accessible by browsing to the hostname on another PC. PRT-WX-DIN | Using Protege WX | Programming Reference Manual... - Page 17 If the controller's external port is not the default port, you will need to append the port number to the URL (e.g. controller.ddns.org:1000). PRT-WX-DIN | Using Protege WX | Programming Reference Manual...
-
Page 18: Setting Up An Https Connection
For older controllers not equipped with a default certificate, ICT strongly recommends that all live Protege sites establish an HTTPS connection between the controller web interface and the web browser. This is especially important if the controller can be accessed on-site via a router, or externally via the internet. - Page 19 Save the configuration and Restart the controller. Note: The default gateway must be set to the router's internal IP address that identifies it on the local internal network, not the external IP address used to connect over the internet. PRT-WX-DIN | Using Protege WX | Programming Reference Manual...
- Page 20 Generally a DDNS service will provide a client application which runs on the web server PC and automatically updates the domain's IP address mapping whenever the external IP address changes. Controllers also have an integrated DDNS client which supports several free DDNS providers. PRT-WX-DIN | Using Protege WX | Programming Reference Manual...
-
Page 21: Third-Party Certificate
It is recommended that you carefully note all requirements for your chosen CA before beginning. If you need help when obtaining and loading a third-party certificate, consult your IT support. ICT Technical Support cannot assist with this process. - Page 22 Once the CA has verified that your domain is accessible, you will be sent the signed certificate. Wait times can vary between providers, but will typically take from one hour to several hours. PRT-WX-DIN | Using Protege WX | Programming Reference Manual...
- Page 23 A lock or similar icon in the browser toolbar should indicate that the connection is secure. Click on this icon to see details about the certificate, including the information you entered in the certificate signing request. PRT-WX-DIN | Using Protege WX | Programming Reference Manual...
-
Page 24: Self-Signed Certificate
Access the controller's web interface by typing its IP address into the address bar of a web browser, then log in with your username and password. Navigate to the System Settings. If not already enabled, enable the Use HTTPS option. PRT-WX-DIN | Using Protege WX | Programming Reference Manual... - Page 25 When using a self-signed certificate, you will likely be presented with a security warning if you attempt to access the HTTPS web page. The connection is still encrypted, but the browser has flagged the certificate as untrustworthy as it lacks third-party validation. PRT-WX-DIN | Using Protege WX | Programming Reference Manual...
-
Page 26: Basic Programming
In most cases these will be enough, but you can modify them as needed or create your own to suit your requirements. The four most commonly used input types are: ⦁ Instant: Activates an armed area immediately when input opens ⦁ Delay: Activates entry delay when input opens PRT-WX-DIN | Using Protege WX | Programming Reference Manual... - Page 27 Trouble Silent: Used for system trouble inputs. Generates an alarm without the Bell ⦁ 24 Hour Alarm: Used for panic inputs. Generates an alarm even when area is disarmed ⦁ PRT-WX-DIN | Using Protege WX | Programming Reference Manual...
-
Page 28: Using The Protege Wx Wizards
The wizard lists the placeholder area that is created by default which you can now edit to fit your needs. If you require additional areas create these first, or create and configure them later. PRT-WX-DIN | Using Protege WX | Programming Reference Manual... -
Page 29: Users
For each user, enter the name, PIN, and card details. Select the Area(s) and Door(s) you wish to grant them access to, then click Add User. Repeat until you have added all the users you need. PRT-WX-DIN | Using Protege WX | Programming Reference Manual... -
Page 30: Configuring Additional Areas
Pulse times are measured in tenths of a second, or 100ms. A pulse time of 10 equates to 1 second. Setting the Pulse On to 1 and the Pulse Off to 9, provides a short pulse (such as a short beep or flash) every second. PRT-WX-DIN | Using Protege WX | Programming Reference Manual... - Page 31 If Pulse On is given a value but Pulse Off is set to zero, the output will pulse (flash or beep) once only, then ⦁ remain off PRT-WX-DIN | Using Protege WX | Programming Reference Manual...
-
Page 32: Configuring Schedules And Holidays
This is the default mode of operation for schedules PRT-WX-DIN | Using Protege WX | Programming Reference Manual... -
Page 33: Schedules And Multiple Time Spans
The holiday must be programmed in a holiday group. That holiday group must be applied to the schedule in the Holiday groups tab. The Holiday mode for the schedule period must be set to Disabled on holiday. PRT-WX-DIN | Using Protege WX | Programming Reference Manual... -
Page 34: Monitoring Your System
Each status list also enables you to manually control the items from the web interface. For example, you can use the Door Status List to lock and unlock doors, or use the Area Status List to arm and disarm areas. PRT-WX-DIN | Using Protege WX | Programming Reference Manual... -
Page 35: Reporting
Click Export for either of the two services to generate a CSV format report that can be forwarded to your monitoring station. Depending on your browser settings you may be prompted to save the file, otherwise it is downloaded automatically to your Downloads folder. PRT-WX-DIN | Using Protege WX | Programming Reference Manual... -
Page 36: Led Indicators
Ethernet cable not connected, no link detected Modem Indicator The Modem indicator shows the status of the onboard modem. State Description On (green) Modem has control of telephone line Modem is not active PRT-WX-DIN | Using Protege WX | Programming Reference Manual... -
Page 37: Power Supply (4 Amp)
The power indicator is lit whenever the correct module input voltage is applied across the mains input terminals. State Description Constantly on Correct module input voltage applied Constantly off Incorrect module input voltage applied PRT-WX-DIN | Using Protege WX | Programming Reference Manual... - Page 38 Mains has failed and the PSU is drawing power from the battery. State is Battery Low Flashing (green) Mains has failed and the PSU is drawing power from the battery. State is Battery Restore PRT-WX-DIN | Using Protege WX | Programming Reference Manual...
-
Page 39: Power Supply (2 Amp)
When the fault and status indicators are flashing alternately, the module is in identification mode, enabling the installer to easily identify the module in question. Upon either a module update or the identification time period expiring, the module will return to normal operation. PRT-WX-DIN | Using Protege WX | Programming Reference Manual... -
Page 40: Error Code Display
The following table is only valid if the fault indicator is constantly on and the status indicator is flashing red. If the fault indicator is flashing the module requires a firmware update or is currently in firmware update mode. PRT-WX-DIN | Using Protege WX | Programming Reference Manual... - Page 41 The serial number in the device is not valid. Return the unit to the distributor for replacement. Locked Device The module or system controller is a locked device and cannot communicate on the network. Return the unit to the distributor for replacement. PRT-WX-DIN | Using Protege WX | Programming Reference Manual...
-
Page 42: Trouble Inputs
Module Communication Fault CP001:14 Module Security Violation CP001:20 ReportIP Reporting Failure CP001:24 Installer Logged In CP001:29 System Restarted CP001:30 PoE Connection Lost (PoE model only) CP001:31 Output Over-Current Failure (PoE model only) PRT-WX-DIN | Using Protege WX | Programming Reference Manual... -
Page 43: Property Reference Guide
Certain options are only available in Advanced Mode. These are indicated with an asterisk [*] in the following section. PRT-WX-DIN | Using Protege WX | Programming Reference Manual... -
Page 44: Users Menu
Expiry Date: Optional setting enabling you to set an expiry date for the user. For example, for a contractor who finishes work on a specific date Areas ⦁ User Area: Optional setting enabling you to set an area for the user PRT-WX-DIN | Using Protege WX | Programming Reference Manual... -
Page 45: Users | Credentials
The duress code is the last digit of a user's PIN plus 1. For example, if the user's PIN is 1234 but the PIN is entered as 1235, it will be processed as a duress code. (Note that PRT-WX-DIN | Using Protege WX | Programming Reference Manual... -
Page 46: Users | Events
Dual Custody Master enabled has activated the reader first. Users | Events Recent Events ⦁ Shows a list of all recent events associated with the user PRT-WX-DIN | Using Protege WX | Programming Reference Manual... -
Page 47: Access Levels
For example, limiting access to an office so it may only be entered during office hours. PRT-WX-DIN | Using Protege WX | Programming Reference Manual... -
Page 48: Access Levels | Area Groups
Access Levels | Output Groups This feature is only available in Advanced mode. PRT-WX-DIN | Using Protege WX | Programming Reference Manual... - Page 49 PRT-WX-DIN | Using Protege WX | Programming Reference Manual...
-
Page 50: Credential Types
Prefix: The characters that are required at the start of the credential data packet sent to the controller. This setting is determined by the third-party device/application. Case Sensitive: Defines whether the data is case sensitive or not ⦁ PRT-WX-DIN | Using Protege WX | Programming Reference Manual... -
Page 51: User Csv Import
Browse to and select the CSV file you wish to import the users from, then click OK. ⦁ The Users records are created and a message displayed to indicate the action was successful. PRT-WX-DIN | Using Protege WX | Programming Reference Manual... -
Page 52: Monitoring Menu
Display a list of all services and their current status Allows the configuration, viewing and exporting of Event Reports as well as the Reports exporting of Report Maps for the ContactID and ReportIP services PRT-WX-DIN | Using Protege WX | Programming Reference Manual... -
Page 53: Reporting | Event Reports
Defines the users displayed in the report. ⦁ Event Reports | Doors Doors ⦁ Defines the door(s) displayed in the report. Event Reports | Areas Areas Defines the areas displayed in the report. ⦁ PRT-WX-DIN | Using Protege WX | Programming Reference Manual... -
Page 54: Reporting | Central Station Report
Reporting | Central Station Report Central Station Reports (report maps) for the Contact ID and Report IP services can be exported from the Protege WX interface and supplied to the monitoring station. PRT-WX-DIN | Using Protege WX | Programming Reference Manual... -
Page 55: Programming Menu
Configure the phone numbers assigned to a service that communicates using a Phone Numbers modem or telephone connection Create and manage services to provide interaction between Protege WX and external Services systems PRT-WX-DIN | Using Protege WX | Programming Reference Manual... -
Page 56: Doors
Access will be denied to the user based on an interlock. Commands Commands*: Used to send manual commands to a device. ⦁ PRT-WX-DIN | Using Protege WX | Programming Reference Manual... -
Page 57: Doors | Outputs
10 will pulse the unit off for 1 second and then on for the programmed time set in the pulse on section. To configure a door forced delay, add the DoorForcedStateDelay = X command in the Commands field for the door, where is the delay time in seconds. PRT-WX-DIN | Using Protege WX | Programming Reference Manual... -
Page 58: Doors | Inputs
Forced Door Sends Door Open: When enabled the reader expander processes door forced open events as ⦁ door open events. When disabled the reader will process forced door events as normal. PRT-WX-DIN | Using Protege WX | Programming Reference Manual... -
Page 59: Doors | Options
AND the inside or outside area is disarmed dependent on the options set for Prevent Unlock On Schedule If Inside Area Armed Prevent Unlock On Schedule If Outside Area Armed. PRT-WX-DIN | Using Protege WX | Programming Reference Manual... -
Page 60: Doors | Advanced Options
Disable During Unlock Schedule: Enable this option to disable the door pre-alarm while the door has been ⦁ latch unlocked by an unlock schedule. PRT-WX-DIN | Using Protege WX | Programming Reference Manual... -
Page 61: Doors | Events
Alarm Operating Schedule: The door forced alarm will be enabled when this schedule is valid and disabled ⦁ when this schedule is invalid. Doors | Events Recent Events ⦁ Shows a list of all recent events associated with the door. PRT-WX-DIN | Using Protege WX | Programming Reference Manual... -
Page 62: Door Groups
Door groups define which doors a user can access and/or control. A door group is assigned to an access level to restrict the ability of a user to gain entry to or exit from certain doors. Click Add to add doors, then apply a schedule. PRT-WX-DIN | Using Protege WX | Programming Reference Manual... -
Page 63: Inputs
For example, an input can be a delay input in one area and an instant input in another. ⦁ Input Type: When an input is assigned to an area the input must be programmed with the type of input (24HR Panic, Burglary Delay, etc.) in order to function. PRT-WX-DIN | Using Protege WX | Programming Reference Manual... -
Page 64: Inputs | Options
⦁ Input End of Line (EOL): Defines the resistors used for EOL configuration ⦁ Contact Type: Defines whether the input is Normally Closed or Normally Open. Normally Closed is the default. PRT-WX-DIN | Using Protege WX | Programming Reference Manual... -
Page 65: Door Types
Selecting Hard Passback prevents the user from exiting the area and also logs an event. PRT-WX-DIN | Using Protege WX | Programming Reference Manual... -
Page 66: Door Types | Options
Dual Card Provider Can Initiate Access*: When enabled the door will unlock provided both users have either Dual Custody Provider or Dual Custody Master access rights. If disabled the Dual Custody Provider will only be recognized after a Dual Custody Master has activated the reader first. PRT-WX-DIN | Using Protege WX | Programming Reference Manual... -
Page 67: Input Types
⦁ 24hr Panic Input: When enabled the input type will generate a 24-hour alarm if the input generates an alarm. The area state does not affect the generation of this alarm. PRT-WX-DIN | Using Protege WX | Programming Reference Manual... - Page 68 This option can be used to indicate an alarm has occurred in the system. Use this feature to display an indication to the users of the system to prevent possible 'sitter' and 'hostage' situations. PRT-WX-DIN | Using Protege WX | Programming Reference Manual...
-
Page 69: Input Types | Options 3
Deactivate Input Control Output On Restore: When enabled the input type will deactivate when the input ⦁ control output assigned restores from an alarm. PRT-WX-DIN | Using Protege WX | Programming Reference Manual... - Page 70 Use Alternate Entry Time: When enabled the input type will start the alternate entry delay timer for the ⦁ assigned area when the input generates an alarm. PRT-WX-DIN | Using Protege WX | Programming Reference Manual...
-
Page 71: Areas
Arm/Disarm Schedule: Defines a schedule that enables the area to be armed and disarmed automatically. ⦁ Disarm Area When Schedule Starts: When enabled the area will automatically disarm when the assigned ⦁ Arm/Disarm Schedule starts. PRT-WX-DIN | Using Protege WX | Programming Reference Manual... - Page 72 The keypad beeper is recommended to be programmed in the defer output group. The Defer Automatic Arming option must be enabled, and for the keypads to generate a message they must also be programmed with the Display Defer Messages. PRT-WX-DIN | Using Protege WX | Programming Reference Manual...
-
Page 73: Areas | Reporting Services
The value entered here must be greater than 0 and is in increments of 100ms. For example, setting 10 will pulse the unit on for 1 second and then off for the programmed time set in the PRT-WX-DIN | Using Protege WX | Programming Reference Manual... - Page 74 The value entered here must be greater than 0 and is in increments of 100ms. For example, setting 10 will pulse the unit off for 1 second and then on for the programmed time set in the pulse on section. PRT-WX-DIN | Using Protege WX | Programming Reference Manual...
-
Page 75: Areas | Options 1
The delay before rearming is set by the Rearm Area Time (Configuration tab). This function force arms the area, so Enable Force Arming must be selected (Options (2) tab). PRT-WX-DIN | Using Protege WX | Programming Reference Manual... - Page 76 Always Verify Area Schedule: When enabled the area will verify that the programmed schedule has not changed or that the area has not been disarmed when it should have been armed. This will occur every one minute period. PRT-WX-DIN | Using Protege WX | Programming Reference Manual...
- Page 77 Period 1, an Early to Disarm event will be generated. If the area is still armed when Period 1 ends, the system will generate a Late to Disarm event. No event is generated if the area is PRT-WX-DIN | Using Protege WX | Programming Reference Manual...
-
Page 78: Areas | Events
Late to Arm event. No event is generated if the area is armed while Period 2 of the schedule is valid. Areas | Events Recent Events Shows a list of all recent events associated with the area ⦁ PRT-WX-DIN | Using Protege WX | Programming Reference Manual... -
Page 79: Area Groups
Select the Areas tab to manage the areas assigned to the group. Areas The areas that belong to the area group. Click Add, select and click OK to add to the list displayed. ⦁ PRT-WX-DIN | Using Protege WX | Programming Reference Manual... -
Page 80: Outputs
If enabled the output will be activated. If disabled the output will be deactivated. Preset Module Power Up: When enabled the state of the output will be set when the module powers up, and ⦁ will override the current state held in the controller. PRT-WX-DIN | Using Protege WX | Programming Reference Manual... - Page 81 Output Turns on When Module Offline: Defines the state of the output when the Preset Module Offline option ⦁ is enabled. If enabled the output will be activated. If disabled the output will be deactivated. PRT-WX-DIN | Using Protege WX | Programming Reference Manual...
-
Page 82: Output Groups
Select the Outputs tab to manage the outputs assigned to the group. Outputs ⦁ The outputs that belong to the group. Click Add, select and click OK to add to the list displayed. PRT-WX-DIN | Using Protege WX | Programming Reference Manual... -
Page 83: Keypad Groups
Keypad Groups are used to group a number of keypads together to restrict access. Keypad Groups are assigned to Menu Groups which, when assigned to Access Levels, determine the keypads a user can log into. PRT-WX-DIN | Using Protege WX | Programming Reference Manual... -
Page 84: Menu Groups
Show User Greeting: When enabled the menu group will display the time of day greeting to the user once they have entered their user code. ⦁ User Can Acknowledge Alarm Memory: When enabled the user will be able to acknowledge alarm memory that is displayed when they first login. PRT-WX-DIN | Using Protege WX | Programming Reference Manual... - Page 85 Show User Alarm Memory On Logon: When enabled the user will be shown any alarms that are in the ⦁ memory when they log in to the keypad. PRT-WX-DIN | Using Protege WX | Programming Reference Manual...
-
Page 86: Trouble Inputs
Hardware Fault: The system controller cannot communicate with an accessory interface board, or a device connected to the system controller has a hardware failure User Denied: A user has been denied entry to a keypad or door PRT-WX-DIN | Using Protege WX | Programming Reference Manual... -
Page 87: Trouble Inputs | Areas And Input Types
No Bypass If Any Area Armed: When enabled the input will be prevented from being bypassed if it is already assigned to an area that has either the 24HR processing enabled or the area is armed. PRT-WX-DIN | Using Protege WX | Programming Reference Manual... -
Page 88: Elevators
Follow Area: When a floor area is defined and this option is enabled, the floor will follow the state of the area. If the area is armed, the floor will lock. And if the area is disarmed, the floor will unlock. PRT-WX-DIN | Using Protege WX | Programming Reference Manual... - Page 89 In addition, this option will prevent a user from accessing a floor when the area is armed and they cannot disarm it. This option is only available when Destination Reporting is enabled. PRT-WX-DIN | Using Protege WX | Programming Reference Manual...
-
Page 90: Elevator Groups
An elevator group can be assigned to an access level to determine the elevators a user has access to. Select the Elevators tab to manage the elevators assigned to the group. Elevators The elevator cars that belong to the elevator group. ⦁ PRT-WX-DIN | Using Protege WX | Programming Reference Manual... -
Page 91: Floors
Floor Relay: Specifies a link to the physical hardware controlling the elevator. This is the index of a relay on an Output Expander module which, if wired correctly, will correspond directly to the Floor number in the building Commands ⦁ Commands*: Used to send manual commands to a device. PRT-WX-DIN | Using Protege WX | Programming Reference Manual... -
Page 92: Floor Groups
(the access level must also have an elevator group). Floors The floors that belong to the floor group. Click Add to select floors to add to the list displayed. ⦁ PRT-WX-DIN | Using Protege WX | Programming Reference Manual... -
Page 93: Cameras
If authentication is required to view the camera feed, the URL entered must contain the login details. Camera Preview ⦁ Once a camera has been configured, a small preview is displayed PRT-WX-DIN | Using Protege WX | Programming Reference Manual... -
Page 94: Phone Numbers
The schedule of the secondary telephone number must be valid or set to none ⦁ Phone Number: Program the telephone number that you want to assign to this telephone number entry PRT-WX-DIN | Using Protege WX | Programming Reference Manual... -
Page 95: Services
This will be dialed after the total number of attempts is reached on the primary and secondary numbers. The backup number will be dialed for the configured number of dialing attempts programmed for the service. PRT-WX-DIN | Using Protege WX | Programming Reference Manual... - Page 96 OK message. The output is not automatically deactivated and should be programmed with a timer, which can be connected to an external audible device to signal that the report was PRT-WX-DIN | Using Protege WX | Programming Reference Manual...
-
Page 97: Report Ip
IP Port Number: The primary port configures the reporting service with the remote port number to ⦁ communicate on. Consult the documentation provided with the receiver software or hardware to find this PRT-WX-DIN | Using Protege WX | Programming Reference Manual... - Page 98 Report Tampers: When enabled the service will report tampers for the inputs that are part of the area group ⦁ assigned. An area group of none will mean ALL areas will be sent using this service. PRT-WX-DIN | Using Protege WX | Programming Reference Manual...
-
Page 99: Automation And Control
5 attempts. If enabled the service will keep trying until it receives an Ack. If not PRT-WX-DIN | Using Protege WX | Programming Reference Manual... -
Page 100: C-Bus
Log C-BUS ACK Message: Logs events for each packet that is successfully exchanged with the CNI. ⦁ Log C-BUS Data Activity: Logs events for each message packet that is sent to or received from the CNI. ⦁ PRT-WX-DIN | Using Protege WX | Programming Reference Manual... -
Page 101: Scheduling Menu
Define the daylight savings period associated with a controller Configure schedules for use by system controllers that enable a function or access level to Schedules operate only within certain scheduled periods PRT-WX-DIN | Using Protege WX | Programming Reference Manual... -
Page 102: Time
Failure to configure any of these will result in the time being inaccurate. PRT-WX-DIN | Using Protege WX | Programming Reference Manual... -
Page 103: Holiday Groups
Repeat: When enabled the holiday will recur on an annual basis. ⦁ Start Date: The start date of the holiday. ⦁ End Date: The end date of the holiday. A maximum of 128 holidays can be added to a holiday group. PRT-WX-DIN | Using Protege WX | Programming Reference Manual... -
Page 104: Daylight Savings
Navigate to Scheduling | Time Ensure the IP address of the Time Server is set correctly and that the Time Zone selected matches the daylight savings period entered. PRT-WX-DIN | Using Protege WX | Programming Reference Manual... -
Page 105: Schedules
Schedules | Holiday Groups Holiday Groups: The holiday groups for which the schedule is to apply. Select which holidays groups are required by clicking Add and selecting them from the list. PRT-WX-DIN | Using Protege WX | Programming Reference Manual... -
Page 106: Expanders Menu
Configure standalone locking devices and ICT RS-485 readers View the hardware that is connected to the system network, and set the addresses of Expander Addressing the modules that have auto-addressing capability PRT-WX-DIN | Using Protege WX | Programming Reference Manual... -
Page 107: Keypads
Display Custom Message (lines 1 and 2): When enabled the keypad will display the text programmed in the Controller settings. ⦁ Display Primary Area Status: When enabled the keypad will display the status of the primary area that is assigned to the keypad. PRT-WX-DIN | Using Protege WX | Programming Reference Manual... - Page 108 Keypad Login Requires Card: When enabled the keypad will require access card verification along with a user code before the user login can succeed. ⦁ Offline Access to Automation Menu*: When enabled the keypad will allow access to the Automation Menu if no user is logged in. PRT-WX-DIN | Using Protege WX | Programming Reference Manual...
- Page 109 Always Activate Access Level Output*: When enabled the user's access level output will activate after they have logged into the keypad, even if they do not have a valid menu group or the ability to control other features through the keypad. PRT-WX-DIN | Using Protege WX | Programming Reference Manual...
-
Page 110: Analog Expanders
'Send ADC Value in Diff Mode' is enabled for the channel, an update will be sent to the controller. PRT-WX-DIN | Using Protege WX | Programming Reference Manual... -
Page 111: Input Expanders
Input Expanders extend the number of inputs available within the system. Configuration ⦁ Physical Address: The device address of the Input Expander. Commands ⦁ Commands*: Used to send manual commands to a device. PRT-WX-DIN | Using Protege WX | Programming Reference Manual... -
Page 112: Output Expanders
Output Expanders extend the number of outputs available within the system. Configuration ⦁ Physical Address: The device address of the Analog Expander. Commands ⦁ Commands*: Used to send manual commands to a device. PRT-WX-DIN | Using Protege WX | Programming Reference Manual... -
Page 113: Reader Expanders
EXIT configuration must be set correctly to ensure the correct action is taken by the reader expander. Exit: The reader is located on the inside of the door and is used to exit out of the area that is being protected by the door. PRT-WX-DIN | Using Protege WX | Programming Reference Manual... - Page 114 Arm Area on 2 Reads: Two successive reads from the same user will result in the inside or outside area (depending on the card reader type configuration) starting the arming process. PRT-WX-DIN | Using Protege WX | Programming Reference Manual...
- Page 115 Allow Access When Area Armed: When enabled the user will be granted access based on the access control ⦁ configuration only and the area status will not be checked against the user's ability to disarm the area. When PRT-WX-DIN | Using Protege WX | Programming Reference Manual...
-
Page 116: Reader Expanders | Reader 1-2 Options
Door Sense Enabled: When enabled the reader will send door events when the door input is opened or closed. ⦁ This is enabled by default but should be disabled on at least one reader port if both reader ports are controlling PRT-WX-DIN | Using Protege WX | Programming Reference Manual... - Page 117 This allows a door to be held while furniture is being moved or to provide extended access for mobility users. PRT-WX-DIN | Using Protege WX | Programming Reference Manual...
-
Page 118: Smart Readers
Smart Readers Smart Readers can be wireless locking devices or ICT RS-485 readers. Configuration ⦁ Expander Address: The address of the Reader Expander that the Smart Reader is connected to. ⦁ Expander Port: The reader port used by the Smart Reader. - Page 119 When disabled the reader performs no action when a card is presented and the door is unlocked or open. PRT-WX-DIN | Using Protege WX | Programming Reference Manual...
- Page 120 This allows a door to be held while furniture is being moved or to provide extended access for mobility users. PRT-WX-DIN | Using Protege WX | Programming Reference Manual...
-
Page 121: Expander Addressing
⦁ The serial number ⦁ Current firmware version ⦁ The current address of the module ⦁ Whether the module is registered with the Controller ⦁ Whether the module is currently online PRT-WX-DIN | Using Protege WX | Programming Reference Manual... -
Page 122: Automation Menu
C-Bus Operates On Falling Edge: When enabled the C-Bus processing will only activate on the falling edge of a change in the Automation Point or output. For example the Automation point changing from On to Off. PRT-WX-DIN | Using Protege WX | Programming Reference Manual... -
Page 123: Programmable Functions
Follow Pulse On: This function will turn the controlled output ON only when the checked output transitions from an OFF to an ON state. No further testing of the output states will occur, allowing full control by other functions, processes and manual control commands. PRT-WX-DIN | Using Protege WX | Programming Reference Manual... -
Page 124: Area Control
(NOT). If the output turns on the controlled area/area group will disarm, and if the output turns off the controlled area/area group will arm. In between state changes the controlled area/area group state is PRT-WX-DIN | Using Protege WX | Programming Reference Manual... -
Page 125: Ripple Output
Door Control The Door Control function can be used to lock and unlock a door or door group based on the status of an output. PRT-WX-DIN | Using Protege WX | Programming Reference Manual... - Page 126 This mode is a higher priority version of the Latched Unlock mode. Door Lockdown (Deny Entry + Exit): This mode forces all unlocked doors to lock. Entry and Exit requests are denied. PRT-WX-DIN | Using Protege WX | Programming Reference Manual...
-
Page 127: Virtual Door
Max Open time. ⦁ Pulse Alarm Output on Door Left Open: When enabled the Alarm output will be activated with a pulse time on and off. PRT-WX-DIN | Using Protege WX | Programming Reference Manual... -
Page 128: Input Follows Output
Latch Elevator Unlock: The floor group will be latched in the unlocked state and will remain unlocked until controlled from: A keypad ◾ The Protege interface ◾ A scheduled action ◾ A change in area status ◾ A programmable function ◾ PRT-WX-DIN | Using Protege WX | Programming Reference Manual... - Page 129 Floor Group: Defines the floors that will be activated on all of the elevators in the elevator group as a result of ⦁ the selected function. ⦁ Token Time: The period of time the floor group will be activated for. PRT-WX-DIN | Using Protege WX | Programming Reference Manual...
-
Page 130: System Menu
Create and manage the operators that can access Protege WX to maintain and monitor the system Roles Configure the operator roles and the access they have Backup Backup and restore Controller programming Firmware View current version information and update firmware PRT-WX-DIN | Using Protege WX | Programming Reference Manual... -
Page 131: System Settings
No-IP: The username and password are the credentials used to log in to your No-IP account. HTTPS This feature is only available with Protege WX version 4.00.452 or higher. Use HTTPS: ICT controllers come preconfigured with a pre-loaded certificate and HTTPS enabled by default. ⦁ However an alternate certificate can be installed if preferred. -
Page 132: Settings | Configuration
Generate Input Restore On Test Report Input: When enabled the controller will generate a restore event for ⦁ the trouble input test report input restoring. This occurs one minute after the trouble input has been activated. PRT-WX-DIN | Using Protege WX | Programming Reference Manual... -
Page 133: Settings | Email
SMTP Password: The password for the outgoing SMTP mail server logon. ⦁ SMTP Timeout: Defines how long (in seconds) before the connection times out. ⦁ Sender Email Address: The email address used when sending outgoing mail. ⦁ PRT-WX-DIN | Using Protege WX | Programming Reference Manual... -
Page 134: Settings | Custom Reader Format
Clear Bit: A clear bit defines a location in the received data that must always be cleared (or a logical '0'). The clear bit defines the location of the bit in the received data. PRT-WX-DIN | Using Protege WX | Programming Reference Manual... -
Page 135: Settings | Security Enhancement
Interface will immediately expire on first use. The user will be required to set their own permanent PIN when next logging in at a keypad. This ensures that only the user knows their PIN. PRT-WX-DIN | Using Protege WX | Programming Reference Manual... -
Page 136: Operators
Operator Timeout setting below. Operator Timeout: Defines the inactivity period, after which Protege WX will time out and the operator will be ⦁ prompted to log in again to continue. PRT-WX-DIN | Using Protege WX | Programming Reference Manual... -
Page 137: Roles
Operator Role Function User Can monitor the system and perform basic user configuration Master Can perform actions required to program and configure the system Installer Can perform all actions without any restrictions PRT-WX-DIN | Using Protege WX | Programming Reference Manual... -
Page 138: Password Policy
This option splits the username by space, period, comma, hyphen or underscore to ensure that no parts of the username (more than two characters) exist in the password. If this option is activated and your username is test.operator the passwords testing operator1234 are invalid. PRT-WX-DIN | Using Protege WX | Programming Reference Manual... -
Page 139: Maintaining Your System
Any operator can change their own password on the Home Page. Navigate to System | Operators and select the operator to update. Click Change Password. Enter and confirm the new password, then click OK. Click Save. PRT-WX-DIN | Using Protege WX | Programming Reference Manual... -
Page 140: Backing Up And Restoring Controller Programming
Downloads folder. To restore programming select Choose File to browse to a .bak file created using the backup option, then select Restore Controller to import a copy of the programming. PRT-WX-DIN | Using Protege WX | Programming Reference Manual... -
Page 141: Upgrading Application Software And Module Firmware
⦁ connected module that requires a firmware update from the dropdown. BIN File: Click Upload Firmware to browse to the firmware file (.bin format) supplied by ICT, and open the file ⦁ to install the new firmware on the selected module. - Page 142 This option should only be selected at the direction of ICT Technical Support . Click Upload Firmware to browse to the firmware file (.bin format) supplied by ICT, and open the file to install the firmware on the selected module.
-
Page 143: Addressing Expanders
When connecting a module to the network it must be added to Protege WX and allocated a unique physical address. By default all DIN Rail modules are shipped from ICT with the address of 254 and without changing this address the module will not be able to register with the controller. -
Page 144: Configuring The Ip Address
Programming the IP address, subnet mask, and default gateway requires knowledge of the network and subnet that the system is connected to. You should always consult the network or system administrator before programming these values. PRT-WX-DIN | Using Protege WX | Programming Reference Manual... -
Page 145: Setting The Ip Address From A Keypad
[Enter]. You must then restart the controller, either through the menu [4], [2], [2] or by cycling the power, for the settings to take effect. PRT-WX-DIN | Using Protege WX | Programming Reference Manual... -
Page 146: Temporarily Defaulting The Ip Address
Connect a wire link between NA of the module network and SA of the reader network, and between NB of the module network and SB of the reader network. Connect Input 2 to ground. PRT-WX-DIN | Using Protege WX | Programming Reference Manual... - Page 147 Remember to change the subnet of your PC or laptop to match the subnet of the controller. Remove the wire link(s) and power cycle the controller again. You can now connect to the controller using the configured IP address. PRT-WX-DIN | Using Protege WX | Programming Reference Manual...
-
Page 148: Defaulting A Controller
Connect a wire link between NA of the module network and SA of the reader network, and between NB of the module network and SB of the reader network. Connect Input 1 to ground. PRT-WX-DIN | Using Protege WX | Programming Reference Manual... - Page 149 Reset the controller's IP address to its previous value. Reconfigure any additional network settings. Reinstall previously installed custom HTTPS certificates. Restore any other system settings as required by your site configuration. PRT-WX-DIN | Using Protege WX | Programming Reference Manual...
-
Page 150: Troubleshooting
This can occur when the module has been added, but the address has not been correctly set. Note that if you have recently cycled power to the Controller it can take up to 250 seconds for the module to come back online. PRT-WX-DIN | Using Protege WX | Programming Reference Manual... -
Page 151: Areas Requiring Rearming Due To Input Changes
Click Arm 24 to enable 24 hour monitoring. Inputs Assigned an Area but no Input Type Typical Health Status Message Input Warehouse PIR has an Area but no Input Type assigned PRT-WX-DIN | Using Protege WX | Programming Reference Manual... -
Page 152: Items That Can't Fit In The Database
Expander (such as adding an input to a Controller with a Module Input of 9 or higher where the Controller only has 8 physical inputs), it cannot be added to the system. Solution Ensure the Module Input address physically exists. PRT-WX-DIN | Using Protege WX | Programming Reference Manual... - Page 153 In accordance with the ICT policy of enhanced development, design and specifications are subject to change without notice.
Need help?
Do you have a question about the PRT-WX-DIN and is the answer not in the manual?
Questions and answers