Table of Contents
Advertisement
Quick Links
1100 Series Mid Drive
Installation, Maintenance & Parts Manual
DORNER MFG. CORP.
P.O. Box 20 • 975 Cottonwood Ave.
Hartland, WI 53029-0020 USA
851-747 Rev. B
Conveyors
For other service manuals visit our website at:
www.dorner.com/service_manuals.asp
INSIDE THE USA
TEL: 1-800-397-8664
FAX: 1-800-369-2440
OUTSIDE THE USA
TEL: 262-367-7600
FAX: 262-367-5827
Advertisement
Table of Contents

Related Manuals for Dorner 1100 Series


Summary of Contents for Dorner 1100 Series
- Page 1 1100 Series Mid Drive Conveyors Installation, Maintenance & Parts Manual DORNER MFG. CORP. INSIDE THE USA OUTSIDE THE USA P.O. Box 20 • 975 Cottonwood Ave. TEL: 1-800-397-8664 TEL: 262-367-7600 Hartland, WI 53029-0020 USA FAX: 1-800-369-2440 FAX: 262-367-5827 For other service manuals visit our website at: www.dorner.com/service_manuals.asp...
-
Page 2: Table Of Contents
Introduction ................. 3 Warnings − General Safety ..........4 Product Description ............. 5 Specifications ..............5 Models: ................5 1100 Series End Drive Conveyor......... 5 Conveyor Supports: ............5 Maximum Distances:............ 5 Specifications: .............. 6 Installation ................7 Required Tools..............7 Recommended Installation Sequence ...... -
Page 3: Introduction
Performance Parts Kits logo without guards. Dorner 1100 series conveyors have patents pending. Upon receipt of shipment: Dorner reserves the right to make changes at any time • Compare shipment with packing slip. Contact factory without notice or obligation. regarding discrepancies. -
Page 4: Warnings − General Safety
LOOSENING STAND HEIGHT OR ANGLE ADJUSTMENT SCREWS. Exposed moving parts can cause severe injury. LOCK OUT POWER before removing guards or performing maintenance. A WARNING Gearmotors may be HOT. DO NOT TOUCH Gearmotors. 1100 Series Mid Drive Conveyors Dorner Mfg. Corp. 851-747 Rev. B... -
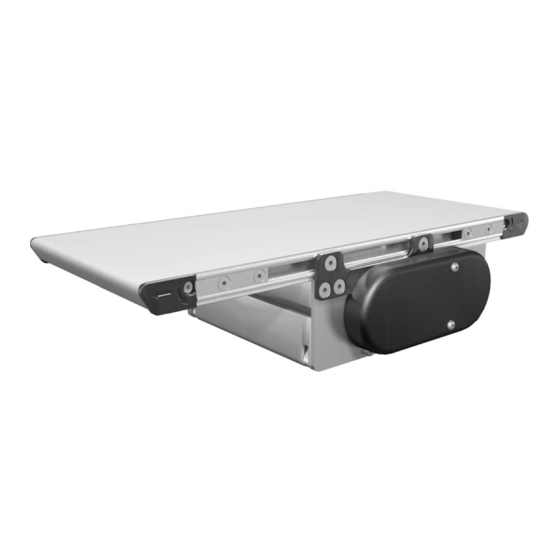
Page 5: Product Description
Gearmotor Guiding Mounting Brackets Return Rollers Figure 1 Specifications Models: Conveyor Supports: 1100 Series End Drive Conveyor Maximum Distances: 1 = 18” (457 mm) LLLL 2 = 36” (914 mm) 3 = 18” (457 mm) Belt Type Profile (D side) -
Page 6: Specifications
0.93 ft (283 mm) to 6 ft (1829 mm) in 0.12” (0.31 mm) increments * See Ordering and Specifications Catalog for details. NOTE Maximum conveyor loads based on: • Non-accumulating product • Product moving towards gearmotor • Conveyor being mounted horizontal 1100 Series Mid Drive Conveyors Dorner Mfg. Corp. 851-747 Rev. B... -
Page 7: Installation
If Locate short or tall mounting brackets. Exploded views maintenance is needed to the components shown in Figure 4 & Figure 5. see 1100 Series Mid Drive Mounting Package Figure 4 manual 851-749. NOTE Conveyor MUST be mounted straight, flat and level within confines of conveyor. -
Page 8: Pivoting Mounting Bracket
T-bars (Figure 7, item 1) into conveyor side slots (Figure 7, item 2). Figure 7 Figure 9 Tighten screw (Figure 9, item 2) to 15 in-lb (1.7 Nm). Figure 7 1100 Series Mid Drive Conveyors Dorner Mfg. Corp. 851-747 Rev. B... -
Page 9: Return Rollers
Install and tighten screws (Figure 12, item 1) to 15 in- Return Roller Rod lb (1.7 Nm). Roller (Short) Figure 12 Roller (Long) Remove screws (Figure 10, item 3) from roller assembly. Figure 12 1100 Series Mid Drive Conveyors 851-747 Rev. B Dorner Mfg. Corp. -
Page 10: Guiding
2” profile shown below. For other guide profile layouts see pages page 25 thru page 26. NOTE Space support brackets evenly along conveyor as shown in (Figure 15). Figure 14 Figure 14 1100 Series Mid Drive Conveyors Dorner Mfg. Corp. 851-747 Rev. B... -
Page 11: Preventive Maintenance And Adjustment
2 mm, 2.5 mm, 3 mm, 4 mm acetone, Methyl Ethyl Ketone (MEK) or other harsh chemicals. • Level • Needle nose pliers Use Dorner Belt Cleaner. Mild soap and water may also be used. Do not soak the belt. • Torque wrench Conveyor Belt Replacement Checklist •... -
Page 12: Belt Removal
Rotate pinch drive guard (Figure 21, item 1) away from motor (Figure 18, item 2) to mid drive bracket (Figure mid drive bracket (Figure 21, item 2). 18, item 3). Figure 21 Figure 18 Figure 21 Figure 18 1100 Series Mid Drive Conveyors Dorner Mfg. Corp. 851-747 Rev. B... - Page 13 Figure 23 10. Remove one screw (Figure 23, item 3) on each side securing pinch drive guard (Figure 23, item 4) to conveyor pinch plate (Figure 23, item 2). 1100 Series Mid Drive Conveyors 851-747 Rev. B Dorner Mfg. Corp.
-
Page 14: Belt Installation
12-13. Re-install mounting brackets. Refer to “Mounting Brackets” on page 7. Tension belt. Refer to “Conveyor Belt Tensioning” on page 14“. Install return rollers and guiding, if equipped. 1100 Series Mid Drive Conveyors Dorner Mfg. Corp. 851-747 Rev. B... -
Page 15: Conveyors With Nose Bar Tail
30, item 1) tracking cam (Figure 30, item 2) just enough to remove slack in the belt. Figure 30 Figure 30 Tighten screws (Figure 30, item 3) to 12 in-lb (1.4 Nm). 1100 Series Mid Drive Conveyors 851-747 Rev. B Dorner Mfg. Corp. -
Page 16: Conveyor Belt Tracking
Exposed moving parts can cause severe Figure 33 injury. LOCK OUT POWER before removing guards or performing maintenance. • A − Idler Spindle Removal • B − Drive Spindle Removal 1100 Series Mid Drive Conveyors Dorner Mfg. Corp. 851-747 Rev. B... -
Page 17: B − Drive Pulley Removal
Remove drive gear (Figure 36, item 2) from shaft. Remove two screws (Figure 37, item 1) from each side of pinch plate (Figure 37, item 2). Figure 37 Figure 35 Figure 37 1100 Series Mid Drive Conveyors 851-747 Rev. B Dorner Mfg. Corp. -
Page 18: Drive And Idler Bearing Replacement
It is not recommended to change the bushings in the field. Replace the entire nosebar tail. Figure 40 Install conveyor (Figure 40, item 1) onto pinch plate assembly. 1100 Series Mid Drive Conveyors Dorner Mfg. Corp. 851-747 Rev. B... -
Page 19: Idler Spindle Installation
Install belt (Figure 42, item 2). See “Conveyor Belt Replacement” on page 11. Figure 44 Tighten screws 12 in-lb (1.4 Nm). (Install belt and see “Conveyor Belt Tensioning” on page 14 to tension belt to specification.) 1100 Series Mid Drive Conveyors 851-747 Rev. B Dorner Mfg. Corp. -
Page 20: Service Parts
Service Parts NOTE For replacement parts other than those shown in this section, contact an authorized Dorner Service Center or the factory. Key Service Parts and Kits are identified by the Performance Parts Kits logo . Dorner recommends keeping these parts on hand. - Page 21 930512MSS Flat Head Screw, M5-0.80 x 12 mm 11MDS-WW Mid Drive Spindle Kit (Includes items 11 & 12) WW = Conveyor width reference: 02, 04, 06, 08, & 10 1100 Series Mid Drive Conveyors 851-747 Rev. B Dorner Mfg. Corp.
-
Page 22: Idler End
Bearing, 0.625 dia. x 0.75 long (for quantities see Bearing Chart) 210092-WW Idler Tail Kit (Includes items 1 through 5) WW = Conveyor width reference: 02, 04, 06, 08 & 10 1100 Series Mid Drive Conveyors Dorner Mfg. Corp. 851-747 Rev. B... -
Page 23: Nose Bar Idler End
Service Parts Nose Bar Idler End Item Part Number Description 11TT-WW Nosebar Tail Assembly WW = Conveyor width reference: 02, 04, 06, 08, & 10 1100 Series Mid Drive Conveyors 851-747 Rev. B Dorner Mfg. Corp. -
Page 24: Frame
210073-LLLLL 6" Wide Frame 210074-LLLLL 8" Wide Frame 210075-LLLLL 10" Wide Frame LLLLL= Part length in inches with 2 decimal places Example: Part Length = 35.25" LLLLL = 03525 1100 Series Mid Drive Conveyors Dorner Mfg. Corp. 851-747 Rev. B... -
Page 25: 1" Profile
Single T-Bar 950512MSS Low Head Cap Screw, M5 - 0.80 x 12 mm LLLLL= Part length in inches with 2 decimal places. Example: Part Length = 35.25" LLLLL = 03525 1100 Series Mid Drive Conveyors 851-747 Rev. B Dorner Mfg. Corp. -
Page 26: 2" Profile
Single T-Bar 950512MSS Low Head Cap Screw, M5 - 0.80 x 12 mm LLLLL= Part length in inches with 2 decimal places. Example: Part Length = 35.25" LLLLL = 03525 1100 Series Mid Drive Conveyors Dorner Mfg. Corp. 851-747 Rev. B... -
Page 27: Short Mounting Bracket
Short Mounting Bracket Item Part Number Description 210145 Mounting Bracket (Short) 210135 Single T-Bar 930512MSS Flat Head Screw, M5 - 0.80 x 12 mm 210143 Short Mounting Bracket Assembly 1100 Series Mid Drive Conveyors 851-747 Rev. B Dorner Mfg. Corp. -
Page 28: Tall Mounting Bracket
Tall Mounting Bracket Item Part Number Description 210146 Mounting Bracket (Tall) 210135 Single T-Bar 930512MSS Flat Head Screw, M5 - 0.80 x 12 mm 210144 Tall Mounting Bracket Assembly 1100 Series Mid Drive Conveyors Dorner Mfg. Corp. 851-747 Rev. B... -
Page 29: Pivoting Mounting Bracket
210148 Flat Mounting Bracket 950512MSS Low Head Cap Screw, M5 - 0.80 x 12mm 950510MSS Low Head Cap Screw, M5 - 0.80 x 10mm Pivoting Mounting Bracket Assembly 210149 1100 Series Mid Drive Conveyors 851-747 Rev. B Dorner Mfg. Corp. -
Page 30: Conveyor Belt Part Number Configuration
HARTLAND, WI US A 800-397-8664 Figure 45 Mid Drive Part Number Configuration Refer to Dorner serial number plate (Figure 45). From the model number, determine conveyor width (“WW”), length (“LLLL”), and belt type (“BB”). Use data to configure belt part number as indicated below. -
Page 31: Notes
Notes 1100 Series Mid Drive Conveyors 851-747 Rev. B Dorner Mfg. Corp. -
Page 32: Return Policy
RMA will automatically close 30 days after being issued. To get credit, items must be new and undamaged. There will be a return charge on all items returned for credit, where Dorner was not at fault. It is the customer’s responsibility to prevent damage during return shipping.
Need help?
Do you have a question about the 1100 Series and is the answer not in the manual?
Questions and answers