
Related Manuals for StarTech.com 8STSDOCK1EU3P2


Summary of Contents for StarTech.com 8STSDOCK1EU3P2
- Page 1 Standalone Hard Drive Eraser | USB 3.0 Dock Actual product may vary from photos User Manual SKU#:SDOCK1EU3P2 For the latest information and specifications visit www.startech.com/SDOCK1EU3P2 Manual Revision: 10/16/2018...
- Page 2 This manual may make reference to trademarks, registered trademarks, and other protected names and/or symbols of third-party companies not related in any way to StarTech.com. Where they occur these references are for illustrative purposes only and do not represent an endorsement of a product or service by StarTech.com, or an endorsement of the product(s) to which this manual...
-
Page 3: Compliance Statements
• I cavi (inclusi i cavi di alimentazione e di ricarica) devono essere posizionati e stesi in modo da evitare pericoli di inciampo, rischi di scosse elettriche o pericoli per la sicurezza. To view manuals, videos, drivers, downloads, technical drawings, and more visit www.startech.com/support... - Page 4 • Kablar (inklusive elkablar och laddningskablar) ska dras och placeras på så sätt att risk för snubblingsolyckor och andra olyckor kan undvikas. To view manuals, videos, drivers, downloads, technical drawings, and more visit www.startech.com/support...
-
Page 5: Table Of Contents
Printing and Saving Log Records ......................11 Deleting Log Records ..........................12 Resetting the Password........................... 12 Printing a Receipt ...................13 Connecting the Eraser to a Computer ..........14 LED Indicators............................. 15 Erase Modes ....................16 To view manuals, videos, drivers, downloads, technical drawings, and more visit www.startech.com/support... - Page 6 Additional Information .................17 To view manuals, videos, drivers, downloads, technical drawings, and more visit www.startech.com/support...
-
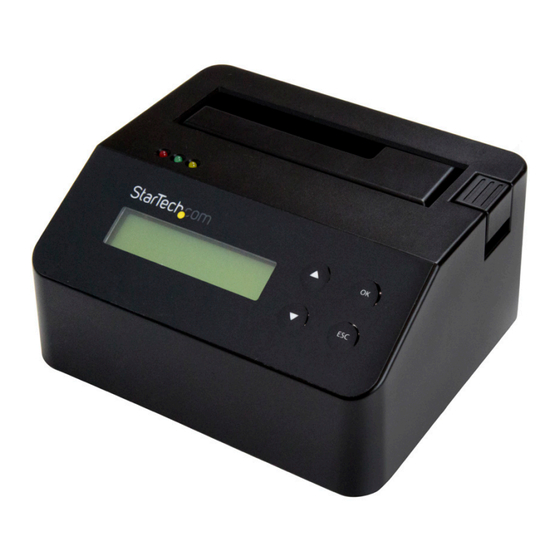
Page 7: Product Diagram
Product Diagram Actual product may vary from photos Front View Drive Bay Eject Button Indicators Button Display Button Menu Navigation Buttons (2) To view manuals, videos, drivers, downloads, technical drawings, and more visit www.startech.com/support... -
Page 8: Rear View
Rear View Power RS232 Button Serial Based Printer USB 3.0 Power Port Port Jack To view manuals, videos, drivers, downloads, technical drawings, and more visit www.startech.com/support... -
Page 9: Product Information
To select an erase mode, use the Menu navigation buttons on the front of the eraser to move up and down in the Erase To view manuals, videos, drivers, downloads, technical drawings, and more visit www.startech.com/support... -
Page 10: Erasing A Drive Using Custom Settings
Select Custom Erase and press the OK button. Select Run <x> Pass and press the OK button. When the drive is erased, the LCD display indicates that the To view manuals, videos, drivers, downloads, technical drawings, and more visit www.startech.com/support... -
Page 11: Changing Custom Erase Settings
Custom Erase settings. Viewing Eraser Details The SDOCK1EU3P2 includes a Utility menu that you can use to view information about the eraser, including system and disk information. To view manuals, videos, drivers, downloads, technical drawings, and more visit www.startech.com/support... -
Page 12: Updating The Eraser Firmware
Use the Menu navigation buttons on the front of the eraser to move up and down in the Erase mode menu. Select Utility and press the OK button. Select Start-up Menu and press the OK button. To view manuals, videos, drivers, downloads, technical drawings, and more visit www.startech.com/support... -
Page 13: Setting The Date And Time
To print the report, select Print Report and press the OK • button. To save the report to a file, select Save to File and press the • To view manuals, videos, drivers, downloads, technical drawings, and more visit www.startech.com/support... -
Page 14: Deleting Log Records
Use the Menu navigation buttons on the front of the eraser to move up and down in the Erase mode menu. Select Log Manager and press the OK button. To view manuals, videos, drivers, downloads, technical drawings, and more visit www.startech.com/support... -
Page 15: Printing A Receipt
Consult the documentation that came with the serial printer for more information about how to configure it. When a process is complete, a receipt automatically prints on the connected serial printer. To view manuals, videos, drivers, downloads, technical drawings, and more visit www.startech.com/support... -
Page 16: Connecting The Eraser To A Computer
When Are you sure? appears on the LCD display, press the OK button. Press the ESC button. When Are you sure? appears on the LCD display, press the OK button to disconnect the eraser from your computer. To view manuals, videos, drivers, downloads, technical drawings, and more visit www.startech.com/support... -
Page 17: Led Indicators
Yellow (Briefly The dock is turned on. illuminated) Yellow (Solid) The drive is being erased, When the process is complete, the yellow LED will no longer be illuminated. To view manuals, videos, drivers, downloads, technical drawings, and more visit www.startech.com/support... -
Page 18: Erase Modes
HMG Enhanced IS5 specifications is completed. 7-Pass (VSITR) A multi-pass overwrite based on VSITR Specifications is completed. Custom Erase The user specifies the number of passes and the pattern used. To view manuals, videos, drivers, downloads, technical drawings, and more visit www.startech.com/support... - Page 19 HDD Docks mSATA StarTech.com adapter SAT32MSAT257 drives mSATA SSD to 2.5in SATA Adapter Converter M.2 drives StarTech.com adapter SAT32M225 M.2 NGFF SSD to 2.5in SATA Adapter Converter To view manuals, videos, drivers, downloads, technical drawings, and more visit www.startech.com/support...
- Page 20 Limitation of Liability In no event shall the liability of StarTech.com Ltd. and StarTech.com USA LLP (or their officers, directors, employees or agents) for any damages (whether direct or indirect, special, punitive, incidental, consequential, or otherwise), loss of profits, loss of business, or any pecuniary loss, arising out of or related to the use of the product exceed the actual price paid for the product.
- Page 21 StarTech.com is an ISO 9001 Registered manufacturer of connectivity and technology parts. StarTech.com was founded in 1985 and has operations in the United States, Canada, the United Kingdom and Taiwan servicing a worldwide market.
Need help?
Do you have a question about the 8STSDOCK1EU3P2 and is the answer not in the manual?
Questions and answers