Table of Contents
Advertisement
Quick Links
Standalone Hard Drive Eraser & USB 3.0 Dock
SDOCK1EU3P
DE: Bedienungsanleitung - de.startech.com
FR: Guide de l'utilisateur - fr.startech.com
ES: Guía del usuario - es.startech.com
IT: Guida per l'uso - it.startech.com
NL: Gebruiksaanwijzing - nl.startech.com
PT: Guia do usuário - pt.startech.com
For the latest information, technical specifications, and support for
this product, please visit www.startech.com/SDOCK1EU3P.
Manual Revision: 11/27/2015
*actual product may vary from photos
Advertisement
Table of Contents

Related Manuals for StarTech.com SDOCK1EU3P


Summary of Contents for StarTech.com SDOCK1EU3P
- Page 1 Standalone Hard Drive Eraser & USB 3.0 Dock SDOCK1EU3P *actual product may vary from photos DE: Bedienungsanleitung - de.startech.com FR: Guide de l'utilisateur - fr.startech.com ES: Guía del usuario - es.startech.com IT: Guida per l'uso - it.startech.com NL: Gebruiksaanwijzing - nl.startech.com PT: Guia do usuário - pt.startech.com...
- Page 2 StarTech.com. Where they occur these references are for illustrative purposes only and do not represent an endorsement of a product or service by StarTech.com, or an endorsement of the product(s) to which this manual applies by the third-party company in question. Regardless of any direct acknowledgement elsewhere in the body of this document, StarTech.com hereby...
-
Page 3: Table Of Contents
Table of Contents Product diagram ..................1 Introduction ....................2 Packaging contents ..........................2 About the LED indicators ........................3 Erasing a drive ..................4 Erase a drive ..............................5 Erase a drive using customized settings ................... 5 Change the custom erase settings ..................... 6 Using the Utility menu ................7 View the eraser details .......................... -
Page 4: Product Diagram
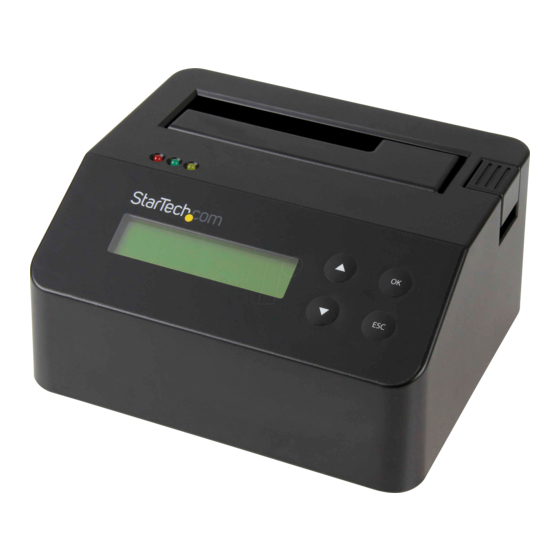
Product diagram Front view Activity LED Power and link LED Drive bay Eject button Error LED OK button ESC button LCD display Menu navigation buttons Rear view Power button USB 3.0 port Power jack RS232 serial-based printer port Instruction manual... -
Page 5: Introduction
Introduction You can use the SDOCK1EU3P standalone eraser dock to erase your 2.5 in. and 3.5 in. drives without having to connect to a computer, making it easier to reuse and repurpose your SATA storage. For added security, you can connect a serial printer to the SDOCK1EU3P and print a confirmation that includes the time and date of the erase, as well as the erase mode that you used. -
Page 6: About The Led Indicators
About the LED indicators The SDOCK1EU3P includes three LED indicators that are located on the top of the unit. See the tables below for more information about what the LED behaviors signify. Red error LED LED behavior Signifies Red LED is illuminated An error is occurring. -
Page 7: Erasing A Drive
Erasing a drive The SDOCK1EU3P offers nine erase modes. For more information about the different erase modes, consult the descriptions below. Erase option Description of the process Quick Erase The partition table is quickly erased. Of the nine erase options, the Quick Erase is the fastest option. -
Page 8: Erase A Drive
Erase a drive Before you erase a drive, make sure that you back up any important data from the drive. 1. Plug one end of the universal power adapter into the power jack on the back of the eraser and the other end into a power source. 2. -
Page 9: Change The Custom Erase Settings
Change the custom erase settings You can customize the erase settings that are applied when you select Custom Erase in the Eraser mode menu, including setting the number of passes and selecting a pattern number. 1. Use the Menu navigation buttons on the front of the eraser to move up and down in the Erase mode menu. -
Page 10: Using The Utility Menu
Using the Utility menu The SDOCK1EU3P includes a Utility menu that you can use to view information about the eraser, including system and disk information. View the eraser details 1. Use the Menu navigation buttons on the front of the eraser to move up and down in the Erase mode menu. -
Page 11: Change The Order Of The Erase Mode Menu
Utility menu. Print a receipt You can use the SDOCK1EU3P with a serial printer to print an erase record with details of the process, including the date and time that the drive was erased, the erase mode used, and more. The receipt also includes an area for a signature. -
Page 12: Managing Log Records
Managing log records The SDOCK1EU3P includes a Log Manager menu that you can use to save, and print the log records for a specified period of time. Log records include information about what type of erase was selected and when the erase was performed, as well as other details. -
Page 13: Delete All Of The Log Records
buttons to select a number between 1 and 28 days and press the OK button. • Select A Period Date and press the OK button. Use the Menu navigation buttons to select a start and an end date and press the OK button. To return to the Erase mode menu, press the ESC button until you have exited the Log Manager menu. -
Page 14: Print A Receipt
Connect the eraser to your computer You can use the SDOCK1EU3P as a dock by simply connecting it to your computer. 1. Connect a USB 3.0 cable to your computer and the USB 3.0 port on the back of the eraser. -
Page 15: About The Erase Mode Menu
About the Erase mode menu The following diagram outlines the default settings for the Erase mode menu on the SDOCK1EU3P. If you customize the eraser menu, the layout below will no longer be accurate. Quick Erase 1-Pass Erase 3-Pass (DoD 5220.22-M) -
Page 16: Technical Support
Limitation of Liability In no event shall the liability of StarTech.com Ltd. and StarTech.com USA LLP (or their officers, directors, employees or agents) for any damages (whether direct or indirect, special, punitive, incidental, consequential, or otherwise), loss of profits, loss of business, or any pecuniary loss, arising out of or related to the use of the product exceed the actual price paid for the product. - Page 17 StarTech.com is an ISO 9001 Registered manufacturer of connectivity and technology parts. StarTech.com was founded in 1985 and has operations in the United States, Canada, the United Kingdom and Taiwan servicing a worldwide market.
Need help?
Do you have a question about the SDOCK1EU3P and is the answer not in the manual?
Questions and answers