Advertisement
Quick Links
INSTRUCTION MANUAL FOR MICROWAVE MOTION SENSOR
PRODUCT TYPE:
OPERATING VOLTAGE:
HF SYSTEM:
RATED LOAD:
(capacitive load)
DETECTION ANGLE:
POWER CONSUMPTION:
DETECTION RANGE:
TIME SETTING:
DAYLIGHT SENSOR:
STAND-BY PERIOD:
STAND-BY DIMMING LEVEL: 10%~30%
MOUNTING:
WORKING TEMP.:
The sensor is an active motion detector; it emits a high-frequency electro-magnetic wave 5.8GHz and receives its echo. The sensor detects the change
in echo from movement in its detection zone. A microprocessor then triggers the switch light ON command. Detection is possible through doors, panels
of glasses thin walls.
Note: the high-frequency output of this sensor is <0.2mW; approximately just 0.2‰ of the transmission power of a mobile telephone
PLEASE READ THESE INSTRUCTIONS CAREFULLY PRIOR TO INSTALLATION AND RETAIN THIS LEAFLET IN A KNOWN
1.1 Ensure that the electricity supply is switched off before installing or servicing this product.
1.2 Wiring diagram
1
1 -
0
V
SYNC
1-10V
LED Driver
HYTRONIK INDUSTRIAL LIMITED
Room D, 10/f, Tower A, Billion Center, 1 wang Kwong Road,
Kowloon Bay, Kowloon, Hongkong
T: 00852-35197525
E: info@hytronik.com
Model No.:HC419VRC
Technical Specifications
Microwave Motion Sensor
120-277VAC 50Hz/60Hz
5.8GHz CW radar
120VAC / 3.4A / 400W
230VAC / 3.5A / 800W
277VAC / 3.7A / 1000W
°
°
30 ~150
<1W
Max. 12 x 6m (DxH)
5s~30min.
2~50Lux; disable
0s, 10s~1h, +
Indoors, ceiling & wall mounted
-20 ~ +60 ℃
AND SAFE PLACE FOR FUTURE REFERENCE.
SECTION 1 INSTALLATION AND WIRING
LED
F: 00852-30116936
Infrared remote receiver
Buzzer
Detection area
Hold-time
Daylight threshold
Stand-by period
Stand-by dimming level
Daylight sensor
IMPORTANT
Wiring diagram for synchronization function
1
1 -
0
V
SYNC
1-10V
Note: this 1-10V output is isolated, SELV output.Do not connect the
1-10V terminals on driver X to Driver Y.
CHINA FACTORY
3rd Floor, block C, complex building, 155#, Bai'gang road south,
Bai'gang village, Xiao Jin Kou town, Huicheng district, Huizhou 516023
Tel:86-752-2772020
F:86-752-2777877
E: info@hytronik.com
W:www.hytronik.com
Sensor antenna
LED indication
Installation hole
+
L
1-10V
N
L '
SYNC
Push
SYNC
HC419VRC
1
LED Driver ( X )
LED
ON/
Auto Mode
Reset
OFF
SC1
SC2
Power
+
100%
Scene mode
Dim
-
Power
SC3
SC4
80%
Detection range
100%
50%
10%
Stand-by dimming level
Daylight Sensor
10%
20%
30%
2Lux
Test
5min
30s
1min
10Lux
2s
Hold-time
5min
10min
30min
50Lux
Lux
0s
10s
1min
Disable
Stand-by period
10min
30min
M/A
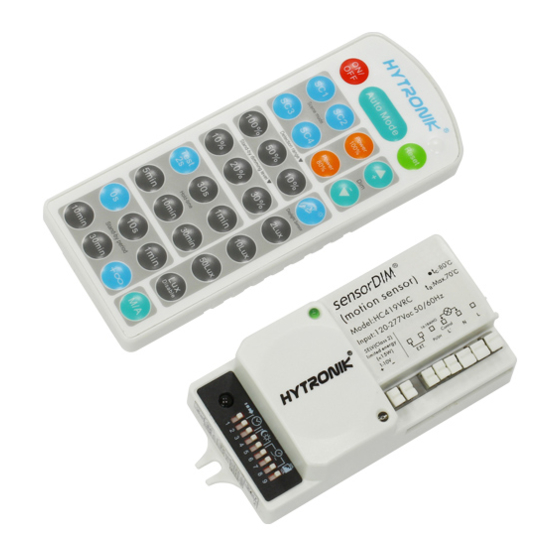
HRC-05
.
SYNC
1 -
0
V
Max.10pcs
LED Driver ( Y )
1-10V
LED
Advertisement

Subscribe to Our Youtube Channel
Related Manuals for Hytronik HC419VRC


Summary of Contents for Hytronik HC419VRC
- Page 1 HYTRONIK INDUSTRIAL LIMITED CHINA FACTORY Room D, 10/f, Tower A, Billion Center, 1 wang Kwong Road, 3rd Floor, block C, complex building, 155#, Bai'gang road south, Kowloon Bay, Kowloon, Hongkong Bai'gang village, Xiao Jin Kou town, Huicheng district, Huizhou 516023...
- Page 2 SECTION 2 REMOTE CONTROL Auto Mode Reset Power 100% Scene mode Power Detection range 100% Stand-by dimming level Daylight Sensor 2Lux Test 5min 1min 10Lux Hold-time 5min 10min 30min 50Lux 1min Disable Stand-by period 10min 30min HRC-05 Note: the buzzer beeps one time when RC receives signal successfully Permanent ON/OFF [ button...
- Page 3 Scene mode options [ zone There are 4 scene modes built into the remote control for different applications: Daylight sensor Scene options Detection range Hold time Stand-by period Stand-by dimming leve 2Lux 100% 1min 10min 2Lux 100% 5min 10min 10Lux 100% 10min 30min...
- Page 4 4.2 Synchronization Function By connecting the “SYNC” terminals in parallel (maximum 10pcs, see wiring diagram), no matter which sensor detects motion, all HC419VRC/R in the group will turn on the lights when surrounding natural light is below the daylight threshold. The sensor antenna is shared and the detection area could be widely enlarged in this way.
Need help?
Do you have a question about the HC419VRC and is the answer not in the manual?
Questions and answers