Table of Contents
Advertisement
Quick Links
OWNERS MANUAL
Treadmill/Bike Desks: DT-3/DT-5/DT-7
2
Getting Started
Version 5.1
4
5
8
12
17
Desk Leveling and Height Adjustment
DT-7 Desk
18
Assembly Instructions
23
Desk Leveling and Height Adjustment
24
25
26
28
30
32
34
36
40
42
43
44
46
Table of Contents
3
Advertisement
Table of Contents
Troubleshooting

Related Manuals for LifeSpan Workplace C3-DT7


Summary of Contents for LifeSpan Workplace C3-DT7
-
Page 1: Table Of Contents
Table of Contents Getting Started Welcome Warranty Maintenance & Tips Desk Assembly DT-5 Desk Assembly Instructions Desk Leveling and Height Adjustment OWNERS MANUAL DT-7 Desk Treadmill/Bike Desks: DT-3/DT-5/DT-7 Assembly Instructions Desk Leveling and Height Adjustment DT-5 Manual Treadmill Desk Assembly DT-7 Electric Treadmill Desk Assembly DT-3 Console Assembly Treadmill Desk Operations... -
Page 2: Welcome
Customer may be responsible If you need to contact LifeSpan customer service, visit our website at to pay for the service technician’s travel time, where travel time exceeds www.LifeSpanFitness.com and select customer service. - Page 3 “act of god”. • This warranty does not apply to discoloration of paint or plastics. • LifeSpan shall not be responsible for incidental or consequential damages. • This warranty is nontransferable from original owner.
-
Page 4: Maintenance & Tips
One ounce of silicone remove all dirt and salt from the belt, painted parts and the display. should be used for each application. LifeSpan offers 100% silicone lubricant that can be ordered at www.LifeSpanFitness.com. Monthly Cleaning The walking belt comes pre-lubricated from the factory. - Page 5 Maintenance and Tips Maintenance and Tips Belt Tensioning Belt Alignment (continued) If the belt begins to slip and needs to be tensioned, tension bolts are E. Observe the alignment for two minutes. Repeat steps A-D as accessible from the back of the treadmill. Before tensioning the belt, needed.
-
Page 6: Desk Assembly
Assembly Instructions DT-5 Desk: Assembly Instructions At LifeSpan we strive to make our equipment easy to assemble and start using. Parts that can be pre-assembled are always assembled and tested on the product line. Prior to starting the assembly process, take all the parts out of the box, remove plastic bags and lay everything out on the floor to become familiar with the components. -
Page 7: Desk
DT-5 Desk: DT-5 Desk: Assembly Instructions Assembly Instructions Step 1: Lift Frame Assembly Step 3: Desktop Assembly A. Position the lift frame (1), left A. Make sure the extension tube (B) is at level 15 (done in step 2C). base foot (3) and right base B. - Page 8 DT-5 Desk: DT-5 Desk: Assembly Instructions Desk Leveling and Height Adjustment Step 4: Attach the Wire Cover to the Right Extension Tube Desk Leveling The desk needs to be leveled prior A. Simply snap the cover (11) over the right extension tube (B). The to use.
- Page 9 DT-7 Desk: Assembly Instructions Assembly Instructions At Lifespan we strive to make our equipment easy to assemble and start using. Parts that can be pre-assembled are always assembled and tested on the product line. Prior to starting the assembly process, take all the parts out of the box, remove plastic bags and lay everything out on the floor to become familiar with the components.
- Page 10 DT-7 Desk: DT-7 Desk: Assembly Instructions Assembly Instructions Step 1: Lift Frame Assembly Step 3: Desktop Assembly A. Position the lift frame (1), NOTE: It is a good idea to use two people for this portion of the left base foot (3) and right assembly in order to be sure wires are properly routed and do not get base foot (4) as shown in the pinched while installing the desktop.
- Page 11 DT-7 Desk: DT-7 Desk: Assembly Instructions Desk Leveling and Height Adjustment Desk Leveling Step 4: Height Adjustment/Console Harness Connections The desk needs to be leveled prior to use. The desk comes with two A. Remove the two upper adjustable feet that can be used screws (13) attaching the to level the desk and eliminate access panel for the height...
-
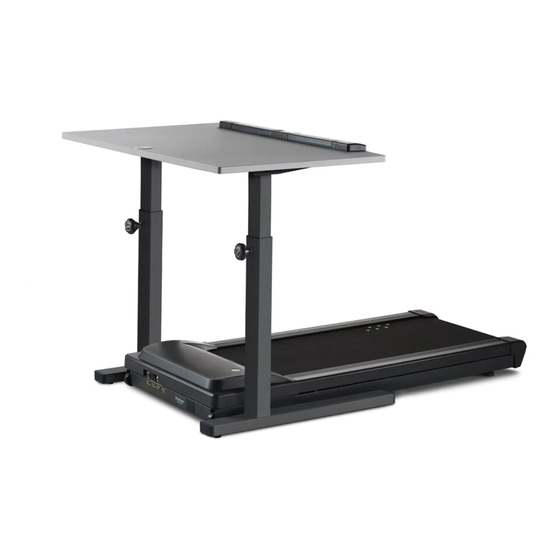
Page 12: Assembly Instructions
DT-5 Manual Treadmill Desk: DT-7 Electric Treadmill Desk: Assembly Instructions Assembly Instructions Treadmill to DT-5 Desk Assembly Treadmill to DT-7 Desk Assembly A. Position the pre-assembled treadmill as shown below. A. Position the pre-assembled treadmill as shown below. B. Lift the rear of the treadmill and roll it forward under the desk until B. -
Page 13: Console Assembly
DT-3 Console: Assembly Instructions After assembling the bike or treadmill, roll it to the desired location. TREADMILL DESK Plug the console connector into the connector coming from the front of the treadmill or the bottom of the bike. Be sure to screw the two OPERATIONS connectors together with the attached thumb screws. -
Page 14: Specifications
Treadmill Desk Specifications Treadmill Desk Specifications Console DT-3 DT-5 DT-7 Readouts Time, Steps, Calories, Distance, Time, Steps, Calories, Distance, Time, Steps, Calories, Distance, Speed Speed Speed Display Bluetooth Mechanics and Performance DT-3 DT-5 DT-7 Speed Range 0.4 - 4.0 mph 0.4 - 4.0 mph 0.4 - 4.0 mph 0.6 - 6.4 kph... -
Page 15: Console Overview
Treadmill Desk Console Overview Treadmill Desk Console Overview Starting the Treadmill Desk DT-3 1. Turn the On/Off switch located on the front right corner of the treadmill to the on position. 2. Make sure the safety key is installed on the console. NOTE: The display will show “----“... -
Page 16: Innovative Features
Treadmill Desk Innovative Features Treadmill Desk Innovative Features Intelli-Guard – This treadmill desk is equipped with our patented Audible Safety Alert – This treadmill desk has an audible alert to notify Intelli-Guard feature. This feature senses when you stop walking on the user when the treadmill desk is starting as well as when the speed is the treadmill and for safety purposes, it automatically pauses the being adjusted. -
Page 17: Troubleshooting
Treadmill Desk Troubleshooting Treadmill Desk Troubleshooting The LifeSpan Treadmill Desk is designed and manufactured to be Problem “Uart” appears in the display. reliable and easy to use. However, if you have a problem, these Solution Turn the treadmill desk power switch off. For DT5 desks unplug troubleshooting steps may help you find the cause. - Page 18 LifeSpan reserves the right to make changes and improvements to our products without incurring any obligations to similarly WARNING – The audible alert is turned on from the alter any product purchased.
-
Page 19: Bike Desk Operations
BIKE DESK OPERATIONS... -
Page 20: Specifications
Bike Desk Specifications Bike Desk Specifications Console DT-3 DT-5 DT-7 Readouts Time, Level, Calories, Distance, Time, Level, Calories, Distance, Time, Level, Calories, Distance, Speed Speed Speed Display Bluetooth Mechanics and Performance DT-3 DT-5 DT-7 Resistance Level 16 Levels 16 Levels 16 Levels Dimensions 12.5”W x 3”D x 2”H... -
Page 21: Console Overview
Bike Desk Console Overview Bike Desk Innovative Features DT-3 Console shown here. DT-5/DT-7 Desks follow the same button layout. Audible Safety Alert – The bike desk has an audible alert to notify the user when the cycle desk is starting as well as when the resistance level is being adjusted. -
Page 22: Troubleshooting
Make Contact LifeSpan customer service if this does not solve the sure the thumb screws are properly tightened. Plug the power problem. -
Page 23: Personal Settings
NOTE: Depending on the firmware the console has will determine if all of the options listed above will be available. LifeSpan reserves the right to make changes and improvements TREADMILL/BIKE DESK MODEL NUMBER – DT-3/DT-5/DT-7 to our products without incurring any obligations to similarly...
Need help?
Do you have a question about the Workplace C3-DT7 and is the answer not in the manual?
Questions and answers