Table of Contents
Advertisement
Available languages
Available languages
Quick Links
Quick Reference Guide
Included Items
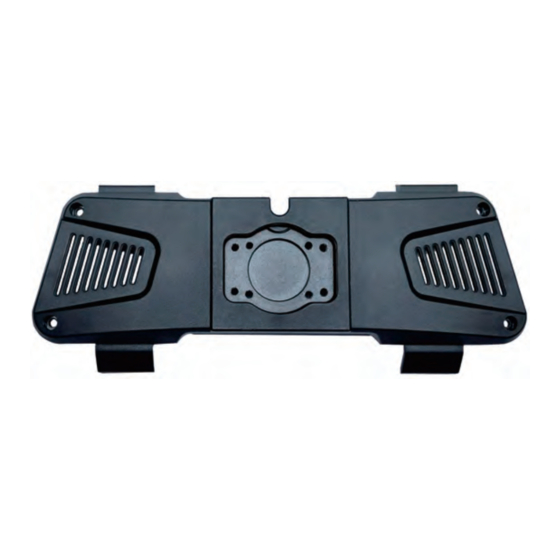
Backpack Adaptor for Mirror Stem
AHD Backup Camera
Proximity Sensor
Mirror Stem VSM-AV
Box Shape Camera
Fit Most Vehicles(H)
Bracket(I)
LED Indicators Cable for Rydeen Blind
Spot (BSS) Products(L)
Power Wire Harness for Hard Wire Installation(M)
Getting Started
1.Mount the mirror onto vehicle
Remove the existing mirror and unplug the
connector, if one exists. (Note: All vehicles use
different mounting solutions. If necessary,
consult your local automotive dealer or
installation professional for specific instructions.)
Note:
If your vehicle uses a universal D-Tab mount, do not
remove the D-Tab and use the VSM-AV mount
provided.
Universal Mount Package: (All items included below)
Mount Adaptor Inserts
Mount Adaptor Inserts
23mm-27mm(P)
14mm-21mm(Q)
Universal Mount
Universal Mount
Adaptor (Large)(P)
Adaptor (Small)(Q)
AHD Camera Extension Cable(G)
U-Shape Camera Bracket(J)
L-Shape Mount Stem(K)
Pry Tool(N)
Screw Driver(O)
a b c
d e
Splice Connector
Backpack Plate
Backup Camera
& Zip Ties(N)
Screws(1)
Screws(2)
Screws size reference
a:PM3*7mm b:PM2.5*8mm c:PM3*10mm d: PM3*5mm e:M3*15mm
Insert Backpack Adaptor for Mirror Stem onto
TOMBO 360 Main Unit.
MIC
Screws size:
PM2.5*8mm
Method 1 Use VSM-AV Mount Stem
Screws size:
PM3*7mm
Note:
If Rydeen Mirror does not fit into factory windshield
tab, please use the included universal mounting
solution.
Method 2 Use Universal Mount Package
Screws size:
Factory
PM3*10mm
Mirror Stem
Note:
If the diameter of the factory joint mount in your
vehicle is 22mm, then you do not require the use of
any mount adaptor inserts.
Method 3 Use the L-shape mount stem and
universal mount package for rooftop application
Screws size:
Screws size:
PM3*7mm
PM3*10mm
Mirror Stem
Factory
Mirror Stem
2.Install the accessories
For Cars
For Trucks
Inside View
*For more detail instructions, please visit our website at
3.Install the backup camera bracket
(remove wing mount first)
Use Box Shape Camera
Use U-Shape Camera
Bracket
2
Screws size:
1
PM3*5mm
1
Screws size:
M3*15mm
4.Backup camera installation position
option diagram
Rear windshield mounting location
(Interior Top Mounted)
Factory
Rear
Windshield
Pillar B
Pillar C
Above license plate mounting location
(Exterior Mounted)
Pillar B
Pillar C
www.rydeenmobile.com/manual-catalog-downloads/
Bracket
2
Screws size:
PM3*5mm
Screws size:
M3*15mm
Advertisement
Table of Contents

Related Manuals for Rydeen TOMBO ProKit


Summary of Contents for Rydeen TOMBO ProKit
- Page 1 Screws size: PM3*7mm Note: Note: If your vehicle uses a universal D-Tab mount, do not If Rydeen Mirror does not fit into factory windshield remove the D-Tab and use the VSM-AV mount tab, please use the included universal mounting provided. solution.
- Page 2 Remarque : Remarque : Si votre véhicule utilise un support D-Tab universel, ne Si miroir Rydeen ne rentre pas dans la languette de retirez pas le D-Tab et utilisez le support VSM-AV fourni. pare-brise d'usine, veuillez utiliser la solution de montage universelle incluse.
Need help?
Do you have a question about the TOMBO ProKit and is the answer not in the manual?
Questions and answers