Table of Contents
Advertisement
Available languages
Available languages
Quick Links
3.75L FOOD PROCESSOR
PROCESADOR DE ALIMENTOS DE 3,75 L
ROBOT MULTIFONCTION DE 3,75 L
KEUKENMACHINE 3,75 LITER
3.75L KÜCHENMASCHINE
КУХОННЫЙ КОМБАЙН С ОБЪЕМОМ ЧАШИ 3,75 Л
MIXER CON CAPACITÀ DI 3,75 L
3,75L PROCESSADOR DE ALIMENTOS
WFP16SCDE / WFP16SCDK
For your safety and continued enjoyment of this product,
always read the instruction book carefully before using.
Para su seguridad y para disfrutar plenamente de este producto,
siempre lea las instrucciones cuidadosamente antes de usarlo.
Afin que votre appareil vous procure en toute sécurité beaucoup
de satisfaction, lire attentivement le mode d'emploi avant de l'utiliser.
Lees alle instructies zorgvuldig door, alvorens u het product gebruikt,
zodat uw veiligheid en gebruiksgemak gewaarborgd worden.
Zu Ihrer eigenen Sicherheit und für langfristige Freude an diesem Produkt,
lesen Sie vor der Benutzung immer sorgfältig die Gebrauchsanweisung.
Per un funzionamento sicuro e duraturo di questo prodotto
leggere sempre le istruzioni prima dell'uso.
Para sua segurança e usufruto contínuo deste produto,
ler sempre atentamente o manual de instruções antes de usar.
В целях обеспечения безопасности и надлежащего использования электроприбора
просьба тщательно ознакомиться с руководством по эксплуатации.
Advertisement
Table of Contents

Subscribe to Our Youtube Channel
Related Manuals for Waring WFP16SCDE


Summary of Contents for Waring WFP16SCDE
- Page 1 КУХОННЫЙ КОМБАЙН С ОБЪЕМОМ ЧАШИ 3,75 Л MIXER CON CAPACITÀ DI 3,75 L 3,75L PROCESSADOR DE ALIMENTOS WFP16SCDE / WFP16SCDK For your safety and continued enjoyment of this product, always read the instruction book carefully before using. Para su seguridad y para disfrutar plenamente de este producto, siempre lea las instrucciones cuidadosamente antes de usarlo.
-
Page 2: Important Safeguards
5. This product is not intended for use by persons (including children) with reduced physical, sensory or mental capabilities, or lack of experience and knowledge. 6. Your Waring Commercial food processor is a piece of ® kitchen equipment, and like all other kitchen equipment, extreme care must be used when operating it. - Page 3 13. The use of attachments not recommended or sold by Waring Commercial may cause fire, electric shock or injury. 14. Do not use outdoors. 15. Do not let cord hang over edge of table or counter, or touch hot surfaces.
- Page 4 TYPE F PLUG This grounded plug has two round prongs and there are two grounding clips on the side of the (GERMANY, AUSTRIA, NETHERLANDS, socket. This plug is non-polarized so the plug can be inserted in either direction into the socket. SWEDEN, NORWAY, FINLAND, Grounding is accomplished when the clip on the PORTUGAL, SPAIN, EASTERN EUROPE)
- Page 5 S-blade while pouring. These professional machines are prime examples of Waring’s seventy-five years of industry food service experience, as well as seventy-five years of food processing experience.
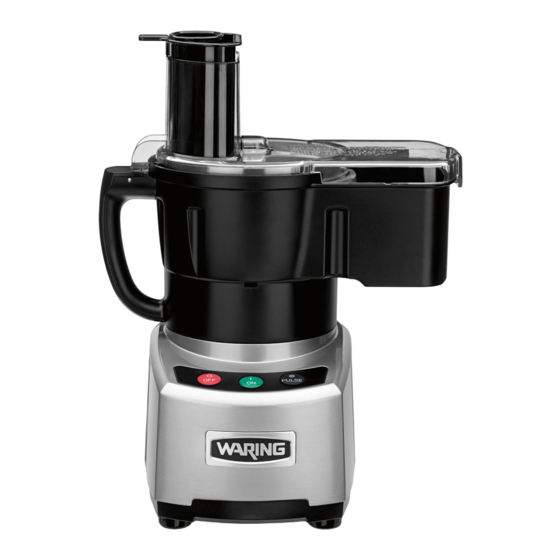
- Page 6 THE PARTS The Waring Commercial food processor consists of the ® following standard parts and accessories: 1. Die-cast motor base with vertical heavy-duty shaft 2. Three control buttons a. OFF b. ON c. PULSE 3. Safety interlock (not shown). Prevents machine from operating until cover is in place 4.
- Page 8 ASSEMBLY OF BATCH BOWL PARTS We will use the terms work bowl, batch bowl and cutter bowl interchangeably throughout this instruction book. They mean the same thing. Prior to First Use: • Clean and sanitize the motor base. Wash, rinse, and sanitize the work bowl, cover, food pusher, food pusher insert and accessories.
- Page 9 • If processing food with the S-blade or whipping disc, now is the time to add the food or liquid to the work bowl. • Do not fill liquid over MAX LIQUID FILL LINE. If too much liquid is used, it will overflow. In this case, stop operation, remove liquid to below MAX LIQUID FILL LINE and continue processing.
- Page 10 DISASSEMBLY OF BATCH BOWL PARTS ALWAYS UNPLUG THE UNIT BEFORE DISASSEMBLING. • Remove the large food pusher from the feed tube. Remove the small pusher from the large pusher. Disassembly when removing the S-blade or whipping disc • Remove the work bowl from the unit by rotating clockwise (left) to disengage the tabs on the bottom of the bowl platform from the work bowl.
- Page 11 ASSEMBLY OF CONTINUOUS-FEED CHUTE PARTS • Clean and sanitize the motor base, and wash, rinse, and sanitize the continuous-feed chute, cover, slinger disc, food pusher, food pusher insert and processing tools prior to initial use. • Place the base on a counter or table near an electrical outlet. Position it so that you are looking at the front of the unit and can see the control panel.
-
Page 12: Operating The Controls
DISASSEMBLY OF CONTINUOUS-FEED CHUTE PARTS ALWAYS UNPLUG THE CORD BEFORE DISASSEMBLING. • Turn the cover clockwise until the safety interlock tab on the cover is disengaged from the safety interlock switch on the chute, and the tabs are clear of the tabs on the cover. •... - Page 13 HOW TO USE Continuous use For continuous processing, use the ON button which is located in the middle. Pulsing • For rapid ON/OFF operation, use the PULSE. The motor runs as long as you hold the button down; it stops when you release the button.
-
Page 14: Food Preparation
FOOD PREPARATION • Prepare all food items to be processed by washing and peeling as required. Remove pits, stones, and large seeds. • Cut vegetables, meats, cheeses, etc. into sizes that will fit into either the small or large feed tube for processing with accessory discs. - Page 15 If your food processor does not function properly following this procedure, discontinue use and contact a Certified Waring Customer Service Center. USE INSTRUCTIONS FOR S-BLADE (CUTTER BLADE) • The sealed S-blade (cutter blade) is designed for chopping, grinding, puréeing, blending, mixing or kneading.
-
Page 16: Accessory Disc Selection And Use
the top of the bowl’s inner tube, and pulse until you reach the desired consistency. Note: If you let the blade run too long, the ingredients on the bottom will become puréed or give you uneven results. Purée or mix To purée tomatoes, vegetables and fruits, make sauces, or mix and blend ingredients, put the ingredients into the bowl, turn the unit on and allow it to run continuously until you reach the... - Page 17 cabbage or lettuce heads may be cut into thirds to fit in the feed chute. Larger heads may need to be quartered. • When food preparation is complete, fill the chosen feed tube, position the pusher, turn the machine on and monitor the results.
-
Page 18: Grating Operation
If it overflows, stop operation, remove liquid to below MAX FILL LINE and continue. GRATING OPERATION Waring Commercial offers grating discs as an optional accessory. For grating, use instructions below. • Prepare all food items to be processed by washing and peeling as required. -
Page 19: Troubleshooting
This section describes potential problems and the correct solutions for them. Problems that cannot be solved with the guidelines listed below should be referred to one of the Waring Authorized Service Centers for assistance. A listing of authorized service agencies is supplied with each Waring food processor. -
Page 20: Cleaning And Maintenance
If food processor makes grinding noise • Turn unit off, unplug, disassemble, check bowl and blade to see if they have been rubbing together. • If bowl and blade are rubbing, call your authorized Waring service agency. CLEANING AND MAINTENANCE Clean the food processor and accessories prior to initial use and after each use. - Page 21 SOLUTION PRODUCT DILUTION IN WATER TEMPERATURE Washing *Ajax® ¼ oz. per Hot 115°F (46°C) Sanitizer 2½ gallons Cleaner Powder Rinsing Plain Water Warm 95°F (35°C) Sanitizing **Clorox® 1 tablespoon per Cold 50–70°F Institutional gallon (10–21°C) To clean and sanitize the motor base Clean and sanitize the motor base prior to initial use and after each use.
-
Page 22: Medidas De Seguridad Importantes
6. Como todo electrodoméstico, su robot de cocina Waring ® Commercial debe usarse con mucha precaución. Aunque no se necesita mucha preparación para operar este aparato, sólo debería ser usado por personas responsables y... - Page 23 13. El uso de accesorios no recomendados o vendidos por Waring Commercial presenta un riesgo de incendio, electrocución o herida. 14. No lo utilice en exteriores. 15. No permita que el cordón cuelgue del borde de la encimera o de la mesa, ni que haga contacto con superficies calientes.
- Page 24 Clavija con dos patas cilíndricas. Hay un polo ENCHUFE DE TIPO F de puesta a tierra en ambos lados de la toma de corriente. Este tipo de enchufe no está polariza- (ALEMANIA, AUSTRIA, PAÍSES BAJOS, do. Por lo tanto, encajará en la toma de corriente SUECIA, NORUEGA, FINLANDIA, de cualquiera manera.
- Page 25 MODELO, SIEMPRE DEBE ESTAR PUESTO A TIERRA. LA LISTA DE PAÍSES A CONTINUACIÓN NO ES EXHAUSTIVA. SIEMPRE AVERIGÜE EL TIPO DE ENCHUFE DEL APARATO. INTRODUCCIÓN Los robots de cocina Waring Commercial son los aparatos ® más versátiles de su categoría. Cuentan con un sello hermético que permite procesar altas cantidades de líquido sin derrame...
- Page 26 PIEZAS El robot de cocina de Waring Commercial cuenta con las ® piezas y los accesorios siguientes: 1. Bloque-motor de fundición con resistente árbol motor 2. Tres controles a. OFF (apagado) b. ON (encendido) c. PULSE (pulso) 3. Mecanismo de bloqueo de seguridad (no ilustrado) Impide que el aparato se ponga en marcha a menos que la tapa esté...
- Page 28 ENSAMBLAJE DEL BOL Antes del primer uso: • Limpie y sanee el bloque-motor. Lave, enjuague y sanee el bol, la tapa, los empujadores y los accesorios. • Coloque el aparato sobre una mesa o una encimera, cerca de una toma de corriente. Posiciónelo de manera que esté fácilmente accesible.
- Page 29 Instalación de los discos Para instalar el disco rebanador ajustable (WFP16S10): Quite la tapa. Instale el adaptador amovible sobre el árbol motor. El disco rebanador ajustable permite elegir entre 16 grosores, de 1 a 6 mm. Elija el grosor deseado. Una vez fijado el grosor, coloque el disco sobre el adaptador.
- Page 30 DESMONTAJE DEL BOL SIEMPRE DESENCHUFE EL APARATO ANTES DE DESENSAMBLARLO. • Retire el empujador grande de la boca de llenado. Retire el empujador pequeño del empujador grande. Desmontaje de la cuchilla y del disco batidor • Gire el bol en sentido horario para liberar las anclas. El asa debe encontrarse a mano izquierda para poder alzar el bol.
- Page 31 ENSAMBLAJE DEL BOL PARA PROCESADO CONTINUO • Antes de usar el aparato por primera vez: Limpie y desinfecte el bloque-motor. Lave, enjuague y desinfecte el bol, la tapa, el disco eyector, los empujadores y los accesorios. • Coloque el aparato sobre una mesa o una encimera, cerca de una toma de corriente.
-
Page 32: Funcionamiento Del Aparato
DESMONTAJE DEL BOL PARA PROCESADO CONTINUO SIEMPRE DESENCHUFE EL APARATO ANTES DE DESENSAMBLARLO. • Gire la tapa en sentido horario hasta desencajar las anclas. • Retire el empujador grande de la boca de llenado. Retire el empujador pequeño del empujador grande. •... -
Page 33: Modo De Empleo
MODO DE EMPLEO Encendido continuo Oprima el botón ON. Función de pulso • Para utilizar la función de pulso, oprima el botón PULSE repetidamente. El motor permanecerá encendido hasta que suelte el botón. • La función de pulso permite controlar la duración de cada pulsación y la frecuencia de las pulsaciones con precisión. - Page 34 PREPARACIÓN DE LOS ALIMENTOS • Lave todos los alimentos antes de procesarlos. Pele las frutas/ verduras si fuera necesario. Quite las pepas, pepitas y semillas grandes. • Corte los vegetales, la carne o el queso de manera que quepan en la boca de llenado o a la talla deseada según el accesorio usado.
- Page 35 Si el aparato no funcionara debidamente después de seguir estos pasos, deje de usarlo y comuníquese con un centro de servicio autorizado. UTILIZACIÓN DE LA CUCHILLA • La cuchilla ha sido diseñada para picar, moler, hacer purés, mezclar, emulsionar, licuar y amasar. •...
- Page 36 Picar cebolla, apio, col, etc. Corte las cebollas en cuartos y las demás verduras en pedazos de 2,5 cm. Ponga los pedazos en el bol, sin pasar la cumbre del cilindro de plástico. Nota: no pique demasiado. Esto producirá resultados irregulares o convertirá...
- Page 37 • Quite el corazón de las verduras como la col y la lechuga. Corte las coles/lechugas medianas en tres pedazos. Corte las coles/lechugas más grandes en cuatro pedazos. • Tras haber preparado los alimentos, introdúzcalos en la boca de llenado deseada, inserte el empujador y encienda el aparato.
- Page 38 No bata más de 1,5 L de crema a la vez. En caso de derrame, apague el aparato y vacíe parcialmente el bol. USO DEL DISCO RALLADOR Los discos ralladores Waring Commercial son accesorios ® opcionales. Para usarlos, siga las instrucciones a continuación.
-
Page 39: Resolución De Problemas
• Vacíe el bol antes de que el queso alcance la capacidad máxima. RESOLUCIÓN DE PROBLEMAS Esta sección describe los problemas más comunes. Si esta lista no soluciona su problema, por favor comuníquese con su distribuidor local. Consulte la lista de los centros de servicio autorizados, proveída con el aparato. -
Page 40: Limpieza Y Mantenimiento
El aparato no alcanza la velocidad máxima • Vacíe el bol e intente procesar menos alimentos a la vez. Si el aparato aún no funciona correctamente: • Averigüe que la toma de corriente está funcionando. • Averigüe que el disyuntor está encendido. •... - Page 41 Para lavar los accesorios a mano, le recomendamos que utilice soluciones limpiadoras a base de detergente sin espuma y soluciones desinfectantes con una concentración mínima de cloro de 100 ppm. Se podrán usar las soluciones siguientes o sus equivalentes: SOLUCIÓN PRODUCTO PROPORCIONES TEMPERATURA...
-
Page 42: Importantes Consignes De Sécurité
6. Comme c’est le cas avec tout appareil ménager, il vous faudra être prudent lorsque vous utilisez le robot multifonction Waring Commercial. Bien que simple ® d’utilisation, ce robot ne devrait être utilisé que par des personnes vigilantes. - Page 43 Envoyer l’appareil à un service après-vente autorisé afin qu’il soit inspecté, réparé ou réglé au besoin. 13. L’utilisation d’accessoires non recommandés ou vendus par Waring Commercial peut présenter un risque d’incendie, d’électrocution ou de blessure. 14. Ne pas utiliser l’appareil à l’air libre.
- Page 44 PRISE DE TYPE F Prise dotée de deux broches cylindriques. Cette fiche n’est pas polarisée, si bien qu’elle peut (ALLEMAGNE, AUTRICHE, PAYS BAS, s’insérer dans la prise dans n’importe quel sens. La mise à la terre se fait quand les bornes de la SUÈDE, NORVÈGE, FINLANDE, prise entrent en contact avec les ergots de mise PORTUGAL, ESPAGNE, EUROPE DE L’EST)
- Page 45 INTRODUCTION Les robots multifonction Waring Commercial sont les plus ® polyvalents de leur catégorie. Dotés d’un système d’étanchéité, ils permettent de préparer de grands volumes de liquide sans fuite et de vider le bol sans avoir à retirer la lame. Ces appareils professionnels sont le fruit de 75 ans d’expérience dans la...
- Page 46 PIÈCES Ce robot multifonction Waring Commercial comprend les ® pièces et accessoires suivants : 1. Socle moulé sous pression avec arbre moteur à usage intensif 2. Trois boutons de commande a. OFF (arrêt) b. ON (marche) c. PULSE (pulse) 3. Mécanisme de verrouillage (non illustré) Empêche l’appareil de se mettre en marche si le couvercle n’est pas bien fermé.
- Page 48 ASSEMBLAGE DU BOL NORMAL Avant la première utilisation: • Nettoyer et désinfecter le socle. Laver, rincer et désinfecter le bol, le couvercle, l’entonnoir, les poussoirs et les accessoires. • Placer l’appareil sur un plan de travail ou une table, à proximité d’une prise de courant, et de façon à...
- Page 49 Installation des disques Pour installer le disque à trancher réglable (WFP16S10) : Retirer le couvercle. Enfoncer l’adaptateur amovible sur l’arbre du moteur. Le disque à trancher réglable permet d’obtenir des tranches de 16 épaisseurs différentes de 1 à 6 mm. Régler le disque sur l’épaisseur voulue.
- Page 50 Désassemblage du couteau ou du disque à fouetter • Tourner le bol dans le sens des aiguilles d’une montre pour libérer les pattes de verrouillage. La poignée du bol devrait se trouver du côté gauche. Soulever alors le bol. Il est conseillé de retirer le bol du socle-moteur avant d’enlever le couteau ou le disque à...
- Page 51 • Enfoncer le bol sur le socle-moteur jusqu’à ce que la base du bol recouvre le plateau du socle-moteur. Tourner dans le sens inverse des aiguilles d’une montre jusqu’à ce qu’il se bloque. • Glisser le disque éjecteur sur l’arbre du moteur et l’enfoncer jusqu’au fond du bol.
- Page 52 FONCTIONNEMENT DE L’APPAREIL • Brancher l’appareil dans une prise électrique • Les boutons de commande se trouvent face à vous. Les trois boutons de commande sont : ON (marche) OFF (arrêt) PULSE (pulse) Fonctionnement: ON : Appuyer sur ce bouton pour mettre l’appareil en marche continue.
- Page 53 Ne jamais essayer de les contrôler en bougeant le bol ou le couvercle. Cela pourrait endommager l’appareil. Arrêt de l’appareil • Toujours utiliser le bouton OFF pour éteindre l’appareil. Cela arrêtera le moteur. • Éteindre l’appareil et attendre que le couteau soit complètement immobile avant d’ouvrir le couvercle.
- Page 54 Gros poussoir Le gros poussoir sert à pousser les aliments introduits à l’horizontale dans l’entonnoir. Il permet d’obtenir des morceaux plus longs. DISPOSITIF DE PROTECTION DU MOTEUR Cet appareil est équipé d’un dispositif de protection thermique qui arrête le moteur automatiquement en cas de surchauffe. Si cela se produisait, arrêter (OFF) et débrancher l’appareil.
- Page 55 Pour obtenir une texture plus fine, utiliser le mode continu (ON) pendant quelques secondes. Si l’appareil a du mal à hacher, retirer un peu de viande et continuer. Râper/réduire en poudre du fromage dur Couper le fromage (bien réfrigéré) en cubes de 2,5 cm et placer les morceaux dans le bol, sans dépasser la capacité...
- Page 56 UTILISATION DU DISQUE À TRANCHER • Les accessoires inclus avec cet appareil comprennent un disque à trancher réglable permettant d’obtenir des tranches de 16 épaisseurs différentes, de 1 à 6 mm ! Régler l’épaisseur désirée avant d’installer le disque sur l’arbre du moteur. Une fois l’épaisseur des tranches réglée et le disque installé, fermer le couvercle et retirer le poussoir.
- Page 57 Ne pas fouetter plus de 1,5 L de crème à la fois. En cas de débordement, arrêter l’appareil, puis vider partiellement le bol avant de continuer. UTILISATION DU DISQUE À RÂPER Les disques à râper Waring Commercial sont en option. Suivre ® les instructions ci-dessous pour les utiliser.
-
Page 58: Résolution De Problèmes
• Pour éviter que le moteur ne surchauffe, il est conseillé d’appuyer puis de relâcher le poussoir tour à tour jusqu’à ce que le fromage soit complètement râpé. Éviter de faire pression continuellement sur le fromage. Cela pourrait faire surchauffer le moteur. -
Page 59: Nettoyage Et Entretien
• Vérifier que la prise de courant est sous tension. • Vérifier que le disjoncteur est allumé. • Vérifier que le fusible qui alimente la prise n’est pas grillé. • Contacter un service après-vente Waring autorisé. L’appareil grince • Éteindre l’appareil, le débrancher, puis vérifier si le couteau touche le bol. - Page 60 Bien laver et rincer toutes les pièces après chaque utilisation. Nettoyer le couteau et les disques à l’aide d’une brosse dure avant de les laver. Le couteau et les disques sont très aiguisés. Les manipuler avec précaution. Pour le lavage à la main, nous recommandons l’utilisation d’une solution de nettoyage à...
-
Page 61: Belangrijke Voorzorgsmaatregelen
5. Dit product is niet bedoeld voor gebruik door personen die verminderde fysieke, gevoelsmatige of mentale capaciteiten hebben (inclusief kinderen) of gebrek aan ervaring of kennis hiervoor hebben. 6. Uw Waring Commerciële keukenmachine is bedoel voor ® gebruik in de keuken en, net als andere keukenapparatuur, moet zorgvuldigheid in acht worden genomen bij de bediening ervan. - Page 62 Retourneer het apparaat naar het dichtstbijzijnde erkende servicecentrum voor inspectie, reparatie of afstelling. 13. Het gebruik van hulpmiddelen die niet door Waring Commercial worden aanbevolen of verkocht, kan leiden tot brand, elektrische schokken of letsel. 14. Gebruik het apparaat niet buitenshuis.
- Page 63 TYPE F STEKKER De geaarde stekker heeft twee ronde pennen en er zijn twee klemmen aan de zijkant van de con- (DUITSLAND, OOSTENRIJK, NEDERLAND, tactdoos. Deze stekker is niet gepolariseerd waar- door die in beide richtingen in de contactdoos ZWEDEN, NOORWEGEN, FINLAND kan worden gestoken.
- Page 64 S-mes te verwijderen, kunnen schenken. Deze professionele machines zijn een uitmuntend voorbeeld van de vijfenzeventig jaar ervaring die Waring heeft opgedaan in de voedselindustrie, naast vijfenzeventig jaar in het verwerken van voedsel. Deze machine bevat een werkschaal met afdichting (ook wel een...
- Page 65 DE ONDERDELEN De Waring Commerciële Keukenmachine bestaat uit de ® volgende standaard onderdelen en accessoires: 1. Gietijzeren motorvoetstuk met een verticale hoog-belastbare schacht 2. Drie bedieningsknoppen a. UIT (OFF) b. AAN (ON) c. PULS (PULSE) 3. Veiligheidsvergrendeling (niet getoond). Voorkomt dat de machine in werking kan treden als het deksel niet gesloten is.
- Page 67 SAMENSTELLEN VAN DE ONDERDELEN VAN DE MENGKOM In deze instructies gebruiken we de termen mengkom, werkschaal en snijkom in diverse omschrijving. Hiermee wordt telkens dezelfde kom bedoeld. Voor het eerste gebruik: • Motorblok reinigen en schoonmaken. Was, spoel en reinig de mengkom, deksel, duwer , invoer en accessoires.
- Page 68 • Verzeker u ervan dat het mes of de schijf volledig onderin zit, door het voorzichtig heen en weer te draaien tijdens het naar beneden drukken. Als het correct is geïnstalleerd en op de juiste plek zit, zal het onderste blad zich iets boven de onderzijde van de kom bevinden.
- Page 69 om kleine stukjes te geleiden en nauwkeuriger te snijden of om bijvoorbeeld salami in dunne schijfjes te snijden. Plaats de kleine voedselduwer in de opening van de grote voedselduwer. Nu kunt u de grote voedselduwer in de opening van de vultrechter plaatsen.
- Page 70 Demontage met een accessoire-schijf. • Verwijder de mengkom pas als de accessoire-schijf is verwijderd. • U kunt de accessoire-schijf verwijderen door uw vingers op de buitenste rand van de schijf te plaatsen en deze op te tillen. De schijf moet eenvoudig van de as kunnen worden afgenomen. Als de as van de schijf vast blijft zitten, neemt u de schijf in een hand en richt u de as van u af, en gebruikt u de andere hand om de as eruit te trekken.
- Page 71 links van het vergrendellipje van de trechter. Druk het deksel naar beneden en draai het linksom tot het vastklikt in het vergrendellipje op de trechter voor continue-invoer. Zo vermijdt u dat het deksel omhoog komt tijdens de voedselverwerking. • Het vergrendellipje op het deksel schuift in de uitsparing op de deksel en de magnetische vergrendeling wordt ingeschakeld.
- Page 72 Deze drie knoppen zijn: AAN (ON) UIT (OFF) PULS (PULSE) Hoe werken deze: AAN: Druk op de AAN-knop om de motor te starten. UIT: Druk op de UIT-knop om de motor te stoppen. PULS: Om de pulseerstand te gebruiken, drukt u op PULS en laat direct de knop weer los.
- Page 73 De UIT-knop gebruiken om de motor stil te zetten. • Schakel de keukenmachine altijd uit met behulp van de UIT- knop. Hierdoor wordt gewaarborgd dat er geen stroomtoevoer naar de motor (meer) is. • Als u de machine heeft uitgezet, wacht dan altijd tot de messen of schijven stil staan voor u het deksel verwijderd.
- Page 74 Als uw keukenmachine niet goed werkt na deze procedure, gebruik het apparaat dan niet meer en neem contact op met uw erkende Waring Klantenservicecentrum. GEBRUIKSAANWIJZINGEN VOOR HET S-MES (SNIJMES) • Het gesealde S-mes (snijmes) is gemaakt voor snijden, schaven, pureren, mengen, mixen of kneden.
- Page 75 het gelijkmatig gesneden wordt. Verwerk niet meer dan 1 kilo vlees per keer. Druk op de PULS-knop. Druk 3 a 4 keer op de puls-knop, telkens 1 seconde per puls. Als het voedsel nog niet fijngesneden genoeg is, laat dan de machine gedurende een paar seconden lopen.
- Page 76 kloppen en versnipperen. Er zijn drie schijfaccessoires meegeleverd. Vanaf deze druk zijn dat: WFP16S10 - Instelbare schijf voor plakjes WFP16S11 - Afgedichte klopschijf WFP16S12 - Omkeerbare versnipperschijf SNIJDEN VAN PLAKJES • De keukenmachine is voorzien van een instelbare schijf voor het snijden van plakjes.
- Page 77 VERSNIPPEREN • De keukenmachine is voorzien van een omkeerbare schijf voor versnipperen. Met de ene zijde van de schijf kan een fijne versnippering worden bereikt, met de andere medium-fijn. Als u de schijf plaatst, zal de naar boven gerichte zijde het gewenste resultaat geven.
- Page 78 “Max vloeistofniveau” en ga verder. RASPEN Waring Commercial biedt schijven voor het raspen aan als optionele accessoire. Volg de onderstaande instructies voor het raspen. • Bereid alle te verwerken voedsel voor: was en schil zoals vereist.
- Page 79 IN dit hoofdstuk beschrijven we potentiële problemen en de juiste oplossing ervoor. Problemen die niet met deze richtlijnen kunnen worden opgelost, moeten worden aangemeld bij een van de erkende Waring servicecentra. Bij iedere Waring keukenmachine wordt een lijst geleverd met de erkende servicecentra die beschikbaar zijn.
-
Page 80: Reiniging En Onderhoud
• Controleer of een stroombeveiliging is aangebracht. • Controleer of de zekeringen niet zijn doorgeslagen als dit van toepassing is. • Bel met het plaatselijke Waring servicepunt. Als de keukenmachine schurende geluiden maakt • Schakel het apparaat uit, haal de stekker uit het stopcontact,... - Page 81 Met een stevige borstel kunnen de voedselresten uit de holtes van de schijven en messen worden geveegd. Deze zijn scherp, dus wees zorgvuldig met het hanteren ervan. Voor handmatige schoonmaak raden wij aan om een afwasmiddel te gebruiken dat niet schuimt en een ontsmetter op chloorbasis, die een concentratie heeft van 100DPM of minder.
-
Page 82: Wichtige Sicherheitshinweise
Fähigkeiten besitzen oder einen Mangel an Erfahrung oder Wissen haben. für den kommerziellen 6. Ihre Küchenmaschine von Waring ® Gebrauch stellt einen Teil der Küchenausstattung dar und muss, wie alle anderen Küchengeräte mit enormer Sorgfalt behandelt werden. - Page 83 Sie das Gerät zur Überprüfung, Reparatur oder für eine elektrische oder mechanische Anpassung zu Ihrer nächsten zuständigen Kundendiensteinrichtung. 13. Die Verwendung von Aufsätzen, die nicht von Waring Commercial verkauft werden, können Feuer, einen elektrischen Schock oder Verletzungen verursachen. 14. Nicht im Freien verwenden.
- Page 84 TYP F STECKER Dieser geerdete Stecker hat zwei runde Stifte und es gibt zwei Erdungslaschen an der Seite der (DEUTSCHLAND, ÖSTERREICH, NIEDERLANDE, Steckdose. Dieser Stecker ist nicht polarisiert, damit er von beiden Richtungen in die Steckdose SCHWEDEN, NORWEGEN, FINNLAND, gesteckt werden kann. Die Erdung findet statt, PORTUGAL, SPANIEN, OSTEUROPA) wenn die Lasche an der Steckdose mit dem Kontakt am Stecker in Verbindung kommt.
- Page 85 EINFÜHRUNG Die Küchenmaschinen von Waring Commercial sind die ® vielfältigsten ihrer Art. Sie sind mit einem Versiegelungssystem ausgestattet, das die Verarbeitung von großen Flüssigkeitsmengen ohne jedes Auslaufen ermöglicht und die Notwendigkeit zur Entfernung des S-Messers während des Eingießens umgeht. Diese professionellen Geräte sind Musterbeispiele für Warings fünfundsiebzigjährige Erfahrung...
- Page 86 DIE TEILE Die Küchenmaschine von Waring Commercial besteht aus ® den folgenden Standardteilen und Zubehör: 1. Druckguss-Motorfuß mit Hochleistungswelle 2. Drei Steuerungsschalter a. AUS (OFF) b. AN (ON) c. PULSE 3. Sicherheitsverriegelung (nicht aufgeführt). Verhindert, dass das Gerät betrieben wird, bis die Abdeckung eingerastet ist 4.
- Page 88 ANBRINGEN DER DOSIERSCHÜSSELTEILE Die Begriffe Arbeitsbehälter, Dosierschüssel und Schneideschüssel werden in dieser Anleitung austauschbar verwendet. Sie haben die gleiche Bedeutung. Vor der Ersten Verwendung: • Reinigen und Desinfizieren des Motorsockels, Waschen, spülen und desinfizieren Sie die Dosierschüssel, den Deckel, den Stopfer, den Stopfereinsatz und das Zubehör.
- Page 89 nach unten gedrückt ist, könnte es beschädigt werden oder Flüssigkeit austreten. Drücken Sie nur am Mittelteil herunter (Kunststoffteil); berühren Sie niemals die Schneideklinge, denn diese ist extrem scharf. • Überprüfen Sie, ob die Klinge oder Scheibe auch so weit wie möglich nach unten gedrückt ist, indem Sie sie vor und zurück drehen und sie dabei vorsichtig herunter drücken.
- Page 90 VERSUCHEN SIE NIEMALS DIE KÜCHENMASCHINE IN BETRIEB ZU NEHMEN WENN DER DECKEL NICHT FEST POSITIONIERT IST. Zwei Stopfer für die Einfüllöffnung Es gibt einen großen und einen kleinen Stopfer. Der große Stopfer dient zur Verarbeitung von großstückigen Lebensmitteln. Der kleine Stopfer ist in dem großen eingefügt und kann für kleinere Produkte verwendet werden, um langes, dünnes Gemüse für präzisere Schnitte zu führen oder für Arbeiten wie das Schneiden von Peperoni.
- Page 91 • Um die Klinge oder Scheibe zu entnehmen, behalten Sie einen leichten Druck auf dem oberen Mittelpunkt bei, während Sie die Schüssel aus der Motorbasis nehmen. Dies hat eine Verdichtung zur Folge, die verhindert, dass Essenspartikel in die Zentralöffnung der Schüssel und auf die Motorbasis oder die Arbeitsfläche gelangen.
- Page 92 • Nehmen Sie die ständige Einfüllöffnung und halten Sie diese in beiden Händen mit der Öffnung in Richtung einer 4-Uhr- Position und dem Griff in einer 10-Uhr-Position. Platzieren Sie die Öffnung auf den Sockel, indem Sie die Öffnung in der Mitte über die Motorwelle stülpen.
- Page 93 VOR DEM ABMONTIEREN IMMER ERST DIE ENERGIEVERSORGUNG TRENNEN. • Drehen Sie den Deckel mit dem Uhrzeigersinn bis die Sicherheitsverriegelungskerbe auf dem Deckel von dem Sicherheitsverriegelungsschalter auf der Öffnung gelöst ist und die Kerben von den Kerben auf dem Deckel befreit sind. •...
- Page 94 ANWENDUNG Durchgängige Verwendung Für eine durchgängige Verarbeitung verwenden sie den ON- Schalter in der Mitte. Pulsieren • Für einen raschen AN/AUS-Betrieb verwenden Sie den Schalter PULSE. Der Motor läuft so lange, wie Sie den Schalter gedrückt halten; er stoppt, wenn Sie den Schalter loslassen. •...
- Page 95 • Zur Sicherheit sollten Sie sich immer durch Drücken der OFF- Taste vergewissern, dass das Gerät ausgeschaltet ist, bevor Sie den Deckel herunterdrücken. LEBENSMITTELZUBEREITUNG • Bereiten Sie alle zu verarbeitenden Lebensmittel durch Abwaschen und Schälen vor, sofern erforderlich. Entfernen Sie Kerne, Steine und große Samen.
- Page 96 Sie die Verarbeitung fort. Wenn Ihre Küchenmaschine nicht ordnungsgemäß funktioniert, befolgen Sie diese Anweisungen, brechen die Benutzung ab und wenden sich an ein zertifiziertes Kundenservice-Center von Waring. VERWENDEN SIE DIE ANLEITUNG FÜR DAS S-MESSER (SCHNEIDEKINGE) • Das beschichtete S-Messer (Schneideklinge) eignet sich zum Zerkleinern, Reiben, Pürieren, Mischen und Mixen.
- Page 97 Zerkleinern von Fleisch Schneiden Sie das Fleisch in 2,5 cm große Stücke, um für einen gleichmäßigen Schnitt zu sorgen. Verarbeiten Sie nie mehr als 2,25 Pfund Fleisch. Drücken Sie die PULSE-Taste 3 oder 4 mal für eine Sekunde an und eine Sekunde aus. Wenn das Essen nicht fein genug geschnitten wird, lassen Sie das Gerät für einige Sekunden dauerhaft laufen.
- Page 98 AUSWAHL UND VERWENDUNG DES SCHEIBENEINSATZES Die Scheibeneinsätze der Küchenmaschine wurden so konzipiert, dass eine Vielzahl von Zubereitungsmöglichkeiten zur Verfügung steht: in Scheiben schneiden, Schlagen, Zerkleinern. Im Lieferumfang sind drei (3) Scheibeneinsätze enthalten. Laut dieser Abbildung sind dies: WFP16S10 - Einstellbare Schneidescheibe WFP16S11 - Beschichtete Schlagscheibe WFP16S12 - Drehbare Raspelscheibe SCHNEIDEVORGANG...
- Page 99 Dosierschüsseldeckels aufgezeichneten MAX. FÜLLLINIE, wenn Sie mit dem großen Stopfer arbeiten. • Versuchen Sie niemals Schmelzkäse zu schneiden. Verwenden Sie nur Hartkäse. Mozzarella darf nur geschnitten werden, wenn dieser bei etwa 2°C gut gekühlt wurde. • Wenn geschnittene Lebensmittel fast die gesamte Kapazität der Schüssel ausfüllen, entfernen Sie alle geschnittenen Lebensmittel aus der Schüssel.
- Page 100 6 Tassen Schlagsahne. Wenn diese überläuft, entfernen Sie die Flüssigkeit bis zur MAX. FÜLLLINIE und setzen den Verarbeitungsvorgang anschließend fort. REIBEN Waring Commercial bietet die Reibscheiben als optionales Zubehör an. Befolgen Sie beim Reiben die unten aufgeführten Anweisungen. • Bereiten Sie alle zu verarbeitenden Lebensmittel durch Abwaschen und Schälen vor, sofern erforderlich.
-
Page 101: Problembehebung
Lösungen. Probleme, die mit den unten aufgeführten Richtlinien nicht gelöst werden können, sollten an eines der autorisierten Waring-Kundendienststellen weitergeleitet werden. Eine Liste von autorisierten Servicecentern wird bei jeder Waring- Küchenmaschine mitgeliefert. Die Einheit kann nicht gestartet werden, obwohl sie korrekt eingerichtet ist •... - Page 102 • Prüfen Sie, ob die Steckdose Strom gibt. • Prüfen Sie, ob die Sicherung drin ist. • Prüfen Sie, ob die Sicherung nicht durchgebrannt ist, falls sich Sicherungen im Stromkreis befinden. • Wenden Sie sich an ein lokales Waring-Servicecenter.
-
Page 103: Reinigung Und Wartung
Sie sie ab, prüfen die Schüssel und die Klinge, ob diese aneinander gerieben wurden. • Wenn die Schüssel und Klinge aneinander reiben, wenden Sie sich an Ihr autorisiertes Waring-Servicecenter. REINIGUNG UND WARTUNG Reinigen Sie die Küchenmaschine und das Zubehör vor dem ersten Gebrauch und nach jeder weiteren Benutzung. - Page 104 Für die Reinigung per Hand empfehlen wir Ihnen, nicht- schäumende Reinigungsmittel und Chlor-basierte Desinfektionslösungen mit einer minimalen Chlorkonzentration von 100 PPM zu verwenden. Die folgenden Lösungen (oder gleichwertige Lösungen) können zum Reinigen, Spülen und Desinfizieren verwendet werden: LÖSUNG PRODUKT VERDÜNNUNG IN WASSER TEMPERATUR Waschmittel *Ajax...
-
Page 105: Precauzioni Importanti
5. Questo elettrodomestico non deve essere usato da adulti o bambini con ridotte capacità motorie, sensoriali o mentali e da chiunque non conosca l’apparecchiatura. 6. Il vostro mixer Waring è un elettrodomestico da cucina ® e come tutti gli altri elettrodomestici deve essere operato con attenzione. - Page 106 13. L’utilizzo di accessori non consigliati o non commercializzati da Waring Commercial può causare incendi, scosse elettriche o lesioni. 14. Non utilizzare all’aperto. 15. Non lasciare che il cavo penda fuori dal tavolo o dal piano di lavoro, né...
- Page 107 SPINA DI TIPO F Questa spina, dotata di messa a terra, presenta due punte tonde e ha due morsetti di messa (schuko) a terra al lato della presa. È una spina non polarizzata e, pertanto, può essere inserita in (GERMANIA, AUSTRIA, OLANDA, entrambe le posizioni della presa.
- Page 108 Queste macchine professionali rappresentano il meglio della produzione Waring che vanta un’esperienza nel settore alimentare e in quello della lavorazione del cibo di ben settantacinque anni. Il mixer è dotato di una ciotola da lavoro a tenuta e di una lama sigillata/bloccata, detta anche lama a “S”...
- Page 109 COMPONENTI Questo mixer Waring è composto dai seguenti componenti ® standard e accessori: 1. Rivestimento motore pressofuso con albero di trasmissione verticale per impieghi gravosi 2. Tre pulsanti di controllo a. OFF (spento) b. ON (acceso) c. PULSE (impulso) 3. Blocco di sicurezza (non mostrato): interrompe il funzionamento della macchina se il coperchio non è...
- Page 111 MONTAGGIO DEI COMPONENTI DELLA CIOTOLA DA LAVORO In questo manuale useremo indistintamente i termini ciotola da lavoro, ciotola dosatrice e ciotola per tagliare. Questi termini hanno lo stesso significato. Prima del primo utilizzo: • Pulire e igienizzare la base del motore. Lavare, sciacquare e igienizzare la ciotola da lavoro, il coperchio, lo spingi-cibo con il relativo inserto e gli accessori.
- Page 112 plastica); non toccare mai le lame, queste sono estremamente affilate. • Assicurarsi che la lama o il disco siano completamente abbassati girandoli da entrambi i lati spingendoli delicatamente verso il basso. Se l’installazione è avvenuta con successo, la lama inferiore si troverà esattamente appena sopra al fondo della ciotola.
- Page 113 Due spingi-cibo per il tubo di alimentazione Sono disponibili due spingi-cibo, uno grande e uno piccolo. Quello grande serve per i cibi più grandi. Quello piccolo si trova all’interno di quello più grande e può essere usato per i prodotti più...
- Page 114 “S” o il disco per montare dalla ciotola tirando verso l’alto per sbloccare l’accoppiamento. Maneggiare la lama a “S” con attenzione; le lame sono estremamente affilate. Smontaggio per la rimozione di un disco accessorio • Non rimuovere la ciotola da lavoro fino a quando il disco non sarà...
- Page 115 • Posizionare l’eiettore (disco espulsore) nella ciotola facendolo scorrere sull’albero del motore fino a raggiungere la parte bassa dello scivolo. • Selezionare il disco accessorio corretto. Attenersi alle istruzioni a pagina 113 per il montaggio dello stelo al disco. • Posizionare il coperchio sulla parte superiore dello scivolo con il gancio posizionato a sinistra sullo scivolo.
- Page 116 • Fare attenzione durante la rimozione dei dischi accessori poiché le lame sono molto affilate. UTILIZZO DEI COMANDI • Inserire la spina in una presa. • Sull’unità sono presenti tre pulsanti. I pulsanti sono: ON (acceso) OFF (spento) PULSE (impulso) Funzionamento: premere il pulsante ON per avviare il motore.
- Page 117 • Gli impulsi manuali permettono un maggiore controllo della consistenza quando si trita, si mescola e quando si frulla. • Gli impulsi manuali sono utili per lavorare cibi più duri. Lavorare il cibo a intermittenza permette di ridurlo in parti più piccole. Quindi procedere con il funzionamento continuo non appena i pezzi hanno raggiunto le dimensioni adeguate per essere lavorati.
- Page 118 Se, pur seguendo tale procedura, il mixer dovesse continuare a non funzionare correttamente, interromperne l’utilizzo e contattare un centro assistenza clienti autorizzato Waring. ISTRUZIONI PER LA LAMA A “S” (COLTELLO) • La lama a “S” (Coltello) sigillata è progettata per tritare, macinare, passare, mescolare, miscelare o impastare.
- Page 119 Tritare o sminuzzare • Per tritare o sminuzzare nella ciotola, riempirla fino a ¾. • Per tritare o sminuzzare in modo più efficace usare la funzione PULSE. Questo vi permetterà di avere un maggiore controllo sulla consistenza. Continuare con l’intermittenza fino al raggiungimento della consistenza voluta.
- Page 120 Puré o Mix Per creare un puré di pomodori, verdure o frutta, per fare salse, o anche per mescolare e miscelare ingredienti vari, mettere gli ingredienti desiderati nella ciotola e lavorarli con continuità fino al raggiungimento della consistenza desiderata. Non abbandonare la macchina in funzione.
- Page 121 • Per cibi come cavolo, lattuga e ogni altro prodotto dal centro duro si renderà necessario scartare detta parte. Il cavolo di medie dimensioni o le palle di lattuga possono essere tagliate in 3 pezzi per farli passare attraverso lo scivolo. Le parti più grandi potrebbero aver bisogno di essere tagliate in più...
- Page 122 GRATTUGIARE Waring Commercial offre dischi per grattugiare come accessori opzionali. Per grattugiare attenersi alle seguenti istruzioni. • Preparare i cibi da inserire nel mixer lavandoli e sbucciandoli se necessario.
-
Page 123: Risoluzione Dei Problemi
I problemi che non possono essere risolti con le linee guida di seguito elencate devono essere sottoposti all’attenzione dei centri di assistenza Waring autorizzati. Un elenco di agenzie autorizzate all’assistenza è fornito con ogni mixer Waring. L’unità non si avvia anche se assemblata correttamente •... - Page 124 • Assicurarsi che l’interruttore della presa sia acceso. • Se ci sono fusibili nel circuito, controllare che non siano bruciati. • Contattare l’agenzia locale di assistenza Waring. Se il mixer emette un suono stridente • Spegnere l’unità, scollegare l’alimentazione, smontarla e controllare che la ciotola e la lama non siano entrate in contatto.
-
Page 125: Pulizia E Manutenzione
PULIZIA E MANUTENZIONE Pulire e igienizzare il mixer prima dell’uso iniziale e dopo ogni utilizzo. Non usare pulitori aggressivi o abrasivi su nessuna delle parti del mixer. Per la pulizia attenersi alle linee guida ETL. Lavare l’albero del motore con un piccolo spazzolino. Lavare, sciacquare, sterilizzare e asciugare la ciotola, il coperchio, lo spingi-cibo piccolo, lo spingi-cibo grande, i dischi accessori e la lama a “S”... - Page 126 Per pulire e igienizzare la base Pulire e igienizzare la base del motore prima dell’uso iniziale e dopo ogni utilizzo. Scollegare l’alimentazione dell’unità, pulire le superfici esterne con un panno o con una spugna inumiditi con un detergente idrosolubile. Quindi, ripassare il panno o la spugna inumiditi solo con acqua.
-
Page 127: Precauções Importantes
5. Este produto não se destina a ser utilizado por pessoas (incluindo crianças) com capacidades físicas, sensoriais ou mentais reduzidas, ou com falta de experiência e de conhecimentos. 6. O seu processador de alimentos da Waring Commercial ® é um equipamento de cozinha, e como todos os outros equipamentos de cozinha, deve ser usado com cuidado. - Page 128 Enviar o aparelho para a assistência técnica para verificação, reparação ou ajuste. 13. O uso de acessórios não recomendados ou vendidos pela Waring Commercial pode provocar incêndio, choque elétrico ou ferimentos. 14. Não usar no exterior.
- Page 129 FICHA TIPO F Este ficha com terra tem dois pinos redondos e dois clipes de ligação à terra no lado da tomada. Esta ficha é não polarizada para poder ser (ALEMANHA, ÁUSTRIA, HOLANDA, inserida em qualquer sentido na tomada. A liga- SUÉCIA, NORUEGA, FINLÂNDIA, ção à...
- Page 130 S ao derramar. Estas máquinas profissionais são exemplos de setenta e cinco anos de experiência no setor do serviço alimentação da Waring, bem como setenta e cinco anos de experiência em processamento de alimentos. É fornecido com um copo de trabalho com vedante (também conhecido como “batch bowl”) e uma lâmina de corte selada/...
- Page 131 AS PARTES O processador de alimentos da Waring Commercial é ® constituído pelas seguintes peças e acessórios: 1. Base de motor fundido com o eixo vertical de alta resistência 2. Três botões de controlo a. OFF b. ON c. PULSE 3.
- Page 133 MONTAGEM DAS PEÇAS DO COPO Usamos os termos copo de trabalho, “batch bowl” e copo cortador alternadamente ao longo deste guia de instruções. Todos significam o mesmo. Antes da primeira utilização: • Limpar e desinfetar a base do motor. Lavar, enxaguar e desinfetar o copo de trabalho, tampa, utensílio de pressão de alimentos, utensílio de inserção de alimentos e acessórios.
- Page 134 • Certificar-se de que a lâmina ou o disco está totalmente inserido, rodando para trás e para frente e premindo levemente para baixo ao mesmo tempo. Se instalada adequadamente e totalmente encaixada, a lâmina inferior ficará posicionada logo acima do fundo interior do taça. •...
- Page 135 pressão mais pequeno encaixa no grande e pode ser usado para vegetais mais pequenos, para guiar vegetais finos e longos para corte mais preciso ou para tarefas como a de fatiar pepperoni. Inserir o utensílio de pressão mais pequeno na abertura do utensílio de pressão maior.
- Page 136 Desmontagem quando retirar um disco acessório • Não retirar o copo de trabalho até que o disco acessório seja retirado. • Para retirar um disco acessório, colocar os dedos no bordo externo de dois lados opostos ao disco e elevador. O disco deve sair facilmente.
- Page 137 para baixo e rodar a tampa até encaixar na aba na rampa de entrada contínua. Isto irá impedir que a tampa levante, durante o processamento. • A aba de bloqueio na tampa desliza na ranhura de bloqueio na tampa e encaixa o interruptor magnético de bloqueio de segurança.
- Page 138 OPERAÇÃO DOS CONTROLOS • Ligar a máquina a uma tomada elétrica. • Existem três botões de controlo na base da unidade. Os três controlos são: PULSE Como funcionam: Pressionar o botão ON para iniciar o motor. OFF: Para desligar o motor, pressionar o botão OFF.
- Page 139 • Usar sempre o botão PULSE para pulsar. Nunca mexer ou retirar o copo e na tampa para controlar os impulsos. É menos eficiente e pode danificar a máquina. Desligar a máquina com o botão OFF • Desligar sempre o processador de alimentos pressionando e libertando o botão OFF.
- Page 140 Se o processador de alimentos não funcionar corretamente após este procedimento, descontinuar o uso e contactar um Centros de Serviço ao Cliente Certificado da Waring. INSTRUÇÕES DE UTILIZAÇÃO PARA A LÂMINA S (LÂMINA DE CORTE) •...
- Page 141 • Se os alimentos cortados forem continuamente processados, o alimento pode ficar processado de forma irregular, ou seja, o alimento no fundo fica picado finamente e os alimentos na parte superior mais grosseiros. Cortar carne Cortar a carne em pedaços de 1 inch. (2,5 cm) para assegurar um corte igual.
- Page 142 SELEÇÃO E USO DO DISCO ACESSÓRIO Os acessórios de discos do robô de cozinha são fabricados para desempenharem diversas tarefas de processamento de alimentos: fatiar, bater, triturar. Estão incluídos três (3) discos acessórios. À data de impressão, estes são: WFP16S10 - Disco para fatiar ajustável WFP16S11 - Disco para bater com vedante WFP16S12 - Disco para triturar reversível OPERAÇÃO DE FATIAR...
- Page 143 • Nunca tentar fatiar queijo mole. Usar apenas queijos duros. O mozzarella pode ser fatiado apenas quando bem frio a cerca de 36˚F. • Quando o alimento fatiado atingir a capacidade quase total do copo, retirar todos os alimentos cortados do mesmo. OPERAÇÃO DE TRITURAÇÃO •...
- Page 144 MAX FILL LINE e continuar. OPERAÇÃO DE RALAR A Waring Commercial oferece discos de ralar como acessórios opcionais. Para ralar, ver as instruções abaixo. • Preparar todos os alimentos a serem processados, lavando e descascando quando necessário.
-
Page 145: Resolução De Problemas
Centros de Serviço Autorizados da Waring para assistência. A lista de centros de serviço autorizados é fornecida com cada processador de alimentos Waring. A unidade não funciona quando montada corretamente •... -
Page 146: Limpeza E Manutenção
• Verificar se o disjuntor está ligado. • Verificar se o fusível não está queimado, se existirem fusíveis no circuito. • Contactar um centro de serviço local da Waring. Se o processador de alimentos fizer ruídos de trituração • Desligar a unidade, desligar a ficha da corrente, desmontar, verificar o copo e a lâmina para confirmar se estão bem... - Page 147 Lavar o eixo do motor, com uma escova pequena. Lavar, enxaguar, desinfetar e secar o copo, tampa, utensílios de pressão de alimentos - pequeno e grande -, discos acessórios e lâmina S antes da primeira utilização e após qualquer utilização, exceto quando sejam usados de novo imediatamente a seguir.
- Page 148 Para limpar e desinfetar a base do motor Limpar e desinfetar a base do motor antes da utilização inicial e depois de cada utilização. Desligar o aparelho e, em seguida, limpar as superfícies externas da base do motor com um pano ou esponja humedecida com um detergente solúvel.
-
Page 149: Важные Меры Безопасности
физическими, сенсорными или умственными способностями или лицами с недостаточным опытом и знаниями. 6. Как и в случае с любым кухонным оборудованием, при эксплуатации кухонного комбайна от компании Waring ® Commercial следует проявлять особую осторожность. Несмотря на минимальные требования к обучению... - Page 150 любым иным способом. Верните электроприбор в ближайший авторизованный сервисный центр для проверки, ремонта или регулировки. 13. Использование насадок, не рекомендуемых и не распространяемых компанией Waring Commercial, может привести к пожару, поражению электрическим током или травме. 14. Не используйте электроприбор на открытом воздухе.
- Page 151 21. Внимание: Не используйте насадку для нарезки кубиками (WFP16S13) в моделях на 220-240 В с маркировкой «Одобрено СЕ». 22. Будьте осторожны при выливании горячей жидкости в кухонный комбайн или блендер, так как она может выплеснуться из устройства вследствие резкого начала процесса...
- Page 152 которая позволяет обрабатывать большие объемы жидкости без утечек и необходимости извлечения S-образного лезвия при переливании. Эти профессиональные электроприборы замечательно демонстрируют 75-летний опыт компании Waring в сфере общественного питания и пищевой промышленности. В комплект данного кухонного комбайна входят герметичная рабочая чаша (или порционная чаша) и фиксируемый...
- Page 153 и облегчения очистки. Прозрачные чаша и крышки позволяют наблюдать за работой электроприбора и изготовлены из сверхпрочного материала для работы в интенсивном режиме. КОМПОНЕНТЫ Кухонный комбайн Waring Commercial состоит из ® следующих стандартных компонентов и насадок: 1. Литое основание с вертикальным сверхмощным...
- Page 154 для нарезки ломтиками и двусторонним дисковым ножом для шинковки 11. Щетка для очистки (не показана) 12. Лоток для непрерывной подачи продуктов 13. Крышка лотка для непрерывной подачи продуктов 14. Эжекторная насадка...
- Page 155 СБОРКА ПОРЦИОННОЙ ЧАШИ В данном руководстве по эксплуатации термины «рабочая чаша», «порционная чаша» и «чаша для нарезки» будут использоваться в качестве синонимов. Они означают один и тот же компонент кухонного комбайна. Перед началом работы: • Очистите и продезинфицируйте основание кухонного комбайна.
- Page 156 чтобы зафиксировать их. Убедитесь, что они опущены до упора. В противном случае могут возникнуть повреждения или утечка жидкости. Нажимать можно только на центральную секцию (пластмассовая часть); лезвие очень острое – не прикасайтесь к нему. • Убедитесь, что лезвие или дисковой нож опущены до упора, поворачивая...
- Page 157 ЗАПРЕЩАЕТСЯ ЗАПУСКАТЬ КУХОННЫЙ КОМБАЙН, ЕСЛИ ЕГО КРЫШКА НЕ ЗАФИКСИРОВАНА. Два толкателя для подающей трубки В кухонном комбайне имеются большой и малый толкатель для продуктов питания. Большой толкатель предназначен для обработки крупных продуктов. Малый толкатель расположен внутри большого толкателя и может использоваться...
- Page 158 • Для извлечения лезвия или дискового ножа слегка надавите на их верхнюю центральную втулку, одновременно снимая чашу с основания кухонного комбайна. Это создаст герметизирующий эффект и поможет предотвратить попадание кусочков пищи на основание или рабочую поверхность комбайна через отверстие в центре чаши.
- Page 159 • Возьмите лоток для непрерывной подачи двумя руками, так чтобы его отверстие находилось справа от Вас, а ручка – слева. Установите лоток на основание так, чтобы приводной вал вошел в отверстие в центре лотка. • Надавите на лоток так, чтобы зафиксировать его круглую нижнюю...
-
Page 160: Кнопки Управления
• Поворачивайте крышку по часовой стрелке, пока выступ защитной блокировки на крышке не разъединится с защитным блокирующим переключателем на лотке и его выступы не выйдут из выступов на крышке. • Выньте большой толкатель для пищевых продуктов из подающей трубки. Выньте малый толкатель из большого толкателя. - Page 161 УПРАВЛЕНИЕ КУХОННЫМ КОМБАЙНОМ Непрерывная работа Для непрерывной обработки продуктов нажмите кнопку ON, расположенную в центре. Импульсный режим • Для работы в импульсном режиме нажмите и удерживайте кнопку PULSE. Кухонный комбайн остановится после того, как кнопка будет отпущена. • Контролировать продолжительность обработки продуктов в...
-
Page 162: Приготовление Пищи
• В качестве меры предосторожности всегда проверяйте, чтобы кухонный комбайн был выключен, нажимая на кнопку OFF перед тем, как надавливать на крышку. ПРИГОТОВЛЕНИЕ ПИЩИ • Перед обработкой вымойте и очистите продукты питания от кожуры при необходимости. Удалите косточки, зернышки и крупные... -
Page 163: Сброс Защиты От Перегрева
обработку. Если после этой процедуры кухонный комбайн не будет работать как положено, прекратите эксплуатацию и свяжитесь с сертифицированным центром по обслуживанию клиентов компании Waring. РАБОТА С S-ОБРАЗНЫМ ЛЕЗВИЕМ (НОЖОМ) • S-образное лезвие (нож) предназначено для рубки, измельчения, смешивания и замешивания продуктов. - Page 164 Рубка мяса Нарежьте мясо на кубики размером 2,5 см для обеспечения равномерной рубки. Одновременно разрешается обрабатывать не более 1 кг мяса. Нажмите кнопку PULSE 3-4 раза на короткое время (1 сек.). Если мясо будет недостаточно мелко нарублено, включите режим непрерывной работы на несколько секунд. Если кухонный комбайн...
- Page 165 ВЫБОР ДОБАВОЧНОГО ДИСКОВОГО НОЖА И РАБОТА С НИМ Благодаря набору дисков кухонного комбайна можно обрабатывать пищу различным образом: измельчать, взбивать, резать. Прилагается три (3) дополнительных диска. Они представлены на рисунке: WFP16S10 - регулируемый дисковой нож для нарезки ломтиками WFP16S11 - дисковой нож с прокладкой для взбивания WFP16S12 - двусторонний...
- Page 166 работой. ОБРАТИТЕ ВНИМАНИЕ! Не переполняйте чашу выше ЛИНИИ МАКС. НАПОЛНЕНИЯ на подающей трубке крышки порционной чаши при использовании большого толкателя. • Не пытайтесь нарезать мягкий сыр. Используйте только твердый сыр. Сыр моцарелла можно нарезать только, предварительно охладив его до 2°С. •...
- Page 167 через край, выключите кухонный комбайн и отлейте жидкость, так чтобы ее уровень был ниже ЛИНИИ МАКС. НАПОЛНЕНИЯ, после чего можно продолжать работу. ТЕРКА ПРОДУКТОВ В качестве дополнительных насадок компания Waring Commercial предлагает дисковые ножи для терки продуктов. Следуйте приведенным ниже инструкциям по терке продуктов.
-
Page 168: Устранение Неисправностей
устранить, следуя нижеперечисленным указаниям, свяжитесь с одним из авторизованных сервисных центров компании Waring. Список авторизованных сервисных центров входит в комплект поставки кухонных комбайнов Waring. Электроприбор собран правильно, но не работает • Выньте вилку из розетки и попробуйте воткнуть ее в... - Page 169 • Нажмите кнопку ON. Электроприбор останавливается во время обработки продуктов питания • Возможно, что электроприбор перегрелся. См. раздел «Сброс защиты от перегрева» (стр. 164). • Выключите электроприбор и выдерните вилку из розетки. • Снимите чашу с основания. • Опорожните чашу и выбросьте обрабатываемые продукты питания.
-
Page 170: Очистка И Уход
• Свяжитесь с местным агентством компании Waring по обслуживанию клиентов. Если кухонный комбайн издает скрежещущий звук • Выключите электроприбор, выдерните вилку из розетки и проверьте, трутся ли чаша и лезвие друг об друга. • Если да, свяжитесь с местным агентством компании... - Page 171 Для ручной очистки рекомендуется использовать растворы непенящихся моющих средств и хлорсодержащие дезинфицирующие растворы с минимальной концентрацией хлора 100 частей на миллион. Разрешается использовать следующие растворы для мытья, споласкивания и дезинфекции, а также их эквиваленты: РАСТВОР ТОВАР КОНЦЕНТРАЦИЯ В ВОДЕ ТЕМПЕРАТУРА Мытье...
- Page 172 Используемые здесь торговые марки или знаки обслуживания третьих лиц являются торговыми марками или знаками обслуживания их соответствующих владельцев. ©2014 Waring Commercial 314 Ella T. Grasso Ave Torrington, CT 06790 www.waringcommercialproducts.com Printed in China Imprimé...
Need help?
Do you have a question about the WFP16SCDE and is the answer not in the manual?
Questions and answers