Table of Contents
Advertisement
Quick Links
Advertisement
Table of Contents

Related Manuals for Trotec PRTS 10-1200


Summary of Contents for Trotec PRTS 10-1200
- Page 1 PRTS 10-1200 ORIGINAL INSTRUCTIONS ROUTING MACHINE...
-
Page 2: Table Of Contents
This symbol indicates dangers to the health of persons due to hand injuries. Warning https://hub.trotec.com/?id=46397 This signal word indicates a hazard with an average risk level which, if not avoided, can result in serious injury or death. routing machine PRTS 10-1200... -
Page 3: Safety
• Do not use the power tool if the switch does not turn it or entangled cords increase the risk of electric shock. on and off. Any power tool that cannot be controlled with the switch is dangerous and must be repaired. routing machine PRTS 10-1200... - Page 4 • Use clamps or another practical way to secure and support the workpiece to a stable platform. Holding the workpiece by your hand or against the body leaves it unstable and may lead to loss of control. routing machine PRTS 10-1200...
- Page 5 Intended use Residual risks We recommend using the power tool with original Trotec Warning of electrical voltage accessories. Electric shock from insufficient insulation. Only use the device PRTS 10-1200 for: Check the device for damages and proper functioning • Milling before each use.
-
Page 6: Information About The Device
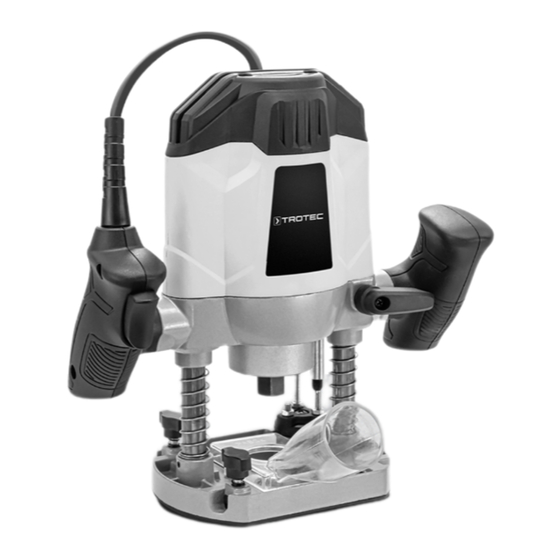
2. In an emergency, disconnect the device from the mains feed-in: Hold onto the mains plug while pulling the power cable out of the mains socket. 3. Do not reconnect a defective device to the mains. routing machine PRTS 10-1200... - Page 7 Guide rods Phillips screws Collet chuck 6 mm Collet chuck 8 mm Semicircular milling cutter 6 mm groove cutter 12 mm groove cutter V-groove cutter Rounding cutter Profile cutter Open-end wrench Centring tip with wing nut Rip fence Extraction adapter routing machine PRTS 10-1200...
- Page 8 All parts of an operating cycle must be considered for this (e.g. times at which the power tool is switched off and times when it is switched on but runs without load). routing machine PRTS 10-1200...
-
Page 9: Transport And Storage
Wear protective gloves! Note Never actuate the spindle lock (10) button while the tool is running! This may damage the tool. Note Only use milling cutters with a shank diameter suitable for the respective collet chuck installed. routing machine PRTS 10-1200... - Page 10 5. Tighten the union nut (31) using the open-end wrench (27) and let go of the spindle lock (10). 6. Make sure that the tool is attached securely. 4. Insert the 6 mm collet chuck into the collet chuck holder. routing machine PRTS 10-1200...
- Page 11 If required, you can first connect the reducer (15) to the adapter for dust extraction (30). If anything is unclear or if you have questions, please contact the manufacturer of your vacuum cleaner. routing machine PRTS 10-1200...
- Page 12 Turn counter-clockwise to increase the milling depth. Turn clockwise to decrease the milling depth. 10. After having adapted the fine adjustment, you can set the scale below the control dial (13) to position “0”. routing machine PRTS 10-1200...
-
Page 13: Operation
2. Check whether the inserted milling cutter is suitable for the intended application. 3. Check whether the workpiece is secured and the worktop prepared correspondingly. 4. Position the device on the workpiece. 5. Press the start lock (8) to be able to actuate the on/off switch (7). routing machine PRTS 10-1200... - Page 14 (7) again to switch off the device. 8. Set the device down in a stable position. 4. When you have reached the desired milling depth, lock the position with the locking lever for the milling depth lock (4) by turning it downwards. routing machine PRTS 10-1200...
- Page 15 1. Turn the step buffer (9) until it audibly engages at the highest step below the depth stop. 2. Set all further milling depths using the lower steps of the step buffer (9). routing machine PRTS 10-1200...
- Page 16 4. Pierce the centring tip (28) into the marked centre of the pressure on the rip fence. arc and perform the milling process with an even forward motion. routing machine PRTS 10-1200...
-
Page 17: Errors And Faults
• Make sure not to exert too much pressure on the device during operation. • Keep the venting slots clear to prevent the motor from overheating. • Wait for at least 10 minutes before switching the device back on. routing machine PRTS 10-1200... -
Page 18: Maintenance
EU countries on the website Please contact the customer service. If necessary, bring the https://hub.trotec.com/?id=45090. Otherwise, please contact an device to an authorised specialist electrical company or to official recycling centre for electronic and electrical equipment Trotec for repair. -
Page 19: Declaration Of Conformity
Declaration of conformity Declaration of conformity in accordance with the EC Machinery Directive 2006/42/EC, Annex II, Part 1, Section A We – Trotec GmbH – declare in sole responsibility that the product designated below was developed, constructed and produced in compliance with the requirements of the EC Machinery Directive in the version 2006/42/EC. - Page 20 Trotec GmbH Grebbener Str. 7 D-52525 Heinsberg +49 2452 962-400 +49 2452 962-200 info@trotec.com www.trotec.com...
Need help?
Do you have a question about the PRTS 10-1200 and is the answer not in the manual?
Questions and answers