Table of Contents
Advertisement
Quick Links
Advertisement
Table of Contents

Related Manuals for Strymon Lex rotary


Summary of Contents for Strymon Lex rotary
- Page 1 USER MANUAL...
-
Page 2: Table Of Contents
Appendix 1: Sample Settings ������������������������������������������������������������������������� 34 Appendix 2: Power Up Modes Quick Reference ��������������������������������������������� 36 General Options ���������������������������������������������������������������������������������������������������������� 37 MIDI & Jack Options ��������������������������������������������������������������������������������������������������� 38 Appendix 3: Live Edit Controls Quick Reference �������������������������������������������� 39 Strymon Non-Transferable Limited Warranty ����������������������������������������������� 41... -
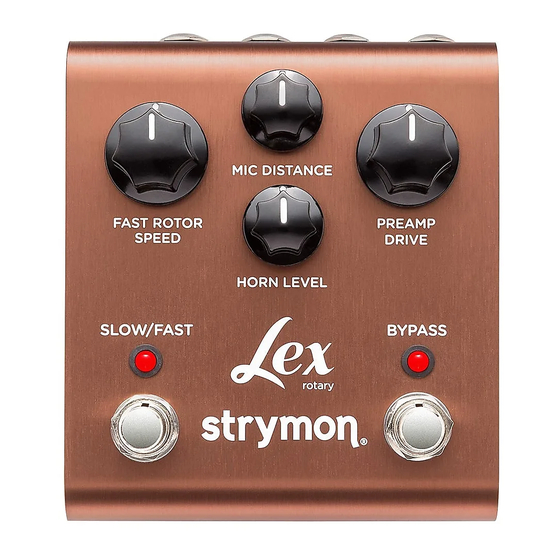
Page 3: Knobs And Switches
- rotary Knobs and Switches Front Panel Controls Changes the position of the stereo microphones relative to the cabinet� front: picks up the sound from the partially covered front of the cabinet rear: picks up the sound from the open back of the cabinet SPEED Controls the rotor speed for the SLOW and FAST modes, as currently selected by the... - Page 4 - rotary Knobs and Switches Front Panel Controls RAMP Controls how quickly the rotors transition when switching between speeds via the SLOW/FAST switch� The rotors accel- erate independently, with the low-frequency rotor accelerating more slowly, just like a physical rotating speaker system� VOLUME Controls the +/-6dB boost or cut when the pedal is engaged�...
-
Page 5: Rear Panel I/O And Control
- rotary Rear Panel I/O and Control AUDIO INPUT SELECTOR MONO : Use with a mono input signal, such as a guitar� Output is stereo� Use OUT L for mono connection� STEREO : Use with a stereo input signal� Output is stereo� OUTPUTS High impedance, ultra low- Low impedance stereo outputs�... - Page 6 - rotary Rear Panel I/O and Control (cont.) 9VDC Computer connection for MIDI Use the included power control as well as for perform- supply or an adapter with the ing firmware updates� following rating: • 9VDC, center negative • 300mA minimum EXP / MIDI Multifunction communication jack for external control of Lex’s features and functions�...
-
Page 7: Live Edit Functions
- rotary Live Edit Functions Use the following steps to enter Live Edit mode and access the second- ary functions of the controls� Any of the following secondary functions can be edited while in Live Edit mode� Bi-Amp Output Mode Allows you to enable Bi-Amp Output mode rather than the default stereo output�... -
Page 8: Cab Filter
- rotary Live Edit Functions Cab Filter Optimizes the output signal for use either into the front of a guitar am- plifier or a full range speaker system� Press and hold the ON footswitch to enter Live Edit mode� Once both LEDs flash, release the footswitch�... -
Page 9: Midi Clock Sync
- rotary Live Edit Functions MIDI Clock Sync Selects whether Lex’s Speed will sync to incoming MIDI Clock messages� Press and hold the ON footswitch� Once both LEDs flash, release the footswitch� Set the position of the RAMP switch to select whether Lex will sync to incoming MIDI Clock messages�... -
Page 10: Respond/Ignore Midi Expression
- rotary Live Edit Functions Respond/Ignore MIDI Expression When set to MIDI mode, this setting selects whether Lex will respond to MIDI Expression CC# 100 to control the knob settings in the same manner as a TRS Expression pedal� Press and hold the ON footswitch� Once both LEDs flash, release the footswitch�... -
Page 11: Power Up Modes
- rotary Power Up Modes Input Level Selects the input level that is routed to the effect processing� Press and hold the ON footswitch while powering up Lex� Once both LEDs flash, release the footswitch� Turn the SPEED knob to select the Input Level mode� The SLOW/ FAST LED will change color to indicate the current status as you turn the knob�... -
Page 12: Bypass Mode
- rotary Power Up Modes Bypass Mode Setting Lex to Buffered Bypass mode preserves the high frequency response of your instrument’s signal through your pedal chain and long cable runs� Press and hold the ON footswitch while powering up Lex� Once both LEDs flash, release the footswitch�... -
Page 13: Configuring The Exp/Midi Jack
Strymon MultiSwitch Plus� Full MIDI functionality is available by sending MIDI Program Change messages via 1/4" MIDI connection using a Strymon Conduit or MIDI EXP cable� Up to 300 presets are available via MIDI� (See “Configuring MultiSwitch Plus” on page “Saving Presets in MIDI Mode”... - Page 14 - rotary Configuring the EXP/MIDI Jack (cont�) Press either footswitch to store the EXP/MIDI jack mode and begin using Lex� NOTE: The EXP/MIDI jack mode setting persists across power cycles and is not saved per preset� pg 14...
-
Page 15: External Control
- rotary External Control Expression Pedal Setup Use a TRS expression pedal to control the knobs of Lex� Configure the EXP/MIDI jack for Expression mode� See page 13 configuration instructions� RIGHT IN LEFT OUT RIGHT OUT MIDI IN MIDI OUT Connect an expression pedal to the EXP/MIDI jack of Lex using a TRS cable�... -
Page 16: External Speed Switch Mode
- rotary External Control External Speed Switch Mode Connect a MiniSwitch or other external latching footswitch with a TRS cable to toggle between the fast and slow speeds� Configure the EXP/MIDI jack for External Speed Switch Mode� (See page 13 for more info�) Connect an external switch with a TRS cable to the EXP/MIDI jack�... -
Page 17: Favorite Switch Setup And Compare Mode
- rotary External Control Favorite Switch Setup and Compare Mode Connect a MiniSwitch or other external latching footswitch with a TRS cable to store and recall your favorite setting� Configure the EXP/MIDI jack for Favorite mode� (See page 13 details�) Connect an external switch with a TRS cable to the EXP/MIDI jack�... - Page 18 - rotary Favorite Switch Setup and Compare Mode (cont�) Compare Mode With the Favorite or MIDI preset recalled, as a knob or switch is ad- GREEN justed, both LEDs flash when the current knob or toggle switch position matches the setting of the preset� NOTE: Along with the knobs and toggle switches on the face of the pedal, all Live Edit settings and Lex’s bypass state are stored with the Favorite and MIDI presets�...
-
Page 19: Tap Mode
- rotary External Control Tap Mode Connect a MiniSwitch or other external momentary footswitch with a TRS cable to tap in the speed of the rotating speaker� Configure the EXP/MIDI jack for Tap mode� (See page 13 for more info�) Connect an external switch with a TRS cable to the EXP/MIDI jack�... -
Page 20: Configuring Multiswitch Plus
- rotary External Control Configuring MultiSwitch Plus Configure Lex and MultiSwitch Plus for remote access to three additional presets� Press and hold the SLOW/FAST footswitch while connecting power to the pedal� Hold until both LEDs stop blinking� Turn the SPEED knob all the way counter-clockwise to set the MIDI channel to Channel 1�... -
Page 21: Using Multiswitch Plus
- rotary External Control Using MultiSwitch Plus Selecting and saving Lex presets using MultiSwitch Plus� Preset 1 Preset 2 Preset 3 NOTE: Footswitches A, B, and C on MultiSwitch Plus correspond to MIDI Program Changes 1, 2, and 3� Step on a switch that is not illuminated to recall the corresponding preset�... -
Page 22: Midi Functionality
Lex EXP/MIDI jack� This requires a Strymon MIDI EXP cable or a MIDI controller/interface, such as Strymon Conduit, with at least one quarter-inch output� NOTE: When using a Strymon MIDI EXP Cable, the MIDI OUT mode must be set to Off� (See page 26 for details�) - Page 23 - rotary Configuring Lex to Use MIDI (cont�) STEP 1 – SET EXP/MIDI JACK TO MIDI MODE Press and hold the SLOW/FAST footswitch while connecting power to the pedal� Once both LEDs flash, release the footswitch� Turn the VOLUME knob clockwise until the ON LED is BLUE� pg 23...
- Page 24 - rotary Configuring Lex to Use MIDI (cont�) STEP 2 – SET MIDI CHANNEL Turn the SPEED knob to set the MIDI communication channel� The SLOW/FAST LED indicates status� Your SPEED knob selections are as follows: • Channel 1: GREEN (default) •...
- Page 25 #102 with a value of 127 when the ON footswitch is off� This will enable the ON footswitch if MIDI is properly connected and configured� NOTE: If you are only sending data to Lex using the Strymon MIDI EXP Cable, page 26 the MIDI OUT mode must be set to OFF�...
- Page 26 - rotary Configuring Lex to Use MIDI (cont�) STEP 3 – SET MIDI OUT MODE Press and hold the SLOW/FAST footswitch while connecting power to the pedal� Once both LEDs flash, release the footswitch� Turn the HORN LEVEL knob to select what kind of MIDI data is sent from Lex to other MIDI devices�...
-
Page 27: Saving Presets In Midi Mode
- rotary MIDI Functionality (cont.) Saving Presets in MIDI Mode When in MIDI mode, the currently loaded settings can be saved to any of Lex’s 300 preset locations at any time� To enter Save mode, press and hold BOTH footswitches� Both LEDs will blink GREEN to indicate that Lex is waiting to receive a MIDI... -
Page 28: Midi Specifications
- rotary MIDI Specifications MIDI Program Changes Lex contains 300 preset locations, numbered sequentially from 0-299� Because MIDI Program Change messages have a maximum number of 128 (0-127), the presets are grouped into three MIDI patch banks� MIDI BANK 0 = PRESETS 0-127 MIDI BANK 1 = PRESETS 128-255 MIDI BANK 2 = PRESETS 256-299 0 Favorite setting (accessible via MiniSwitch) -
Page 29: Midi Ccs
- rotary MIDI Specifications (cont.) MIDI CCs LEX - MIDI CC NUMBERS PARAMETER RANGE VALUE Bank Select (0=Bank 1, 1=Bank 2, 2=Bank 3) (1=front, 2=rear) Speed 0-127 Speed (Full Range) 0-127 Mic Distance 0-127 Horn Level 0-127 Ramp (1=slow, 2=med, 3=fast) Volume 0-127 0-127... -
Page 30: Factory Reset
- rotary Factory Reset Performing a Factory Reset restores the pedal to its factory default Power-up modes and secondary functions, and replaces all stored pre- sets with their factory default settings� Press and hold the ON footswitch while connecting power to the pedal� Once both LEDs flash, release the footswitch�... - Page 31 - rotary Factory Reset (cont.) FACTORY DEFAULT SETTINGS EXP/MIDI Jack: Assigned to Expression mode and configured to control the SPEED knob Input Level: Instrument Bypass Mode: True Bypass MIDI Channel: 1 MIDI OUT Mode: Off MIDI Clock Sync: Off MIDI Expression: On Live Edit, Secondary BI-AMP OUTPUT MODE = 0% (Stereo)
-
Page 32: Features
• Two Live Edit, secondary parameters: Bi-Amp and Guitar Amp/Full Range Speaker Output Modes • Remote switching of SLOW / FAST speeds with a Strymon MiniSwitch, with BRAKE feature • True bypass (electromechanical relay switching) • Ultra low noise, high performance A/D and D/A converters •... -
Page 33: Specifications
Use an adapter with the following rating: 9VDC, center negative, 300mA minimum� © 2022 Damage Control Engineering, LLC� Strymon, the Strymon logo, and Damage Control Engineering are trademarks or registered trademarks of Damage Control Engineering, LLC� in the U�S� and/or other jurisdictions� pg 33... -
Page 34: Appendix 1: Sample Settings
- rotary Appendix 1: Sample Settings pg 34... - Page 35 - rotary Sample Settings ALMOST PINKISH ROOTSY BE THREE Rotor Speed: Slow Rotor Speed: Fast MIDI Program Change 0 MIDI Program Change 1 MiniSwitch Favorite MultiSwitch Plus A LAZY RIVER SLOW SWIRLY CHORUS Rotor Speed: Slow Rotor Speed: Slow MIDI Program Change 2 MIDI Program Change 3 MultiSwitch Plus B MultiSwitch Plus C...
-
Page 36: Appendix 2: Power Up Modes Quick Reference
- rotary Appendix 2: Power Up Modes Quick Reference pg 36... -
Page 37: General Options
- rotary Power Up Modes Quick Reference Global parameters and functions can be accessed via a power up proce- dure� All power up functions persist through power cycles� General Options Press and hold the ON footswitch while powering up Lex� Once both LEDs flash, release the footswitch�... -
Page 38: Midi & Jack Options
- rotary Power Up Modes Quick Reference (cont.) Global parameters and functions can be accessed via a power up proce- dure� All power up functions persist through power cycles� MIDI & Jack Options Press and hold the SLOW/FAST footswitch while powering up Lex� Once both LEDs flash, release the footswitch�... -
Page 39: Appendix 3: Live Edit Controls Quick Reference
- rotary Appendix 3: Live Edit Controls Quick Reference pg 39... - Page 40 - rotary Live Edit Controls Quick Reference Lex provides a way to adjust several secondary functions that are avail- able on several knobs (also, see “Live Edit Functions” on page 7)� Live Edit Functions are saved per preset� Press and hold the ON footswitch until both LEDs blink to enter Live Edit mode�...
-
Page 41: Strymon Non-Transferable Limited Warranty
In no event will Strymon be liable for more than the amount of the purchase price, not to exceed the current retail price of the prod- uct�...
Need help?
Do you have a question about the Lex rotary and is the answer not in the manual?
Questions and answers