Table of Contents
Advertisement
Quick Links
GENERAL:
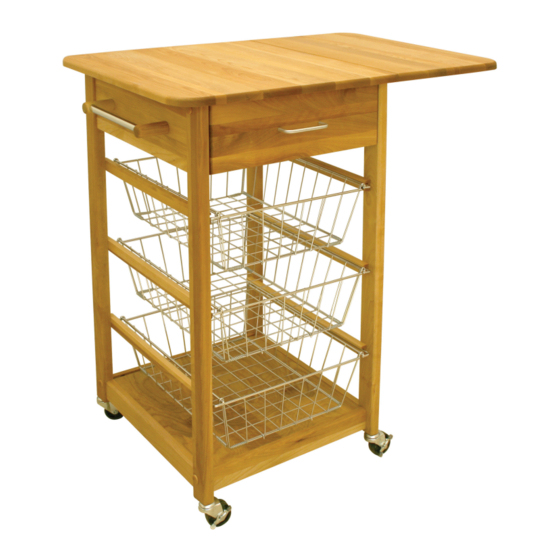
1. You have purchased model 7225. Overall dimensions of an assembled unit are 20 3/4 in. wide x 21 in.
deep x 35 1/2 in. high
2. Should you need assistance or need to replace a damaged or missing part, DO NOT RETURN THE
UNIT TO THE STORE where you purchased it, simply give us a call at 607-652-7321 from 7:30 AM-
4:00 PM EST and we will send you the prepaid part via UPS usually that same day!
3. Read the assembly instructions and the enclosed brochure before beginning assembly. Assembly is
very easy if you read and follow the instructions step by step.
4. Tool required: Phillips screwdrivers, medium and small; medium flat blade screwdriver and a hammer
5. See assembly video on our website: www.catskillcraftsmen.com
Assembly Instructions
Model 7225
Single Drop Leaf Basket Cart
Advertisement
Table of Contents

Related Manuals for CATSKILL 7225


Summary of Contents for CATSKILL 7225
- Page 1 Single Drop Leaf Basket Cart GENERAL: 1. You have purchased model 7225. Overall dimensions of an assembled unit are 20 3/4 in. wide x 21 in. deep x 35 1/2 in. high 2. Should you need assistance or need to replace a damaged or missing part, DO NOT RETURN THE...
-
Page 2: Cabinet Parts
Drawer Back P/N DBK-7225 (1) Drawer Front P/N DF-7225 (1) Top Back Brace P/N B-15 7/8-5 3/4-TB (1) Drawer Side/Right P/N DS-7225/R Top Left Brace P/N B-15 3/8-5 3/4-TS-7225 (1) Bottom Front Brace P/N B-15 7/8-BF-BB-7225 (2) Drawer Side/Left P/N DS-7225/L Drilled for Glide... - Page 3 HARDWARE 10-24 Hex Nut (8) Hinge (2) 1 3/4” Phillips Flat Head Bolt (8) “Z” Bracket (2) (Attaches Top Front Brace to Table Top) 1 3/4” Phillips Flat Head #8 Screw (2) Handle (1) 5/8” Wooden Disk (8) 1 1/4” Phillips Flat Head #8 Screw (16) Bastion Post (10) (Attaches Towel Bar) 1 ”...
- Page 4 TIPS ON HOW THE BASTION FASTENING SYSTEM WORKS 1. The Bastion fastening system consists of a steel post (threaded on one end with a hole through the shaft on the other end); a Barrel Nut (cylindrical barrel-shaped with threaded Illustration Bas. 1 open end &...
-
Page 5: Drawer Assembly
STEP 1 Drawer Assembly Tap in post with hammer to start and screw down with a screwdriver until the shoulder of the post hits the wood. Then unscrew until the hole is parallel with the groove on the bottom of the Drawer Front. To understand how the bastion fastening system works see “Tips on how the Bastion System Works”... - Page 6 STEP 2 Tabletop Assembly A. Attach hinges to the tabletop and drop leaf using 5/8” Phillips Flat Head #8 screws. The long edge of the hinge goes to the drop leaf. 5/8” #8 B. Attach the Drop Leaf Support using 5/8” Phillips Flat Head #8 screws.
-
Page 7: Left Side Assembly
STEP 4 Left Side Assembly Bastion Post Set Screw 1” #8 Barrel Nut Not Used Not Used A. Insert Bastion Posts into the top hole in the legs as illustrated. B. Attach the Top Left Brace using Bastions. C. Attach the Towel Bar using 1” #8 Flat Head Screws. D. -
Page 8: Right Side Assembly
STEP 5 Right Side Assembly Set Screw Bastion Post Barrel Nut Not Used Not Used A. Insert Bastion Posts into the top hole in the legs as illustrated. B. Attach the Top Left Brace using Bastions. C. Attach Bottom Brace using Bastions and pins. - Page 9 STEP 6 Basket Rail Assembly A. Attach the Cabinet Side Glide to the Top Right Brace using 5/8” #7 screws. Made sure the glide wheel overlaps the front leg and line up 2 pilot holes. B. Attach the Basket Rails using 1 1/4” #8 screws. Left Side Right Side 5/8”...
-
Page 10: Back Assembly
STEP 7 Back Assembly A. Attach the Top Back Brace using 1 3/4” Machine Screws and a nut. B. Attach the Bottom Back Brace using 1 3/4” Machine Screws and a nut. 1 3/4” Machine Screw 1” Pin Inside Brace Side Panel Leg Note: Put the nut on the tip Hex Nut... -
Page 11: Front Assembly
STEP 8 Front Assembly A. Attach the Top Front Brace using 1 3/4” Machine Screws and a nut. B. Attach the Bottom Front Brace using 1 3/4” Machine Screws and a nut. 1 3/4” Machine Screw 1” Pin 1” Pin 1”... - Page 12 STEP 9 Top Attachment Invert the Cart Base and posi- tion onto the Cart Top. Fit the “Z” Brackets into the slot across the Top Back Brace. Align the holes in the Top Front Brace with the pilot holes at the front of the Cart Top.
-
Page 13: Main Assembly
STEP 10 Main Assembly A. Insert the Bottom Shelf onto the Shelf Support Pins. B. Insert the Wire Baskets onto the Basket Rails C. Insert the wooden disks into the 8 machine screw holes. Tap in with a hammer. NOTE: It may be a good idea to tighten all machine screws prior to inserting the wooden disks. - Page 14 Visa and Address _____________________________ Mastercard are accepted online. City ________________________________ State ________________ Zip ___________ Catskill Craftsmen, Inc. Please make checks payable to Catskill Craftsmen Inc. 15 West End Ave. 15 West End Ave., Stamford, NY 12167-1296 Stamford, NY 12167-1296...
Need help?
Do you have a question about the 7225 and is the answer not in the manual?
Questions and answers