Advertisement
Quick Links
Assembly Instructions
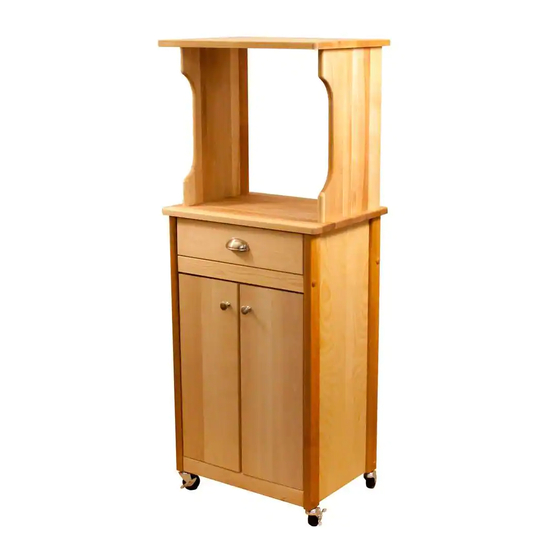
Model 51530
Hutch Top Cuisine Cart
GENERAL:
1. You have purchased model 51530.
2. Should you need assistance or need to replace a damaged or missing part, DO NOT RETURN THE UNIT
TO THE STORE where you purchased it, simply give us a call at 607-652-7321 from 7:30 - 4:00 PM Eastern
time and we'll send you the prepaid part via UPS usually that same day! Please have model number and
part description ready when you call.
3. Read the assembly instructions and the enclosed brochure before beginning assembly. Assembly is easy
if you read and follow the instructions step by step.
4. Tools required: Phillips screwdrivers, medium and small; medium flat blade screwdriver and hammer.
Advertisement

Subscribe to Our Youtube Channel
Related Manuals for CATSKILL 51530


Summary of Contents for CATSKILL 51530
- Page 1 Hutch Top Cuisine Cart GENERAL: 1. You have purchased model 51530. 2. Should you need assistance or need to replace a damaged or missing part, DO NOT RETURN THE UNIT TO THE STORE where you purchased it, simply give us a call at 607-652-7321 from 7:30 - 4:00 PM Eastern time and we’ll send you the prepaid part via UPS usually that same day! Please have model number and...
- Page 2 CABINET PARTS Cabinet Top (1) Drawer Front (1) Side Panel (2) Back Panel (1) Drawer Back (1) Drawer Bottom (1) Middle Shelf has edge banding Drawer Side Right (1) Left Door (1) Right Door (1) Drawer Side Left (1) Middle Shelf (1) Bottom Shelf (1) RACK PARTS Middle Brace (1)
-
Page 3: Table Of Contents
CABINET HARDWARE (Cabinet Assembly) 1 3/4” Phillips Flat Head Machine Screw (8) 3/16” Flat Washer (2) Cam (2) (Drawer Back, Table Top Sticks) 1 1/4” Phillips Flat Head #8 Screw (20) (Knobs) 1 1/4” Truss Head Machine Screw (2) 10-24 Hex Nut (8) 5/8 Wooden Disk (8) (Drawer Handle) 1/2”... -
Page 4: 1/4" Phillips Flat Head #8 Screw
STEP 1 1. Attach the Rack Top to the top ends of the Side Panels (universal: same left/right & top/bottom) using 1 1/4” #8 bronze wood screws. MAKE SURE YOU HAVE THE RACK TOP! The only difference between the Rack Top and the Cabinet Top is that the Cabinet Top has 4 small pilot holes on the bottom side plus the 4 through holes;... - Page 5 STEP 2 Prep Sides A. Attach Table Top Sticks to the top of both side panels with 1 1/4” #8 screws. Counter sunk holes in stocks are up. B. Tap 1” pins into bottom sets of holes. Middle holes are adjustments for middle shelf. 1 1/4”...
- Page 6 STEP 3 A. Lay Back Panel flat on a smooth surface with holes up. B. Attach Side Panels with 1 3/4” bolts and hex nuts. After inserting bolt(s) thru the holes in the Side Panels, thru the holes in the long edges of the Back Panel, place a hex nut on the tip of your finger, align nut with bolt and tighten.
- Page 7 STEP 5 Attach Side/Back Assembly to Bottom of the Cabinet Top. 1” Pin 1” Pin Drawer Dowel Hole 1 1/4” Screw...
-
Page 8: 1/4" Truss Head Machine Screw
STEP 6 1 1/4 #8 Screws A. Attach the drawer back to the drawer sides with four 1 1/4” #8 screws. Make sure parts are aligned Drawer Back as in illustration 4A. B. Insert drawer bottom into the slots in the drawer sides, best side to inside of drawer. -
Page 9: Door Knob
STEP 7 Insert Drawer Dowel through Drawer Back into hole in Back Panel. Back Panel Drawer Back Drawer Dowel Place drawer in position upside down STEP 8 5/8” #8 Screw Door Assembly 1/2” Flat 1 1/2” Pin Head #4 Machine Magnet Plate Screw Screw... - Page 10 STEP 9 Brace Preparation Bottom Front Brace Top Front Brace Note: O.K. if pins are loose! 3/4” Pin Install 3/4” pins in brace ends STEP 10 Install Top Brace A. Insert end of drawer dowel into hole on inside of Top Front Brace. Leg Slot B.
- Page 11 STEP 11 Install Doors/Front Bottom Brace A. Insert door pins into the holes Washer in the Top Brace. 1 3/4” Machine Screw B. Place a Washer on bottom pins of doors. Seat bottom front brace on pins and secure brace with 1 3/4 in. Machine Screws/Nuts.
- Page 12 STEP 13 Install Castors A. Tap in Castor Sleeves until teeth bite wood. DO NOT POUND FLAT. Locking wheels go in the front.
- Page 13 STEP 14 Insert Shelves A. Turn cart upright. B. Place Bottom Shelf on back pins and close door, shelf will drop into place. Place middle shelf on pins.
- Page 14 STEP 15 Insert Wood Plugs Tap in the 5/8” wooden disks. If you are afraid of marring the disks put a piece of paper over them before tapping them in. 5/8” Wooden disk...
- Page 15 Catskill Craftsmen’s factory. For Please send me______# of bottle(s) of the one eight ounce (8 fl. oz.) bottle, which Catskill Craftsmen Butcher Block Oil at $6.95 is sufficient for two applications, simply per bottle. My check or money order is send $6.95 along with the completed...
Need help?
Do you have a question about the 51530 and is the answer not in the manual?
Questions and answers