Atmos Scope Operating Instructions Manual
Hide thumbs
Also See for Scope:
- Operating instructions manual (32 pages) ,
- Operating instructions manual (68 pages)
Table of Contents
Advertisement
Quick Links
Advertisement
Table of Contents

Related Manuals for Atmos Scope


Summary of Contents for Atmos Scope
- Page 1 Operating Instructions ATMOS Scope English GA1GB.150259.0 2022-03 Index 03...
-
Page 2: Table Of Contents
3.5.1 Required additional devices ................20 3.5.2 Installation of ATMOS Capture Suite Basic ............20 3.5.3 Installation of the ATMOS Scope using ATMOS Capture Suite Basic .....21 Checks and tests ......................21 3.6.1 Checking the glass surfaces ................22 3.6.2 Performing a leakage test ..................22... - Page 3 Operation ......................25 Use/operation ......................25 4.1.1 Switching on and adjusting the system ............25 4.1.2 Functions of the buttons with the ATMOS Capture Suite .......25 Reprocessing ....................27 Safety instructions for reprocessing ..............27 5.1.1 General safety instructions ................27 5.1.2 Danger for users, patients, and third parties ..........28 5.1.3...
-
Page 4: Introduction
This document may only be re- printed, either in part or in whole, with written permission from ATMOS. These operating instructions must always be kept available near the product. - Page 5 The Declarations of Conformity and our General Terms and Conditions can be viewed on our website at www.atmosmed.com The quality management system at ATMOS has been certifi ed according to international standard EN ISO 13485. These operating instructions are valid for the following devices: •...
-
Page 6: Explanation Of Pictures And Symbols
Explanation of pictures and symbols In the operating instructions DANGER Warning of a danger that will result in immediate fatal or serious injury. Observe the necessary measures. WARNING Warning of a danger that can cause fatal or serious injury. Observe the necessary measures. - Page 7 Notice of potential material damage. Useful information on the handling of the device. & Action. Proceed step by step. » Result of an action. Move, plug in this direction. Engage, check correct fi t. click On device and type plate Follow operating instructions (blue) This device complies with the relevant requirements of EU regulations.
- Page 8 Date of manufacture Country of manufacture: Germany Serial number Reference number IP68 Degree of protection Protection class II device Professional disposal Type BF applied part Medical device This device complies with the relevant requirements of the Eurasian Economic Union. Introduction...
-
Page 9: Intended Purpose
Intended purpose Product name: ATMOS Scope Main functions: For short-term endoscopic application in natural orifices for the visualization of existing structures Intended purpose: For endoscopic examination in humans Intended users / User Doctors and medical specialists who are specially profile: trained in the handling of endoscopes. - Page 10 Application period: Transient (< 60 min) Application environ- Outpatient medical facilities, e.g., ENT practices, hospital ment: outpatient departments, medical care centers Patient selection None criteria: Indications: Need for visual inspection of anatomy in defined organs Medical contra-indica- Non-intact mucosa in the area of the application organs tions: Other contra-indica- None...
-
Page 11: Function
Scope of delivery Prior to dispatch, the ATMOS Scope was subjected to an extensive functional test and was carefully packed. Nevertheless, please compare the contents of the shipment on completeness immediately upon receipt (see delivery note). - Page 12 • Leakage tester • Adapter for leakage test • Attachment for pressure compensation including information tag on pressure compensation • Infection control return bag • ATMOS Capture Suite Basic 507.7060.0 ATMOS Scope iPrime Set includes: • Endoscope • Leakage tester •...
-
Page 13: Transport And Storage
Only transport the device in a shipping carton that is padded and off ers suffi cient protection. If damage occurs during transport: Document and report damages in transit. Send the device to ATMOS (see chapter “6.2 Sending in the device” on page 40). Introduction... - Page 14 Environmental conditions for transport and storage: • Temperature range −30...+50 °C • Air humidity without condensation 5...90 % • Air pressure 700...1060 hPa Please observe the notes on pressure compensation (screw on the adapter). & Introduction...
-
Page 15: Notes For Your Safety
Check the device for leak tightness (see chapter “3.6.2 Performing a leakage test” on page 22). Do not operate the device if the leakage test is failed. In this case, clean and disinfect the device and send it to ATMOS for repair. Notes for your safety... - Page 16 • Do not modify the device without the manufacturer’s permission. • During prolonged use of the ATMOS Scope, the distal endoscope tip can heat up to 53.5 °C. • Never leave the patient unattended near the device.
-
Page 17: Avoiding Damage To The Device
Make sure that both the USB cable and the distal tube are not pinched, squeezed, knotted, or clamped off. • Do not pull on the USB cable or distal tube of the ATMOS Scope. The pressure compensation valve may only be used with ATMOS accessories and can be fixed without tools. -
Page 18: Setting Up And Starting Up
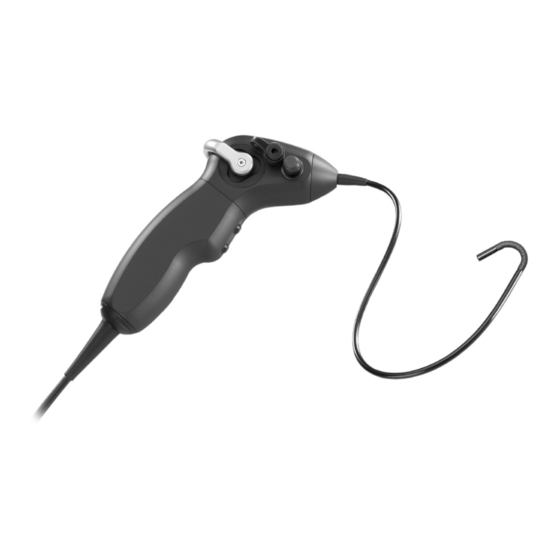
Setting up and starting up Device overview Setting up and starting up... -
Page 19: Leakage Tester And Tube
Only qualifi ed personnel are authorized to install electrical systems. The manufactur- er of an electrical medical system is responsible for ensuring that the performance, safety, technical data, and intended use of the ATMOS Scope are not impaired. Observe the following information when connecting the device in the required... -
Page 20: Preparing The Device
Risk of injury and risk of infection due to production residues. Prior to fi rst use, reprocess the product according to the operating instructions. Check the leak tightness of the ATMOS Scope according to the operating instruc- tions (see “3.6.2 Performing a leakage test” on page 22). -
Page 21: Installation Of The Atmos Scope Using Atmos Capture Suite Basic
Click on “Capture Suite Basic“. Restart your computer. Installation is complete. 3.5.3 Installation of the ATMOS Scope using ATMOS Capture Suite Basic Launch the software. Open the settings. Select the ATMOS Scope as source. Close the software. Restart your computer. -
Page 22: Checking The Glass Surfaces
3.6.1 Checking the glass surfaces • Visual inspection of the glass surfaces. The surfaces must be clean and smooth. • If impairments are found during inspection, observe the notes on the cause and how to remedy it in the chapter “7 Troubleshooting” on page 42. 3.6.2 Performing a leakage test •... - Page 23 The leakage tester must not be immersed in water and may only be cleaned by & wipe disinfection. Never connect or disconnect the leakage tester from the endoscope under & water. Never immerse the endoscope in liquid if there is a pressure drop. &...
- Page 24 CAUTION Risk for patients Risk for patients due to the use of products with sharp edges or otherwise dangerous surface damage. • Do not use these products any longer. CAUTION Damaged products Do not use products with a damaged camera chip (e.g. recognizable by image inter- ferences), damaged glass surfaces, or stubborn deposits that cannot be removed by cleaning.
-
Page 25: Operation
• Do not knock the distal end against hard surfaces. • Do not knock or drop the ATMOS Scope, and protect it from blows and impacts. • Do not bend, kink, pull, or squeeze the insertion and distal tube. The outer sheath and inner components could become damaged. - Page 26 The two buttons on the handle body can be set in the software ATMOS Capture Suite HD. In the photo mode of the programs, “Trigger snapshot” is stored by default on the upper button and “Switch to video function” on the lower button. In the video mode of the programs, the upper button is “Video start/stop”...
-
Page 27: Reprocessing
Reprocessing Safety instructions for reprocessing 5.1.1 General safety instructions We recommend that you always document any maintenance work and also any exchange of parts. It is the responsibility of the user to ensure that the required results of cleaning and disinfection are achieved. -
Page 28: Danger For Users, Patients, And Third Parties
5.1.2 Danger for users, patients, and third parties Risk of infection due to unsuitable aids and tools Deadly diseases can be transmitted. • Always wear your own personal protective equipment. The protective equipment consists of protective gloves, protective clothing, safety goggles, and mouth and nose protection for all steps in which the product components are contaminat- •... - Page 29 Follow the corresponding operating instructions of all aids, tools, and devices used. Unsuitable cleaning agents and disinfectants The product may become damaged. Do not use any process chemicals containing the following ingredients on the ATMOS Scope as well as for all accessories: • Chloramines •...
-
Page 30: Further Cleaning Instructions
Image quality can be reduced even by the slightest contamination such as finger- prints on the tip cover glass. After use, you can protect the ATMOS Scope from dust by storing it on a soft cloth and covering it. Preparing and completing reprocessing Prior to reprocessing Prior to cleaning, put the protection cap onto the USB connector. -
Page 31: Preparing Surfaces
Move the deflection lever several times and check that it moves easily and that the distal end moves properly. Check the ATMOS Scope for leak tightness using the manual leakage tester (see chapter “3.6.2 Performing a leakage test” on page 22). -
Page 32: Selecting Process Chemicals
Selecting process chemicals Material compatibility tests using the following cleaning agents and disinfectants were carried out for the ATMOS Scope. Please follow the instructions specified by the manufacturer of the cleaning agents and disinfectants, particularly with regard to concentrations, temperature, duration of use, and contact times as well as protective measures. - Page 33 Prolystica, Steris Alcohols, C9–11, ethoxylated surfactant 5 % Liquid concentrate Glycerin 5 % Citric acid 5 % N,N-Dimethyloctadecylamine oxide 2 % Proteolytic enzymes 1 % Gigazyme, Schülke & Nonionic surfactants, enzymes, fragrances 5–15 % Liquid concentrate Mayr Helizyme, BBraun Surfactants, enzymes, complexing agents, corrosion inhibitors, Liquid concentrate additives mikrozid®...
- Page 34 Gigasept FF, Schülke 93.9 g reaction product of DMO-THF, ethanol and water Liquid concentrate & Mayr mikrozid® sensitive 0.25 g Alkyl (C12–16) dimethylbenzylammonium chloride Wipes Ready-to-use wipes, Schülke & Mayr 0.25 g Didecyldimethylammonium chloride 0.25 g Alkyl (C12–14) ethylbenzylammonium chloride Helipur® H plus N, Aldehydes Liquid concentrate BBraun...
-
Page 35: Manual Cleaning And Disinfection
• With the insertion tube lying in the solution, clean it with a soft • Soft cloth cloth and clean the ATMOS Scope handle with a soft cleaning • Soft nylon brush 1 min brush until no residue is visible on the surface. - Page 36 Intermediate rinsing: • Fill the sink with enough drinking water so that the ATMOS Scope • Drinking water is completely immersed. • Water jet gun for 60 s • Set the pressure for the water jet gun to maximum 2 bar.
-
Page 37: Mechanical Cleaning And Disinfection
• Connect the tube for the leakage tester to the pressure compensation valve 2 of the ATMOS Scope handle and use an adapter if necessary. The validation that the product can be cleaned and disinfected has been conducted using the washer-disinfector for flexible endoscopes from Belimed Type WD 430 with the rack Endoscopy 2 level. - Page 38 Bristles: nylon attention to crevices and hidden areas. Hardness: soft) Mechanical cleaning and disinfection: • Lay the ATMOS Scope on the silicone bubble mat and fix • Pre-rinse: 3 min the insertion tube at a minimum of 2 places. • Drain •...
-
Page 39: Sterilization
Checking and maintaining: • Check whether reprocessing was successful using a suitable light magnifier. The ATMOS Scope must be free of particles and organic material. 5.3.5 Sterilization Do not autoclave the product. & Prior to sterilization, ensure that the product does not show any reduction in usability and no visible moisture on the surface (crevices or blind holes) in accordance with chapter “3.6 Checks and tests”... -
Page 40: Maintenance And Service
To carry out these measures, the person must have the necessary test devices and original spare parts. ATMOS recommends: Work should be carried out by an authorized ATMOS service partner. This ensures that repairs and testing are carried out professionally, original spare parts are used, and warranty claims remain unaffected. -
Page 41: Warranty
Place the QD 434 “Delivery complaint / return shipment” form and the respective decontamination certificate in an envelope. Affix the envelope to the outside of the package. Send the product to ATMOS or your dealer. Warranty The manufacturer grants a 24-month warranty on the product’s function. This war-... -
Page 42: Troubleshooting
Glass surfaces are Clean glass surfaces in accord- dirty ance with chapter “5.3 Preparing surfaces” on page 31 Leaky, defective Send in the ATMOS Scope for repair lens system Image is too dark, Glass surfaces are Remove residues according to... - Page 43 Error symptom Possible cause Remedy Corrosion, staining, Inadequate cleaning Clean again, rub thoroughly if discolorations (e.g., protein residue) necessary Inadequate rinsing Ensure adequate rinsing between of the endoscope the reprocessing phases between reprocessing phases (especially before sterilization) Contaminated disin- Replace the disinfecting and fectant and cleaning cleaning solutions at regular solutions that are...
- Page 44 Check connections between connected incorrectly the attachment for pressure compensation, tube of leakage tester, and leakage tester Insertion tube is Send in the ATMOS Scope for defective repair Protection cap is not Push protection cap firmly onto on connector connector...
- Page 45 Poor color reproduc- Monitor not properly Check the monitor settings tion adjusted Colored stripes on the ATMOS Scope is Send in the ATMOS Scope for monitor defective repair ATMOS Scope is not USB port has switched USB port must be permanently...
-
Page 46: Accessories
Accessories Accessories ATMOS Capture Suite HD License Dongle 700.0047.0 ATMOS Controller for visualization 507.6200.0 ATMOS Medical Monitor 21.5” Touch 507.3128.0 Accessories... -
Page 47: Disposal
The product does not contain any hazardous materials. Clean and disinfect the product. In Germany: Send the product back to ATMOS or your special- ist dealer. They will dispose of the product professionally. For other countries: Dispose of the product properly and in accordance with country-specific laws and regulations. -
Page 48: 10 Technical Data
10 Technical data Input voltage 5V≈ (USB 2.0) Current consumption max. 0.73A (USB 2.0; 5 V≈) Power consumption max. 3.65W Other power sources None Mode of operation Continuous operation Protective earth conductor resistance Earth leakage current Touch current Patient leakage current Environmental conditions: Transport/ storage •... - Page 49 • Air humidity without condensation 20...80 % • Air pressure 700...1060 hPa Maximum operational altitude 3000m (NN) Contamination level Overvoltage category Dimensions (H x W x D) 189 x 445 x 40 mm Dimensions of the insertion tube Length 300 mm; Ø 3.9 mm Weight 0.4 kg Periodical tests Follow the instructions for the individ- ual components...
-
Page 50: Notes On Emc
HF-shielded room of a magnetic resonance imaging system. The customer or user of the ATMOS Scope must ensure that the device is used in a prescribed environment. - Page 51 WARNING Portable RF communications equipment (e.g. radios, antenna cables) should be closer than 30 cm* to any part of the ATMOS Scope , used no including cables, specifi ed by the manufacturer. Otherwise, degradation of the performance of this equipment could result.
- Page 52 ATMOS MedizinTechnik GmbH & Co. KG Ludwig-Kegel-Str. 16 79853 Lenzkirch / Germany Phone: +49 7653 689-0 info@atmosmed.com www.atmosmed.com...
Need help?
Do you have a question about the Scope and is the answer not in the manual?
Questions and answers