Atmos S 351 NATAL Operating Instructions Manual
Vacuum extraction device
Hide thumbs
Also See for S 351 NATAL:
- Operating instructions manual (52 pages) ,
- Service manual (40 pages) ,
- Operating instructions manual (48 pages)
Table of Contents
Advertisement
Quick Links
Advertisement
Table of Contents

Related Manuals for Atmos S 351 NATAL


Summary of Contents for Atmos S 351 NATAL
- Page 1 English ATMOS ® S 351 Natal GA1GB.210302.0 0124 2017-07 Index: 26...
-
Page 2: Table Of Contents
Content Introduction ............3 Cleaning and Maintenance .......34 Notes on operating instructions ......3 Reprocessing of hoses and secretion canister ...34 Function ..............4 Cleaning and disinfecting the surface Explanation of symbols .........4 of the unit ............35 Recommended instrument disinfectants .....35 Recommended surface disinfectants ....35 For your safety ............5 Maintenance ............36 Intended use ............7... -
Page 3: Introduction
Major maintenance and repair work may be carried out only by expert personnel authorised by ATMOS. In case of repairs you should insist that original spare parts only are used. You will then have the warranty that operational safety, readiness for work and the value of your appliance will be preserved. -
Page 4: Function
S 351 Natal is a mains-operated suction unit. ® The quiet, maintenance-free diaphragm pump forms the Caution, observe operating instructions core of the ATMOS S 351 Natal. It creates a vacuum in the ® secretion canister which assists in drawing off and collecting Equipment safety fuse the secretions. The final vacuum required and thus the suction power can be preselected in steps with the press of a button. -
Page 5: For Your Safety
(pinch) and then removing the suction hose from the pump connection or cutting through the suction hose on • The ATMOS S 351 Natal may be used only by trained ® the pump connection with a scalpel. Then carefully let air staff under supervision (IEC 601-1 / EN 60601-1). - Page 6 2.0 For your safety • The suction hose must never come into direct contact ) ATMOS is not liable for personal injury and damage to with the suction area. A suction catheter, suction property if attachment or medical suction instruments must always - no original ATMOS parts are being used, be used.
-
Page 7: Intended Use
The ATMOS S 351 Natal is also indicated for freeing the ® respiratory tract on patients and as a breast pump (removal of galactostasis and removal of milk). -
Page 8: Setting Up And Starting Up
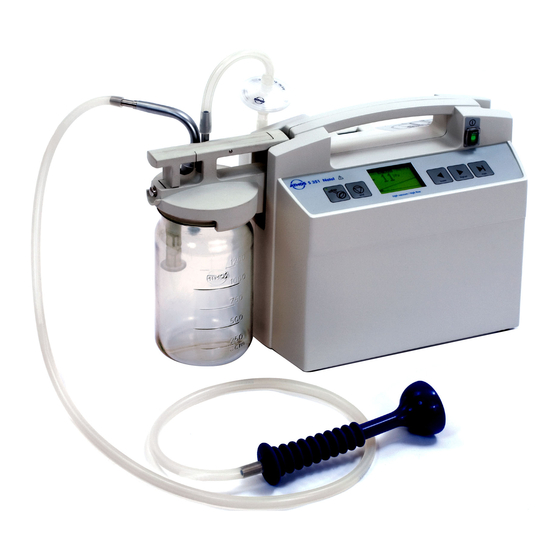
Fig. 1. ATMOS S 351 Natal ® Bracket and contact element for secretion canister Pump connection Hose reducer 10 - 6 mm Bracket for secretion canister Connection for hose to safety canister ... - Page 9 4.0 Setting up and starting up Fig. 2. ATMOS S 351 Natal (rear) ® Mains supply Equipment safety fuses Connection for potential equalization Connection for foot controller Vent...
-
Page 10: Initial Start-Up
• how to handle the closure system of the secretion canister lid • how to lock and insert the secretion canister • which hoses have to be connected • how to connect the ATMOS S 351 Natal to mains ® electricity. -
Page 11: Using A Trolley
Fig. 5. ) Please do not use the secretion canister brackets on the ATMOS S 351 Natal and the trolley for any other ® purposes. This will prevent malfunctions. Fig. 5. Attaching the 1.5 litre secretion canister 4.2.1 Using a trolley... -
Page 12: Hose Connections For Vacuum Extraction
) The ATMOS S 351 Natal must never be used without a ® Fig. 8b. Hose connections for suction mode bacterial filter. Pump connection Bacterial filter Safety canister lid ... - Page 13 4.0 Setting up and starting up • Now fit the suction hose to the angled connection of the double socket nipple. Fig. 9. Connecting the suction hose • The 10 mm diameter suction hose is fitted directly to connection (, Fig. 10) the 6 mm dia. hose is fitted via the hose reducer . Fig. 10. Double socket nipple Connection for hose to safety canister ...
-
Page 14: Indicators And Control Panel
. • If you have a foot controller, connect it to its connection (, Fig. 11). The ATMOS S 351 Natal is now ready for operation. ® Fig. 11. -
Page 15: Operation
5.0 Operation ) Please ensure that the following parts have been reprocessed before treating a new patient: • suction hose including suction attachment or suction instrument • secretion canister including lid and double socket nipple • the connection hose to the safety canister as well as the safety canister, where applicable. -
Page 16: Basic Operation
3 unities: mbar, mmHg and kPa. This switching-over is described in chapter 5.3, page 28. Electronic filling level monitoring (suction function) The ATMOS S 351 Natal is equipped with an electronic ® filling level monitoring which, in VE mode, does not affect the performance of the pump. The vacuum is not decreased. -
Page 17: Fully Automatic Vacuum Build Up (Ve Auto Mode)
5.1.2 Fully automatic vacuum build up (VE Auto Mode) • Switch on the ATMOS S 351 Natal. Make sure that the ® pilot lamp in the switch lights up. Then, the switching-on menu (Fig. 15) is shown in the display for approx. - Page 18 Here, the vacuum generated is displayed. In addition, the desired vacuum build up time (default = 120 s) is shown top left and the final vacuum set at the top right (default = -80 kpa). The ATMOS S 351 Natal attempts to build up the base ® vacuum of -20 kPa. • Apply the extraction cup. ...
-
Page 19: Semi-Automatic Vacuum Build Up
In addition, the desired vacuum build up time (default = 120 s) is shown top left and the final vacuum set at the top right (default = -80 kpa). The ATMOS S 351 Natal attempts to build up the base vacuum ® of -20 kPa. • Apply the extraction cup. - Page 20 5.0 Operation • After the -20 kPa basic vacuum is reached, the device waits for the extraction cup button to be depressed. During this waiting period, an alert tone can be heard, it is synchronised with the flashing of the green LED which switches on respectively off. When the extraction cup button is pressed, the alert tone stops and the automatic vacuum build up starts (Fig.
-
Page 21: Controlled Venting (Vacuum Release)
5.0 Operation 5.1.4 Controlled venting (vacuum release) • After completed vacuum extraction or at any other time in VE Mode (VE Auto Mode and VE Semi Mode), the extraction cup can be vented in a controlled manner over a preset period (default: 5 s) (Fig. 25 and 26) by pressing the END button (Fig. -
Page 22: Additional Functions
5.0 Operation 5.1.5 Additional functions In the VE mode of the ATMOS S 351 Natal it is possible at ® any time to intervene in the operation of the unit using the arrow buttons (Fig. 28). The MAX-key is locked. -
Page 23: Using The Foot Controller
S 351 Natal automatically goes into suction ® mode. The ATMOS S 351 Natal must be switched off before ® the foot controller is connected. This also applies for the removal of the foot controller. • In VE mode, set the foot controller pedal towards the position which corresponds to the currently applied Fig. -
Page 24: Vacuum Build Up With Foot Controller
5.1.8 Starting automatic vacuum build up from a vacuum value preset in suction mode • The ATMOS S 351 Natal must be switched off before ® the foot controller is connected. This also applies for the It is possible for the ATMOS S 351 Natal to start the ®... -
Page 25: Warning Signals
The pump output is increased, if possible, to counteract the leak. ) The ATMOS S 351 Natal cannot predict a loss of contact ® of the extraction cup. There is no warning for this. -
Page 26: Short Circuit Between Contact Terminals
The vacuum currently present is not affected (there is no vacuum release). ) To avoid malfunctions, use the supports on the unit only for original ATMOS secretion canisters. 5.2.5 Electronic filling level monitoring see page 16. 5.2.6 Electronic filter monitoring see page 16. -
Page 27: Settings In The Service Menu
5.0 Operation 5.3 Settings in the service menu During switching on, keep depressing the extraction cup button (Fig. 19, page 20) to reach the Service 1 menu. Here, adjustments can be made in following sub-menus (Fig. 33): • Adjusting unities (Adjust Unity) (see chapter 5.3.5, page 28). -
Page 28: Switching On/Off Of Alert Tones
5.0 Operation 5.3.1 Switching on/off of alert tones The alert tones for the ‘start of automatic vacuum build up (VE Start Beep)' and ’reaching the final vacuum (VE Stop Beep)' can be switched on and off in the VE Tone sub-menu (Fig. 34). • Select either the VE Start Beep or VE Stop Beep using the END button. -
Page 29: Ve Automatic
Fig. 37. 5.3.5 Unities The vacuum unity displayed can be changed for the ATMOS S 351 Natal. To do this, press and hold the adjust unity ® extraction cup button while switching on until Service 1 is displayed on the graphics display. -
Page 30: Trolley Operation
5.0 Operation 5.4 Operation with trolley REF 444.0020.0 When the ATMOS S 351 Natal is mounted on a trolley, the ® trolley symbol appears in the display. During operation with a trolley please observe the symbol (fig. 38). If the symbol is not displayed, the liquid level in the secretion canister cannot be detected. -
Page 31: Changing The Secretion Canister
• Insert the double socket nipple into the empty secretion canister and continue suction. After application • Switch off the ATMOS S 351 Natal and clean unit and ® accessories as described in chapter 6.0. Fig. 42. Removing the secretion canister... -
Page 32: Suction With Foot Controller
15). • Connect the suction catheter, suction connector or suction instruments. • Switch on the ATMOS S 351 Natal. Make sure that the ® pilot lamp in the switch lights up. • Select the final vacuum required using one of the arrow buttons (, and , Fig. 39, page 29). If button and ... -
Page 33: Faults
• Check the ventilation louvres of the ATMOS S 351 Natal. ® If the temperature continues to rise, the ATMOS® S 351 Natal will be switched off. If this happens, the overheating display is left on the graphics display. Please call the service department if this happens. -
Page 34: Cleaning And Maintenance
6.0 Cleaning and Maintenance 6.1 Reprocessing of hoses and secretion canister Always wear protective clothing (gloves) when carrying out cleaning work. Those parts which come into contact with the secretion must be cleaned and disinfected after each use before a new patient is treated. -
Page 35: Cleaning And Disinfecting The Surface Of The Unit
6.0 Cleaning and Maintenance 6.2 Cleaning and disinfecting the surface of the unit • You must disconnect the mains plug before cleaning and disinfecting the unit casing. • Wipe the unit surface with a cloth moistened with a cleaning or disinfecting solution. Do not allow any liquid to get into the device. -
Page 36: Maintenance
• ATMOS recommends: Work should be carried out by an authorized ATMOS service partner. This ensures that repairs and testing are carried out professionally, original spare parts are used and warranty claims remain unaffected. • At least every 24 months a repeat test of the electrical safety should be performed according to IEC 62353. ATMOS recommends an inspection according to the manufacturer‘s specifications. -
Page 37: Troubleshooting
8.0 Troubleshooting ) Please clean your ATMOS S 351 Natal before sending it ® This section describes how to remove functional faults. for servicing. Fault Possible cause Remedy Device does not start Power plug is fitted badly • Check mains plug (indicator light in switch is not No power •... - Page 38 5.3.6 Spanner displayed on graphics An equipment fault has occurred • If the display clears, the ATMOS S 351 ® display Natal was able to remove the fault. However,...
-
Page 39: Spare Parts And Accessories
9.0 Spare Parts and Accessories 9.1 Spare parts Description ..............REF Safety canister, standard (without filter, without lid) ........000.0504.0 Safety canister + DDS filter .........444.0646.1 Bacterial filter cover ..........444.0056.0 Bacterial filter lid ..........444.0058.0 DDS bacterial filter / overflow safety....340.0054.0 Filter adapter ............340.0031.0 O-Ring ...............055.0055.0 Silicone hose - for safety canister-secretion canister....443.0046.0 - for connecting nipple-filter .........320.0044.0 - for safety canister-secretion canister (trolley)..444.0118.0 - for filter-safety canister ........999.0128.0 ... - Page 40 9.0 Spare Parts and Accessories Description ..............REF Double socket nipple, complete ......444.0012.0 O-ring 6 mm Ø (at least 5 pcs.) .......055.0069.0 Hose reducer ...........444.0013.0 O-ring 23 mm Ø (at least 5 pcs.) .....055.0073.0 O-ring 14 mm Ø (at least 5 pcs.) .....055.0072.0 Contact spring washer ........444.0079.0 Spare parts (not shown) Fuse 230 V T 1 A/H ..........008.0471.0 Fuse 115 V T 2 A/H..........008.0738.0 Power cord ............008.0629.0 Secretion canister set I Replacement bag for Receptal...
-
Page 41: Accessories
9.0 Spare Parts and Accessories 9.2 Accessories 9.2.1 Canisters Description .......................REF Secretion glass, with graduation, 1.5 l ............444.0032.0 Canister lid......................444.0015.0 Double socket nipple with overflow electrode..........444.0012.0 Hydrophobic bacterial and viral filter, Ø 8 mm ..........443.0738.0 9.2.2 Accessories to simplify handling Description .......................REF Hose bracket, for attachment to a standard rail..........444.0450.0 Trolley with the possibility for an electronic overflow protection .....444.0020.0 Trolley (for obstetrics);... -
Page 42: Gynaecology
9.0 Spare Parts and Accessories 9.2.4 Gynaecology Description .......................REF Suction curette with auxiliary air vent, external diameter 6 mm .....401.0529.0 Suction curette with auxiliary air vent, external diameter 8 mm .....401.0530.0 Suction curette with auxiliary air vent, external diameter 10 mm ....401.0531.0 Suction curette with auxiliary air vent, external diameter 12 mm ....401.0532.0 Suction curette for sampling, diameter 3 mm ..........401.0554.0 Suction curette for sampling, diameter 4.5 mm ..........401.0528.0... -
Page 43: Technical Data
10.0 Technical data Air flow rate 36 ± 2 l/min. Max. vacuum at sea level -90 kPa** Vacuum display digital numeric, resolution 10 mbar / 10 mmHg / 1 kPa and quasi analogue via bar graph; accuracy ± 2% Auxiliary air control electronically controlled magnetic valve Secretion canister 1.5 l / 3 l / 5 l glass or 1.5 l / 2 l / 3 l Receptal... -
Page 44: Disposal
ElektroG regulations. In order to guarantee a proper disposal of your old device, please either pass on your old device to your specialised dealer or send it directly to ATMOS MedizinTechnik GmbH & Co. KG for a professional disposal. -
Page 45: Notes On Emc
12.1 Guidelines and Manufacturer's Declaration - Emissions The ATMOS S 351 Natal is intended for use in the electromagnetic environment specified below. The customer or user of the ® ATMOS S 351 Natal should ensure that it is used in such an environment. ® Emissions Test Compliance Electromagnetic Environment - Guidance RF Emissions acc.to CISPR 11... - Page 46 12.3 Guidelines and Manufacturer's Declaration - Immunity The ATMOS S 351 Natal is intended for use in the electromagnetic environment specified below. The customer or user of the ® ATMOS S 351 Natal should ensure that it is used in such an environment. ® IEC 60601- Test Immunity Test Compliance Level Electromagnetic Environment - Guidance...
- Page 47 S 351 Natal ® The ATMOS S 351 Natal is intended for use in electromagnetic environment in which radiated disturbances are controlled. The ® customer or user of the ATMOS S 351 Natal can help prevent electromagnetic interference by maintaining a minimum distance ®...
- Page 48 ATMOS MedizinTechnik GmbH & Co. KG Ludwig-Kegel-Straße 16 79853 Lenzkirch / Germany Phone: +49 7653 689-0 atmos@atmosmed.de www.atmosmed.com...
Need help?
Do you have a question about the S 351 NATAL and is the answer not in the manual?
Questions and answers