Table of Contents
Advertisement
Quick Links
Advertisement
Table of Contents

Related Manuals for Okolab H201-LG-DLS


Summary of Contents for Okolab H201-LG-DLS
- Page 1 User Manual H201-LG-DLS September 2016 H201-LG-DLS Compatible with the following XY stages Compatible with the following Okolab Controllers LEICA super Z Galvo stage (SP5/SP8) H201-T-BL-PLUS UNO-STAGE-TOP-INCUBATOR H401-T-DUAL Vers. 01.16 www.oko-lab.com...
-
Page 2: Table Of Contents
User Manual H201-LG-DLS September 2016 Index Components and dimensions....................3 Sample Holders ........................4 2.1 Available Sample Holders ....................... 4 Insertion of the Sample Feedback Temperature Sensor ..............5 Removing and Inserting the Lid ....................6 Insertion of Sample Holder into Chamber ................... 7 Working with 35 or 60 mm Petri Dishes ..................10... -
Page 3: Components And Dimensions
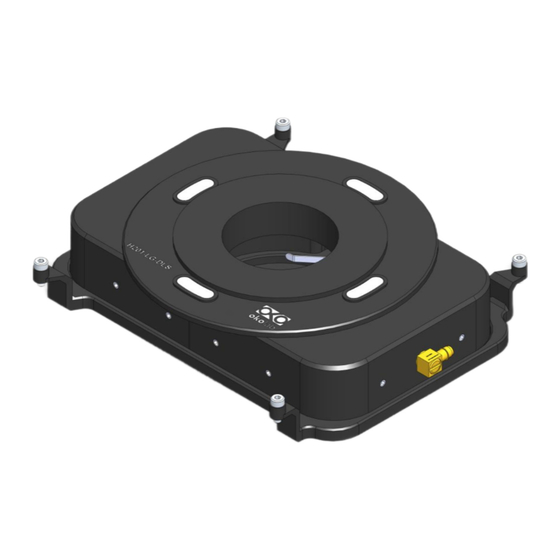
Sample Holder, it allows the Petri to be hold in the chamber. Lid, it features a magnetic system allowing to lift and release the Lid surrounding the objective, together with Total chamber weight, 130g. Figure 1. H201-LG-DLS Components and Dimensions. www.oko-lab.com... -
Page 4: Sample Holders
User Manual H201-LG-DLS September 2016 2. Sample Holders 2.1 Available Sample Holders The following sample holders are available. NOTE: Please contact info@oko-lab.com if you cannot find the sample holder you are looking for. We are constantly adding new inserts to the list. -
Page 5: Insertion Of The Sample Feedback Temperature Sensor
User Manual H201-LG-DLS September 2016 3. Insertion of the Sample Feedback Temperature Sensor Insert the Sample Feedback Temperature Sensor through the dedicated opening located in the H201-LG-DLS main body (see 1. Frontal View 2. 3D View Figure 3, Frontal and 3D views). -
Page 6: Removing And Inserting The Lid
September 2016 4. Changing the Microscope Pillar Cover The H201-LG-DLS is equipped with a magnetic Lid which directly holds into the provided Okolab Microscope Pillar Cov- er. To install Okolab Microscope Pillar Cover follow the instructions as shown in Figure 4. -
Page 7: Insertion Of Sample Holder Into Chamber
User Manual H201-LG-DLS September 2016 Figure 5. Removing and Inserting the Lid. 6. Insertion of Sample Holder into Chamber Sample holders fit into the chamber base and are held in place by captive screws embedded the holder. Screw the sample holder using a 1.5 mm Allen key, don’t care about the orientation since the sample holder is symmetric, as illustrated in Figure 6. - Page 8 User Manual H201-LG-DLS September 2016 Figure 6. Introduction of the Specimen Holder inside the Chamber Base. If you want to change the sample holder follow the steps shown in the images of Figure 7 and listed below: Remove the chamber body by lifting it from the workspace, as shown in Figure 7 Image 1 and 2 Unscrew the sample holder captive screws using a 1.5 mm Allen key...
- Page 9 User Manual H201-LG-DLS September 2016 Figure 7. Introduction of the Specimen Holder inside the Chamber Base. www.oko-lab.com...
-
Page 10: Working With 35 Or 60 Mm Petri Dishes
User Manual H201-LG-DLS September 2016 7. Working with 35 or 60 mm Petri Dishes Flat springs prevent movement of 35 and 60 mm dishes inside of the sample holder (See Figure 8 and Figure 9). To place the Petri, please follow the steps below:... - Page 11 User Manual H201-LG-DLS September 2016 Figure 9. Plate adapter for 60 mm Petri-dish holder. Note. On the sample holders for petri dishes there are two water reservoirs (see Image 4 of Figure 8 and Figure 9). Fill them with water to ensure a high humidity percentage inside the chamber.
-
Page 12: Connection Of The Gas Supply
A single silicon tubing carries output gas from the Okolab Gas Controller to the H201-LG-DLS. Silicon tubing connects to a gas input - brass opening - located on a corner of the H201-LG-DLS. See Figure 10. Connect by gently pushing sili- con tubing onto brass opening. - Page 13 User Manual H201-LG-DLS September 2016 Figure 12. How to fix the H201-LG-DLS on the Super Z Galvo stage www.oko-lab.com...
Need help?
Do you have a question about the H201-LG-DLS and is the answer not in the manual?
Questions and answers