Advertisement
Quick Links
JPT-H10S
JPT-H18S
For household use
Pressure Induction Heating
Rice Cooker/Warmer
OPERATING INSTRUCTIONS
Thank you for purchasing this TIGER rice cooker/warmer.
Please read these instructions carefully before use and observe them during use.
家庭用
压力IH电饭煲
使用说明书
非常感谢您购买本公司的产品。
在您使用之前,请仔细阅读完本说明书,并妥善保存,以便随时参阅。
家庭用
壓力IH炊飯電子鍋
使用說明書
感謝您購買TIGER(虎牌)壓力IH炊飯電子鍋。
使用前請務必仔細閱讀本操作說明的全部內容。
Pressure Induction Heating Rice Cooker/Warmer cooks under high pressure. Improper
usage may result in dangerous situations. Be sure to read the operating instructions to
ensure correct usage.
压力IH电饭煲内部为高压状态,一旦操作错误,就会发生危险,因此请仔细阅读本使用说明
书后,正确遵守使用方式。
壓力IH炊飯電子鍋內部為高壓狀態,一旦操作錯誤,就會發生危險,因此請詳細閱讀本使用
說明書後,正確遵守使用方式。
JPT-H
シンガポール ・ 香港向け
Advertisement
Chapters

Subscribe to Our Youtube Channel
Related Manuals for Tiger JPT-H10S


Summary of Contents for Tiger JPT-H10S
- Page 1 JPT-H JPT-H10S For household use JPT-H18S Pressure Induction Heating Rice Cooker/Warmer OPERATING INSTRUCTIONS Thank you for purchasing this TIGER rice cooker/warmer. Please read these instructions carefully before use and observe them during use. 家庭用 压力IH电饭煲 使用说明书 非常感谢您购买本公司的产品。 在您使用之前,请仔细阅读完本说明书,并妥善保存,以便随时参阅。 家庭用 壓力IH炊飯電子鍋...
- Page 2 シンガポール・香港向け...
-
Page 3: Table Of Contents
Contents 1 Important Safeguards ....................4 2 Names of Component Parts and Accessories ............10 Menu options and features ..................12 Tips on making delicious rice ..................14 3 Before Cooking Rice ....................16 4 How to Cook Rice ..................... 18 Cooking time guidelines .................... -
Page 4: Important Safeguards
Important Safeguards Read and follow all safety instructions before using the rice cooker. • The WARNINGS and CAUTIONS described below are intended to protect the user and other individuals from physical and property damage. To ensure safety, please follow them carefully. •... - Page 5 WARNING Do not handle the power plug with Do not expose the power plug to wet hands. steam. Doing so may cause electric shock or Doing so may cause electric shock or injury. fire. When using the rice cooker on a Do not touch the unit with sliding tabletop, be careful not to expose...
- Page 6 Important Safeguards WARNING Do not use this product in any Stop using the rice cooker way not described in the operating immediately in case of any instruction. Always make sure that malfunction or failure. the pressure adjusting hole and Using the rice cooker with a problem safety valve are not clogged.
- Page 7 CAUTION Do not use the rice cooker in a small This rice cooker is for household use. space where the operation panel is It can also be used in the following exposed to steam. environments: Steam and heat may result in •...
- Page 8 Important Safeguards CAUTION Wait until the rice cooker has cooled Be sure to hold the power plug when down before cleaning it. removing it from an outlet. Touching the hot surfaces may cause This is to avoid electric shock, short burns.
- Page 9 „ Safety instructions for the ● Strictly observe the following instructions to appliance to be used for many keep the fluorocarbon resin coating of the inner years pot from swelling, peeling, or deformation. • Do not place the inner pot directly over a gas ●...
-
Page 10: Names Of Component Parts And Accessories
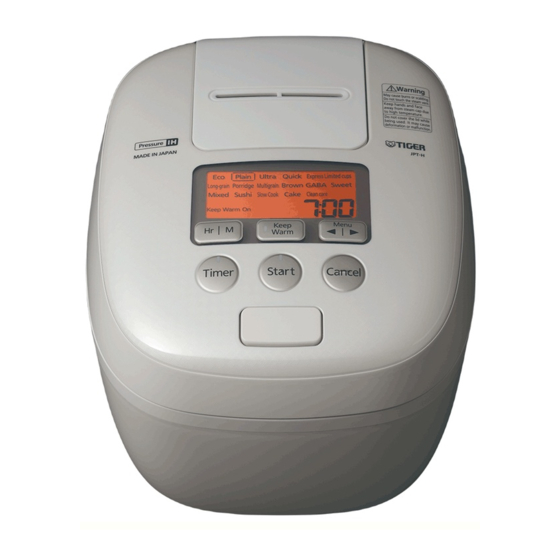
Names of Component Parts and Accessories Check the following immediately after opening the packaging. Inner lid (See P.36 to 38) Pressure adjusting Front side Pressure Back side Steam cap balls adjusting holes Hook button (See P.39, 40) Push to open Steam vents the lid. - Page 11 Operation panel Display Keep Warm lamp [Menu /◀▶] keys [Keep Warm] Start lamp [Hr] key [M] key [Cancel] key Timer lamp [Timer] key [Start] key The projections ( ) at the center of the [Start] and [Cancel] keys are to aid persons with a visual impairment.
-
Page 12: Menu Options And Features
Menu options and features Timer Keep function Warm Menu availability Feature function (Soak availability Timer) Select when cooking white rice. Cooking using this menu makes rice firmer compared to the “Plain” menu. However, power can be saved (approximately 6 to 24% reduction). Plain Select when cooking short rice. - Page 13 Timer function You can select either “Timer” or “Soak Timer”. • Timer: You can preset the time that you want cooking to be actually completed. (See P.22) • Soak Timer: You can set the time for rice to be soaked naturally before cooking. (See P.24) Express Limited cups This is a menu for a small amount of rice to be cooked quickly.
-
Page 14: Tips On Making Delicious Rice
Read P.16 to P.17 for preparations before cooking rice and P.18 to 25 for Tips on making delicious rice how to cook rice. Select good quality rice and a good Amount of water to add storage location. Use the corresponding scale on the inner pot as a guide. - Page 15 Adding other ingredients to rice Cooking other grains together with brown rice The total amount of ingredients should be no more than approximately 70 g per cup of rice (the • Be sure to select the “Brown” menu. “Porridge” menu is excluded). •...
-
Page 16: Before Cooking Rice
Before Cooking Rice Measure the rice. Tips Be sure to use the supplied measuring cup. ● The water level should be selected according A level filling of rice in the supplied measuring to the type of rice and the selected cooking cup equals about 0.18 L (150 g). - Page 17 Connect the power cord. Note (2) Insert ● Be sure to remove any cooked rice or grains of rice the plug. (1) Insert the adhering to the upper casing, around the hook catch, plug. and to the inner lid. Any rice on the inner lid can prevent the lid from closing, allow steam to leak out during cooking, or enable the Power plug Appliance plug...
-
Page 18: How To Cook Rice
How to Cook Rice Select the Keep Warm setting Press the [Menu /◀▶] key to for after cooking. select the desired menu. Each time the [Menu /◀▶] key is pressed, Press the [Keep Warm] key. The selected the selected menu changes in the order setting switches between “Keep Warm shown below. -
Page 19: Cooking Time Guidelines
The “Pressure” indication lights If you need to cancel cooking up when pressure application before it is completed starts. WARNING Be sure to open the lid according to the following procedure. Contents may spray out, causing burns or other injuries. Make sure that no person is near the steam cap. -
Page 20: Once Rice Is Finished Cooking
Once Rice Is Finished Cooking Once the rice is fully cooked, Open the lid. the Keep Warm function is automatically activated. WARNING (When “Keep Warm On” is selected) ● Be sure to open the lid according to the following procedure. Contents may spray out, 8 long beeps causing burns or other injuries. -
Page 21: When Finished Using The Rice Cooker
When Finished Using the Rice Cooker Be sure to press the [Cancel] key. Short beep Note ● If you disconnect the power plug without canceling the Keep Warm function, the next time you turn on the rice cooker, the Keep Warm lamp turns on and you cannot cook. -
Page 22: Using The Timer Function
Using the Timer Function Press the [Menu /◀▶] key to select the desired menu P.18. • It is not necessary to press the [Menu /◀▶] 4 ·7 key if the desired menu is already selected. 2 short beeps Timer function (Timer 1/Timer 2) Check You can preset the time that you want cooking that the... - Page 23 Press the [Timer] key to select „ Sounds emitted by the rice cooker either “Timer 1” or “Timer 2”. ● If you do not operate the rice cooker within approximately 30 seconds after pressing the [Timer] The selected setting switches between “Timer key, the rice cooker beeps 2 times (short beeps).
-
Page 24: Setting The Soak Timer Function
Setting the Soak Timer Function When you select the “Porridge” menu, use the [Hr] and [M] keys to set the desired cooking time. • Pressing the [Hr] key increases the time by 5 3·6 minutes while the [M] key decreases it by 5 minutes. - Page 25 „ Sounds emitted by the rice cooker Press the [Start] key once. The Soak Timer function is set. ● If you do not operate the rice cooker within approximately 30 seconds after pressing the For “Plain” menu [Timer] key, the rice cooker beeps 2 times (short beeps).
-
Page 26: Keeping Rice Warm
Keeping Rice Warm Restarting the Keep Warm function The Keep Warm function is particularly good for maintaining the shine and taste of white rice. The Keep Warm function starts immediately after the [Keep Warm] key is held down (for 1 second „... - Page 27 • Using the Keep Warm function for anything other than white rice • Keeping warm a circle of rice with a hole in the middle • Using the Keep Warm function for longer than 24 hours ● Be sure to remove any cooked rice that adheres to the brim of the inner pot as well as to any gaskets.
-
Page 28: Reheating Cooked Rice
Reheating Cooked Rice Press the [Start] key. For piping hot rice, reheat the rice that is being kept warm before serving it. Note ● Rice cannot be fully heated if more than half of the inner pot is full. ● The rice ends up dry if reheated under any of the following conditions. -
Page 29: Slow Cooking ("Slow Cook" Menu)
Slow Cooking (“Slow Cook” Menu) You can prepare the following dishes with ease. ● Some ingredients such as milk and soymilk Refer to the recipes listed in “Menu guide” (P.54) can boil over easily. Add them after heating for directions. is completed and heat them no more than 5 minutes at a time. - Page 30 Slow Cooking (“Slow Cook” Menu) Set the desired cooking time. When cooking is completed Use the [Hr] and [M] keys to set the desired The rice cooker automatically switches to the Keep Warm setting, the Keep Warm lamp cooking time. The cooking time can be set turns on, and “0h”...
- Page 31 1. Remove the inner pot and set it on a wet cloth. 2. Leave the rice cooker lid open and cool down the rice cooker and the inner pot for approximately 10 minutes. 3. Place the inner pot back inside the rice cooker.
-
Page 32: Making Cakes ("Cake" Menu)
Making Cakes (“Cake” Menu) Press the [Menu /◀▶] key to You can make cakes described in “Menu guide” (P.53). select the “Cake” menu. Note ● Cautions should be exercised when making cakes other than those described in “Menu guide”, as Short beep they may boil over or may not be cooked properly. - Page 33 When heating is completed Once heating is completed... The Keep Warm lamp blinks. Press the [Cancel] key. “0” blinks 8 long beeps The Keep Warm lamp turns off when the [Cancel] key is pressed. Blinks Short Blinks beep (1) Open the lid and insert a toothpick into Be sure to clean the inner pot and the center of the cake.
-
Page 34: Cleaning And Maintenance
Cleaning and Maintenance Any repair services not described in this manual should be performed by an authorized service representative. To maintain cleanliness, always clean the rice cooker on the same day it is used. Also clean the rice cooker periodically. The rice cooker should also be cleaned on the day that it is used in order to remove any odors that remain from cooking. - Page 35 The steam cap can be rinsed. (1) Wash it well using a sponge with detergent diluted with cold or lukewarm water. (2) Wipe off the water using a dry cloth and Steam cap completely dry all parts. Note ● Do not use the following methods to clean as the steam cap may be deformed.
- Page 36 Cleaning and Maintenance (1) Wash it well using a sponge with detergent Inner lid diluted with cold or lukewarm water. Front side Pressure (2) Wipe off the water using a dry cloth and Safety valve adjusting holes completely dry all parts. Condensation can be formed more easily on the dirty inner lid.
- Page 37 „ Parts to wash when dirty Inside and outside the rice cooker Stoppers Wet a cloth, wring out excess water, and wipe. Stopper, lid gasket, hook, and upper casing Remove any cooked rice or grains of rice, etc. Inner lid Stopper button Steam...
- Page 38 Cleaning and Maintenance Removing and attaching the inner lid „ Removing the inner lid Inner lid button Pull up the inner lid button and detach the inner lid toward you. (1) Lift the inner lid. Holding (2) Remove the inner lid. „...
- Page 39 Removing and attaching the steam cap „ Removing the steam cap (2) Close the cap lid and push to close the hook until it clicks. (1) Insert your fingers into the opening of the lid and pull up the steam cap to remove it.
- Page 40 Cleaning and Maintenance Attaching the steam cap gaskets When the steam cap gasket, etc. comes off, Cap gasket carefully set the gasket in place as shown in the Fit in. figure. Otherwise, the gasket may come off or steam may leak out of the rice cooker, resulting in malfunction.
- Page 41 Cleaning The following procedure should be performed each time after cooking, or if odors become bothersome. (1) Add water up to the “MAX” line of the (6) Press the [Cancel] key and disconnect inner pot and set it in the rice cooker. the power plug and the appliance plug.
-
Page 42: If Rice Does Not Cook Properly
If Rice Does Not Cook Properly Check the following points if you experience a problem with the cooked or reheated rice, cooking process, or operation of the Keep Warm function. Check point Problem Too hard ... - Page 43 Problem Cause There is a thin film covering A thin, tissue-like film is formed by melted and dried starch. This is not harmful to your the rice. health. Rice sticks to the inner pot. Soft rice and sticky rice can easily stick to the pot. Check point Problem Has an odor...
-
Page 44: If Food Or Cakes Are Not Made Properly
If Food or Cakes Are Not Made Properly Check the following if you experience a problem with cooked food or cakes. Check point Problem Does not boil Boils over Boils down ... -
Page 45: Troubleshooting
Troubleshooting Check the following before requesting repairs. Reference Symptom Check point Action page Rice was not cooked completely by Does the display show the correct Set the right time. the preset time. current time? Check “The cooking time is excessively long” on P.42 and take the necessary action. - Page 46 Troubleshooting Reference Symptom Check point Action page “6” blinks while the cooked food is Was the Keep Warm function used continuously for more than 6 hours kept warm. after cooking? After 6 hours has elapsed, “6” blinks on the display. (Do not keep warm for more than 6 hours after cooking.) “24”...
-
Page 47: If These Indications Appear
If these indications appear Reference Display Action page “E02” appears on the display and the When the rice cooker is placed on a carpet, the air inlet and outlet rice cooker beeps continuously. are blocked, the temperature goes up, and the rice cooker may not respond even if a key is pressed. -
Page 48: Adjusting The Steaming Time ("Express Limited Cups" Menu)
Adjusting the steaming time (“Express Limited cups” menu) Complete the following procedure from steps (1) to (7) each within 30 seconds with the power plug connected to the outlet. ● Mode ● Value If no operation is performed within 30 seconds, the current time adjustment change is displayed again and the steaming time cannot be set. -
Page 49: Adjusting The Sound Volume
Adjusting the sound volume Complete the following procedure from steps (1) to (7) each within 30 seconds with the power plug connected ● Mode ● Value change to the outlet. If no operation is performed within 30 adjustment Volume adjustment: seconds, the current time is displayed again and the 4: Volume adjustment 0 to -2... -
Page 50: Menu Guide
● This Menu guide uses an approximately 0.18 L measuring cup (included). ● A tablespoon is 15 mL. Menu guide ● A teaspoon is 5 mL. ● When too much of seasonings such as soy sauce, sweet cooking rice wine, etc. - Page 51 Seven-Herb Rice Multigrain Rice Porridge Multigrain Porridge Cooked with Dried Menu Menu Fish and Hijiki 115kcal/ For 1 serving 362kcal/ For 1 serving „ Ingredients (for 4 servings) ● Rice…1 cup ● Salt…1/3 tsps. „ Ingredients (for 6 servings) ● Seven herbs (water dropwort, shepherd’s purse, cudweed, ●...
- Page 52 Sekihan Chinese Style Sweet Sweet (Red Bean Rice) Steamed Sweet Menu Menu Rice 329kcal/ For 1 serving 426kcal/ For 1 serving „ Ingredients (for 6 servings) ● Sweet rice…3 cups „ Ingredients (for 6 servings) ● Red beans…80 g ● Sweet rice…3 cups ●...
- Page 53 Hand-Rolled Sponge Cake Sushi Cake Sushi Menu Menu 309kcal/ 341kcal/ 1/8 piece For 1 serving (1.0 L type) (Calories of sushi rice only) (Excluding fruits) 1.0 L type 1.8 L type „ Ingredients (for 5 servings) „ Ingredients (for 1 cake) (for 1 cake) ●...
- Page 54 Freshly Cooked Dishes Made So Easily Slow Cook Authentic dishes can be cooked easily by taking advantage of Menu seasonal ingredients. Note ● Stir well before cooking to prevent seasonings from settling at the bottom of the inner pot. ● When simmering ingredients in broth, cool the broth down before cooking. ●...
- Page 55 Chicken and Slow Cook shimeji mushrooms Menu with tomato sauce Quick recipe 189kcal/ For 1 serving 1.0 L type 1.8 L type „ Ingredients (for 4 servings) (for 6 servings) ● Chicken thigh, cut into 250 g 380 g cubes ●...
-
Page 56: Setting The Current Time
Setting the current time The current time is displayed in a 24-hour format. The time cannot be set while the following operations are performed. • During cooking, when the Keep Warm function is on, when the Timer function is set, when the Timer function (Soak Timer) is in use, during reheating, or during additional heating •... -
Page 57: Specifications
Specifications Unit size 1.0 L (5.5-cups) type 1.8 L (10-cups) type Rated voltage/Rated frequency 220 - 230 V 50 - 60 Hz Rated power input (W) 1,085 1,213 0.18 to 1.0 (1 to 5.5 cups) 0.36 to 1.8 (2 to 10 cups) Plain 0.18 to 1.0 (1 to 5.5 cups) 0.36 to 1.8 (2 to 10 cups) - Page 58 目录 1 安全注意事项 ........................ 59 2 各部件的名称及附属品 ....................64 菜单选择功能与特长........................66 煮出美味可口米饭的秘诀......................67 3 煮饭前的准备 ........................ 69 4 煮饭方法 ........................71 煮饭时间的标准........................... 72 5 米饭煮好后 ........................73 6 电饭煲使用完毕后 ......................74 7 预约煮饭的方法 ......................75 8 预约吸水的方法 ......................77 9 关于保温 ........................
-
Page 59: 安全注意事项
安 全注意事项 使用前请仔细阅读,并务必遵守。 • 此处标识的注意事项是为防止对使用者及他人造成危害及财产损失。此注意事项为安全相关的重要内容,请 务必遵守。 • 请勿撕下贴在本体上的注意事项贴纸。 以下标志说明了忽视标识内容、采用错误的用法可能产生的危害 图标记号的说明 及损害程度。 记号表示警告、注意。具体 的注意内容用图或文章标注在 图标记号的中间或附近。 该符号表示错误操作可能导致使用者死 警 告 亡或重伤 。 记号表示禁止的行为。具体 表示如果用户操作不当,可能会造成使 的禁止内容用图或文章标注在 注 意 用者受伤害 或财产损失 的内容。 图标记号的中间或附近。 记号表示强制行为或指示的 *1.重伤是指失明或因受伤、烫伤 (高温、低温) 、触电、骨折、中 内容。具体的指示内容用图或 毒等会留下后遗症及需住院治疗或长期看门诊的伤害。 文章标注在图标记号的中间或 *2.伤害是指无需住院治疗或长期看门诊的受伤、烫伤或触电等。 附近。 *3.财产损失是指房子、物质资产及家畜、宠物等相关的放大性损害。 警 告 不可使用额定电压以外的电源。... - Page 60 安全注意事项 警 告 请勿改装。除维修技术人员以外,不可拆卸 请勿用于使用说明书记载内容以外的用 修理。 途。请随时检查调压孔及安全阀有无堵塞。 以免造成火灾、触电、受伤。 如调压孔或安全阀堵塞,可能造成蒸汽 喷出或食物溢出,导致烫伤或受伤。. 禁止分解 〈不可烹调的事例〉 请勿将刀子、汤匙、锅盖等金属制品放 • 烹调咖喱、炖菜、果酱等会产生糊状的 在本产品上面。 菜肴 以免造成金属制品过热。 • 使用会突然产生气泡的 “小苏打” 等煮饭 请勿让电源插头接触蒸汽。 • 料理书籍等中介绍的用市场上销售的电 以免造成火灾、触电、起火。若在抽出 饭煲制作的烹调 式桌台上使用,请将电源插头置于蒸汽 • 将食材、调料等放入塑料袋中加热 影响范围外。 • 有可能堵塞调压孔的番茄及叶菜类蔬菜 的烹调 • 使用了有可能堵塞调压孔的油纸、铝箔、 保鲜膜烹调 • 烹调分量会越来越多的熬制食物或煮豆 子等豆类 (如需在红豆饭等菜饭中使用 豆类,请用其他锅子煮制后再放入本产...
- Page 61 警 告 请勿在墙壁或家具的附近使用。 请勿将金属片或污垢附着在产品插头上。 蒸汽和热量会导致墙壁及家具受损、变形、 以免造成触电、短路、起火。 变色,使用时请与墙壁和家具保持 30cm 以上的距离。 请勿使用非本产品专用电源线。请勿将 在厨房内的储物架等的地方使用时,请注 电源线用于其他设备。 意勿让蒸汽滞留其中。 以免造成故障、起火。 30cm 以上 注 意 请勿在操作面板可能接触到蒸汽的狭窄 本产品为一般家庭用电器。 空间内使用本产品。 同样可以用于以下用途。 • 商店,办公室等的茶水间 蒸汽和热量会导致操作面板变形及本体受 损、变色、变形或故障。 • 农场设施 放在抽出式桌子上使用电饭煲时,请拉出 • 酒店等住宿设施的客房 桌面,防止蒸汽接触操作面板。 • 民宿等简易住宿设施的客房 请勿在铝板、电热毯上使用本产品。 以免铝质材料发热,导致冒烟、起火。 请勿在吸气孔和排气孔有可能被堵塞或 室温较高的场所使用本产品。 请勿将本产品放置在地毯、塑料袋等物 请勿将电饭煲放在负重强度不足的抽出 品上面使用。...
- Page 62 安全注意事项 注 意 使用中或刚使用完接触内锅把手时,应 煮饭过程中请不要移动本体。 使用隔热手套,请勿直接用手接触。 以免造成烫伤或食物喷出。 以免高温烫伤。 内锅把手 移动本体时,请勿碰触到上盖开关片。 以免导致上盖开启,造成受伤或烫伤。 禁止触摸 移动本体时,请勿提着上盖移动。 以免造成烫伤或受伤。请务必使用把手 不使用时请从插座拔下电源插头。 移动。 以免受伤或烫伤及因绝缘体老化而造成 触电、漏电火灾。 必须拔出插头 请务必手持电源插头拔下电源。 以免造成触电、短路而起火。 使用容易冒泡或膨胀的食材时,请注意 用量。 以免因食材溢出,造成事故或产品故障。 请勿使用多头插座。 〈例〉 大豆、黑豆、银耳等容易冒泡的食材。 以免造成火灾。 请小心使用。 坠落或强力冲击可能导致受伤或故障。 由于本产品的磁力线暴露在外部,因此 在使用时,请勿靠近不耐磁性的物体。 以免导致电视机、收音机等产生杂音。银 行卡、交通卡、磁带、录影带等也有可 能被消磁。 使用医疗用起搏器等器材的用户,在使 用本产品时,请先咨询医生。 本产品工作时可能会影响起搏器。 请勿使用外用型定时器或遥控器操作本 产品。 以免造成故障。...
- Page 63 注 意 „ 为了能经久耐用,请注意以下事项。 ● 请务必遵守,以免内锅氟素加工面膨胀,剥落 ● 请清除粘附于本体和内锅上的焦饭粒和米粒等。 . 或变形。 以免造成漏蒸汽、煮沸溢出、故障或煮饭的结果不 • 请勿将内锅直接放在煤气上烧或放在电磁炉、 理想。 微波炉中使用。 • 请勿保温白米、免洗米以外的米饭 (菜饭等) 。 ● 煮饭中,请勿将布等覆盖在本 • 请勿在内锅中使用醋。 体上。 • 请勿使用附属品或木制品以外的饭勺。 以免造成本体或上盖变形、变 • 请勿使用金属制的汤勺、汤匙、打蛋器等坚硬 色。 物品。 • 请勿在内锅中放入竹制蒸笼。 ● 请勿使用本产品对已冷却的米饭进行再加热 (保温) 。 • 请勿将餐具等坚硬物放入内锅中清洗。 以免造成异味等。 •...
-
Page 64: 各部件的名称及附属品
各 部件的名称及附属品 开箱后,首先请进行检查。 内盖 (参照 P.86~88) 表面 内侧 调压孔 上盖开关片 调压球 蒸汽盖 按压便可打开 (参照 P.89、90) 上盖。 蒸汽孔 负压垫圈 安全阀 减压孔 内盖垫圈 不可拆卸,请不要用力拉扯。 别扣 内盖装卸按钮 上盖 放热板 上盖垫圈 (参照 P.88) 不可拆卸,请不要用力拉扯。 内锅 内锅把手 上框橡胶 开关片托 上框 本体 温度传感器 把手 请务必握住把手移动本体。如本体温度较高,请务必 使用隔热手套等。 电源插口... - Page 65 操作面板 液晶显示屏 保温指示灯 [Menu /◀ ▶] 键 [Keep Warm] 键 煮饭指示灯 [Hr] 键、 [M] 键 [Cancel] 键 预约指示灯 [Timer] 键 [Start] 键 [Start] 键和 [Cancel] 键中间的凸出部位 ( .) 是专门为眼睛不方便的人士所设计。 液晶显示屏有时会因静电把印字渗出的现象 ,.并非故障。若想清除,可用拧干的抹布擦拭清除。如此便可通 过去除静电而减轻印字渗出的现象。 „ 检查附属品 „ 关于锂电池 〈饭勺〉 〈量杯〉 因本产品内置锂电池,即使拔掉电源插头仍会继续记 饭勺可直立摆放。 约 1 杯 (约 0.18L) 忆现在时间及预约时间。...
-
Page 66: 菜单选择功能与特长
菜单选择功能与特长 预约 菜单 保温 特长 (吸水) 煮白米时选择。 由于容量少于 “Plain” 菜单, 因此可用更少的耗电量 (减 ○ ○ 少约 6~24%) 煮饭。 Plain ○ ○ 煮短粒米时选择。 (煮饭的标准选项。 ) 想要煮出白米的甜味、香味、粘性时选择。吸水时间是 “Plain” 菜单 Ultra ○ ○ 的两倍,会花更长的时间进行加热,煮出味道更加香甜的米饭。 想要快速煮熟白米时选择。煮饭时间比 “Plain” 菜单更短,煮出的白 Quick ○ - 饭口感较硬。 想要比 “Quick” 菜单更快煮熟少量白米时选择。煮饭时间比 “Plain” Express.Limited. -
Page 67: 煮出美味可口米饭的秘诀
煮饭前的准备工作请查阅 P.69~ P.70,煮饭方法请查阅 P.71~78。 煮出美味可口米饭的秘诀 选择优质大米和适当的储存地方 加水量标准 按照内锅的刻度线加水即可。请根据米的种类和个 • 选择碾米日期新鲜、颗粒饱满且有光泽的大米。 人喜好调节水量。可根据标准刻度线适量增加或 • 请把大米储存在通风好的阴凉位置。 减少水量,但增减的水量请不要超过刻度线的 1/3。 使用附带的量杯正确计量 以免造成煮沸溢出等。 水量标准表 平满 1 杯约 0.18L。 • 免洗米也请用附带的量杯计量。 菜单 加水 (对照内锅的刻度线) “Eco” 的刻度线。 快速淘米 Plain. “Plain” 刻度线。 Ultra “Ultra” 的刻度线。 将大米放入内锅,一次性加入足量的水,然后快速 Quick “Plain” 刻度线。 淘洗,并倒掉淘米水。... - Page 68 放入配料煮饭时 白米中加入糙米、杂粮糙米一起煮饭时 • 杂粮糙米是糙米中加了杂粮的米。 1 杯米加入的配料量请勿超出约 70g ( “Porridge” 菜单以外) 。充分搅拌均匀调料后,将配料放到米 • 糙米、杂粮米比白米量多时,请选择 “Brown” 菜 饭上面。请务必遵守放入配料煮饭时的最大煮饭量 单煮饭。 (下表) 。 • 糙米、杂粮糙米与白米同量,或白米量多时,请 可加入食材煮饭的 选择 “Plain” 菜单煮饭。 (先将糙米、杂粮糙米浸 1.0L 型 1.8L 型 菜单 泡 1~2 小时,使其吸水。 ) Porridge・Firm 0.5 杯 1.5 杯 •...
-
Page 69: 煮饭前的准备
煮 饭前的准备 量米 请擦掉水滴、米粒等,检查内盖网 眼有无堵塞 请务必使用附属的量杯计量。 附带的量杯平满一杯约为 0.18L (约 150g) 。 〈内锅外侧及边缘〉 Tips ● 免洗米也请使用附属的量杯计量。 〈正确量法〉 〈错误量法〉 〈本体内側〉 Note 内盖 ● 请不要超过规定的煮饭容量 (参照 P.107 的规格 表) 。以免导致做出的饭菜不可口。 本体内侧 加入配材煮饭的具体事宜请参照 P.68。 ● 不可混合煮饭容易堵塞网眼的苋属籽等颗粒过小的 杂粮。以免堵塞调压孔和安全阀的网眼,因蒸汽冒 上框 出或沸腾溢锅造成烫伤或受伤。 ● 使用计量米缸等会产生误差,导致煮好的米饭不可 温度 口。 传感器 淘米... - Page 70 煮饭前的准备 将内锅放入本体,用双手盖紧上盖 Note (2) 关闭 ● 当保温指示灯点亮时,请按下 [Cancel] 键将其关 闭。 内锅 内盖 点亮 (1) 放入 点亮 不要按下操 咔哒 作键 哔 熄灭 Note „ 关于提示音 • 在没有放入内锅的状态下按下 [Start] 键或长按 ● 由于压力 IH 电饭煲的内锅内部密闭度高,上盖可 [Keep.Warm] 键,就会发出 “哔哔” 声提醒。 能会难以盖上。请务必检查上盖是否盖紧。 • 如果您认为提示音的音量不适当,可以进行调整。 连接电源线 (参照...
-
Page 71: 煮饭方法
煮饭方法 选择煮饭后的保温种类 按下 [Menu /◀ ▶] 键,选择煮饭 菜单 按下 [Keep Warm] 键。每按一次,便 每按一次, 便会依次切换菜单边框。 (参照下图) 会依次在 “Keep Warm On” 和 “Keep Warm Off” 之间进行切换。 (当保温指示 灯点亮时,可以按下 [Cancel] 键重新设 定。 ) ■使用白米时 ( “Plain” 的边框点亮) 点亮 点亮 点亮 哔 • 煮饭中也可选择是否保温。 • 如果已经事先选择了是否需要保温,则此时无需 选择。关于保温,参照 P.79。 哔哔 【选择... -
Page 72: 煮饭时间的标准
煮饭方法 如不得不中断煮饭 警告 请务必按照以下流程打开上盖。 以免内容物溢出造成烫伤或受伤。 确认蒸汽盖附近没有人。 按下 [Cancel] 键,中断煮饭。 由于蒸汽孔经常可能会喷出大量高温蒸汽, 需要注意。 等待大约 2 分钟后, “Pressure” 熄灭。 确认没有蒸汽冒出后,按下上盖开关片。 如按下 [Cancel] 键后立刻打开上盖,可能 会导致烫伤。 ■如需继续煮饭 请换掉内锅中的米和水,等待本体充分冷却, 然后再开始重新煮饭。 若在煮饭过程中按下 [Cancel] .键,即会停止 煮饭。如果不换掉内锅中的米和水就重新煮饭, 会导致煮到一半的米被重新煮,导致做出的米 饭不可口。 煮饭时间的标准 Plain Ultra Quick Express.Limited.cups Long-grain 1.0L 型 36~50 分钟 43~54 分钟... -
Page 73: 米饭煮好后
米饭煮好后 饭煮好后自动开始保温。 打开上盖 (选择 “Keep.Warm.On” 时) 警告 哔 - 哔 - 哔- (响 8 声) ● 请务必按照以下流程打开上盖。以免内容物溢出造 成烫伤或受伤。 (1) 确认蒸汽孔是否已经没有蒸汽喷出。 (2) 请查看 “Pressure” 指示灯有无熄灭。 点亮 (3) 按下上盖开关片,打开上盖。 蒸汽孔 点亮 熄灭 上盖开关片 • 选择 “Keep.Warm.Off” 时,保温指示灯和所 选菜单将闪烁,且不会进行保温。放置不管可 能会导致发生异味、米饭变粘稠、腐败等,请 立刻将其取出。 • “Porridge” 菜单过程中加入配料,或烹调时 间不够用时,请在保温指示灯点亮或闪烁的状 态下按下 [Hr] 键与 [M] 键,设定好所需追加 的烹调时间后按下... -
Page 74: 电饭煲使用完毕后
电 饭煲使用完毕后 请务必按下 [Cancel] 键 哔 熄灭 Note ● 如果没有取消保温模式就拔下电源插头,则下次使 用电饭煲时会点亮保温指示灯,而不会进入煮饭模 式。 拔下电源插头,拔出产品插头 (1) 拔下 电源插头 (2) 拔出 产品插头 进行清洁 (参照 P.85~91) シンガポール・香港向け... -
Page 75: 预约煮饭的方法
预约煮饭的方法 按下 [Menu /◀ ▶] 键,选择煮饭 菜单 P.71 • 如已经预先选好菜单,则无需再次选择。 点亮 4 ·7 哔 哔 确认已经 熄灭 关于预约煮饭 ( “Timer1” 、 “Timer2” ) 您可以按照喜好时间能煮好米饭。 选择 “Porridge” 菜单时,请按下 [Hr] 键或 [M] 键调整煮饭时间 • 选择 “Timer1” 或 “Timer2” 设定时间,就能按照 设定的时间自动煮好饭。. • [Hr] 键每按一次增加 5 分钟, [M] 键每按一 •... - Page 76 预约煮饭的方法 按下 [Timer] 键, 选择 “Timer1” „ 关于提示音 或 “Timer2” ● 如按下 [Timer] 键约 30 秒内不执行任何操作,会 发出 “哔哔” 声提示。 每按一次, 就会按照 “Timer1” → “Timer2” →. ● 如在无法进行预约煮饭的状态下进行了设定,将在 “Soak.Timer” 的顺序依次切换。 按下 [Timer] 键后发出 “哔哔” 声提示。 • 如需预约吸水,参照 P.77。 ● 如果您认为提示音的音量不适当,可以进行调整。 显示上次设定的 (参照...
-
Page 77: 预约吸水的方法
预约吸水的方法 选择 “Porridge” 菜单时,请按下 [Hr] 键或 [M] 键调整煮饭时间 • [Hr] 键每按一次增加 5 分钟, [M] 键每按一 次减少 5 分钟。 3·6 • 能够以 5 分钟为单位,在 40~90 分钟之间进 行设定。 增加 5 分钟 减少 5 分钟 关于预约吸水 可以设定开始煮饭前让大米自然吸水 (浸泡) 的时间。 • 初始设定为 60 分钟。请根据个人喜好调整时 间。... - Page 78 预约吸水的方法 „ 关于提示音 ● 如按下 [Timer] 键约 30 秒内不执行任何操作,会 发出 “哔哔” 声提示。 ● 如在无法预约吸水的状态下进行了设定,将在按下 [Timer] 键时发出 “哔哔” 声提示。 ● 如果您认为提示音的音量不适当,可以进行调整。 (参照 P.99) 按下 [Hr] 键或 [M] 键,设定大米 的浸泡时间 点亮 闪烁 闪烁 哔 • 能够以 10 分钟为单位,在 10~60 分钟之间 进行设定。 • [Hr] 键每按一次增加 10 分钟, [M] 键每按一 次减少...
-
Page 79: 关于保温
关于保温 „ 选择 “Keep Warm Off” 时 保留白米的色泽与美味。 „ 关于保温种类 煮饭结束后,将不会切换到保温。放置不管可能会导 致发生异味、米饭变粘稠、腐败等,请立刻将其取出。 ● 您可以选择饭煮好后是否保温。煮饭前按下 [Keep. Warm] 键,选择 “Keep.Warm.On” 或 “Keep. 闪烁 Warm.Off” 。 (参照 P.71) ● 产品会记忆上一次选择的保温种类,如果需要做出 与上次相同的选择,则无需再次选择是否保温。 ● 初始设定为 “Keep.Warm.On” 。 „ 选择 “Keep Warm On” 时 闪烁 煮饭结束后将自动切换到保温状态。 „ 如需对少量米饭进行保温 请将米饭集中到内锅中央进行保温,并尽快食用。 点亮 按住... -
Page 80: 再加热的方法
再加热的方法 按下 [Start] 键 食用之前将保温中的米饭重新加热,便可吃到热腾腾 的米饭。 Note ● 米饭超过内锅一半以上时,因米饭量过多可能无法 充分加热。 ● 按以下情况进行再加热,会导致米饭变干。 • 米饭刚煮好等还没变凉的情况 闪烁 熄灭 哔- • 米饭量少于最小煮饭容量 (1.0L 型 1 杯、1.8L 型 2 杯) 时 • 重复加热 3 次以上的情况 翻动保温中的米饭 在还剩 5 分 钟时显示剩 余时间 洒入 1~2 大匙水后均匀翻动 闪烁... -
Page 81: 烹调 ( "Slow Cook" 菜单
烹调 ( “Slow Cook” 菜单) 烹调时的基本操作步骤 可以使用本产品轻松烹调下述料理。做菜方法请参照 食谱指南 (P.104) 上介绍的菜谱。 处理食材 “Slow Cook” 菜单 开始时使用接近沸点的高温煮沸后,将温度降低再炖 煮一段时间。之后再次降低温度继续炖煮。逐渐降低 将食材放入内锅,盖上上盖 温度炖煮,不仅可让食物更加入味,而且也无需担心 长时间加热将汤汁熬干。 可以进行长时间炖煮和 20.分钟以内的快速烹调。 Note 菜单示例 ● 请以内锅内侧的 “Plain” 刻度线为标准加入食材。 (参照下表) ・长时间炖煮…….蔬菜鸡肉浓汤、红烧肉 ● 当多于规定的最多量时可能无法炖煮或溢出。另外, ・快速烹调……番茄酱鸡肉炖丛生口蘑 即使少于最少量时也有可能溢出,请多加注意。 →食谱指南 (参照 P.104~105) “Plain” 的刻度线 烹调时间 1.0L 型 1.8L 型 不可烹调的菜单示例... - Page 82 烹调 ( “Slow Cook” 菜单) 设定烹调时间 • 烹调结束后将会继续保温,并以 1 小时为单 位显示 1 (1h) 至 6 小时 (6h) 。超过 6 小时候, 请使用 [Hr] 、 [M] 键设定烹调时间。1~30 “6” 会开始闪烁。 分钟可以使用 1 分钟为单位进行设定,30~ • 各料理在持续保温后可能会变质,敬请注意。 180 分钟可以使用 5 分钟为单位进行设定。 • 使用了酸味较重的食材的菜肴请勿长时间保温, 应尽快食用。 • 按下 [Hr] 将增加设定时间,按下 [M] 键将减 •...
-
Page 83: 蛋糕的制作方法 ( "Cake" 菜单
蛋糕的制作方法 ( “Cake” 菜单) 按下 [Menu /◀ ▶] 键选择 您可以根据食谱指南 (P.103) 介绍的内容制作蛋糕。 熄灭 “Cake” 菜单 Note 点亮 ● 请勿根据食谱指南没有的方法制作蛋糕。 ● 请勿超过食谱指南上介绍的用量。 . 哔 以免造成食物溢出。 处理食材,将面团放入内锅,排出 面团内的气体 设定加热时间 按 [Hr] 或 [M] 键设定加热时间。可以 5 分钟 Note 为单位,在 5~80 分钟之间进行设定。 • 按下 [Hr] 将增加设定时间,按下 [M] 键将减 ●... - Page 84 蛋糕的制作方法 ( “Cake” 菜单) 做好之后 蛋糕完成后…… 保温指示灯闪烁。 按下 [Cancel] 键 哔- 哔- 哔- “0” 闪烁 按下 [Cancel] 键保温指示灯熄灭。 (响8 声) 闪烁 哔 熄灭 闪烁 熄灭 请务必清洗内锅及内盖等部位,祛除异 (1) 打开盖子,用竹签刺向蛋糕中央。 (如果没 味 (清洗方法→ P.91) 有面糊附着,说明内部已烤熟。 ) • 如附着了面糊,请在保温指示灯闪烁的状态下按 下 [Hr] 键增加加热时间, 然后按下 [Start] 键。 ( 最 多可追加...
-
Page 85: 清洁保养方法
清洁保养方法 如需进行本手册中未记录的修理,请委托经本公司认可的修理技术人员。 使用结束后,为了下次能够随时干净方便地使用,请务必在当日将电饭煲清洗干净。此外,请定期进行清洁保养。 烹调结束后容易有异味残留,请务必在当日进行清洗,祛除异味。 (参照 P.91) Note ● 请务必拔掉电源插头,等待本体、内锅、内盖、蒸汽盖冷却后再进行清洁保养。 ● 为避免腐蚀及异味,请保持内锅与内盖的洁净。 ● 请勿使用稀释剂、去污剂、漂白剂、化学性抹布、钢丝球、尼龙刷等清洁用具。 ● 将各部分卸下后再进行保养。 ● 请勿使用洗碗机或烘碗机等。以免导致变形、变色。 ◆使用清洗剂清洁保养时,请使用家用的中性厨房用合成清洗剂 (餐具用、烹调器具用) 。 ※ 洗涤剂残留会导致塑胶等材料老化、变色,请务必冲洗干净。 ※ 使用中性以外的洗涤剂可能导致变色、腐蚀等问题。 ◆请使用海绵或布等柔软的清洁用具。 请勿用磨砂面 ◆ 请 勿使用海绵的磨砂面或三聚氰胺海绵清洗。以免造成内锅的 清洗。 氟素加工面及内盖的涂料剥落。 „ 每次使用后应清洁的部位 (1) 用海绵蘸着凉水或温水稀释后的清洗剂进行清洗,然 后用水冲洗干净。 (2) 用干布擦拭水分,使其充分干燥。 Note ● 每次使用内锅后,请仔细清洗内侧和外侧。 ● 请勿将餐具放入内锅或将内锅作为洗碗盆一起清洗。此外在 干燥内锅时,请不要将其覆盖到其他餐具上重叠放置。以免... - Page 86 清洁保养方法 内盖 (1) 用海绵蘸着凉水或温水稀释后的洗涤剂进行清洗,然 后用水冲洗干净。 表面 (2) 用干布擦拭水分,使其充分干燥。 安全阀 调压孔 若内盖变脏,则更容易凝结水珠。 调压孔、调压球、减压孔 如附着了饭粒和米粒,请清除干净。 用流水仔细冲洗。 安全阀 内盖垫圈 从内盖的表面用手指轻按 2~3 次,如附着了饭粒或米粒,请清 除干净。 负压垫圈 表面 内侧 一边按 2~3 次,一边检 调压球 查安全阀有无堵塞,同时 用流动水清洗内部。 负压垫圈 在安装在内盖上的状态下进行清洗。 . 脱落时,注意垫圈方向进行安装。 (参照 P.88) 内盖垫圈 减压孔 安全阀 清洗时,无需拉拽及从内盖上拆下。万一脱落,请咨询购买本 产品的销售店。 拆卸、安装方法 (参照 P.88) Note ●...
- Page 87 „ 脏污后应立即清洁保养的部位 本体的外侧、内侧 止动件单元 用拧干的布擦净。 止动件单元、上盖垫圈、开关片、上框 如粘附有饭粒和米粒时,请清除干净。 内盖装卸. 止动件单元 按钮 蒸汽. 传感器 上盖垫圈 蒸汽传感器 用布或棉签等沾水后轻轻擦拭。 上框橡胶 温度传感器 如附着了焦饭粒、米粒等,请清除干净。 上盖 如难以清除,请用市面上销售的砂纸 (320 号左右) 将其 清除,然后用拧干的抹布擦拭。 Note 上框 ● 请绝对不要让水进入本体内部。 ● 请勿拉扯上盖垫圈。 一旦扯下,将无法再次安上。万一垫圈脱落,请咨询购 温度. 传感器 买本产品的销售店。 开关片部位 吸气孔、排气孔 用棉签等清除灰尘。 Note 排气孔 ● 请勿在吸气孔、排气孔沾有灰尘的状态下使用。 以免造成本体内部温度上升,导致故障或火灾。...
- Page 88 清洁保养方法 内盖的拆卸、安装方法 „ 拆卸方法 内盖装卸按钮 提起内盖装卸按钮,正面取出内盖。 (1) 拉起 提钮 (2) 拔出 „ 安装方法 (2) 持续插入直至听到 “咔哒” 声 (1) 插入 将内盖的左右别扣完全嵌入槽中。 别扣 槽 Note ● 请不要拉扯上盖垫圈、内盖垫圈。若取下将无法再次安装。 上盖垫圈 若上盖垫圈或内盖垫圈脱落,请咨询购买本产品的销售店。 上盖 内盖垫圈 请勿取下垫圈。 请勿强行按压安装或是拉拽。 . 以免导致蒸汽喷出或上盖无 法打开等故障。 内盖 负压垫圈的安装 • 请务必注意安装方向进行 表面 负压垫圈 安装。以免导致做出的饭...
- Page 89 蒸汽盖的拆卸与安装 „ 拆卸方法 (2) 盖上盖子并按下开关片,直到发出 “咔哒” 声。 (1) 将手指插入上盖的凹槽内,向上拉起卸除调 压阀。 (2) 持续插入直至听到 “咔哒” 声. 开关片 (3) 准确安装在本体上。 蒸汽盖 将蒸汽盖从前方嵌入本体。 (2) 翻转蒸汽盖,如图所示拆卸蒸汽盖本体。 蒸汽盖本体 (2) 打开 (1) 对准 (1) 打开 (2) 嵌入 (3) 拔出 Note ● 准确安装蒸汽盖。 . 如未能装好,可能造成做出的米饭不可口、沸腾溢 锅或烫伤。 „ 安装方法 蒸汽盖 (1) 将蒸汽盖本体的别扣嵌入蒸汽盖。如未确实 嵌入,会导致脱落、蒸汽喷出等故障。 蒸汽盖本体 ①...
- Page 90 清洁保养方法 蒸汽盖用垫圈的安装 如蒸汽盖的垫圈类脱落,请如图所示,将垫圈类重新 垫圈 装好。如未确实嵌入,会导致脱落、蒸汽喷出等故障。 嵌入 Note ● 请务必安装垫圈类后使用本产品。 . 蒸汽盖本体 如没有安装,可能因蒸汽泄露而导致做出的米饭不 可口。 ● 请勿拆卸环形垫圈。 . 如环形垫圈脱落,请照原样准确嵌入。 ● 若安装困难,可在垫圈上沾少许水解决。 环形垫圈 シンガポール・香港向け...
- Page 91 清洗方法 如出现异味,请在烹调后进行清洗。 (1) 在内锅里加水至 “MAX” 线,然后把内锅放 (6) 按下 [Cancel] 键,拔下电源插头,拔出产 入电饭煲中。 品插头。 哔 “MAX” 线 熄灭 (2) 连接电源线。 (2) 插入 (7) 等待本体冷却后,倒出内锅中的水并进行清 (1) 插入 洁。 Note 产品插头 电源插头 ● 请注意,清洗后内锅和本体会发热。以免造成烫伤。 ● 请务必等本体冷却后再进行连续清洗。以免因本体 (3) 按下 [Menu /◀ ▶] 键,选择 “Clean 温度过高而导致清洗得不完全。 care” 。 Tips ● 如出现异味,可在水中加入柠檬酸 (约 20g) 进行 点亮...
-
Page 92: 做出的米饭不可口时
做出的米饭不可口时 煮好的饭或煮饭期间、保温期间、再加热期间的米饭发生异常时,请检查如下事项。 水 米 煮 使 使 菜 进 就 使 粒 内 内 没 超 查看事项 量 量 饭 用 用 单 行 直 用 或 锅 锅 有 过 有 、 碱 矿 选 了 接 电 水 外... - Page 93 发生情况 理.由 形成了薄膜 纸糊状的薄膜是淀粉被溶解后干燥所形成,并非有害物质。 米饭粘在内锅上 柔软的米饭或有黏性的米饭比较容易粘在锅上。 ( 米 或 内 没 附 垫 未 再 上 预 持 免 查看事项 量 水 锅 有 着 圈 充 加 约 续 洗 或 滴 外 充 了 类 分 热 煮 保...
-
Page 94: 烹调或蛋糕做得不理想时
烹调或蛋糕做得不理想时 如烹调的菜肴或烤好的蛋糕出现异常时,请检查以下几点。 制 食 放 放 烹 烹 管 没 水 内 内 等 垫 上 产 查看事项 材 入 入 调 调 作 有 滴 锅 锅 杂 圈 盖 品 的 了 了 时 时 了 立 等 外... -
Page 95: 认为发生故障时
认为发生故障时 在委托修理前,请查看以下事项。 参照. 故障现象 确认事项 处理方法 页面 未按照预约时间煮好 本产品设定的时间与当前时间是否相 请校准时间。 符? 请确认 P.92 “煮饭时间过长” 项目,并进行处理。 如设定的时间短于预约推荐时间,则可能无法在预约的时间完成煮饭。 按下 [Timer] 键后发出了 “哔哔” 声 有无按下 [Start] 键? 如未按下 [Start] 键,就无法完成预 76・ . 提示,无法设定预约煮饭 (吸水) 约。 显示时间是否闪烁 “0:00”? 请调整为当前时间后,再进行预约。 有无选择 “Quick” 、 “Express.Limited.cups” 、 “Sweet” 、 “Mixed” 、 “Slow. 76・... - Page 96 认为发生故障时 参照. 故障现象 确认事项 处理方法 页面 水蒸气积聚在上框 刚做好饭或保温期间,水蒸气可能凝聚在上框,并非故障。如上框凝聚了太 多水蒸气,请用干布擦拭干净。 内盖是否变脏?. 请用洗涤剂仔细清洗内盖。 如内盖变脏, 可能会导致水蒸气增加。 有无选择 “Eco”?. 选择 “Eco” 煮饭时,可能会凝聚较多水蒸气。 如希望减少水蒸气,请选择 “Plain” 煮饭。 70・ 按下按键后没有反应 产品插头是否已插入本体的电源插 请将插头插到底。 口?电源插头是否已插入插座? 75・ . 77・ 保温指示灯是否点亮? 请按下 [Cancel] 键取消保温,然后 再继续操作。 电源插头有火花飞溅 插拔电源插头时出现小火花是 IH 产品的特征,并非故障。 产生塑胶等异味 产品刚开始使用时会产生塑胶等异味, 过段时间即会自动消失。如气味过大, 请参照...
-
Page 97: 液晶显示屏上出现下列显示内容时
液晶显示屏上出现下列显示内容时 参照. 显.示 处.理 页面 如将本体放置在地毯等物品上,可能导致吸气孔和排气孔堵塞、温度上 显示 “E02” ,发出 “哔哔哔哔哔哔…” 声 升,按下按键后没有反应。 此外,将本体放在室温较高的地方也可能导致温度上升,出现同样的症 状。 此时,请按以下步骤处理。 (1) .拔下电源插头。 显示 “E11” (2) .将电饭煲移动到室温较低的地方,以免吸气孔和排气孔堵塞。 (3) .重新将电源插头插入插座,进行按键操作。 ※. 如 果还是没有反应,则是本体出现异常。请拔下电源插头,委托购买 本产品的销售店进行修理。 显示 “E02” 、 “E11” 之外 “E” 开头的代 可能存在故障。请拔下电源插头,委托购买本产品的销售店进行修理。 码 关于塑胶零部件 接触热和蒸汽的塑胶零件可能会伴随着使用而出现损坏。请咨询购买本产品的销售店。 シンガポール・香港向け... -
Page 98: 焖饭时间的调整方法 ( "Express.limited.cups" 菜单
焖饭时间的调整方法 ( “Express Limited cups” 菜单) 请在电源插头插入插座的状态下完成以下 (1)~(7) 步,每一 步的操作间隔不得超过 30 秒。30 秒以上没有任何操作就会返 ● 调整模式. ● 切换数值 回显示当前时刻,无法继续设定。如需再次设定,请重新来过。 5 : 调整焖饭时间 0 : + 0 分钟 煮饭 (烹调) 、保温、设定预约、预约煮饭 (吸水) 、再加热、追 1 : + 1 分钟 加加热期间无法变更设定。 2 : + 2 分钟 ※.如需在调整期间中断操作,请按下... -
Page 99: 音量调整方法
音量调整方法 请在电源插头插入插座的状态下完成以下 (1)~(7) 步, 每一步的操作间隔不得超过 30 秒。30 秒以上没有任何 ● 调整模式 ● 切换数值 操作就会返回显示当前时刻,无法继续设定。如需再次 4 : 音量调整 调整音量 : 0~- 2 设定,请重新操作。 煮饭 (烹调) 、保温、预约定时、预约煮饭 (吸水) 、再加 热、追加加热期间无法变更设定。 ※.如需在调整期间中断操作,请按下 [Cancel] 键。 „ 需要调整音量 (按键音、提示音) 时 如果您对按键音、提示音的音量不满意,请按以下步骤进行调整。 (1) 按下 [Menu /◀ ▶] 键,选择 “Plain” 菜单。 (4) 按下... -
Page 100: 食谱指南
. ● 本食谱指南中使用的量杯容量为约 0.18L (附带的量杯) 。 . ● 大勺容量为 15mL。.. 食谱指南 . ● 小勺容量为 5mL。 . ● 放入过多的酱油、甜料酒等调料可能导致做出的饭不可口。 . ● 煮制免洗米时,无需进行淘米。 . ● 各菜单下记载的卡路里数值仅供参考。 味增黄油酱炒鲑鱼 Mixed Brown 五目饭 糙米拌饭 菜单 菜单 322kcal/ 422kcal/ 1 人份 1 人份 „ 材料 (6 人份) „... - Page 101 鱼 干和羊栖菜杂粮 Porridge 七 草粥 Multigrain 饭 菜单 菜单 115kcal/ 362kcal/ 1 人份 1 人份 „ 材料 (4 人份) „ 材料 (6 人份) . ● 米……1 杯 . ● 米……3 杯 . ● 盐……1/3 小勺 . ● 杂粮……4.又 1/2 大勺 (40g) .
- Page 102 Sweet Sweet 红豆饭 虾 仁板栗糯米饭 菜单 菜单 329kcal/ 426kcal/ 1 人份 1 人份 „ 材料 (6 人份) „ 材料 (6 人份) . ● 糯米……3 杯 . ● 干虾……10g . ● 五花肉……110g . ● 笋……20g . ● 糯米……3 杯 . ● 红小豆……80g .
- Page 103 Sushi Cake 手卷寿司 海 绵蛋糕 菜单 菜单 309kcal/ 341kcal/ 1/8 块 1 人份 (1.0L 型 ) (仅寿司饭的卡路里) (不包括水果) 1.0L 型 1.8L 型 „ 材料 (5 人份) . ● 寿司饭 „ 材料 (1 个) (1 个) 米……3 杯......海带……3cm 长 1 片 .
- Page 104 轻松煮好一碗热腾腾的美味粥! Slow Cook 菜单 可以使用本产品轻松做出能发挥食材美味的正宗菜肴。 Note ● 烹调时请充分搅拌,以免调料沉淀到内锅锅底。 ● 用汤汁炖煮时,请待冷却后再开始烹调。 ● 如需使用淀粉进行勾芡,请在烹煮的最后阶段进行。 ● 竹轮及鱼糕等熬制食物在加热时会膨胀。请适量添加。 ● 请勿使用金属制的汤勺、汤匙、打蛋器等坚硬物品。 ● 烹饪完毕后,请祛除异味。 (参照 P.91 “清洗方法” ) ● 如烹调时间不够,在继续烹调前请勿按下 [Cancel] 键。以免保温指示灯熄灭,导致无法继续烹调。 (万一按下,请将内锅从本体取出, 放在湿布上,同时打开本体的上盖,放置 10 分钟左右,使本体和内锅冷却。然后将内锅放回本体,进行烹调。 ) 蔬 菜鸡肉浓汤 红 烧肉 Slow Cook Slow Cook 菜单 菜单...
- Page 105 番 茄酱鸡肉炖丛生 Slow Cook 口蘑 菜单 快速烹调食谱 189kcal/ 1 人份 1.0L 型 1.8L 型 „ 材料 (4 人份) (6 人份) . ● 鸡腿肉 (切成方块) 250g 380g . ● 盐、胡椒 各少许 各少许 . ● 丛生口蘑. (已切好) 1 包 1 又 1/2 包 (约...
-
Page 106: 时间的调整方法
时间的调整方法 本产品以 24 小时为单位显示时间。 执行以下操作时,无法调整时间。 • 煮饭中、保温中、预约设定、预约煮饭 (吸水) 、重新加热、追加加热时 • 选择 “Porridge” 、 “Slow.Cook” 、 “Cake” 菜单时 „ 例 : 如需将 “9:30” 调整为 “9:35” 连接电源线 调整时间 • [Hr] 键用于调整 “小时” , [M] 键用于调整 “分 钟” 。 (2) 插入 (1) 插入 •... -
Page 107: 产品规格
产品规格 规格 1.0L 型 (5.5 杯) 1.8L 型 (10 杯) 额定电压 / 额定频率 220.-.230.V.~50.-.60.Hz 额定功率 (W) 1085 1213 0.18~1.0 (1~5.5 杯) 0.36~1.8 (2~10 杯) Plain 0.18~1.0 (1~5.5 杯) 0.36~1.8 (2~10 杯) Ultra 0.18~1.0 (1~5.5 杯) 0.36~1.8 (2~10 杯) Quick 0.18~1.0 (1~5.5 杯) 0.36~1.8 (2~10 杯)... - Page 108 目錄 1 安全須知 ........................109 2 各部名稱及附件 ......................114 從選單可選的功能與特點......................116 煮出美味可口米飯的秘訣......................117 3 煮飯前的準備 ......................119 4 煮飯方法 ........................121 煮飯所需的時間.........................122 5 米飯煮好後 .........................123 6 電子鍋使用完畢後 ......................124 7 預約煮飯方法 ......................125 8 預約浸泡方法 ......................127 9 關於保溫 ........................129 10 再加熱方法 .........................130 11 烹調 ( 「Slow Cook」 選單) ..................131 12 蛋糕烘烤方法...
-
Page 109: 安全須知
安 全須知 使用前請詳閱並請務必遵守。 • 此處所敘述的注意事項旨在防止對使用者或他人造成人身傷害或財產損失。屬於安全方面的重要內容,請務 必遵守。 • 請勿撕下產品上所黏貼有關注意事項的貼紙。 不顧以下內容,將因疏忽注意事項而錯誤操作、導致危害及損失 所用圖形符號的說明 的程度,据這些程度加以區分說明。 符號表示警告、注意。具體 注意內容會在圖形符號裡或者 旁邊以圖片或文字表示。 警 告 表示操作不當的話,可能導致使用者死 亡或重傷 的內容。 符號表示該行為屬於禁止行 為。具體禁止內容會在圖形符 注 意 表示操作不當的話,可能會造成使用者 號裡或者旁邊以圖片或文字表 的傷害 ,或者出現財物損失 的內容。 示。 *1.重傷是指失明、受傷、燙傷 (高溫、低溫) 、觸電、骨折或因中 符號表示強制行為或指示行 毒等而留下後遺症的傷勢,以及需要住院或長期回診治療的傷 勢。 為的內容。具體指示內容會在 *2.傷害是指不需要住院或長期回診治療的受傷、燙傷或觸電等傷 圖形符號裡或者旁邊以圖片或 勢。 文字表示。 *3.財物損失是指波及房屋、電器家具及家畜、寵物等之損失。... - Page 110 安全須知 警 告 不可改造。請勿讓非本公司專業修理技 請勿用於使用說明書記載用途以外的用 術人員對本產品進行分解或維修。 途。 可能會導致火災、觸電或受傷。 且應隨時檢查確保調壓孔或安全閥未受 堵塞。 嚴禁拆卸 〈禁止進行的烹調範例〉 金屬物品,諸如刀子、叉、瓢和鍋蓋,不 • 呈糊狀的 “咖哩或燉煮濃稠湯汁” 等的烹 得放置在電器上,因為它們會變熱。 調方法 • 使用會快速發泡的 “小蘇打” 等產品的烹 調方法 電源線插頭請勿接觸到蒸氣。 • 按照市售的電子鍋所編寫的料理書上記 可能導致火災、觸電或起火。在滑動桌 上使用時,電源線插頭請勿在蒸氣影響 載的烹調方式。 範圍內使用。 • 塑料袋中放入食材或調味料進行加熱的 烹調方法 • 可能會造成調壓孔堵塞的蕃茄或綠葉蔬 菜的烹調方法。 • 使用可能會造成調壓孔堵塞的烹調紙、 鋁箔、保鮮膜做飯的烹調方法 •...
- Page 111 警 告 請勿在靠近牆壁或家具的位置使用。 請勿讓金屬片或異物附著在器具用插頭 上。 蒸氣或高溫可能導致損傷、變色或變形, 因此請離牆壁或傢俱 30cm 以上使用。 否則可能導致觸電、短路或起火。 使用廚房專用收納櫃等時,請注意切勿 請勿使用本產品專用電源線以外的電源 在蒸氣無法散發的環境中使用。 線。請勿將電源線使用在其他機器上。 否則可能導致故障或起火。 30cm 以上 注 意 請勿在蒸氣可能接觸到操作面板的狹小 本電器為家用或類似用途,如下列所示。 空間中使用本產品。 • 商店、辦公室及其他工作環境之員工廚 蒸氣或高溫可能導致操作面板變形或主 房區域 體損傷、變色、變形、故障。 • 農莊 放在滑動桌上使用時,請拉出滑動桌,避 • 旅館、汽車旅館及其他居住型環境之住 免蒸氣接觸到操作面板。 戶 • 提供床鋪及早餐型式之環境 • 民宿型態之環境 請勿在鋁板或電熱毯上使用本產品。 以免因鋁材發熱而導致冒煙或起火。 請勿在會堵塞吸、排氣孔或者室溫較高...
- Page 112 安全須知 注 意 使用中或使用後觸摸內鍋提把時,要使 請勿將產品整機清洗。 用隔熱手套,請勿用手直接觸摸。 此電器不得浸水,可能導致短路和觸電。 因為已經變成高溫,會造成燙傷。 內鍋提把 請勿在煮飯過程中移動電子鍋。 可能導致燙傷或米湯溢出。 搬運本產品時,請勿觸摸開蓋按鍵。 可能因鍋蓋打開,而導致受傷或燙傷。 不使用時,將電源線插頭從插座上拔下。 請勿觸摸或接觸 可能導致受傷、燙傷,或因電源線材劣 搬運本產品時,請勿握住上蓋移動。 化而導致觸電、漏電或火災。 可能會導致燙傷或受傷。務必持主體提 拔下電源插頭 把移動。 取下電源線時請務必握緊插頭。 可能導致觸電或短路,進而導致起火。 禁止同時使用多孔插座。 本產品具調理功能,請勿過度使用容易 可能導致火災。 出現泡沫或容易膨脹的食材。 以避免食材溢出導致事故的發生或產品 故障。 (如 :.黃豆、黑豆、白木耳 ...等,容易產 生泡沫、溢出的食材。 ) 請小心對待本產品。 掉落或強大撞擊,可能導致受傷或故障。 由於會產生磁力線,因此請勿靠近會受 磁力影響的物體。 可能會造成電視、收音機出現雜音,或是 造成金融卡、 捷運悠遊卡、 卡匣式錄音帶、 錄影帶等消磁。...
- Page 113 注 意 „ 延長產品使用壽命的注意事項 ● 內鍋的氟素塗層出現膨脹或剝落會導致變形, ● 請清除主體和內鍋上附著的米飯粒和米粒等。 因此請務必遵守下列使用方法。 可能導致蒸氣外漏、米湯溢出、故障或無法煮出美 • 請勿將內鍋直接放置於瓦斯爐上加熱,或在電 味可口的米飯。 磁爐、微波爐等器具中使用。 • 請勿將白米、免洗米以外的米飯 (什錦飯等) 進 ● 煮飯過程中,請勿用布等覆蓋 行保溫。 電子鍋。 • 請勿在內鍋中使用醋。 可能導致主體或鍋蓋變形或變 • 請勿使用隨附或木製品以外的飯匙。 色。 • 請勿使用金屬製的勺子、湯匙、打蛋器等堅硬 物體。 • 請勿在內鍋上放上篩子等。 ● 冷飯請勿再加熱 (保溫) 。 • 請勿在內鍋中放入餐具等堅硬物體進行清洗。 以避免異味產生。 •...
-
Page 114: 各部名稱及附件
各 部名稱及附件 開箱後,請先確認以下內容。 內蓋 (參照 P.136~138) 正面 背面 調壓孔 調壓球 蒸氣孔蓋 開蓋按鍵 (參照 P.139•140) 按壓後鍋蓋開啟。 蒸氣孔 負壓 密封墊片 安全閥 減壓孔 內蓋密封圈 無法自行拆卸,請勿用力拉扯。 卡榫 內蓋裝卸按鈕 鍋蓋 散熱板 上蓋密封圈 (參照 P.138) 無法自行拆卸,請勿用. 力拉扯。 內鍋 內鍋提把 上框橡膠 開蓋按鍵托 上框 主體 中央感應器 提把 移動主體時,務必握住提把移動。主體處於高溫時, 務必使用隔熱手套。... - Page 115 操作面板 顯示螢幕 保溫燈 [Menu/◀ ▶] 鍵 [Keep Warm] 鍵 煮飯燈 [Hr] 鍵、[M] 鍵 [Cancel] 鍵 預約燈 [Timer] 鍵 [Start] 鍵 [Start] 鍵、[Cancel] 鍵中央的凸出部分 ( .) 是為視障者而設計的。 顯示螢幕有時會因靜電把印字滲出,並不屬於故障。如果在意,請用擰乾的抹布擦拭去除。可透過去除靜電 減輕印字滲出現象。 „ 確認附件 „ 關於鋰電池 〈飯匙〉 〈量杯〉 電子鍋內建鋰電池,因此即使拔下電源線插頭,時間 可立起。 約 1 杯 (約 0.18L) 或預約時間也會持續記憶。 1 杯米約為...
-
Page 116: 從選單可選的功能與特點
從選單可選的功能與特點 預約 選單 保溫 特點 (浸泡) 煮白米時選擇。與 「Plain」 選單相比,雖然口感稍硬,但可用更少的 ○ ○ 耗電量 (大約削減 6~24% 的電量) 煮出美味可口的米飯。 Plain ○ ○ 煮短粒米時選擇。 (標準的煮飯方法。 ) 想讓白米更加香甜、鮮美而富有黏性時選擇。浸泡時間為 「Plain」 的 Ultra ○ ○ 2 倍,且耗時慢慢加熱,煮出的米飯風味格外深遠有層次。 快速煮白米時選擇。煮飯時間較 「Plain」 短,因此煮出的米飯口感會 Quick ○ - 略硬。 想要比 「Quick」 更快煮少量白米時選擇。煮飯時間較 「Plain」 短,因 Express.Limited. -
Page 117: 煮出美味可口米飯的秘訣
煮飯前的準備請參照 P.119~P.120, 煮飯方法請參照 P.121~128。 煮出美味可口米飯的秘訣 選擇優良好米與保存地方 水量的標準 以內鍋的水量刻度為標準。根據米的種類或個人喜 • 請選擇碾米日較近,顆粒飽滿有光澤的米。 好加減水量。如果要加減水量時,加減幅度請避免 • 請保存在通風良好、陰暗涼爽處。 超過基準水量刻度的三分之一。可能導致溢出的原 使用隨附的量杯正確量米 因。 加減水量的標準表 量杯平口盛滿一杯約為 0.18L。 • 免洗米也請使用隨附的量杯量米。 選單 加減水量 (對照內鍋的水量刻度線) 「Eco」 的水量刻度。 迅速洗米 Plain. 「Plain」 的水量刻度。 Ultra 「Ultra」 的水量刻度。 將量好的米倒進內鍋,加進足夠的水快速攪動洗米 Quick 「Plain」 的水量刻度。 後,立刻將水倒掉。 . Express.Limited. 「Express.Limited.cups」... - Page 118 加入配料煮飯時 糙米、什穀糙米中加入白米煮時 一杯米的配料請控制在約 70g 以下 ( 「Porridge」 • 什穀糙米為糙米中加入什穀雜糧的米。 選單除外) 。 仔細攪勻調味料,將配料放到米上。 • 糙米、什穀糙米比白米多時,請選擇 「Brown」 選 加入配料煮飯時,請務必遵守最大煮飯量 (下表) 。 單煮。 • 糙米、什穀糙米與白米等量,或白米較多時,請 可加入配料煮飯的 1.0L 型 1.8L 型 選擇 「Plain」 選單煮。 (先將糙米、什穀糙米浸於 選單 水中 1~2 小時,使其充分浸泡。 ) Porridge•Firm 0.5 杯 1.5 杯 Brown 2 杯...
-
Page 119: 煮飯前的準備
煮 飯前的準備 量米 擦拭乾淨水珠、米粒等,並確認內 蓋是否堵塞 請務必使用隨附的量杯進行計量。 隨附量杯平口盛滿一杯約為 0.18L (約 150g) 。 〈內鍋外側及邊緣〉 Tips ● 免洗米也可以用隨附的量杯進行計量。 〈正確的測量範例〉 〈錯誤的測量範例〉 〈主體內側〉 Note 內蓋 ● 請勿超過規定煮飯量標準 (請參照 P.157 的規格 表) 煮飯。可能會無法煮出美味可口的米飯。 主體內側 加入配料煮飯時,請參照 P.118。 ● 請勿加入莧菜、小米等小顆粒什穀雜糧,否則容易 造成堵塞。調壓孔或安全閥如果被堵塞,因蒸氣外 上框 洩或煮沸時溢出會導致燙傷或受傷。 ● 使用計量米箱等器具有時會出現誤差。可能無法煮 中央 出美味可口的米飯。 感應器 洗米... - Page 120 煮飯前的準備 將內鍋放進主體,並以雙手確實關 Note 閉鍋蓋 ● 保溫燈亮燈時,按 [Cancel] 鍵使其熄滅。 (2) 關閉 內鍋 亮燈 內蓋 亮燈 (1) 安裝 切勿按下操 喀擦 作鍵 嗶 熄滅 „ 關於聲響 • 在未放入內鍋的狀態下按下 [Start] 鍵時,或是長按 [Keep.Warm] 鍵時,會發出 「嗶嗶」 的提示音。 Note • 如果介意聲響時,可以調整音量。 (參照 P.149) ● 壓力式電子鍋的內鍋內部密封性很高,因此有時會 難以關閉鍋蓋。請確認鍋蓋是否已確實蓋緊。 連接電源線 (2) 插入...
-
Page 121: 煮飯方法
煮飯方法 選擇煮飯後的保溫種類 按下 [Menu/◀ ▶] 鍵,選擇想要 的煮飯選單 按下 [Keep Warm] 鍵。每按 1 次,即會 每按一下, 選單的方框便會依序移動切換。 (參 在 「Keep Warm On」 與 「Keep Warm 照下圖) Off」 之間輪流切換。 (保溫燈亮燈時,按下 [Cancel] 鍵再度設定。 ) 亮燈 ■煮白米時 ( 「Plain」 的方框會亮燈) 嗶 亮燈 亮燈 • 煮飯過程中亦可選擇是否要保溫。 • 如果已經事先選好是否要保溫時,則無需再次選 擇。關於保溫,請參照 P.129。 【選擇 「Keep Warm Off」 時】 嗶嗶... -
Page 122: 煮飯所需的時間
煮飯方法 不得已須停止煮飯時 警 告 要打開鍋蓋時,請務必進行以下步驟的操作。 以免因米飯、食材溢出,造成燙傷或受傷。 請確認蒸氣孔蓋附近是否有人。 按下 [Cancel] 鍵停止煮飯。 從蒸氣孔處會噴出大量高溫蒸氣,敬請多加 注意。 等待約 2 分鐘,確認 「Pressure」 顯示 燈已熄滅,且不再冒蒸氣後,再按下開 蓋按鍵。 若是按下 [Cancel] 鍵後便立刻打開鍋蓋, 可能導致燙傷。 ■繼續煮飯時 將內鍋裡的米和水全部換新,主體充分冷卻後, 再重新開始煮飯。 若在煮飯過程中按下 [Cancel] 鍵,即會停止煮 飯。若未將內鍋裡的米和水全部換新,便重新 開始煮飯,剛才煮到一半的米會再次從頭開始 煮,可能導致焦底或無法煮出美味可口的米飯。 煮飯所需的時間 Plain Ultra Quick Express.Limited.cups Long-grain 1.0L 型 36~50 分鐘... -
Page 123: 米飯煮好後
米飯煮好後 煮好飯後會自動開始保溫。 打開鍋蓋 (已事先選擇 「Keep.Warm.On」 時) 警 告 嗶 - 嗶- 嗶-… (發出 8 次響聲) ● 要打開鍋蓋時,請務必進行以下步驟的操作。以免 因米飯、食材溢出,造成燙傷或受傷。 (1) 確認蒸氣孔不再冒蒸氣。 (2) 請確認 「Pressure」 顯示燈是否已熄滅。 亮燈 (3) 按下開蓋按鍵打開鍋蓋。 蒸氣孔 亮燈 熄滅 開蓋按鍵 • 選擇 「Keep.Warm.Off」 時,保溫燈與選擇的 選單會閃爍,此時不會進行保溫。如果持續放 在內鍋內,可能導致食物出現異味、發黏或腐 壞,因此請立刻將食物取出。 • 「Porridge」 選單過程中添加食材,或煮飯時 間不足時,請在保溫燈點亮或閃爍的狀態下, 按 [Hr] 鍵.[M] 鍵。調整追加煮飯時間後,再 按... -
Page 124: 電子鍋使用完畢後
電 子鍋使用完畢後 務必按下 [Cancel] 鍵 嗶 熄滅 Note ● 若不取消保溫就拔出電源線插頭,下次使用時保溫 燈會亮燈,無法煮飯。 拔下電源線插頭後,再拔下器具用 插頭 (1) 拔下 電源線插頭 (2) 拆卸 器具用插頭 清潔保養 (參照 P.135~141) シンガポール・香港向け... -
Page 125: 預約煮飯方法
預約煮飯方法 按下 [Menu/◀ ▶] 鍵,選擇想要 的煮飯選單 P.121 • 如果已經事先選好選單,就無需再次選擇選單。 亮燈 4 ·7 嗶嗶 確認顯示. 燈已熄滅。 關於預約煮飯 (Timer1•2) 可以按照就餐的時間煮好米飯。 選擇 「Porridge」 選單時,請按 • 選擇 「Timer1」 或 「Timer2」 後設定預約時刻,便 [Hr] 鍵或 [M] 鍵調整煮飯時間 可在預約的時刻煮好米飯。. • 設定好的時刻將會保留記憶, 「Timer1」 、 • 每按1次[Hr]鍵,會增加5分鐘,每按1次[M] 「Timer2」 的 2 段時刻均可設定。 鍵,會減少5分鐘。... - Page 126 預約煮飯方法 按下 [Timer] 鍵,選擇 「Timer1」 „ 關於聲響 或 「Timer2」 ● 按下 [Timer] 鍵後,如果 30 秒之間未進行任何操 作,將會發出 「嗶嗶」 的提示音。 每按 1 次,即會依 「Timer1」 → 「Timer2」 → ● 在無法預約煮飯的狀態下設定預約煮飯時,如果按 「Soak.Timer」 順序切換。 下 [Timer] 鍵後,會發出 「嗶嗶」 的提示音。 • 預約浸泡時,請參照 P.127。 ● 如果介意聲響時,可以調整音量。 (參照 P.149) 顯示前次設定的...
-
Page 127: 預約浸泡方法
預約浸泡方法 選擇 「Porridge」 選單時,請按 [Hr] 鍵或 [M] 鍵調整煮飯時間 • 每按 1 次 [Hr] 鍵, 會增加 5 分鐘, 每按 1 次 [M] 鍵,會減少 5 分鐘。 3·6 • 可在 40~90 分鐘範圍內以 5 分鐘為單位進行 設定。 關於預約浸泡 (吸水) 增加 5 分鐘 減少 5 分鐘 開始煮飯前,可設定將白米浸泡水中使其自然吸水的... - Page 128 預約浸泡方法 „ 關於聲響 ● 按下 [Timer] 鍵後,如果 30 秒之間未進行任何操 作,將會發出 「嗶嗶」 的提示音。 ● 在無法預約浸泡的狀態下設定預約浸泡時,如果按 下 [Timer] 鍵,則會發出 「嗶嗶」 的提示音。 ● 如果介意聲響時,可以調整音量。 (參照 P.149) 按下 [Hr] 鍵或 [M] 鍵調整白米浸 泡時間 亮燈 閃爍 閃爍 嗶 • 10~60 分鐘內可以 10 分鐘為單位設定。 • 每按 1 次 [Hr] 鍵,會增加 10 分鐘,每按 1 次 [M] 鍵,會減少...
-
Page 129: 關於保溫
關於保溫 „ 選擇 「Keep Warm Off」 時 保持白米的光澤美味。 „ 關於保溫種類 煮飯結束後,不會進行保溫。如果持續放在內鍋內, 可能導致食物出現異味、發黏或腐壞,因此請立刻將 ● 可選擇是否要保溫。 煮飯前按下 [Keep.Warm] 鍵, 食物取出。 選擇 「Keep.Warm.On」 或 「Keep.Warm.Off」 。 (參照 P.121) 閃爍 ● 由於會自動記憶上次是否要進行保溫的選擇,只要 選擇未變,即無需再次選擇。 ● 預設為 「Keep.Warm.On」 。 „ 選擇 「Keep Warm On」 時 煮飯結束後會自動切換為保溫。 閃爍 „ 保溫少量米飯時 將米飯集中到內鍋中央保溫,並請儘快食用。 亮燈... -
Page 130: 再加熱方法
再加熱方法 按下 [Start] 鍵 保溫中的米飯可於食用前進行再加熱,便能熱騰騰地 品嚐。 Note ● 如果米飯超過內鍋一半以上,因米飯的量多,可能 無法充分加熱。 ● 如果在下列情況下進行再加熱,米飯可能會偏乾。 • 米飯才剛煮好,還很燙時 閃爍 熄滅 嗶- • 米飯少於最小煮飯量 (1.0L.型 1 杯、 1.8L 型 2 杯) 時 • 3 次以上重複加熱時 攪拌保溫中的米飯 剩下 5 分鐘 時會顯示剩 餘時間 灑入 1~2 大匙的水並均勻翻動 閃爍 嗶-嗶-嗶- (連響3 次)... -
Page 131: 烹調 ( 「Slow Cook」 選單
烹調 ( 「Slow Cook」 選單) 烹調時的基本操作步驟 可以輕鬆的使用本產品烹煮出以下料理。作法相關說 明請參照食譜指南 (P.154) 刊載的食譜。 準備食材 「Slow Cook」 選單 先用接近沸騰溫度的高溫烹煮,接著將溫度降低後, 再燉煮片刻。之後,進一步將溫度降低,繼續燉煮。 將食材放入內鍋,關閉鍋蓋 透過慢慢降低加熱溫度進行燉煮,不僅食物會更加入 味,即便長時間加熱,也無需擔心湯汁煮乾。 可以完成熬煮烹調與 20 分鐘以內的輕鬆短時間烹調。 Note 食譜範例 ● 放入食材時,要以內鍋內側的 「Plain」 水量刻度為 標準。 (參照下表) ·熬煮烹調···. 蔬 菜雞肉濃湯、紅燒肉 ● 超過最大量烹調時可能會出現溢出現象。此外,就 ·短時間烹調···茄汁燉雞肉與鴻喜菇 算是少於最小量,有時也會出現溢出現象,敬請多 →參照食譜指南 (P.154~155) 加注意。 「Plain」 的水量刻度 禁止進行的烹調範例... - Page 132 烹調 ( 「Slow Cook」 選單) 調整烹調時間 • 烹調結束後會繼續保溫,並以每小時為單位顯 示保溫經過時間 (1 小時 (1h)~6 小時 (6h) ) 。 按下 [Hr] 鍵或 [M] 鍵,調整烹調時間。 如果超出 6 小時,會閃爍顯示 「6」 。 1~30.分鐘範圍內能以 1 分鐘為單位,30~ • 有些料理若是持續保溫,可能會影響風味,請 180 分鐘範圍內能以 5 分鐘為單位設定。 多加注意。 • 料理當中如果有使用到酸味較強的食材時,請 • 每按一次[Hr]鍵設定時間會增加,每按一 避免長時間保溫,盡早食用。 次[M]鍵設定時間會減少。...
-
Page 133: 蛋糕烘烤方法 ( 「Cake」 選單
蛋糕烘烤方法 ( 「Cake」 選單) 按下 [Menu /◀ ▶] 鍵選擇 可以製作食譜指南 (P.153) 刊登的蛋糕。 「Cake」 選單 Note 亮燈 ● 製作食譜指南中未記載的蛋糕時,可能會出現麵糊 溢出等無法順利烘烤的情況,請多加注意。 嗶 ● 請勿使用超過食譜指南刊登食譜的份量製作。 . 以免麵糊溢出。 事先處理好食材,將麵糊倒入內鍋, 敲出麵糊的空氣 調整加熱時間 按下 [Hr] 鍵或 [M] 鍵調整加熱時間。可在 5~ 80 分鐘範圍內以 5 分鐘為單位進行設定。 Note • 每按一次 [Hr] 鍵設定時間會增加,每按一次 [M] 鍵設定時間會減少。... - Page 134 蛋糕烘烤方法 ( 「Cake」 選單) 烘烤完成後 蛋糕烤好後… 保溫燈閃爍。 按下 [Cancel] 鍵 嗶-嗶-嗶-… 「0」 閃爍 按下 [Cancel].鍵後,保溫燈會熄滅。 (發出8 次響聲) 閃爍 嗶 熄滅 閃爍 熄滅 務必清洗內鍋與內蓋等,去除異味 (清 (1) 打開鍋蓋,用竹籤戳入蛋糕的中央 (如果沒 洗方法→ P.141) 。 沾到麵糊就表示內部烤熟了) 。 • 沾到麵糊時,在保溫燈閃爍的狀態下,按下[Hr]鍵, 調整追加的加熱時間,按下[Start]鍵 。 (每次最 長可追加15分鐘,最多可追加3次。) Note ● 追加烘烤前請勿按下 [Cancel]。保溫燈停止閃爍 後就無法繼續烘烤。如果已經按下了,請按照以下...
-
Page 135: 清潔保養方法
清潔保養方法 本書未記載的維修事宜,請委託經認可的維修業者。 使用後,為了保持鍋體乾凈,請務必在當天進行清潔保養。此外,還要定期進行清潔保養。 烹調完成後,容易留下異味,因此請在當天去除異味。 (參照 P.141) Note ● 請務必拔下電源線插頭,等待主體、內鍋、內蓋、蒸氣孔蓋冷卻後再進行清潔保養。 ● 為了防止變質或產生異味,請隨時保持內鍋及內蓋的清潔。 ● 請勿使用稀釋劑、去污粉類、漂白劑、化學抹布、金屬鍋鏟、菜瓜布等。 ● 拆卸下各部位後請進行清潔保養。 ● 請勿放入洗碗機或烘碗機等產品清洗。否則可能導致變形或變色。 ◆使用清潔劑進行清潔保養時,請使用家庭用中性洗碗精 (餐具用、廚具用) 。 ※ 如果殘留清潔劑成分,會造成樹脂劣化或變色,因此請確實將清潔劑沖洗乾淨。 ※ 如果使用非中性的清潔劑清洗,可能會導致變色或腐蝕等。 ◆請使用海綿或布等柔軟的工具。 請勿使用菜瓜 ◆ 請 勿使用海綿的菜瓜布面、科技海綿清洗。以免導致內鍋的氟 布面進行清洗。 素塗層與內蓋的塗料脫落。 „ 使用後每次都需清洗的物品 (1) 用海綿沾取加入冷水或溫水稀釋後的清潔劑,仔細沖 洗乾淨。 (2) 用乾布擦拭乾淨水分,並充分乾燥。 Note ● 每次使用後,仔細清洗內鍋的內側與外側。 ● 請勿將餐具類放入內鍋中,及把內鍋當作洗碗池使用。此外 在晾乾內鍋時,請勿與餐具重疊放置。以免劃傷氟素塗層,... - Page 136 清潔保養方法 (1) 用海綿沾取加入冷水或溫水稀釋後的清潔劑,仔細沖 內蓋 洗乾淨。 正面 安全閥 (2) 用乾布擦拭乾淨水分, 並充分乾燥。 調壓孔 內蓋髒汙時,會容易沾附水珠。 調壓孔•調壓球•減壓孔 當黏有米飯粒、米粒時,請擦拭乾淨。 以流動水仔細沖洗乾淨。 安全閥 內蓋密封圈 從內蓋表面以手指輕壓下 2~3 次,如沾有飯粒、米粒時,請擦 負壓密封墊片 拭乾淨。 正面 背面 調壓球 按壓下 2~3 次,確認安全 閥是否有堵塞,並以流動 水洗清內部。 負壓密封墊片 在帶著內蓋的狀態下清洗。 . 萬一脫落了,請注意方向進行安裝。 (參照 P.138) 減壓孔 安全閥 內蓋密封圈 清洗內蓋密封圈時,請勿從內蓋上拆下,並切勿拉扯。不慎拆 拆卸•安裝 (參照 P.138) 下時,請洽詢原購買處。...
- Page 137 „ 每次弄髒後都要清潔保養的部位 主體外側、內側 鎖擋部位 請用擰乾的布擦拭乾淨。 鎖擋部位、上蓋密封圈部位、開蓋部位、上框 當黏有飯粒、米粒時,請擦拭乾淨。 內蓋裝卸. 鎖擋 按鈕 蒸氣. 感應器 上蓋密封圈 蒸氣感應器 請用布或棉花棒等輕輕拭去水分。 上框橡膠 中央感應器 當沾有燒焦的飯粒、米粒等時,請擦拭乾淨。 鍋蓋 無法順利清除時,可使用市面上銷售的砂紙 (320 號左右) 擦拭,再用乾布擦拭。 Note 上框 ● 主體內部嚴禁進水。 ● 請勿拉扯上蓋密封圈。 一旦脫落後,便無法再裝回。密封圈不慎脫落時,請洽 中央. 感應器 詢原購買處。 開蓋部位 進氣孔•排氣孔 請用棉花棒等拭去灰塵。 Note 排氣孔 ● 當進氣孔、排氣孔有灰塵等附著時,請勿使用。 否則會因主體內部溫度上升,引起故障或火災。...
- Page 138 清潔保養方法 安裝或拆卸內蓋 „ 拆卸方法 內蓋裝卸按鈕 拉起內蓋裝卸按鈕,將內蓋向前 拉下拆卸。 (1) 往上拉起 提把 (2) 拆卸 „ 安裝 (1) 插入 (2) 插到底,直到響起 「喀嘰」 的 聲響 請將內蓋左右卡榫牢牢嵌入凹槽內。 卡榫 凹槽 Note ● 請勿拉扯上蓋密封圈、內蓋密封圈。如果拆卸下來,就無 上蓋密封圈部 法再次安裝上。 鍋蓋 如上蓋密封圈、內蓋密封圈脫落時,請洽詢原購買處。 內蓋密封圈 請勿拆下密封圈。 請勿用力按壓或過度拉扯。 . 以免導致蒸氣外漏或鍋蓋無 法打開等故障。 內蓋 負壓密封墊片的安裝 • 請務必按照安裝方向安裝 正面...
- Page 139 安裝或拆卸蒸氣孔蓋 „ 拆卸方法 (2) 蓋上罩蓋, 並扣上鎖扣直到聽見 「喀嘰」 聲響。 (1) 將手指伸進鍋蓋的凹洞處,往上提起。 (2) 插到底,直到響起 「喀嘰」 的聲響. 開蓋部位 蒸氣孔蓋 (3) 牢固地安裝到電子鍋主體上。 將蒸氣孔蓋從自己的方向嵌進電子鍋主體。 (2) 翻過蒸氣孔蓋,如圖所示拆除蒸氣孔蓋主體。 蒸氣孔蓋主體 (2) 打開 (1) 對準 (1) 打開 (2) 嵌進 (3) 拆卸 Note ● 蒸氣孔蓋要確實嵌緊。 . 請務必確實嵌緊,否則可能影響風味或導致米湯溢 出或燙傷。 „ 安裝方法 蒸氣孔蓋 (1) 將蒸氣孔蓋主體的卡榫嵌進罩蓋裡。如果嵌 入不夠徹底,可能會導致脫落、蒸氣外洩等, 因而引發故障。 蒸氣孔蓋主體...
- Page 140 清潔保養方法 蒸氣孔蓋專用密封圈的安裝 蒸氣孔蓋專用密封圈類脫落時,請依圖示方式謹慎 密封圈 地確實嵌緊。如果嵌入的不夠徹底,可能會導致脫落、 嵌進 蒸氣外洩等,因而引發故障。 Note 蒸氣孔蓋主體 ● 請務必安裝好密封圈類再使用。 . 如未安裝,可能會因蒸氣外漏而無法煮出美味可口 的米飯。 ● 請勿拆卸圓形密封圈。 . 脫落時,請按照原樣牢固嵌入。 圓形密封圈 ● 無法順利安裝時,可以在密封墊片沾少許水,即可 輕易安裝。 シンガポール・香港向け...
- Page 141 清洗方法 當感覺有異味或在烹調之後,請進行清洗。 (1) 在內鍋加水至 「MAX」 線後,放進主體裡。 (6) 按下 [Cancel] 鍵後,先拔下電源線插頭, 再拔下器具用插頭。 「MAX」 線 嗶 (2) 連接電源線。 熄滅 (2) 插入 (1) 插入 (7) 待主體冷卻之後,倒掉內鍋的熱水,再進行 清潔保養。 器具用插頭 Note 電源線插頭 ● 清洗後,內鍋和主體會發熱,請多加注意。以免會 (3) 按下 [Menu/◀ ▶] 鍵,選擇 「Clean 導致燙傷。 care」 選單。 ● 如欲連續清洗時,請務必待主體冷卻之後再重新清 洗。由於主體會呈現高溫,可能會影響清洗效果。 亮燈 Tips ● 希望清除異味時,可在清潔保養時,在水中加入檸 嗶 檬酸...
-
Page 142: 覺得煮好的米飯不美味時
覺得煮好的米飯不美味時 煮好的米飯或煮飯中、保溫中與再加熱後的米飯有異狀時,請調查以下幾點內容。 糧 米 煮 的 煮 選 使 就 使 或 內 內 煮 煮 查看內容 量 量 飯 水 飯 單 用 直 用 水 鍋 鍋 好 飯 、 及 時 時 選 了 接 電 珠 外... - Page 143 有下述情況時 理由 產生一層薄膜 米紙狀薄膜是澱粉融解乾燥後形成的,對人體無害。 米飯黏內鍋 太軟的米飯或黏度較高的米飯較容易黏內鍋。 ( 米 水 內 煮 沾 密 未 反 上 預 持 免 查看內容 量 珠 鍋 好 有 封 充 覆 約 續 洗 或 等 外 的 飯 圈 分 進 煮 保...
-
Page 144: 覺得烹調的料理或蛋糕不美味時
覺得烹調的料理或蛋糕不美味時 烹調的料理或烘烤的蛋糕出現異常時,請調查以下幾點內容。 食 加 加 烹 烹 烹 保 蛋 滴 內 內 密 沒 器 查看內容 材 入 入 調 調 調 溫 糕 等 鍋 鍋 封 有 具 圈 種 的 的 時 時 非 烤 外 變... -
Page 145: 出現故障時
出現故障時 在委託維修前請確認。 參照. 有下述情況時 確認 處理 頁面 未在預約好的時間煮好 顯示的現在時間是否正確? 請正確設定時間。 確認 P.142 「煮飯時間長」 項目,採取因應處理。 如果設定的時間短於預約設定的標準時間,可能不會依照預約的時間煮好. 飯。 按下 [Timer] 鍵後,會發出 「嗶嗶」 的 是否按下 [Start] 鍵了? 如果未按下 [Start] 鍵,無法完成預 126• . 提示音,無法設定預約煮飯 (浸泡) 約。 顯示時間是否閃爍顯示 「0:00」? 正確調整現在的時間後,再進行預. 約。 是否選擇了 「Quick」 、 「Express.Limited.cups」 、 「Sweet」 、 「Mixed」 、 126•... - Page 146 出現故障時 參照. 有下述情況時 確認 處理 頁面 上框存留水珠 剛煮好飯或保溫期間,有時上框會存留水珠,並不屬於故障。存留於上框時, 請用乾布擦拭。 內蓋是否有髒汙?. 請用清潔劑仔細清洗內蓋。 內蓋有髒汙時, 有時會殘留較多水珠。 是否選擇了 「Eco」?. 選擇 「Eco」 煮飯時,有時會殘留較多水珠。 如果介意時,建議選擇 「Plain」 煮飯。 按鍵無反應 是否已把器具用插頭插入插頭插口, 請將插頭確實插好。 120• 且電源線插頭也已插入插座? 125• 127• 保溫燈是否亮燈? 按下 [Cancel] 鍵,取消保溫後再進行 操作。 電源線插頭冒出火花 插拔電源線插頭時,有時會冒出小火花,這是 IH 式產品特有的現象,並不 - 屬於故障。 有樹脂等異味 剛開始使用時,可能會聞到樹脂等異味,隨著您使用次數增多就會減少。如...
- Page 147 顯示 參照. 顯 示 處 理 頁面 若將電子鍋主體放在地毯上,有時可能會因為進氣孔、排氣孔堵塞,而 顯示 「E02」 ,並發出 「嗶嗶嗶嗶嗶嗶…」 音 使得溫度上升,導致即使按下操作鍵也沒有反應。 此外,若將電子鍋主體放在室溫較高的地方,有時可能會因為溫度上升 而出現相同症狀。 如有此種情況,請按照以下步驟處理。 (1).拔下電源線插頭。 - (2).移到不會堵塞進氣孔、排氣孔且室溫較低的地方。 (3).重新將電源線插頭插入插座,並操作按鍵。 顯示 「E11」 ※. 進 行上述處理後,按鍵仍無反應時,應為電子鍋主體異常。請拔下電 源線插頭後,至原購買處委託維修。 顯示 「E02」 與 「E11」 以外之 「E」 開頭的 可能是故障。請拔下電源線插頭後,至原購買處委託維修。 — 代碼 有關樹脂密封圈零件 如果樹脂或密封圈零件受熱或沾了蒸氣,可能因長期使用出現老化、損壞。請洽詢原購買處。 シンガポール・香港向け...
-
Page 148: 燜飯時間的調整方法 ( 「Express.limited.cups」 選單
燜飯時間的調整方法 Express Limited cups ( 「 」 選單) 請在把電源線插頭插入插座後的狀態下,分別在30秒以內完成 下列的順序(1)~(7)。如果超過30秒未進行任何操作時,會恢 ● 模式調整. ● 數值切換 復至現在時間顯示,無法進行設定。如果想再次設定時,請從 5: 燜飯時間調整 0: + 0 分鐘 頭開始重新進行設定。 1: + 1 分鐘 煮飯 (烹調) 過程中、保溫期間、預約設定期間、預約煮飯 (浸泡) 2: + 2 分鐘 期間、再加熱過程中與追加加熱過程中,無法變更設定。 ※若想在中途停止調整,請按下[Cancel]鍵。 „ 想要調整燜飯時間時 選擇「 」選單煮飯時,想要調整燜飯時間的話,請按下列順序調整時間。 Express.Limited.cups (1) 按下 [Menu/◀ ▶] 鍵,選擇 「Plain」 選單。 (4) 按下[Start]鍵。... -
Page 149: 音量調整方法
音量調整方法 請在把電源線插頭插入插座後的狀態下,分別在30秒以 內完成下列的順序(1)~(7)。如果超過30秒未進行任何 ● 模式調整 ● 數值切換 操作時,會恢復至現在時間顯示,無法進行設定。如果 4: 音量調整 音量調整 :0~- 2 想再次設定時,請從頭開始重新進行設定。 煮飯(烹調)過程中、保溫期間、預約定時期間、預約 煮飯(浸泡)期間與再加熱過程中,無法變更設定。 ※若想在中途停止調整,請按下[Cancel]鍵。 „ 想要調整音量(按鍵操作聲、提示聲)時 如果介意按鍵操作聲與提示聲的音量時,請依照以下步驟調整音量。 (1) 按下 [Menu/◀ ▶] 鍵,選擇 「Plain」 選單。 (4) 按下[Start]鍵。 (2) 按壓[Timer]鍵約3秒以上。 (5) 按下[Hr]鍵與[M]鍵調整音量。 閃爍 閃爍 音量調整 0 : 大 (預設) - 1 : 中 - 2 : 小 (3) 確認模式切換至[4]。 若確認模式切換至[5]時,請按下[Hr]鍵與[M] (6) 按下[Start]鍵。 鍵,將模式設為[4]。 (7) 按壓[Timer]鍵約3秒以上,便會完成設 閃爍... -
Page 150: 食譜指南
. ● 本食譜指南中所使用的量杯為約 0.18L (隨附的量杯) 。 食譜指南 . ● 1 大匙為 15mL。.. . ● 1 小匙為 5mL。 . ● 醬油或味醂等調味料太多時,可能無法煮出美味可口的米飯。 . ● 煮免洗米時無需洗米。 . ● 各道料理所記載的熱量僅為參考。 味噌奶油醬炒鮭魚 什錦飯 Mixed Brown 糙米拌飯 選單 選單 322kcal/ 422kcal/ 1 人份 1 人份 „ 材料 (6 人份) „... - Page 151 鹹 魚羊栖菜什穀雜 七 草粥 Porridge Multigrain 糧拌飯 選單 選單 115kcal/ 362kcal/ 1 人份 1 人份 „ 材料 (4 人份) „ 材料 (6 人份) . ● 米…1 杯 . ● . 米 …3 杯 . ● 鹽…1/3 小匙 . ● 什穀雜糧…4 又 1/2 大匙 (40g) .
- Page 152 紅豆飯 油 飯 Sweet Sweet 選單 選單 329kcal/ 426kcal/ 1 人份 1 人份 „ 材料 (6 人份) „ 材料 (6 人份) . ● 糯. 米 …3 杯 . ● 蝦米…10g . ● 豬五花…110g . ● 竹筍…20g . ● 糯. 米 …3 杯 .
- Page 153 手卷壽司 海 綿蛋糕 Sushi Cake 選單 選單 309kcal/ 341kcal/ 1/8 杯 1 人份 (1.0L 塊) (僅壽司米的熱量) (不含水果) 1.0L 型 1.8L 型 „ 材料 (5 人份) „ 材料 (1 個) (1 個) . ● 壽司米 白米…3 杯......昆布…3cm 見方 1 片 . ● 雞蛋 (M) 4 顆...
- Page 154 「現煮」 美味菜肴輕鬆做! Slow Cook 輕輕鬆鬆就能做出發揮食材原味的道地料理。 選單 Note ● 烹調時請充分攪拌,以免調味料沉澱在內鍋鍋底。 ● 要以湯汁燉煮時,請待湯汁完全冷卻後再開始烹調。 ● 要以太白粉勾芡時,請在烹調即將完成前的最後步驟再加入。 ● 由於竹輪、魚板等魚漿製品在加熱後會膨脹,請斟酌份量。 ● 請勿使用金屬製的勺子、湯匙、打蛋器等堅硬物體。 ● 烹調結束後,請去除異味。 (參照 P.141 「清洗方法」 ) ● 烹調時間不足時,追加烹調前請勿按下 [Cancel] 鍵。保溫燈熄滅了就無法繼續烹調。 (若已按下時,請將內鍋從主體拿出放在濕布上, 並打開鍋蓋,放置 10 分鐘,冷卻主體與內鍋。之後將內鍋重新放進主體內,開始烹調。 ) 蔬 菜雞肉濃湯 紅 燒肉 Slow Cook Slow Cook 選單...
- Page 155 茄 汁燉雞肉 Slow Cook 與鴻喜菇 選單 短時間烹調食譜 189kcal/ 1 人份 1.0L 型 1.8L 型 „ 材料 (4 人份) (6 人份) . ● 雞腿肉 (切丁) 250g 380g . ● 鹽、胡椒 各少許 各少許 . ● 鴻喜菇 1 包 1 又 1/2 包 (已切除蒂頭)...
-
Page 156: 現在時間的調整方法
現在時間的調整方法 時間以24小時制顯示。 正進行以下動作時,無法調整時間。 • 煮飯(烹調)過程中、保溫期間、預約設定期間、預約煮飯(浸泡)期間、再加熱過程中與追加加熱過程中 • 選擇「Porridge」、「Slow.Cook」與「Cake」選單時 „ 例:將「9:30」調整為「9:35」時 連接電源線 調整時間 • 按下 [Hr] 鍵調整 「小時」 ,按下 [M] 鍵調整 「分 鐘」 。 (2) 插入 (1) 插入 • 持續按壓,可快速變換時間。 • 調整好時間後按下[Start]鍵, 即完成時間調 整。 亮燈 器具用插頭 電源線插頭 嗶 設為時間設定模式 按下[Hr]鍵或[M]鍵,會顯示 。 顯示 亮燈... -
Page 157: 發生停電時•器具用插頭脫落時
規格 尺寸 1.0L (5.5 杯) 型 1.8L (10 杯) 型 額定電壓及額定頻率 220.-.230.V.~.50.-.60.Hz 總額定消耗電功率 (W) 1085 1213 0.18~1.0 (1~5.5 杯) 0.36~1.8 (2~10 杯) Plain 0.18~1.0 (1~5.5 杯) 0.36~1.8 (2~10 杯) Ultra 0.18~1.0 (1~5.5 杯) 0.36~1.8 (2~10 杯) Quick 0.18~1.0 (1~5.5 杯) 0.36~1.8 (2~10 杯)... - Page 158 TIGER CORPORATION Head Office: 3-1 Hayami-cho, Kadoma City, Osaka 571-8571, Japan シンガポール・香港向け...
Need help?
Do you have a question about the JPT-H10S and is the answer not in the manual?
Questions and answers