Table of Contents
Advertisement
Quick Links
Advertisement
Table of Contents

Subscribe to Our Youtube Channel
Related Manuals for Torque TANK MX


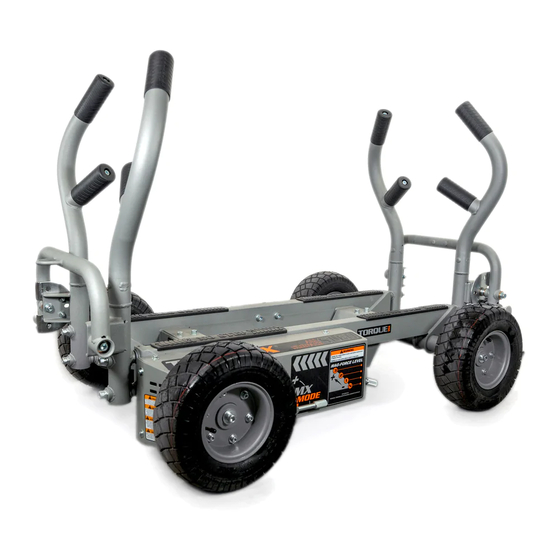
Summary of Contents for Torque TANK MX
- Page 1 TANK MX ASSEMBLY GUIDE VERSION: XTTMX-RPH-101 PART #: 5672701-B...
-
Page 2: Table Of Contents
WEIGHT HORN STACKING KIT (OPTIONAL): PAGES 9 - 10 • WHEELBARROW ATTACHMENT (OPTIONAL): PAGE 11 • TANK MX HANDLE ADJUSTMENTS: PAGE 12 • TANK MX HANDLE STORAGE AND STACKING: PAGES 13 - 14 • TANK MX RESISTANCE ADJUSTMENTS: PAGE 15 • INSPECTION & LUBRICATION: PAGE 16 •... -
Page 3: Tank Mx Assembly: Pages
STEP 1 NOTE: Before assembling Tires, check Tire pressure. Make sure Tires are inflated to 30 PSI NOTE: Align Groove in Hub with Cross Pin in Axle (4X) NOTE: SECURELY tighten all bolt connections in this step. - Page 4 STEP 2 Pull Spring Pin and rotate Handle up 180 degrees NOTE: Repeat this step for the other COMBO HANDLE.
- Page 5 STEP 3 NOTE: After this step is complete, pull Spring Pin and rotate Handle down 180 degrees (2X) NOTE: SECURELY tighten all bolt connections in this step.
- Page 6 STEP 4 NOTE Align "R" Label on Right Handle with "R" Label on Receiver. (Repeat this step for other Right Handle) NOTE Align "L" Label on the Left Handle With "L" Label on Receiver. (Repeat this step for other Left Handle)
-
Page 7: Weight Horn Kit (Optional): Pages
XTWHK WEIGHT HORN KIT (OPTIONAL) STEP 1 Loosen and remove (8) Bolts, (16) Flat Washers and (8) Nuts Loosen (4) side Bolts but DO NOT remove NOTE: Handles have been hidden for assembly clarity. - Page 8 XTWHK WEIGHT HORN KIT (OPTIONAL) STEP 2 SECURELY assemble (2) Weight Horns using the (8) Bolts, (16) Flat Washers and (8) Nuts from previous step SECURELY tighten side Bolts (4X) NOTE: SECURELY tighten all bolt connections in this step. Handles have been hidden for assembly clarity.
-
Page 9: Weight Horn Stacking Kit (Optional): Pages
XTWHSK WEIGHT HORN STACKING KIT (OPTIONAL) STEP 1 Loosen and remove (8) Bolts, (16) Flat Washers and (8) Nuts Loosen (4) side Bolts but DO NOT remove NOTE: Discard these (8) Bolts. Bolts will be replaced NOTE: Handles have been hidden for assembly clarity. - Page 10 XTWHSK WEIGHT HORN STACKING KIT (OPTIONAL) STEP 2 SECURELY assemble (2) Weight Horns and (2) Alignment Cups to TANK using (8) NEW Bolts, (16) Flat washers and (8) Nuts from previous step SECURELY tighten side Bolts (4X) NOTE: SECURELY tighten all bolt connections in this step. Handles have been hidden for assembly clarity.
-
Page 11: Wheelbarrow Attachment (Optional)
WHEELBARROW HANDLE ATTACHMENT (OPTIONAL) NOTE Match "R" Label on Right Wheelbarrow Handle with "R" Label on Rear Frame NOTE Match "L" Label on Left Wheelbarrow handle with "L" Label on Rear Frame... -
Page 12: Tank Mx Handle Adjustments
XTTMX HANDLE POSITIONS Pull Spring Pin to rotate Handle COMBO HANDLE HANDLE DOWN: STORAGE POSITION COMBO HANDLE Attach Tow Straps here (2X) COMBO HANDLE HANDLE HORIZONTAL: LIFTING POSITION AND PUSHING POSITION HANDLE UP: TOWING POSITION AND PUSHING POSITION... -
Page 13: Tank Mx Handle Storage And Stacking: Pages
XTTMX STORAGE/STACKING STEP 1 Remove Left and Right Push Handles and gently place them inside the Tray of the TANK... - Page 14 XTTMX STORAGE/STACKING STEP 2 COMBO HANDLE NOTE: Make sure Receivers are seated SECURELY over Weight Horns (2X) NOTES: Use two people to lift TANKS. Use COMBO HANDLES to stack tanks on top of each other. Make sure both RECEIVERS on the bottom of the TANK are seated securely over the WEIGHT HORNS on top of the TANK (see inset).
-
Page 15: Tank Mx Resistance Adjustments
XTTMX RESISTANCE ADJUSTMENT & MX MODE POSITION 3: HARD RESISTANCE POSITION 2: MEDIUM RESISTANCE POSITION 1: LOW RESISTANCE POSITION N: NEUTRAL NOTE: ENGAGING THE MX MODE WILL INCREASE THE RESISTANCE AT ANY LEVEL N - 3. RESISTANCE INCREASES APPROXIMATELY 30% AT LEVEL 3... -
Page 16: Inspection & Lubrication
INSPECTION & LUBRICATION INSPECTION: ATTENTION: PLEASE ENSURE THAT ALL TIRES ARE INFLATED TO 30 PSI. FAILURE TO DO SO MAY RESULT IN TANK VEERING DURING USE. Once a month, check for loose bolts on handles, wheels and weight horns (optional) as indicated. Tighten if necessary. Once a month, check that the chain and sprockets are clean, free of rust, dust and grime. -
Page 17: Safety And Warning Notices
TANK MX. • DO NOT drop the weight plates onto the TANK MX. Doing so, may result in damage to the TANK MX. • DO NOT use the TANK MX in wet or slippery conditions.
Need help?
Do you have a question about the TANK MX and is the answer not in the manual?
Questions and answers