
Related Manuals for Sutter Instrument MP-225A


Summary of Contents for Sutter Instrument MP-225A
- Page 1 MP-225A Motorized Micromanipulator System Operation Manual Rev. 2.04 ( 20211111) One Digital Drive Novato, CA 94949 Voice: 415-883-0128 Web: www.sutter.com Fax: 415-883-0572 Email: info@sutter.com...
- Page 2 Copyright © 2021 Sutter Instrument Company. All Rights Reserved MP-225A MOTORIZED MICROMANIPULATOR SYSTEM OPERATION MANUAL – REV. 2.04 (20211111)
-
Page 5: Dislaimer
SAFETY WARNINGS AND PRECAUTIONS Electrical Operate the MP-225A system ROE/controller using 110 – 240 VAC., 50-60 Hz line voltage. This instrument is designed for use in a laboratory environment that has low electrical noise and mechanical vibration. Surge suppression is always recommended. -
Page 6: Operational
Doing so can result in physical injury (e.g., fingers can be caught and pinched between the moving parts of the micromanipulator). If the MP-225A system is used in a microinjection environment, please observe the following. As with most micromanipulation devices, sharp micropipettes can fly out of their holder unexpectedly. -
Page 7: Table Of Contents
3.3.10 Movement Knobs Disabling and Lock Mode ([SPEED]/LOCK) ........16 3.3.11 Pausing Home Movements (HOME (while moving to Home)) ........16 3.3.12 Pausing Work Movements (WORK (while moving to Work)) .......... 16 APPENDIX A. LIMITED WARRANTY .................... 17 MP-225A MOTORIZED MICROMANIPULATOR SYSTEM OPERATION MANUAL – REV. 2.04 (20211111) - Page 8 APPENDIX B. ACCESSORIES ......................19 APPENDIX C. TECHNICAL SPECIFICATIONS ................21 APPENDIX D. QUICK REFERENCE ....................23 D.1. Manual Operation ......................... 23 D.2. Configuration..........................24 Rear-Panel DIP Switches ....................... 24 MP-225A MOTORIZED MICROMANIPULATOR SYSTEM OPERATION MANUAL – REV. 2.04 (20211111)
- Page 9 Figure 2-4. Setting the angle of the headstage/rotary dovetail.............. 7 Figure 2-5. Rear of MP-225A ROE/Controller cabinet................8 Figure 2-6. Configuration switches on the of MP-225A ROE/Controller units (switch positions shown are factory defaults)..................... 9 Figure 3-1. MP-225A controls......................... 11 Figure 3-2.
- Page 10 Table 3-1. Maximum positive position value of each axis ..............12 Table 3-2. Screen colors and modes ......................16 Table C-1. MP-225A Controller cables and receptacles/connectors............ 22 Table D-1. MP-225A configuration switches (rear)................24 MP-225A MOTORIZED MICROMANIPULATOR SYSTEM OPERATION MANUAL – REV. 2.04 (20211111)
-
Page 11: Instrodction
Introduction, which provides an overview and general description of the MP-225 system; Chapter 2, Installation, which describes how to install, set up, and configure all components of the system; and Chapter 3, Operations, which describes tow to operate the MP-225A integrated REO/controller. -
Page 12: Technical Support
Figure 1-1. MP-225A Components. 1.3 Technical Support Unlimited technical support is provided by Sutter Instrument Company at no charge to our customers. Our technical support staff is available between the hours of 8:00 AM and 5:00 PM (Pacific Time) at (415) 883-0128. You may also E-mail your queries to info@sutter.com. -
Page 13: Installation
2.1.1 Mounting the MP-225 Series to the Stand or Platform The MP-225 attaches to the mounting adapter plate using four M3.5x6 hex head locking screws. MP-225A MOTORIZED MICROMANIPULATOR SYSTEM OPERATION MANUAL – REV. 2.04 (20211111) -
Page 14: Figure 2-1. Side View Of Mp-225 Showing Mounting Adapter Plate And Lock Screws
Before reattaching the MP-225 to the adapter plate, you need to decide where to position the manipulator and adapter plate on your stand/platform. The stand can be any flat surface carrying ¼-20, 10-32, or M6 holes on one-inch or 25mm centers (such as a Sutter Instrument MT-series stand or MD series platform). -
Page 15: Figure 2-2. Mounting The Mp-225 On The Adapter Plate
“support” such that the three cables running to the micromanipulator have some slack or “service loops” so none of the cables are puling on the manipulator. MP-225A MOTORIZED MICROMANIPULATOR SYSTEM OPERATION MANUAL – REV. 2.04 (20211111) -
Page 16: Headstage Mounting
(not sown). The following mounting accessories are included with the manipulator and are shipped in several plastic bags. Rod holder Dovetail extension (4 inches (10.16 cm)) Ground Cable Hardware for mountain plate Hex wrenches Figure 2-3. MP-225A accessories. MP-225A MOTORIZED MICROMANIPULATOR SYSTEM OPERATION MANUAL – REV. 2.04 (20211111) -
Page 17: Other Accessories
(i.e., rotating base, microscope stage mount, gantry, dovetail extension, etc.). Setup of these accessories is normally covered in the documentation accompanying the accessory, MP-225A MOTORIZED MICROMANIPULATOR SYSTEM OPERATION MANUAL – REV. 2.04 (20211111) -
Page 18: Electrical Connections And Initial Power Up
Power up the system by moving the power switch on the rear of the REO to the “1” position. CAUITION: NEVER CONNECT OR DISCONNECT TO THE REO/CONTROLLER FROM THE ELECTROMECHANICLE MANIPULATOR WHILE THE POWER IS ON! MP-225A MOTORIZED MICROMANIPULATOR SYSTEM OPERATION MANUAL – REV. 2.04 (20211111) -
Page 19: Roe/Controller Rear Panel Controls And Configuration
A set of 6 DIP switches on the back of integrated ROE/controller configure various functions of the MP-225. Figure 2-6. Configuration switches on the of MP-225A ROE/Controller units (switch positions shown are factory defaults). 2.5.2.1 Switches 1, 2, 3, and 4 These switches set the directionality for each of four axes. -
Page 20: Switch 5: Y-Axis Lockout During Home And Work Moves
Homing on Disabled: Automatic calibration does not occur Power On at power on. Power-off position is retained in DOWN memory until next power on. * Factory default (recommended normal operation settings) MP-225A MOTORIZED MICROMANIPULATOR SYSTEM OPERATION MANUAL – REV. 2.04 (20211111) -
Page 21: Operating Instructions
You will now be in the Relative display mode at RELATIVE 0,0,0 and the display will turn from green to blue. You can toggle back and forth using the RELATIVE button. MP-225A MOTORIZED MICROMANIPULATOR SYSTEM OPERATION MANUAL – REV. 2.04 (20211111) -
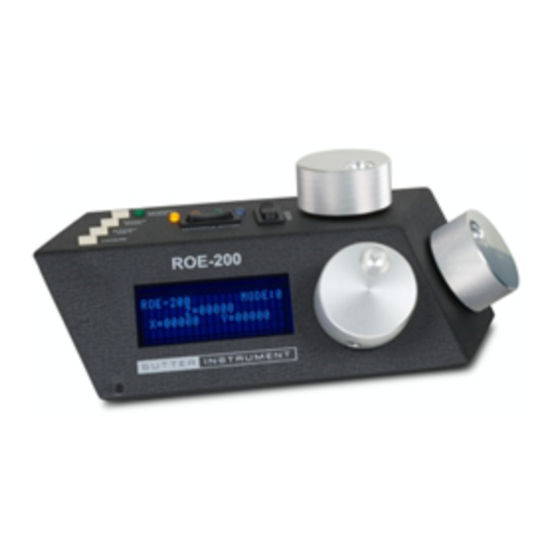
Page 22: Detailed Display Instructions
Green) Figure 3-2. LCD Display showing startup screen. When starting the MP-225A system for the first time or if the HOME position has not yet been defined (saved), the values of all four axes will be 1,000 micrometers (microns). TRIO MP-225A (Text in REV 2.9... -
Page 23: Speed Control (Speed)
You will have 0 seconds t set a new value. Rotate the Z knob on the ROE to set the value of the angle. Once this value is dialed in, do not touch the ROE knob for 8-10 sec. The virtual D angle will now be set. MP-225A MOTORIZED MICROMANIPULATOR SYSTEM OPERATION MANUAL – REV. 2.04 (20211111) -
Page 24: Moving To The Home Position
To move to the Work position, press the WORK button. If the current position before pressing WORK is less than the Work position, the movement will be as follows: 1. Movement travels along the Y-axis away from the operator and towards the microscope. MP-225A MOTORIZED MICROMANIPULATOR SYSTEM OPERATION MANUAL – REV. 2.04 (20211111) -
Page 25: Setting Position For Home Or Work
3.3.9 Display Coordinates (Absolute/Relative) Modes Indications The MP-225 system has two modes of operation: Absolute coordinate and Relative coordinates. The display turns color for each specific mode, as shown in the following table. MP-225A MOTORIZED MICROMANIPULATOR SYSTEM OPERATION MANUAL – REV. 2.04 (20211111) -
Page 26: Movement Knobs Disabling And Lock Mode ([Speed]/Lock)
3.3.12 Pausing Work Movements (WORK (while moving to Work)) After Move to Work has been initiated, and while the move is in progress, pressing WORK a second time pauses the manipulator. Pressing WORK again resumes movement. MP-225A MOTORIZED MICROMANIPULATOR SYSTEM OPERATION MANUAL – REV. 2.04 (20211111) -
Page 27: Appendix A. Limited Warranty
Warranty work will be performed only at the factory. The cost of shipment both ways is paid for by Sutter Instrument during the first three months this warranty is in effect, after which the cost is the responsibility of the customer. - Page 28 (This page intentionally left blank.) MP-225A MOTORIZED MICROMANIPULATOR SYSTEM OPERATION MANUAL – REV. 2.04 (20211111)
-
Page 29: Appendix B. Accessories
Hinged headstage mount M100106 Flat side panel for controller For use with MT- or MD-series stands/platforms, or any surface with 1-inch centered holes. XenoWorks® is a registered trademark of Sutter Instrument Company. MP-225A MOTORIZED MICROMANIPULATOR SYSTEM OPERATION MANUAL – REV. 2.04 (20211111) - Page 30 (This page intentionally blank.) MP-225A MOTORIZED MICROMANIPULATOR SYSTEM OPERATION MANUAL – REV. 2.04 (20211111)
-
Page 31: Appendix C. Technical Specifications
System Power consumption 60-Watts maximum Mains fuses None replaceable (power protection built into the Power Adapter) Cables (Refer to the following tables for a description of all possible cables.) MP-225A MOTORIZED MICROMANIPULATOR SYSTEM OPERATION MANUAL – REV. 2.04 (20211111) -
Page 32: Table C-1. Mp-225A Controller Cables And Receptacles/Connectors
(hooded) receptacle) NOTE: A ferrite at the controller end is strongly recommended (Fair-Rite part number 0443164-251). Fair-Rite Products Corp., P.O. Box J, One Commercial Row, Wallkill, NY, 12589, USA MP-225A MOTORIZED MICROMANIPULATOR SYSTEM OPERATION MANUAL – REV. 2.04 (20211111) -
Page 33: Appendix D. Quick Reference
Angle Entry: Press and hold down SET then press NORM/DIAG * [angle]. On release of both buttons, the enter angle prompt will display for 10 seconds. Use the Z knob to select angle between 0 and 90. MP-225A MOTORIZED MICROMANIPULATOR SYSTEM OPERATION MANUAL – REV. 2.04 (20211111) -
Page 34: Configuration
Z-Axis Knob Rotation for Forward (+) Movement (Diagonal Mode) Clockwise* OFF* DOWN* Disabled* Y Axis Lock Out for Homing Enabled DOWN Enabled * Calibration Homing on Power On ** Disabled DOWN NOTES: MP-225A MOTORIZED MICROMANIPULATOR SYSTEM OPERATION MANUAL – REV. 2.04 (20211111) - Page 35 Home Position ...... 14 system power consumption ......21 moving to the Work Position ....... 14 technical support ............. 2 pausing Home movements ......16 travel ..............21 pausing Work movements ......16 MP-225A MOTORIZED MICROMANIPULATOR SYSTEM OPERATION MANUAL – REV. 2.04 (20211111)
- Page 36 ..............21 unpacking and mounting ........3 warranty ..............17 weight ..............21 voltage WORK button (while moving to Work) ....16 input ..............21 NOTES MP-225A MOTORIZED MICROMANIPULATOR SYSTEM OPERATION MANUAL – REV. 2.04 (20211111)
Need help?
Do you have a question about the MP-225A and is the answer not in the manual?
Questions and answers