Table of Contents
Advertisement
Quick Links
Advertisement
Table of Contents

Related Manuals for Daikin DCC601A51


Summary of Contents for Daikin DCC601A51
- Page 1 INSTALLER REFERENCE GUIDE intelligent Tab Controller DCC601A51...
-
Page 2: Table Of Contents
3.2. Optional equipment ............3 4. System overview ............... 3 This document is part of a documentation set. The complete set 4.1. The Daikin intelligent Tab Controller solution ....3 consists of: 4.2. The intelligent Tab Controller kit ........3 Installation manual: ... -
Page 3: Installation
Based on the following accessory list, check that all parts and accessories for the intelligent Tab Controller are included in the kit. If WARNING there is any missing or defective part, contact the Daikin dealer Tear apart and throw away plastic packaging bags so that where you purchased this product. -
Page 4: Optional Equipment
The Daikin intelligent Tab Controller solution allows an end-user to can each be configured as either a normal-open or normal-closed control and manage a wide range of Daikin HVAC equipment from a contact input, or as a pulse input. tablet app and web browser interface. - Page 5 I/O module d Optional Daikin-supplied tablet e Computer with connection to the cloud f Cloud g LAN gateway (optional Daikin-supplied router) h Outdoor unit connected to DIII-NET i Indoor unit connected to DIII-NET j Forced stop contact input k Digital inputs (can be configured as contact inputs or pulse...
-
Page 6: Before Installation
410 mm to allow for the clearance specified in "5.2.2. Required space" on page Mounting direction: vertical only Make sure the installation place complies with the environmental conditions, specified in "15.2. Environmental conditions" on page Installer reference guide DCC601A51 intelligent Tab Controller 4P420109-1 – 2015.10... -
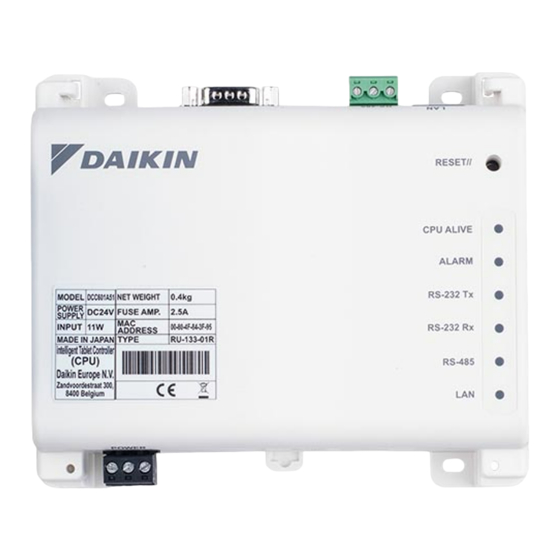
Page 7: The Location Of Terminals And Switches
CPU module and the I/O module. [I/O IF] USB 2.0 type-A socket. Use only this USB socket to connect the CPU module with the I/O module. DCC601A51 Installer reference guide intelligent Tab Controller 4P420109-1 – 2015.10... -
Page 8: Installation Of The Intelligent Tab Controller Hardware
[DIP SW] Mode selector. Factory default: bit 1 is set to: "on"; bits 2-4 are set to: "off". [Lever] To assist mounting / dismounting the module onto / from a DIN rail. Installer reference guide DCC601A51 intelligent Tab Controller 4P420109-1 – 2015.10... -
Page 9: Connecting To Other Equipment
This chapter will describe the procedure to connect the intelligent Tab signal input device for stopping air conditioners, with electric energy Controller kit components with Daikin devices and other equipment. meters for calculating the electricity usage of individual air conditioners or other devices. -
Page 10: Connecting The Power Supply To All Modules
24 V DC For information on the installation, refer to the manual provided with + + - - the Daikin-supplied router. For information on when to use the Daikin-supplied router, refer to "4.4. Additional components in the intelligent Tab Controller solution" on page The following table gives an overview of the most relevant information. -
Page 11: Commissioning
"9.6. Configuring the network settings (local commissioning tool)" on page 9.3. Connecting to the intelligent Tab Controller for the Add all attached (Daikin) equipment to the intelligent Tab first time Controller app. Refer to "9.7. Quick configuration of the connected devices (local commissioning tool)"... -
Page 12: Upgrading The Firmware To The Latest Version
Select Disable. Check if you can make a connection from your computer to the Enter the password (default: "daikin"). CPU module. To do so, open the command prompt on your Make sure the IP address is: "192.168.0.1". -
Page 13: First Run Of The Commissioning Tool
9.6. Configuring the network settings (local Enter the password (default: "daikin") and log in. commissioning tool) In the Time Zone Settings window, select the time zone of the To let the intelligent Tab Controller function within your network, you desired region from the list box and confirm by clicking OK. -
Page 14: Quick Configuration Of The Connected Devices (Local Commissioning Tool)
Click Menu List (a) >> System Settings (b) >> Network (c). Before the intelligent Tab Controller can actually control any of the connected (Daikin) devices, you will need to add them as so-called management points. For more info on management points, refer to "10.2. -
Page 15: Net Commissioning
Make sure to set an AirNet address for all indoor units and outdoor units, and a DIII-NET address for indoor units, using a connected wired remote controller. Make sure you have a list with all connected (Daikin) equipment with the following information: INFORMATION ... - Page 16 Before commissioning, it is necessary to check if all connected To configure or correct the information of the detected devices (model (Daikin) devices have a correct DIII-NET and AirNet address. The name, serial number, etc), proceed as follows: address check will detect faulty address settings (missing addresses In the net commissioning tool, click Port Setup.
- Page 17 Alternatively, if an authentication code was entered, you can To connect to the cloud during the commissioning, you will need to also use the intelligent Tab Controller app on the Daikin-supplied set up the login information. To do so, proceed as follows: tablet (if applicable).
-
Page 18: Operation
After a few seconds, all changes will be applied to the selected management point. After a few seconds, all changes will also be displayed on the connected wired remote controller (if applicable). Installer reference guide DCC601A51 intelligent Tab Controller 4P420109-1 – 2015.10... - Page 19 Check to see if there are any errors. Check for errors: click Check to see if there aren’t any errors in the management points register. DCC601A51 Installer reference guide intelligent Tab Controller 4P420109-1 – 2015.10...
- Page 20 When less air is being supplied into the room, a slightly negative pressure will be created. This can prevent Indoor 1-00~4-15 (default: 1-00) hospital odour and floating bacteria from flowing from the Ventilator 1-00~4-15 (default: 1-00) room into the corridors. Installer reference guide DCC601A51 intelligent Tab Controller 4P420109-1 – 2015.10...
- Page 21 Tab Controller app, in list view. Unit Label For example: kWh, m³, etc. Click Modify to enter the unit of measurement (up to eight characters). DCC601A51 Installer reference guide intelligent Tab Controller 4P420109-1 – 2015.10...
-
Page 22: Changing Date And Time
Click Menu List (a) >> System Settings (b) >> Time/DST (c). Click Modify to change the Date and Time setting. You can choose to Enable or Disable the Daylight Saving Time Settings. Installer reference guide DCC601A51 intelligent Tab Controller 4P420109-1 – 2015.10... -
Page 23: Changing Network Settings
Confirm all settings by clicking OK. INFORMATION The CPU module will restart. The commissioning tool will not automatically restart. To continue with the configuration, exit the commissioning tool and start it again. DCC601A51 Installer reference guide intelligent Tab Controller 4P420109-1 – 2015.10... -
Page 24: Maintenance
>> 12. Upgrading the firmware Maintenance (c). Daikin is constantly trying to improve your user experience. To let the intelligent Tab Controller function as smoothly as possible, please use the latest version of the firmware. The latest version of both tools (version-up tool and commissioning tool) is available on http://www.daikineurope.com/support-and-... -
Page 25: Replacing The Data Backup Battery
Place the new battery. Make sure the new battery is inserted correctly (positive side upwards). Mount the top cover again and tighten the screws. Enable the power to the CPU module. DCC601A51 Installer reference guide intelligent Tab Controller 4P420109-1 – 2015.10... -
Page 26: Technical Specifications
"daikin" Login password net commissioning tool "daikin" Authentication code intelligent Tab Controller Not set (blank) (a) The intelligent Tab Controller app will not work without a set authentication code. (mm) Installer reference guide DCC601A51 intelligent Tab Controller 4P420109-1 – 2015.10... -
Page 27: Wiring Requirements
SDHC Logo is a trademark of SD-3DC, LLC. reuse. By ensuring waste batteries are disposed of correctly, you will help to prevent potential negative consequences for the environment and human health. DCC601A51 Installer reference guide intelligent Tab Controller 4P420109-1 – 2015.10... - Page 28 4P420109-1 2015.10...
Need help?
Do you have a question about the DCC601A51 and is the answer not in the manual?
Questions and answers