Table of Contents
Advertisement
Quick Links
MODEL W1701
1-1/2 HP SHAPER
OWNER'S MANUAL
(FOR MODELS MANUFACTURED SINCE 12/21)
Phone: (360) 734-3482 • Online Technical Support: techsupport@woodstockint.com
COPYRIGHT © AUGUST, 2003 BY WOODSTOCK INTERNATIONAL, INC., REVISED FEBRUARY, 2022 (CS)
WARNING: NO PORTION OF THIS MANUAL MAY BE REPRODUCED IN ANY SHAPE OR FORM WITHOUT
THE WRITTEN APPROVAL OF WOODSTOCK INTERNATIONAL, INC.
***Keep for Future Reference***
V3.02.22
#6915CR Printed in China
Advertisement
Table of Contents

Related Manuals for Shop fox W1701


Summary of Contents for Shop fox W1701
- Page 1 MODEL W1701 1-1/2 HP SHAPER OWNER'S MANUAL (FOR MODELS MANUFACTURED SINCE 12/21) Phone: (360) 734-3482 • Online Technical Support: techsupport@woodstockint.com COPYRIGHT © AUGUST, 2003 BY WOODSTOCK INTERNATIONAL, INC., REVISED FEBRUARY, 2022 (CS) WARNING: NO PORTION OF THIS MANUAL MAY BE REPRODUCED IN ANY SHAPE OR FORM WITHOUT THE WRITTEN APPROVAL OF WOODSTOCK INTERNATIONAL, INC.
- Page 2 This manual provides critical safety instructions on the proper setup, operation, maintenance, and service of this machine/tool. Save this document, refer to it often, and use it to instruct other operators. Failure to read, understand and follow the instructions in this manual may result in fire or serious personal injury—including amputation, electrocution, or death.
-
Page 3: Table Of Contents
Contents ACCESSORIES........35 INTRODUCTION........2 Shaper Accessories ......35 Woodstock Technical Support ....2 Identification ........3 SHOP-MADE.SAFETY.ACCESSORIES..... 37 Controls & Components ......4 Making a Zero-Clearance Fence ..... 37 Machine Specification ......5 Making Featherboards ......38 SAFETY..........7 Making Push Sticks ...... -
Page 4: Introduction
Model W1701 (Mfd. Since 12/21) INTRODUCTION Woodstock.Technical.Support This machine has been specially designed to provide many years of trouble-free service. Close attention to detail, ruggedly built parts and a rigid quality control program assure safe and reliable operation. Woodstock International, Inc. is committed to customer satisfaction. Our intent with this manual is to include the basic information for safety, setup, operation, maintenance, and service of this product. -
Page 5: Identification
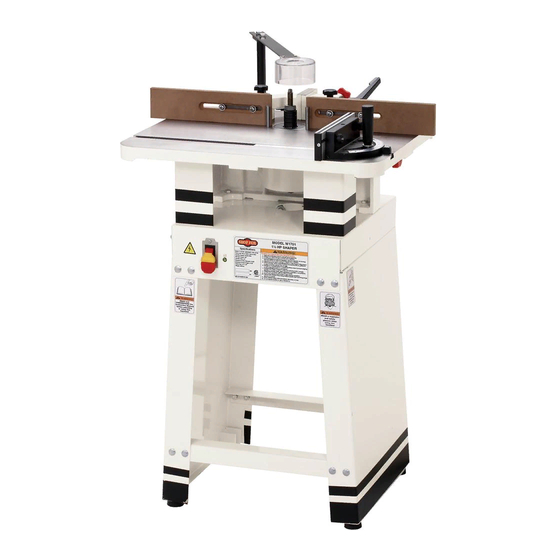
Model W1701 (Mfd. Since 12/21) Identification Become familiar with the names and locations of the controls and features shown below to better understand the instructions in this manual. A. Work Table H. Fence Lock Knob (1 of 2) B. Fence (1 of 2) FOR/REV Switch C. -
Page 6: Controls & Components
Model W1701 (Mfd. Since 12/21) Controls & Components Refer to the Figures 1–3 and the following descriptions to become familiar with the basic controls and components Starting Pin of this machine. Understanding these items and how they Location work will help you understand the rest of the manual and (1 of 2) stay safe when operating this machine. -
Page 7: Machine Specification
Switch Type............ON/OFF Paddle Switch w/Removable Key Motors Main Horsepower....................1.5 HP Phase....................Single‐Phase Amps....................15A/7.5A Speed....................3460 RPM Type................. TEFC Capacitor‐Start Induction Power Transfer ..................Belt Drive Bearings..............Sealed & Permanently Lubricated Model W1701 Machine Specifications, Page 1 of 3... - Page 8 Country of Origin ....................China Warranty ....................... 2 Years Approximate Assembly & Setup Time ............... 1‐1/2 Hours Serial Number Location ................. ID Label on Stand Certified by a Nationally Recognized Testing Laboratory (NRTL) ......... Yes Model W1701 Machine Specifications, Page 2 of 3...
-
Page 9: Safety
Model W1701 (Mfd. Since 12/21) SAFETY SAFETY For.Your.Own.Safety, Read.Manual.Before.Operating.Machine The. purpose. of. safety. symbols. is. to. attract. your. attention. to. possible. hazardous. conditions.. This. manual.uses.a.series.of.symbols.and.signal.words.intended.to.convey.the.level.of.importance.of.the. safety.messages..The.progression.of.symbols.is.described.below..Remember.that.safety.messages.by. themselves. do. not. eliminate. danger. and. are. not. a. substitute. for. proper. accident. prevention. mea- sures—this.responsibility.is.ultimately.up.to.the.operator! - Page 10 Model W1701 (Mfd. Since 12/21) WEARING.PROPER.APPAREL..Do not wear FORCING.MACHINERY..Do not force machine. It clothing, apparel, or jewelry that can become will do the job safer and better at the rate for entangled in moving parts. Always tie back which it was designed.
-
Page 11: Additional Safety For Shapers
Model W1701 (Mfd. Since 12/21) Additional Safety for Shapers Serious.cuts,.amputation,.entanglement,.or.death.can.occur.from.contact.with.rotating.cutter.. Cutters.or.other.parts.improperly.secured.to.spindle.can.fly.off.and.strike.nearby.operators.with. great.force..Flying.debris.can.cause.eye.injuries.or.blindness..To.minimize.risk.of.getting.hurt.or. killed,.anyone.operating.shaper.MUST.completely.heed.hazards.and.warnings.below. AVOIDING.CUTTER.CONTACT: Keep unused portion CUTTER POSITIONING: Whenever possible, make of cutter below table. Use smallest table insert shaping cuts with cutter on underside of work- possible. Adjust fences and guards as close as piece to reduce operator exposure to cutter. -
Page 12: Electrical
Model W1701 (Mfd. Since 12/21) ELECTRICAL Circuit Requirements This machine must be connected to the correct size and type of power supply circuit, or fire or electrical damage may occur. Read through this section to determine if an The machine must be properly set up adequate power supply circuit is available. -
Page 13: Grounding Requirements
Model W1701 (Mfd. Since 12/21) Grounding Requirements This machine MUST be grounded. In the event of certain types of malfunctions or breakdowns, grounding provides GROUNDED 120V 5-15 RECEPTACLE a path of least resistance for electric current to travel—in order to reduce the risk of electric shock. -
Page 14: Setup
Model W1701 (Mfd. Since 12/21) SETUP Unpacking This machine has been carefully packaged for safe This machine presents transportation. If you notice the machine has been serious injury hazards damaged during shipping, please contact your authorized to untrained users. Read Shop Fox dealer immediately. -
Page 15: Inventory
Model W1701 (Mfd. Since 12/21) Inventory The following is a list of items shipped with your machine. I.. Fence Faces .......2 Before beginning setup, lay these items out and inventory J.. Cutterhead Guard ......1 them. K.. Fence Lock Studs ⁄... -
Page 16: Hardware Recognition Chart
Model W1701 (Mfd. Since 12/21) Hardware Recognition Chart USE THIS CHART TO IDENTIFY HARDWARE DURING THE INVENTORY/ASSEMBLY ⁄ " ⁄ " ⁄ " PROCESS. ⁄ " ⁄ " ⁄ " ⁄ " ⁄ " ⁄ " ⁄ " ⁄ "... -
Page 17: Cleaning Machine
Model W1701 (Mfd. Since 12/21) Cleaning Machine To prevent corrosion during shipment and storage of your machine, the factory has coated the bare metal surfaces of your machine with a heavy-duty rust prevention compound. Gasoline.and.petroleum. products.have.low.flash. If you are unprepared or impatient, this compound can points.and.can.explode. -
Page 18: Machine Placement
Model W1701 (Mfd. Since 12/21) Machine Placement Weight.Load Physical.Environment Refer to the Machine.Specifications for the The physical environment where your machine is weight of your machine. Make sure that the operated is important for safe operation and the surface upon which the machine is placed will longevity of its components. -
Page 19: Assembly
Model W1701 (Mfd. Since 12/21) Assembly Before beginning the assembly process, refer to Items. Needed.for.Setup and gather everything you need. Ensure all parts have been properly cleaned of any heavy-duty rust-preventative applied at the factory (if applicable). Be sure to complete all steps in the assembly procedure prior to performing the Test.Run.or connecting... - Page 20 Model W1701 (Mfd. Since 12/21) 6. Level shaper, then tighten all assembly bolts on stand. NOTE: Sheet steel will often “spring” after it has been fabricated at factory, occasionally making it difficult to line up precisely with other parts Fence Face without a bit of effort.
- Page 21 Model W1701 (Mfd. Since 12/21) 15. Place 8mm open-end wrench on top of spindle (see Hold Spindle Figure 13). Here With Wrench Figure 13. Location for wrench on spindle. 16. Using 14mm open-end wrench on drawbar nut, (Figure 14), make sure drawbar nut is tight, but DO NOT over-tighten drawbar nut.
-
Page 22: Test Run
Model W1701 (Mfd. Since 12/21) Test Run Once assembly is complete, test run the machine to ensure it is properly connected to power and safety components are functioning properly. Serious. injury. or. death. can. result. from. using. this. machine. BEFORE. -
Page 23: Operations
Regardless of the content 8. Feeds workpiece through cut while maintaining firm in this section, Shop Fox will not be workpiece pressure against both table and fence, held liable for accidents caused by lack while keeping hands/fingers out of cutting path. -
Page 24: Cutters Vs. Router Bits
Model W1701 (Mfd. Since 12/21) Cutters vs. Router Bits When shipped, the Model W1701 is set up for using shaper cutters. However, if you plan on using router bits, you must first convert the Model W1701 to a router table. To convert your shaper to a router table, refer to Page 43. -
Page 25: Stock Inspection & Requirements
Model W1701 (Mfd. Since 12/21) Stock Inspection & Requirements Here are some rules to follow when choosing and shaping stock: Turn machine OFF and allow cutter to • DO NOT shape stock that contains large or loose come to complete stop before making knots. -
Page 26: Spindle Elevation
Figure 18. Spindle lock knob. during operation. Spindle Direction The Model W1701 is capable of operating in two directions by use of the forward and reverse switch shown in Figure 20. It is very important that the workpiece be fed against the direction of the cutter rotation. -
Page 27: Fence Positioning
Model W1701 (Mfd. Since 12/21) Fence Positioning The two fence faces are independently adjustable to allow for different shaping tasks. The fence faces can be set at different positions to remove material from the entire edge of the wood stock or set at the same position to shape part of the edge. -
Page 28: Cutter Installation
Model W1701 (Mfd. Since 12/21) Cutter Installation Above ACCIDENTAL START-UP HAZARD! Always disconnect machine before installing or removing any cutting equipment. Performing these procedures while machine is connected to power greatly increases risk of serious injury! Figure 24. Rub collar mounted above cutter. - Page 29 Model W1701 (Mfd. Since 12/21) To install cutters and rub collars, do these steps: 1. DISCONNECT MACHINE FROM POWER! 2. Slide cutter(s) and rub collars onto spindle in correct orientation for intended cut. Keyed Safety 3. Install keyed safety washer and nut, as shown in Washer Figure 27.
-
Page 30: Router Bit Installation
Before using router bits, you should convert the shaper to a router table. Refer to Router Table Conversion on Lip Snapped Page 43 to learn how to do this. into Groove The Model W1701 comes with a ⁄ " and ⁄ " router bit collet. -
Page 31: Straight Shaping
Model W1701 (Mfd. Since 12/21) Straight Shaping Because the shaper fence halves are independently Carriage adjustable, you can set up the shaper to cut part or all of Adjustment Knob the workpiece edge. (1 of 2) Note: To quickly set the depth of cut, loosen both... -
Page 32: Partial Edge Removal
Model W1701 (Mfd. Since 12/21) Partial Edge Removal When removing part of the workpiece edge, it is End View important to properly align the fence faces to supported the material from the infeed side to the outfeed side of the table (see Fence Alignment on Page 25). -
Page 33: Template Shaping
Model W1701 (Mfd. Since 12/21) Template Shaping The use of templates allows identical parts to be cut with speed and accuracy. Shaping with a pattern begins by attaching a prefabricated template to the rough CUTTER CONTACT HAZARD! workpiece. The edge of the template rides against a rub... -
Page 34: Freehand Shaping
Model W1701 (Mfd. Since 12/21) Freehand Shaping Freehand shaping is shaping without the aid of the miter slot or fence. The most dangerous part of shaping freehand is beginning the cut, when the cutter first contacts the workpiece. Often the workpiece will tend to jerk or kickback, catching the operator off guard. - Page 35 Model W1701 (Mfd. Since 12/21) Using Starting Block Sometimes the starting pin will not be in the most Pattern w/ advantageous position. To remedy this situation, firmly Clamp Hand-Holds clamp a board in the desired position to act as a starting block (see Figure 40).
-
Page 36: Shaping Small Stock
Model W1701 (Mfd. Since 12/21) Shaping Small Stock Feeding small stock through a shaper is always dangerous. If you must shape small stock, use a zero-clearance fence. This will provide greater protection for the operator, ALWAYS. u se. h old-downs. o r. f eatherboards. -
Page 37: Accessories
Model W1701 (Mfd. Since 12/21) ACCESSORIES Shaper Accessories The following shaper accessories may be available through your local Woodstock International Inc. Dealer. If you do not have a dealer in your area, these products are also available through online dealers. Please call or e-mail Woodstock International Inc. Customer Service to get a current listing of dealers at: 1-800-840-8420 or at sales@woodstockint.com. - Page 38 Roman Carbide, all housed in a handsome wooden box. This is an unbelievable buy. W1500—Right Angle Jig The SHOP FOX® Right Angle Jig is constructed using top quality alu- minum castings and plates which are machined to exacting toleranc- es. It has the perfect weight-use ratio to dampen vibration, yet is still light enough to easily slide the workpiece through the machining process.
-
Page 39: Shop-Made.safety.accessories
Model W1701 (Mfd. Since 12/21) SHOP-MADE SAFETY ACCESSORIES Making a Zero-Clearance Fence A zero-clearance fence provides more support than a standard fence and reduces tearout on narrow/fragile stock. It is the best way to reduce the risk associated with shaping inherently dangerous small stock. -
Page 40: Making Featherboards
Model W1701 (Mfd. Since 12/21) Making Featherboards Featherboards flex with minor height or width variations from stock as it passes through. Because of the consistent 30°-45° pressure featherboards place on the stock, cuts are more 4"-6" Cut fingers consistent, the risk of kickback is greatly reduced, and "-... -
Page 41: Making Push Sticks
Model W1701 (Mfd. Since 12/21) Making Push Sticks Supporting: A second push stick can be When used correctly, push sticks reduce the risk of injury by keeping hands away from the cutter/bit. In the event used to keep the workpiece firmly against of an accident, a push stick can absorb damage that the fence while cutting. -
Page 42: Making Box Guards
Figure 47 shows one way to make and attach a box guard to the Model W1701. This guard replaces the clear plastic guard that is included with the shaper. For durability and strength, use a hardwood when making box guards. -
Page 43: Maintenance
Model W1701 (Mfd. Since 12/21) MAINTENANCE General For optimum performance from your machine, follow this maintenance schedule and refer to any specific instructions given in this section. Ongoing (with each use) • Loose mounting bolts. • Vacuum all dust on and around the machine. -
Page 44: Service
Model W1701 (Mfd. Since 12/21) SERVICE General This section covers the most common service adjustments or procedures that may need to be made during the life of your machine. If you require additional machine service not included in this section, please contact Woodstock International Technical Support at (360) 734-3482 or send e-mail to: techsupport@woodstockint.com. -
Page 45: Router Table Conversion
Model W1701 (Mfd. Since 12/21) Router Table Conversion The provided table spacer kit allows you to modify your shaper for use as a router table by raising the table. A higher table will allow you to make shallow cuts and utilize the upper blade area of most router bits with standard-length shanks. -
Page 46: Spindle Cartridge Replacement
Model W1701 (Mfd. Since 12/21) Converting Router Table to Shaper Items.Needed. Flat Wrench 26mm ..........1 Open-End Wrenches 8, 14, 30mm .......1 Ea. Wrench/Socket 17mm ..........1 Hex Bolts M12-1.75 x 20 ........2 Flat Washers ⁄ " ..........2 Hex Bolts M12-1.75 x 25 ........5 Lock Washers ⁄... -
Page 47: Resurfacing Fence
Model W1701 (Mfd. Since 12/21) To replace spindle cartridge assembly, do these steps: Pulley Cover 1. DISCONNECT MACHINE FROM POWER! Mounting Bolts 2. Remove spindle and drawbar from spindle cartridge assembly. (Remove tapered drawbar nut and tap drawbar up to knock it loose.) 3. -
Page 48: Troubleshooting
Model W1701 (Mfd. Since 12/21) Troubleshooting The following troubleshooting tables cover common problems that may occur with this machine. If you need replacement parts or additional troubleshooting help, contact our Technical Support. Note: Before contacting Tech Support, find the machine serial number and manufacture date, and if available, your original purchase receipt. - Page 49 Model W1701 (Mfd. Since 12/21) Operations PROBLEM POSSIBLE CAUSE CORRECTIVE ACTION Workpiece is 1. Dull cutter. 1. Replace cutter or have it professionally sharpened. burned when cut. 2. Too slow of a feed rate. 2. Increase feed speed. 3. Pitch build-up on cutter.
-
Page 50: Electrical Safety Instructions
Model W1701 (Mfd. Since 12/21) Electrical.Safety.Instructions These pages are current at the time of printing. However, in the spirit of improvement, we may make changes to the electrical systems of future machines. Compare the manufacture date of your machine to the one stated in this manual, and study this section carefully. -
Page 51: Electrical Components & Wiring
Model W1701 (Mfd. Since 12/21) Electrical Components & Wiring Ground Start Capacitor Capacitor 300μF 40μF 125VAC 250VAC 6-15 Plug (As Recommended) FOR/REV SWITCH KEDU Neutral HY29D 5-15 Plug (Prewired) 120 VAC Ground Motor Prewired for 120V KEDU HY18 20/12A 125/250V... -
Page 52: Parts
Model W1701 (Mfd. Since 12/21) PARTS Main 353A 350 351 432V2-11 432V2-3 432V2-2 432V2-1 432V2-8 432V2-10 344A 432V2-5 432V2-9 432V2-6 432V2-7 432V2-4 407A 433V2 432V2 317V3 311V2 309V2 419 420 -50-... - Page 53 Model W1701 (Mfd. Since 12/21) Main Parts List PART # DESCRIPTION REF PART # DESCRIPTION X1701301 SIDE PANEL X1701351 KNOB FEMALE M6-1.0 X1701302 TIE BAR X1701352 WORKING TABLE X1701303 RUBBER FOOT X1701353 TABLE INSERT 13/8" HOLE X1701304 PHLP HD SCR M4-0.7 X 25 353A X1701353A TABLE INSERT 13/4"...
- Page 54 Model W1701 (Mfd. Since 12/21) Main Parts List (Cont.) PART # DESCRIPTION PART # DESCRIPTION X1701400 RUB COLLAR 1/2" X 13/16" X 3/8" 432V2-4 X1701432V2-4 MOTOR FAN X1701401 CUTTER SPINDLE 432V2-5 X1701432V2-5 MOTOR FAN COVER X1701402 COLLET NUT 432V2-6 X1701432V2-6...
-
Page 55: Warranty
Woodstock International, Inc. will repair, replace, or arrange for a dealer refund, at its expense and option, the Shop Fox machine or machine part proven to be defective for its designed and intended use, provided that the original owner returns the product prepaid to an authorized warranty or repair facility as designated by our Bellingham, Washington office with proof of their purchase of the product within two years, and provides Woodstock International, Inc. - Page 56 High Quality Machines and Tools Woodstock International, Inc. carries thousands of products designed to meet the needs of today’s woodworkers and metalworkers. Ask your dealer about these fine products: ® WHOLESALE ONLY Phone: (360) 734-3482 Fax: (360) 671-3053 Toll Free Fax: (800) 647-8801 P.O.
Need help?
Do you have a question about the W1701 and is the answer not in the manual?
Questions and answers