Table of Contents
Advertisement
Quick Links
Advertisement
Table of Contents

Related Manuals for Kiloview S2 HEVC


Summary of Contents for Kiloview S2 HEVC
- Page 1 , S2 HEVC 4K Video Encoder USER MANUAL KILOVIEW Electronics CO., LTD...
- Page 2 Legal Notices Subject to the receiving of this document from Changsha Kiloview Electronics Co., Ltd., (Hereinafter referred to “Kiloview”), the following terms are understood and agreed. Or else, please stop using this document. This document is copyright of Kiloview, all rights reserved. The document covers the proprietary information of the company.
-
Page 3: Table Of Contents
CONTENTS 1. Product Introduction ................................ 1 1.1 Advantages ................................1 1.2 Parameters ................................2 2 Operation Guidance ......................... 错误!未定义书签。 3 Device Interface Description ......................错误!未定义书签。 3.1 Device Interface Description ..........................3 3.2 Signal Indicator Light ............................5 4 Installation And Conection .............................. 6 4.1 Video Signal Connection ............................ - Page 4 6.3 Text And OSD Overlay ............................17 6.3.1 Text Overlay ..............................17 6.3.2 OSD Overlay ............................... 18 6.4Color Adjustment ..............................20 6.5 Image And Rotation ............................20 6.5.1 Horizontal Mirror ............................. 20 6.5.2 Vertical Flip ..............................20 6.2.3 Flip ................................. 21 6.5 Video Cropping ..............................
- Page 5 8 User Management ................................41 9 Location & Time Management ........................... 41 10 System Setup ............................ 错误!未定义书签。 10.1 Language ................................42 10.2 Restore .................................. 42 10.3 Reboot ................................... 42 10.4 Firmware Upgrade ............................43...
-
Page 6: Product Introduction
1. Product Introduction S2 is an UHD 4K HDMI video encoder, which supports up to 4Kp60 input and H.265 (HEVC)/H.264 high-performance encoding with Gigabit wired network transmission. Also, it supports the most common protocols including NDI|HX/SRT/RTMP/RTMPS/HLS/UDP/RTSP, etc. 1.1 Advantages UHD and low latency ... -
Page 7: Parameters
1.2 Parameters Model HDMI input HDMI 2.0 Analog audio interface 1*3.5mm Line in USB interface USB2.0 Video interface 1 channel HDMI input,1 channel HDMI loop Network 1000M Ethernet Support Streaming protocols NDI|HX/SRT/RTMP/HLS/TS-UDP Video resolution input Up to 4KP60 Video encoding H.264/H.265 Encoding resolution 4KP30... -
Page 8: Operation Guidance
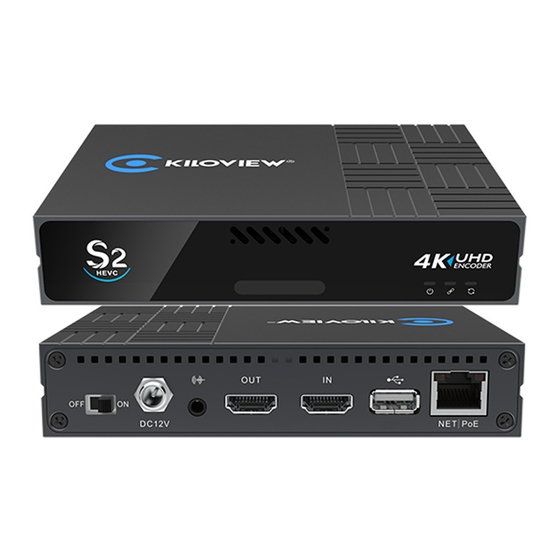
Operation Guidance Installation and connection ⚫ Connect the power, Ethernet cable and video input source correctly, power on the device. Network connection and configuration ⚫ The simplest way is to access the unit via Ethernet through default IP address (192.168.1.168) to login the WEB page for setting (default username and password: admin/admin). - Page 9 2. Status 1. Tally 3. Power Switch 4. Power Port Indicator 5. 3.5mm Line In/Line 8. USB Expansion 6. HDMI Loop 7. HDMI Input Port...
-
Page 10: Signal Indicator Light
9. GbE port with PoE 10. Reset 3.2 Signal indicator light Name Color Status Description Always on Power connected POWER White Flashing Power off or failure No power supplied or power failure Quick flashing Network connected LINK Network connection abnormal or restore factory White Slow flashing setting indication (Run light will be flashing as well) -
Page 11: Installation And Conection
Installation and Connection 4.1 Video signal connection Connect HDMI signal from a source (such as camera) to the device HDMI port through a cable. 4.2 Network connection Connect the network cable to Ethernet port, and connect the other end to the network switch or directly to the network port of the computer. -
Page 12: Power Connection
4.3 Power Connection Using the power adapter (DC 12v) to connect to the power connector of the device. Turn on power switch, the power light will be on and the device starts working, which will take 30~40s. Note: If your switch supports POE power supply, there is no need to connect to the power supply. -
Page 13: Login And Network Configuration
5. Login and Network Configuration 5.1 Device login 1. The default management IP address for the device: The default management IP address of the encoder is 192.168.1.16, which could be used as device management all the time and no effects on the device business IP address. - Page 14 DHCP). This IP address could be used for network streaming and device management. After configured IP address, you could directly visit this IP address to login to the device. There are two ways to get the address, one is DHCP, and the other is manually. To use DHCP, please ensure that the router or switch has enabled the DHCP service.
-
Page 15: Advanced Setting
5.2.2 Advanced setting HTTP/HTTPS setting The default web service port is 80 (https port is 443). You can change it (range: 1- 65535) accordingly. After revised corresponded port, visit device configuration page. You need to add the changed port behind the device IP address before you visit. -
Page 16: Status Column
Note: It is required that professional person with knowledge of the current network routing table or network to operate routing strategy. Incorrect configuration may cause device abnormal. Parameter Configuration 6.1 Status column In the status column, the left window is for preview of the video source either with image or video. -
Page 17: Audio & Video Encoding Setting
Video source: Display the interface of the source ⚫ Encoding format: Display the encoding format of the source ⚫ Resolution: Display encoding resolution of the source ⚫ Real time bit-rate: Display real-time encoding bit-rate changes of signal ⚫ source. Network flow: Display the real-time consumption flow changes of signal. ⚫... -
Page 18: Video Encoding Parameter
audio source, you can select HDMI embedded audio or analog Line in. Default setting is HDMI embedded audio. 6.2.2 Video encoding parameter Main streaming encoding parameters setting parameter as below: Two ways of encoding mode, the main stream and sub stream can be ⚫... - Page 19 Monochrome is black and white color, “with color” remains the original color. Default setting is “With color”. “Profile” supports High profile, main profile, baseline, which is set ⚫ according to platform supported encoding profile. High Profile is the highest compression efficiency, that is, under the same bit-rate, image quality is the best; Baseline is the most widely supported;...
-
Page 20: Audio Encoding Parameter
60, and normally it could meet the most majority of needs. 6.2.3 Audio encoding parameter Audio encoding modes include AAC and G.711 for choice. Audio sampling is chosen according to actual situation. Audio channels consist of “Stereo” and “Mono”. Encoding bit-rate is adjustable between16K-512K, default is 64Kbps. The input channel supports 4 audio channels input. - Page 21 3)After setting completed, you can select corresponding audio channel for encoding when creating streaming service.
-
Page 22: Text And Osd Overlay
6.3 Text and OSD overlay 6.3.1 Text overlay 1)Enter “ OSD”—“Image management”—“Add image”. 2)Fill in “image ID in the pop up window, choose the image to upload, and then save. You can check the image and information listed under the Image list. Fill in name in the pop-up window, select the image to upload, and then save. -
Page 23: Osd Overlay
5)The configured image overlay will be shown at the station column, check the image overlaid, and finally check image overlay to make it effect. Note: Due to the limits of storage space, up to 10 images can be uploaded, and the maximum size of a single image is 5M. The resolution of uploaded image cannot be over the video. - Page 24 “Image”, “Time and Date” and “Text” respectively. Overlay type: “Text, Date, Time, Date/Time, and Image” for options. ➢ Overlay position: there are seven preset display and self-defined positions for ➢ optional, which should be based on your actual needs for selection. Horizontal position: when the overlay position is customized, adjust the ➢...
-
Page 25: Color Adjustment
6.4 Color adjustment 1)Click color adjustment icon in the information bar page. 2)Open the color adjustment page, the system default of brightness, contrast, and saturation are all 128. Users can adjust it according to the image requirements and set the value from 0 to 255 for improving effect. 6.5 Image and rotation 6.5.1 Horizontal mirror After clicked the horizontal mirror icon, the left and right parts of the image can be... -
Page 26: Flip
6.5.3 Flip Click spin button, you can clockwise rotate the video with 90/180/270 degrees. 6.6 Video cropping Video source image cropping: crop a part of the original video and send it for encoding. 1) Click cropping icon in the information bar page. 2) Enter the configuration page, select the video source, click the image crop-turn on, adjust the width and height of the image, etc. - Page 27 The orange area is the encoded image sent after the cropping completed. After finishing the clipping settings, the preview will be updated to show the encoded image after clipping. 3)After cropping is completed, it will be encoded according to the specific length and width pixels, and the resolution will not be changed after cropping.
-
Page 28: Serial Port And Ptz
6.7 Serial port and PTZ 6.7.1 USB xpansion port With USB to RS232/RS422/RS485 adaptor (cable), after connecting to USB port, if the device and identify the serial port correctly, USB port will be listed at “Device”, then you can set the corresponding serial port parameters. The encoder can automatically identify the USB serial port conversion Note: device of universal USB to Serial/FDTI chip/PL2303 chip. -
Page 29: Control Panel
6.7.3 Control panel Through the web page of the encoder, you can control the movement, zoom and focus of the camera in all directions. -
Page 30: Local Recording
6.8 Local recording S2 encoder supports local recording function. Encoder with TF card-slot can support TF recording and meanwhile it supports USB disk inserted into USB port of encoder for recording. The recording operation is as follows: 1)Click “setting” in the Web UI, click “record management”, you can see that there are video parameter display and settings in the video management column. - Page 31 completed, recording is performed in a non-TS format, when the recording is stop the recording manually, and then remove the storage device to ensure the recording can be played normally. 2)By default, it automatically starts recording when storage disks inserted, regardless its storage type.
- Page 32 dashboard shows “Recording”. When it is recording, users can stop the recording manually and it can be restarted again. 5) Click storage at the top. "Video Status" is shown below, where you can view the usage of the memory or download the video files that have been stored in the memory to the computer.
-
Page 33: Nas Storage
6.9 NAS storage NAS is a Disk Arrays connected by network, which has all the main characteristics of disk arrays: high capacity, high efficiency and high reliability. Open “NAS manager”, click “add NAS”, then fill in the corresponding parameters. ID/ Name: Any Alphabet/number NAS Type: NFS or CIFS (CIFS is a shared protocol for network connection, which requires high reliability of network transmission, TCP/IP is usually adopted;... - Page 34 Host: IP address of the Host Volume/Mount point: Storage location on the host Mount options: Settings about the user name and password. (Use half-width commas to separate the parameters) NAS manager will show “Mounted”, if NAS connection has been established, and there is a RECORD file under the Mount point.
-
Page 35: Streaming Service
7. Streaming service encoder currently supports streaming services include: SRT/NDI|HX/ RTSP/RTMP/HLS/TS-UDP. One code stream can run up to 8 stream services at the same time for the encoder, which means it can push the video stream to 8 different live platforms. There are two code streams (the main stream and sub stream) for the encoder, so the encoder can stream up to 16 different live platforms at the same time. -
Page 36: Ndi Discovery Server
“public”. You could set a specified group name, other devices need to search this device through specified group name, which avoids being searched at will by other devices via internet. NDI channel name: When there are multiple NDI sources in the same network, you can modify the channel name with different parameters to identify each device correctly. - Page 37 sources from the server. Or configure the function to send the output streaming to the receiving end. Enter the NEWTEK website (https://ndi.tv/sdk/) on the computer serving as the server to download and install the NDI SDK. After installation, run the file: Bin\Utilities\x64\NDI Discovery Service.exe The NDI encoder configures the receiver IP address in the discovery server, and it will be registered to the server.
-
Page 38: Rtsp
the NDI streams are registered to the server in the receiver. Note: After enabling the discover server, the mDNS auto-discovery function is invalid. The output streams from the encoder can only be sent to the designated server, and the receiving end must register to the same discovery server to pull the NDI streams. -
Page 39: Srt
whether the encoding is normal and view parameter information, etc. After installing and enabling VLC, click "Media"-"Open Network Streaming" and fill in the URL of the encoder's RTSP service, and it can be displayed. Note: The URL content needs to be copied completely, and the punctuation cannot be missing. - Page 40 Setting parameters means the following (It can be set according to the network situation, and select the default configuration generally): Handshake mode: Caller, Listener and Rendezvous. The Caller and Listener ➢ mode are commonly used. In the LAN, the encoder and the decoder can use the Caller and the Listener at will.
- Page 41 quality. Using this value to multiply the total bitrate of the audio and video encoded by the encoder, this will get the occupied maximum bandwidth allowed by Bandwidth Overhead. This value plus the total of video and audio bitrate is the threshold of the current SRT transmission bandwidth, and also the maximum bandwidth that SRT stream can be used.
-
Page 42: Rtmp Pushing(Live Streaming)
Note: The RTMP pushing must be pushed from the encoder to the platform. The computer/decoder then pulls the RTMP stream from the platform for playback. The encoder cannot directly push the RTMP stream to the computer/decoder for playback. While Kiloview decoders support RTMP server functions. 1)YouTube live streaming “Streaming point”... -
Page 43: Ts-Udp Pushing (Unicast And Multicast)
Streaming point should be like Server URL+ Stream ID/key, For example: rtmp://a.rtmp.youtube.com/live2/9ja6-9u28-uz4j-8x6r 2) After getting the RTMP URL address, login to the webpage of the encoder, and click “Add a stream service” to add a stream under the “H.264 main stream”. Select RTMP in the pop-up window and fill in the URL address into the push address (The format is: rtmp address/live code), and then click “OK”. - Page 44 address (address range: 224.xxx ~ 239.xxx) in the "Push Target Address". "Target Port" is a port that not conflict with the ports of other services. For other parameters, if there is no special requirement, it is recommended to use the default values. Note: Multicast streams can only be decoded and played under the same network segment.
-
Page 45: Hls Streaming
Note: When configure multicast udp://225.6.6.6:1234. If use VLC Player to play, please insert an @ in the URL, that is, udp://@225.6.6.6: 1234. 7.7 HLS service Using HLS service, the first thing is to “add a stream service”, enter streaming service interface after added correctly. HLS service setting is very easy, if no special requirements, no need setting, only enable service after entered name and clicked ok. -
Page 46: User Management
8. User Management To add and delete users, change the password, etc. 9. Area and Time management Click “Location & Time” to change the time. If there are no special requirements, please select “Timing with current PC” and click “SET”. -
Page 47: Language
10. System setting 10.1 Language Click the language window to switch the system language, currently it supports simplified Chinese, traditional Chinese and English. 10.2 Restore If users change parameters that lead device cannot work (The typical situation is changed network address, so it cannot login to the device), users could restore factory setting to default value. -
Page 48: Firmware Upgrade
10.4 Firmware upgrade Each product is being improved, so we will continue to upgrade the functions of the device and repair BUG in the form of new version firmware. Please download it at our website “Support”-“Download center”. Click "Basic Settings" - "Update Firmware" in the device webpage to upgrade the firmware. - Page 49 Thank you for reading.
- Page 50 KILOVIEW Electronics CO., LTD. Tel:86-731-88315979 Website: www.kiloview.com Technical support Email:support@kiloview.com WhatsApp: +86-18573195156/18573195256 Address: B4-106/109, Jiahua Intelligence Valley Industrial Park, 877 Huijin Road, Yuhua District, Changsha City, Hunan Province, China...
Need help?
Do you have a question about the S2 HEVC and is the answer not in the manual?
Questions and answers