
Subscribe to Our Youtube Channel
Related Manuals for OSS OSS-PCIe4-ADPT-x8-M.2-2


Summary of Contents for OSS OSS-PCIe4-ADPT-x8-M.2-2
- Page 1 ARWHS™ Hot-Swap Mag System PCIe Gen 4 OSS-PCIe4-ADPT-x8-M.2-2 Dual M.2 Carrier User Manual SKU: OSS-PCIe4-ADPT-x8-M.2-2 www.onestopsystems.com...
-
Page 2: Table Of Contents
4.11.1 SW1 Dipswitch ..................................... 15 4.12 Install the PCIe carrier board ................................15 4.13 Install Canister ....................................16 4.14 Power ON the computer ..................................16 Hardware Check ................................17 LED Definition ......................................17 Verify OSS Device on Windows OS ..........................18 OSS-PCIe4-ADPT-x8-M.2-2... - Page 3 One Stop Systems Using Device Manager .................................... 18 Using Disk Management ..................................19 Check Temperature ....................................19 Verify OSS Device on Linux OS ............................20 Linux Commands ..................................... 20 Check Temperature ....................................22 Check Speed and Link width ..................................22 PCIe Device Detailed Info ..................................23 Smartctl ........................................
-
Page 4: Preface
Disclaimer: We have attempted to identify most situations that may pose a danger, warning, or caution condition in this manual. However, One Stop Systems does not claim to have covered all situations that might require the use of a Caution, Warning, or Danger indicator. OSS-PCIe4-ADPT-x8-M.2-2... -
Page 5: Safety Instructions
Also, before connecting a cable, make sure both connectors are correctly oriented and aligned. CAUTION Do not attempt to service the system yourself except as explained in this manual. Follow installation instructions closely. OSS-PCIe4-ADPT-x8-M.2-2... -
Page 6: Protecting Against Electrostatic Discharge
Handle all sensitive components at an ESD workstation. If possible, use anti-static floor pads and workbench pads. Handle components and boards with care. Do not touch the components or contacts on a board. Hold a board by its edges or by its metal mounting bracket. OSS-PCIe4-ADPT-x8-M.2-2... -
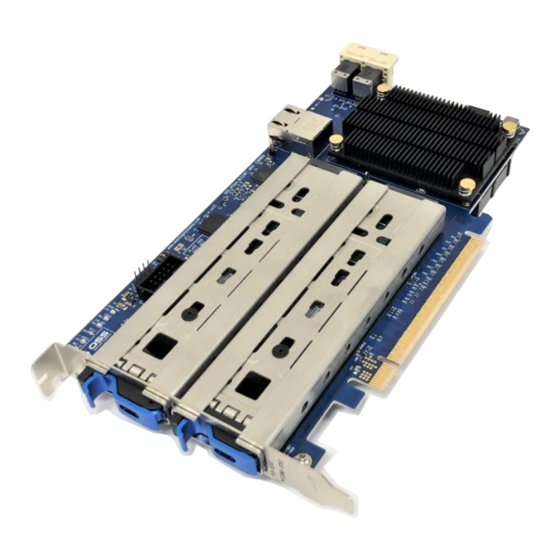
Page 7: Product Information
PCIe x16 Gen 4 add-in card supporting dual Gen 4 hot-swap M.2 drives in removable carriers and dual SFF-8643 connectors supporting additional NVMe expansion. The hot-swap removable carriers provide interchangeability and flexibility at Gen 4 M.2 speeds for edge applications while providing scalability through the additional SFF-8643 internal connections. Removal Tray OSS-PCIe4-ADPT-x8-M.2-2... -
Page 8: Features
CISPR 22, CISPR 24, Class A; Australia/New Zealand AS/NZS CISPR 22, Class A • RoHS 6 of 6 compliance (Directive 2002/95/EC) • WEEE (EU 2012/19) & RoHS 3 (EU 2015/863) Supported Operating Windows 10 & Windows 10 Pro Systems Windows 2012 Server Centos 7 Ubuntu 16x OSS-PCIe4-ADPT-x8-M.2-2... -
Page 9: Block Diagram
One Stop Systems Block Diagram Dimensions OSS-PCIe4-ADPT-x8-M.2-2... -
Page 10: M Key Connector
One Stop Systems M Key Connector The OSS-537 board supports M key edge connector OSS-PCIe4-ADPT-x8-M.2-2... -
Page 11: Hardware Requirements
One Stop Systems Hardware Requirements This section provides the hardware parts needed for the OSS-537 board to work. It is strictly recommended to follow and use the hardware requirements listed below in order for the board to operate properly. M.2 NVME SSD (Gen 4) Recommended: Server type computer Optional: Standard work station (with x16 Gen3 or Gen4 PCIe slot) with good air flow and cooling. -
Page 12: Hardware Installation
The following steps will guide you through the installation of your OSS-537 board. Installation-Procedures Overview Following steps provide the exact sequence that needs to be followed in order to properly install the OSS-537 Board: Set the OSS-537 board on a sturdy surface Remove the module canister Install the M.2 onto the circuit board... -
Page 13: Prepare Oss-537 Board
One Stop Systems Prepare OSS-537 board Place the OSS-537 board on a sturdy surface Remove the canister Remove the module canister from the carrier board by pulling the tab to disengage. Install M.2 module Align the M.2 Key edge connector to the M.2 key edge socket on the circuit board... -
Page 14: Secure The Media
Follow the steps below on how to install the canister in the PCIe card carrier and hot to plug in the PCIe cards in the computer. Turn OFF computer Prior to installing the OSS-537 board make sure to turn OFF or power down the computer. Remove Computer’s top cover Remove the top cover of the computer to gain access to the motherboard. -
Page 15: Configure Sw1 Dipswitch
Plug-in the PCIe carrier board onto PCI express x16 slot. Align the x16 edge connector of the PCIe card on top of the x16 slot connector on the motherboard and gently push the card down until it is seated firmly. OSS-PCIe4-ADPT-x8-M.2-2... -
Page 16: Install Canister
Push the lever forward to latch the canister in place 4.14 Power ON the computer Prior to powering ON the computer, verify that the PCIe card edge connector is fully seated in the PCIe slot connector as shown from the photos below. OSS-PCIe4-ADPT-x8-M.2-2... -
Page 17: Hardware Check
One or more M.2 is seated in the carrier Stuck in reset PWR GOOD Power is present on the board No Power M.2 Link LED M.2 media is present / detected can flash at M.2 media is missing / not detected different rates OSS-PCIe4-ADPT-x8-M.2-2... -
Page 18: Verify Oss Device On Windows Os
When installed properly, you will see the two M.2 media devices and Standard NVM Express Controllers. The screenshots below represent the structure of a single OSS-5377 carrier board with two M.2 media devices detected on Windows 10 host computer. OSS-PCIe4-ADPT-x8-M.2-2... -
Page 19: Using Disk Management
One Stop Systems Using Disk Management You can also view the new M.2 storage devices by using the Disk Management, see photo below. Check Temperature You can check the temperature of the M.2 media via “Windows Powershell”, see screenshot below. OSS-PCIe4-ADPT-x8-M.2-2... -
Page 20: Verify Oss Device On Linux Os
One Stop Systems Verify OSS Device on Linux OS On a Linux based system, the installation can be verified by typing the following command lines: Linux Commands To check the storage devices, type the following commands # nvme -list # lsblk –a # lspci –vtt | grep Phison... - Page 21 One Stop Systems # lshw –short –class storage # lsblk –f # fdisk –l | grep nvme # blkid OSS-PCIe4-ADPT-x8-M.2-2...
-
Page 22: Check Temperature
To check the M.2 media temperature on Linux, use the nvme smart-log command, see screenshot below. Check Speed and Link width You can check the speed and link width of the OSS-537 board by using the commands below (see screenshot). OSS-PCIe4-ADPT-x8-M.2-2... -
Page 23: Pcie Device Detailed Info
One Stop Systems PCIe Device Detailed Info You can view and capture the detailed information of the device by using the command below “lspci –vvv –s XX:xx.x (see screenshot below). OSS-PCIe4-ADPT-x8-M.2-2... -
Page 24: Smartctl
Smartctl (Self-Monitoring, Analysis and Reporting Technology) is a command line utility or a tool that performs SMART tasks such as printing the SMART self-test and error logs, enabling and disabling SMART automatic testing, and initiating device self-tests. Smartctl command allows you to check for errors and extract info regarding the disks that are used, see example below OSS-PCIe4-ADPT-x8-M.2-2... -
Page 25: Contacting Technical Support
Returning Merchandise to One Stop Systems If factory service is required, you must contact OSS Service Representative to obtain a Return Merchandise Authorization (RMA) number. Put this number and your return address on the shipping label when you return the item(s) for service. One Stop Systems will return any product that is not accompanied by an RMA number. -
Page 26: Shipping / Transporting The Card
This Class A digital apparatus complies with Canadian ICES-003. Cet appareil numériqué de la classe A est conformé à la norme NMB-003 du Canada The product(s) described in this manual complies with all applicable European Union (CE) directives. One Stop Systems will not retest or recertify systems or components that have been reconfigured by customers OSS-PCIe4-ADPT-x8-M.2-2... - Page 27 One Stop Systems OSS-PCIe4-ADPT-x8-M.2-2...
Need help?
Do you have a question about the OSS-PCIe4-ADPT-x8-M.2-2 and is the answer not in the manual?
Questions and answers