Advertisement
Quick Links
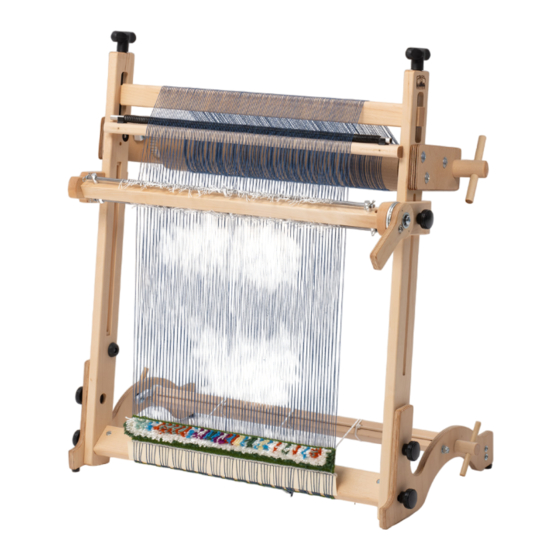
ARRAS BEAM KIT
A
ssembly
left warp
beam riser
left base
Watch videos on installing and warping with the Arras Beam Kit at
youtube.com/user/schachtspindle
Find out more at schachtspindle.com
Schacht Spindle Company 6101 Ben Place Boulder, CO 80301
p. 303.442.3212 800.228.2553 f. 303.447.9273
© 2020 Schacht Spindle Company, Inc.
,
W
Arping
& W
eAving
SL2225
warp beam
right warp
beam riser
cloth beam
cross brace
right base
08.20
Advertisement

Subscribe to Our Youtube Channel
Related Manuals for Schacht SL2225


Summary of Contents for Schacht SL2225
- Page 1 Watch videos on installing and warping with the Arras Beam Kit at youtube.com/user/schachtspindle Find out more at schachtspindle.com Schacht Spindle Company 6101 Ben Place Boulder, CO 80301 p. 303.442.3212 800.228.2553 f. 303.447.9273 © 2020 Schacht Spindle Company, Inc. 08.20...
- Page 2 ARRAS BEAM KIT & W ssembly Arping PARTS TOOLS REQUIRED left and right bases #2 Phillips screwdriver cross brace left and right warp beam risers You will also need the manual for the cloth/warp beams with ratchet Arras Tapestry Loom, available at gears schachtspindle.com.
- Page 3 Attach the left base: Orient the base ratchet dog with its rubber feet at the bottom of the loom, the curve and large hole at the back, and the ratchet dog facing the inner side of the loom (Figure 2). Using a knob and T-nut slide from the previous step (the knob shaft goes through the wider side of the T-nut slide), go through the upper hole...
- Page 4 Attach dowel handles to the cloth dowel handle beam: Insert a dowel handle through the end of the cloth beam, aligning the holes. Secure the handle with a 3/8" Phillips truss head sheet metal screw. Repeat at the other end of the cloth beam with a second dowel handle and 3/8"...
- Page 5 into the upper hole of the riser, through the to the right upright as you did in Step 7. left upright, and into the top beam. Tighten Position the right riser with the ratchet the machine screw into the barrel nut. dog on the inner side of the loom, holes aligned with holes in the right upright, and Insert a cloth/warp beam (now the...
- Page 6 Attach apron cords to the cloth and warp beams: Insert one end of a cord into a hole in the warp or cloth beam. (You can use a straightened paper clip to push the cords through.) Place the other end of the cord through the first complete loop in the cord and pull it tight around the beam (Figure 11).
-
Page 7: Equipment Needed
Arping the rrAs Apestry oom With Watch a video demonstration of warping the Arras Beam Kit at youtube.com/user/schachtspindle from the center of the raddle using this EQUIPMENT NEEDED number and begin spreading the warp Warping board here. Spread the entire warp into the 20"... - Page 8 eAving With the Refer to the Arras Tapestry Loom manual for spreading the warp and weaving with the shedding device. ADVANCING THE WARP REMOVING YOUR PROJECT FROM THE LOOM Turn the warp beam ratchet dog toward you to release tension on the warp, then When you have finished your project or flip up the ratchet dog.
Need help?
Do you have a question about the SL2225 and is the answer not in the manual?
Questions and answers