
Subscribe to Our Youtube Channel
Related Manuals for Schacht CRANBROOK LOOM


Summary of Contents for Schacht CRANBROOK LOOM
- Page 1 CRANBROOK LOOM ssembly AnuAl Find out more at schachtspindle.com Schacht Spindle Company 6101 Ben Place Boulder, CO 80301 p. 303.442.3212 f. 303.447.9273 © 2019 Schacht Spindle Company, Inc. 01.19...
-
Page 2: Small Parts
4- AND 8-HARNESS CRANBROOK LOOM PARTS HARDWARE Some hardware is already attached to the parts. Other hardware has been packaged in labeled bags for the parts they go with. You’ll also find 2 Allen wrenches (sizes 5/16" and 5/32") in a hardware bag. -
Page 3: Tools You Will Need
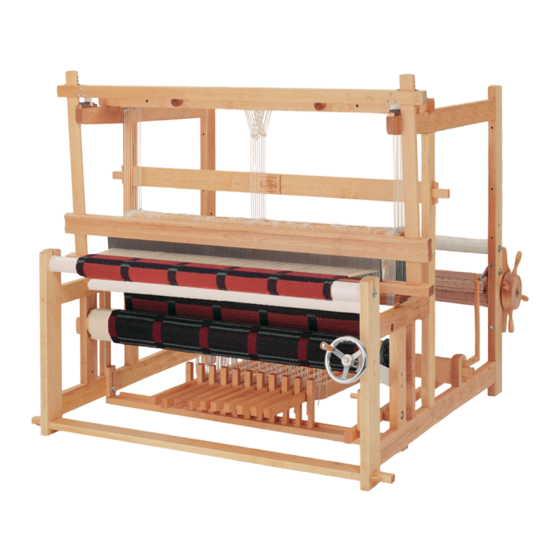
LOOM PARTS 4-shaft 8-shaft Box 1 right frame side left frame side Box 2 cloth beam warp beam steel beams with hardware attached warp beam wheel Box 3 and/or 4 stainless steel reed wooden packing sticks lease sticks (same as packing sticks, but with holes) cross beams (1 with treadle support bar) treadle separator beam assembly with hardware attached jack box assembly with cords attached... - Page 4 & with treadle locks brake hold peg treadles brake release pedal FIGURE 1: OVERVIEW OF THE CRANBROOK LOOM — 4 —...
-
Page 5: Assemble The Frame
CRANBROOK LOOM ssembly nstructIons Before you begin assembling your loom, check to see that ASSEMBLE THE FRAME you have everything. Parts and hardware lists are provided. Parts: 2 frame sides, 3 cross beams, 3 wooden wedges. Because some of the pieces are quite large, the assembly will In the right frame side, insert the rear cross beam (note: the be easier when done with another person (the 72"... - Page 6 Secure the left frame side by placing the remaining three INSTALL THE WORM GEAR AND CLOTH BEAM wood wedges in the cross members. Tap all the wedges gently Parts: worm gear assembly, cloth beam, 3 wooden wedges. but firmly to bring the cross braces against the frame sides. The right frame side should have the wedges loosely set Before continuing, check that the cloth beam spins freely: through all cross beams.
- Page 7 SQUARING THE LOOM Measure the diagonal distance from an inner edge of the left front upright (A on Figure 4), to an inner edge of the right rear upright (A1). Record this distance. left rear right rear Measure the distance from the inner edge of the right front upright upright upright (B) to the inner edge of the left rear upright (B1).
- Page 8 INSTALL THE TREADLES ON THE TREADLE Breast Beam: The breast beam fits into the slots at the top of SUPPORT BAR the front uprights (see Figure 1, page 4). Thread a 1/2" flat Parts: treadle support bar. washer and then a 1/2" fender washer onto each of two 3" truss head bolts.
- Page 9 and bottom. Cut the heddles apart by cutting the loops at the ASSEMBLE THE SHAFTS AND INSTALL THE very top and bottom of the heddles, and slide them all the way HEDDLES to the center. This positioning will help in moving the heddles Parts for each shaft: shaft top with 2 hooks, shaft bottom across the shaft and with installing the heddles on the other with 3 eyes, wooden center support dowel, 2 long metal shaft...
- Page 10 INSTALL THE WARP BEAM HANGER BLOCKS INSTALL THE WARP BEAM BRAKE RELEASE AND WARP BEAM ASSEMBLY Parts: 2 warp beam hanger blocks, warp beam, warp beam Parts: brake release pedal and connector strut wheel. Locate the pivot block on the inside of the right frame side Locate the 3/8"...
- Page 11 ASSEMBLE THE BEATER TYING UP YOUR COUNTERMARCHE LOOM Parts: beater swing bar, beater top, beater race, 2 beater It is easiest to tie up the treadles before the loom is warped. uprights. The tie-up cords should already be attached to the treadles (see page 7).
- Page 12 To tie a treadle to the lower lamm, pass the treadle cord for the optimal height side to side. through the corresponding hole in the lower lamm. Fasten to THE BRAKE LOCK the lower lamm through the loop with the red mark, leaving The brake lock is a rectangular piece of wood that hangs from the long tail end of the cord hanging.
- Page 13 “stationary” lamm pulls shaft directly down lower lamm makes shaft rise—“bottoms up” 42" 9" 7" floor This figure was originally provided by Madelyn van der Hoogt. It has been edited to reflect the current design of the Cranbrook Loom.
- Page 14 ppendIx POSITIONS OF SHAFTS, UPPER LAMMS, LOWER LAMMS, AND TREADLES VIEW FROM THE SIDE reed To open the same shed height at the fell, the shafts must form a bigger shed the farther away they are from the fell. 2" 3"...
-
Page 15: Troubleshooting
ppendIx TROUBLESHOOTING PROBLEM POSSIBLE CAUSES SOLUTIONS Shed won’t open. Jack lock pins haven’t been removed. Remove jack lock pins. Tie-up cords are crossed. Check to make sure treadle-lamm cords are tied in appropriate holes. Check to make sure the yoke cords are connected to Yoke cords are crossed. - Page 16 ppendIx ADJUSTING THE SHED PROCEED CAREFULLY, ADJUSTING YOUR CORDS ONE NOTCH AT A TIME AND TESTING. ADJUSTING THE SHED BY ADJUSTING THE TIE-UP CORDS ■ If the upper shed (raised warps) is uneven: Raise the threads by shortening the lower lamm cord of the errant shaft, by inserting the anchor peg one notch below the red mark.
- Page 17 Madelyn van der Hoogt PO Box 1228 Coupeville, WA 98239 PH/FAX 360-678-6225 Countermarch (general) and Cranbrook (specific) Loom length The longer the loom, the less the relative difference in tension between raised/lowered warp threads and warp threads at rest. Therefore, if the warp is held at maximum tension (as is desirable, especially for rugs), the longer the distance from front to back beam, the less resistance the warp makes to forming the shed (and therefore the easier the treadling).
- Page 18 3. Attach the Y cords to the upper jacks. Suspend the Y cords from the upper jacks so that each cord passes behind its corresponding shaft. 4. Place lower lamms on lamm pivot rod. 5. Attach Y cord to each lower lamm (pass cord through hole in lamm and attach with clip below lamm). 6.
Need help?
Do you have a question about the CRANBROOK LOOM and is the answer not in the manual?
Questions and answers