Table of Contents
Advertisement
Quick Links
Updated date : 2013.01.31
Model : PIP-BM-STD-V4 / Product code : PIP-BM-1110-008
PIP-BMW V4
Specification
For 3/5/6 series, X5, X6
SUNE TECHNOLOGY ELECTRONIC CO., LTD
No.9, Land 606,Anping Rd., Tainan City 70849 Taiwan
Tel: +886-62292246 Fax:+886-62288104
Website http://www.sune-tech.com
Shop http://www.carnavi-tech.com
Skype : hsin_han99 or sune_tech
Your best partner for better driving
Advertisement
Table of Contents

Related Manuals for Sune Technology PIP-BMW V4


Summary of Contents for Sune Technology PIP-BMW V4
- Page 1 Updated date : 2013.01.31 Model : PIP-BM-STD-V4 / Product code : PIP-BM-1110-008 PIP-BMW V4 Specification For 3/5/6 series, X5, X6 SUNE TECHNOLOGY ELECTRONIC CO., LTD No.9, Land 606,Anping Rd., Tainan City 70849 Taiwan Tel: +886-62292246 Fax:+886-62288104 Website http://www.sune-tech.com Shop http://www.carnavi-tech.com...
-
Page 2: Table Of Contents
Contents 1. Before installation 1.1 Main specification 1.2 Features 1.3 System diagram 1.4 Components 1.5 Exterior 2. SETUP 2.1.1 DIP switch 2.1.2 DIP switch 2.2 Remote control 2.3 Keypad 2.4 OSD (on screen display) 2.5 FACTORY mode 2.6 Rear view parking guide line 2.7 CAN Wiring &... -
Page 3: Main Specification
1.1 Main specification 1. Input Spec. (MULTI VIDEO INTERFACE) -. 1 x Analog R,G,B (Sync on Green) -. 1 x CVBS(REAR CAMERA) Input. - 3 x A/V (NTST & PAL) Input. -. 1 x LCD Input (Car system Input) 2. Output Spec. -. -
Page 4: Features
1.2 Features - PIP (picture in picture) Function (Only available in 8.8” model) - Controlling PIP function by “★” button on the steering wheel (The products which are shipped to Japan are different) - switching AV source by “ “ on the steering wheel (The products which are to Japan are different) - Easier operation with remote control. -
Page 5: System Diagram
1.3 System diagram OSD keypad Switch for source toggle Or Remote control OEM Navi Button (Can Interface) NAVIGATION Input (Analog RGB) DISPLAY Car installation A/V 1 OEM LCD A/V 2 VIDEO CIRCUIT A/V 3 VIDEO MUX CVBS In (Rear camera) Car Screen Input POWER (CAR MAIN BOARD) -
Page 6: Components
1.4 Components IR cable (8P) * 1ea (HIRCAB0002) LVDS cable(F-TYPE) * 1ea (HLVDSC0005) Remote control * 1ea (REMOTE0001) AV cable * 1ea Ground cable * 1ea (HAVCAB0002) ( HGROUN0001) Keypad * 1ea MODE cable * 1ea (PCBOSD0001) (HARETC0001) REAR CAMERA POWER cable * 1ea (HARETC0002) POWER cable (10P) * 1ea RGB cable * 1ea... -
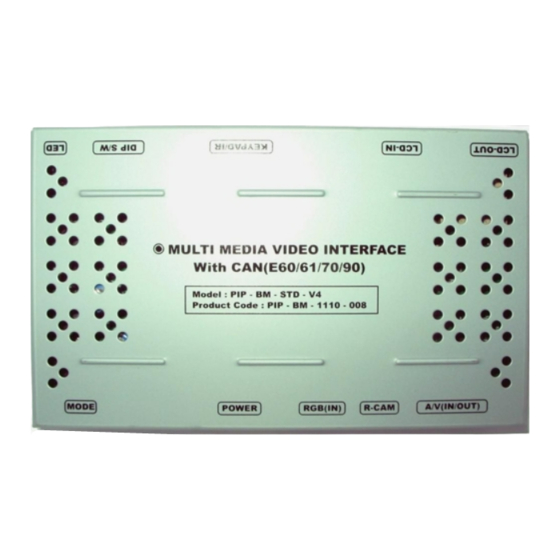
Page 7: Exterior
1.5 Exterior ⑩ ⑨ ⑧ ⑦ ⑥ Dimension Horizontal length 154mm ⑩ ⑨ ⑧ ⑦ ⑥ Vertical length 94mm Height 20mm ① MODE ② POWER ③ RGB(IN) ④ R-CAM ⑤ AV(IN/OUT) ⑥ LCD-OUT ⑦ LCD-IN ① ② ③ ④ ⑤ ⑧... -
Page 8: Dip Switch
2.1.1 DIP switch #PIN Function DIP S/W selection ON : Skipping RGB Mode RGB INPUT skip OFF : RGB Display ON : Skipping A/V 1 A/V 1 skip OFF : A/V1 Display ON : Skipping A/V 2 A/V 2 skip OFF : A/V2 Display ON : Skipping A/V 3 A/V 3 skip... - Page 9 2.1.2 DIP switch #PIN Monitor E60 8.8” [E60 8.8”] E60 Alpine 6.5” E60 Siemens 6.5” ※DIP S/W Use Example [E60 Alpine 6.5”] [BMW E60-6.5” Alpine] -. Use Input Mode : A/V3(DVD), Navigation (RGB) -. Rear Camera : When to be installed on CVBS 4 ▷...
-
Page 10: Remote Control
2.2 Remote control Function POWER Not for use Activating PIP (Picture in Picture) MENU OSD implementation Making a selection ▲ Move upward ▼ Move downward Move leftward, press 2 seconds long-Factory ◀ mode implementation Move rightward, press 2 seconds long-Factory ▶... -
Page 11: Keypad
2.3 Keypad Function MENU OSD Menu, switching to previous mode. Selection in menu, switching AV sources. Move leftward, upward DOWN Move rightward, downward UP+DOWN at once SAFE MODE implementation *FACTORY MODE (Interface setting) : Operated by pressing ▲ → ▼ → ▲ →MENU of remote or keypad in order. -
Page 12: Osd (On Screen Display)
2.4 OSD (on screen display) OSD menu : Operated by pressing MENU button of remote control. Analog RGB mode Analog RGB mode Analog RGB mode Video mode Video mode Video mode UTIL IMAGE -LANGUAGE : To change the language - FACTORY RESET : To reset all the - BRIGHTNESS displaying while using Touch OSD values about navigation, DVD screen... -
Page 13: Factory Mode
2.5.1 Factory mode *FACTORY MODE : Operated by pressing ▲ → ▼ → ▲ →MENU of remote control or keypad in order. Setup for navigation Setup for car model UTIL – NAVI MODEL IMAGE UTIL - CAR MODEL Definition of the navigation Adjusting the position and the size Selecting model of the car of navigation... - Page 14 2.5.2 Factory mode *FACTORY MODE : Operated by pressing ▲ → ▼ → ▲ →MENU of remote control or keypad in order. UTIL - REAR SELECT UTIL - AVOUT SELECT UTIL - FACTORY RESET Selecting how to detect the rear Selecting background sound while Resetting factory mode view camera...
- Page 15 2.5.3 Factory mode *FACTORY MODE : Operated by pressing ▲ → ▼ → ▲ →MENU of remote control or keypad in order. I-DRI TYPE -NEW I-DRV – When there is a New I-Drive on the car as OLD I-DRV – When there is a Old I-Drive on the car shown below as shown below <~2008 Model I-DRIVE>...
- Page 16 2.5.4 Factory mode *FACTORY MODE : Operated by pressing ▲ → ▼ → ▲ →MENU of remote control or keypad in order. I-DRV - REMOTE I-DRV - CONTROL I-DRV - AUX Selecting model of navigation and Selecting whether to use I_DRV Selecting whether to use I_DRV DMB respectively to control I_DRV function or not...
-
Page 17: Rear View Parking Guide Line
2.6 Rear view parking guide line Factory Default : DISPLAY - DISABLE PARK PARK ENABLE : Selecting whether to display the parking guide line or not on rear gear (default : ON) PARK SETUP : Adjusting the position of the parking guide line (available in PARK SETUP -> V-POSITION, H-POSITION) SAFE ENABLE : If your car is connected with CAN cable and it is in ”ON”... -
Page 18: Can Wiring & Steering Wheel Button
CAN Wiring & Steering wheel button ☆ : PIP Mode : Switching AV source with long press ※ The products which are shipped to Japan are different Orange+Black: CAN HIGH Yellow: CAN LOW... -
Page 21: Troubleshooting
3. Troubleshooting Q. I can not switch A/V sources. A. Check IR or Ground cable connection. Check LED lamps in the interface, if it is not on, check power cable. Q. All I got on the screen is black. A. Check second LED lamp of the interface is on, if not, check A/V sources connected are working well. (Second lamp indicates AV sources connected works well.) Check interface connection has been done well.
Need help?
Do you have a question about the PIP-BMW V4 and is the answer not in the manual?
Questions and answers