Advertisement
Available languages
Available languages
Quick Links
Advertisement

Related Manuals for Dtronic A8


Summary of Contents for Dtronic A8
- Page 1 Handleiding Barcode scanner DTRONIC – A8 Versie 10-2018...
- Page 2 Handleiding 1 Het product 1.1 Hoofdfuncties van deze scanner 1.2 Pak het apparaat uit 1.3 Uitstraling van het apparaat 1.4 Communicatie poort 1.5 Aansluiten op de computer 1.5.1 Aansluiten via USB 1.5.2 Aansluiten met RS-232 Serial Port 1.5.3 Aansluiten met een Keyboard Wedge 1.6 Opstarten, afsluiten en opnieuw opstarten 1.7 Onderhoud 1.8 Leesvaardigheden...
- Page 3 Handleiding 2.6.7 UPC / EAN 2.7 CODE ID instelling 2.7.1 CODE 11 2.7.2 CODE 39 2.7.3 CODE 93 2.7.4 CODE 128 2.7.5 CODABAR 2.7.6 ITF 25 2.7.7 Industrial 25 2.7.8 MSI/PLESSEY 2.7.9 UPC/EAN 2.8 Edit installatiecodes 2.9 Barcode karakter instelling 2.10 Eind karakter instelling 3 Afsluiting 3.1 Verkort stappenplan...
- Page 4 Het is verboden om deze gids geheel of gedeeltelijk uit te delen, te kopiëren, te bundelen of zonder schriftelijke toestemming van ons te verkopen. Deze gebruikershandleiding is van toepassing op DTRONIC - 910 scanners, die 1D-streepjescodes identificeren met behulp van een laserscanpatroon. De bovenstaande scanners hebben een sterke identificatiemogelijkheid en ondersteunen automatische continue scanmodus met een snelle en flexibele scansnelheid.
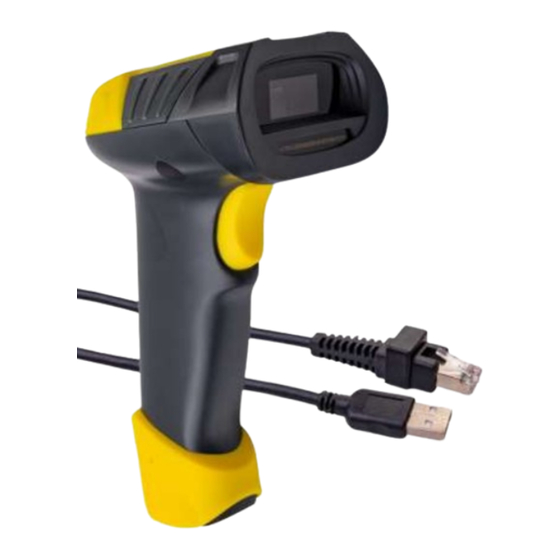
- Page 5 Handleiding 1.3 Uitstraling van het apparaat 1.4 communicatie poort De scanner moet zijn verbonden met een host om te kunnen werken. Host kan een PC, POS-machine, intelligente terminal met USB- of RS-232-interface zijn. USB interface on host RS-232 RS-232 interface on host...
- Page 6 Handleiding 1.5 Aansluiten op computer 1.5.1 Aansluiten via USB 1: Verbind de apparaatinterface van USB met scanner; 2: Verbind de hostinterface (USB-interface) van USB met de computer. 1.5.2 Aansluiten met RS-232 via Serial port 1: Verbind de apparaatinterface van RS-232 seriële poort met scanner;...
- Page 7 Handleiding 1.6 Opstarten, afsluiten en opnieuw opstarten Opstarten: verbind de computer met de scanner, die automatisch opstart en in werkende staat is. Uitschakelen: verwijder de datakabel die is verbonden met de scanner; verwijder de USB die op de computer is aangesloten. Opnieuw opstarten: als de scanner crasht of niet reageert, schakel hem dan uit en start hem opnieuw 1.7 Onderhoud Het venster moet schoon worden gehouden, de leverancier draagt niet de...
- Page 8 Handleiding 2.0 Systeem instellingen Optie- en functie-instelling voornamelijk door het lezen van een reeks speciale barcodes. In dit hoofdstuk geven we u een gedetailleerde introductie van de opties en functies die beschikbaar zijn voor gebruikersinstellingen en de bijbehorende instellingscode. Deze methode voor het instellen van de scan is direct, gemakkelijk te begrijpen en gebruiksvriendelijk.
- Page 9 Handleiding MAC mode 2.2.3 Geluidsinstelling beeper off beeper on Lower beeper power saving mode 2.2.4 Instellingen voor afbeeldingen enable barcode image pros and cons disable barcode image pros and cons...
- Page 10 Handleiding 2.2.5 Barcode ID instelling Disable barcode ID before barcode Enable barcode ID before barcode Disable barcode ID after barcode Enable barcode ID after barcode 2.2.6 Scanlijn instelling default mode(single trigger) Disable single trigger mode Enable press scan mode Disable press scan mode...
- Page 11 Handleiding Automatic continuous scan mode Auto flicker mode 2.3 Toetsenbord instellingen 2.3.1 PC interface Auto detect mode Enable 2 setting pass 2.3.2 Snelheid instelling Transmission speed—0 Transmission speed—25 2.3.3 Taal instelling Language- English( United States) Language-German Language-French(France)
- Page 12 Handleiding Language-others 2.4 Installatiecode serial port mode 2.4.1 Band breedte 2400 4800 9600 19200 2.4.2 Handshake protocol Null XON/OFF RTS/CTS ACK/NAK Handshaking signal respond—2 s...
- Page 13 Handleiding Handshaking signal respond—5 s手信号时间回应—5 秒 2.4.3 Data bits 8 bits 7 bits 2.4.4 Stop bits 1 bit 2 bits 2.4.5 Check bits Null Odd Parity Check even-parity check Mark check space...
- Page 14 Handleiding reset 2.5 Installatiecode Lightgun Enable CODE 128 Light gun mode Disable CODE 128 Light gun mode 2.5.1 Overdracht snelheid Fastest(0) Slowest(3) 2.5.2 Barcode afbeelding “Pros en Cons” instelling pros cons 2.5.3 Code 11 Enable CODE 11 Disable CODE 11...
- Page 15 Handleiding 2.5.4 Code 39 Enable CODE 39 Disable CODE 39 Enable FULL ASCⅡ Disable FULL ASCⅡ 2.6 Symbolen 2.6.1 Code 93 Enable CODE 93 Disable CODE 93 2.6.2 Code 128 Enable CODE 128 Disable CODE 128 Enable CODE 128 ISBT Disable CODE 128 ISBT...
- Page 16 Handleiding 2.6.3 Codabar Enable CODABAR Disable CODABAR 2.6.4 ITF 25 Enable ITF25 Disable ITF25 2.6.5 Industial 25 Enable Industrial 25 Disable Industrial 25 2.6.6 MSI / Plessey Enable CODE MSI Disable CODE MSI 2.6.7 UPC / EAN Enable UPC—A...
- Page 17 Handleiding Disable UPC—A Enable UPC—E Disable UPC—E Enable EAN—13 Disable EAN—13 Enable EAN—8 Disable EAN—8 2.7 Code ID instelling 2.7.1 Code 11 CODE11—‘m’ CODE11—‘z’ Enable CODE11 Multiple authentication...
- Page 18 Handleiding Disable CODE11 Multiple authentication 2.7.2 Code 39 Lead characters—null Lead characters ‘+’ Enable transfer start/ending character Disable transfer start/ending character CODE 39 --‘a’ CODE 39 --‘z’ Enable CODE39 Multiple authentication Disable CODE39 Multiple authentication...
- Page 19 Handleiding 2.7.3 Code 93 CODE93 --‘h’ CODE93 --‘z’ Enable CODE93 Multiple authentication Disable CODE93 Multiple authentication 2.7.4 Code 128 CODE128 --‘g’ CODE128 --‘z’ Enable CODE128 Multiple authentication Disable CODE128 Multiple authentication...
- Page 20 Handleiding 2.7.5 Codabar Enable transfer start/ending character Disable transfer start/ending character Enable allow CODABAR interspace Disable allow CODABAR interspace CODABAR --k CODABAR--z Enable CODABAR Multiple authentication DisableEnable CODABAR Multiple authentication 2.7.6 ITF 25 ITF 25 --i ITF 25-z...
- Page 21 Handleiding Enable ITF 25 Multiple authentication Disable ITF 25 Multiple authentication 2.7.7 Industrial 25 Industrial 25--j Industrial 25--z Enable Industrial 25 Multiple authentication Disable Industrial 25 Multiple authentication 2.7.8 MSI / Plessey MSI ISBN --f MSI ISBN --z Enable MSI Multiple authentication Disable MSI Multiple authentication...
- Page 22 Handleiding 2.7.9 UPC / EAN Enable UPC-E to UPC-A Disable UPC-E to UPC-A Enable UPC-A to EAN-13 Disable UPC-A to EAN-13 Enable EAN-13 to ISBN Disable EAN-13 to ISBN UPC-A --b UPC-A --z UPC-E --c UPC-E --z EAN-13 --e...
- Page 23 Handleiding EAN-13 --z EAN-8 --d EAN-8 --z ISBN --f ISBN --z Disable UPC/EAN Attachment code UPC/EAN with 2 Attachment codes UPC/EAN with 5 Attachment codes UPC/EAN with 2 or 5 Attachment codes Enable UPC/EAN Multiple authentication...
- Page 24 Handleiding Disable UPC/EAN Multiple authentication 2.8 Edit installatiecodes Remover character before‘12345’ restore Hide the last bit Barcode restore Remover the space before the barcode restore Remover the space after the barcode restore...
- Page 25 Handleiding Not send‘Ц’character restore Add ‘0’before barcode restore 2.9 Barcode karakter instelling Replace ordinary barcode character ‘1’ with ‘ONE’ Disable Replace ordinary barcode character ‘1’with ‘ONE’ Replace CODE39 character‘2’with‘TWO’ Disable CODE39 Replace CODE39 character‘2’with‘TWO’ Replace ordinary barcode character ‘0 ’with‘A’...
- Page 26 Handleiding Disable Replace ordinary barcode character ‘0’with‘A’ Special key—F3 correspond ‘0’ Disable Special key—F3 correspond ‘0’ Special key—ENTER correspond ‘2’ Disable Special key—ENTER correspond ‘2’ 2.10 Eind karakter instelling Enter Enter + TAB Disable Enter + TAB CODE 128 + Enter...
- Page 27 Handleiding CODE128 + TAB CODE128 Enter + TAB CODE128 Disable Enter CODE39 + TAB Disable CODE39 TAB Add ’STX’before barcode Add ’STX’ after barcode...
- Page 28 Handleiding 3 Afsluiting DTRONIC is niet aansprakelijk voor de geleden schade en defecten wanneer de barcode scanner niet werkt, niet naar behoren werkt of verkeerd gebruikt wordt. Bovenstaande informatie een samenvatting van diverse bronnen op internet en kan wellicht de gebruiker ondersteunen.
- Page 29 Handleiding 3.1 Verkort stappenplan Heeft u liever een overzicht van de te ondernemen stappen? Volg de onderstaande stappen voor installatie: 1. Haal de barcodescanner en de onderdelen uit de verpakking. 2. Sluit de kabel met de USB aansluiting aan op uw device. 3.
Need help?
Do you have a question about the A8 and is the answer not in the manual?
Questions and answers