DITEC Traffic C Installation Manual, Maintenance, Use
Hide thumbs
Also See for Traffic C:
- Instruction manual (56 pages) ,
- Installation manual, maintenance, use (52 pages)
Table of Contents
Advertisement
Available languages
Available languages
Quick Links
Advertisement
Chapters
Table of Contents

Subscribe to Our Youtube Channel
Related Manuals for DITEC Traffic C


Summary of Contents for DITEC Traffic C
- Page 1 0DT829 Ditec Traffic C - Traffic CM rev. 2014-06-13 Manuel de installation, entretien, utilisation. (Instructions originales) Installation manual, maintenance, use. (Original instructions) www.ditecentrematic.com...
-
Page 2: Table Of Contents
Sommaire deS argumentS argument ..........................Page ConSigneS gÉnÉraLeS de SÉCuritÉ ................2 CaraCtÉriStiQueS teCHniQueS ..................3 inStaLLation mÉCaniQue 3.1 Vérifications initiales ......................4 3.2 Fixation des montants verticaux ..................... 4 3.3 Montage de la traverse ......................4 3.4 Préparation de la traverse ....................... 4 3.5 Montage du tablier ........................ -
Page 3: Caractéristiques Techniques
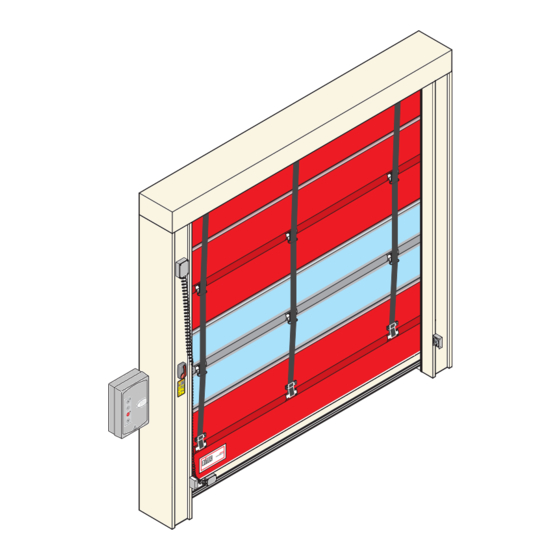
rif. description rif. description Caisson Couvercle colonne gauche Motoréducteur K10 Colonne Droite Arbre d'enroulement Colonne Gauche Chaîne de transmission Profilés en aluminium du tablier Tambour de la courroie du contrepoids Tube de renforcement du tablier Levier manuel de déverrouillage Tableau électronique Profilé... -
Page 4: Installation Mécanique
• Vérifier le fonctionnement du dispositif ; lorsque l'on actionne le levier, le tablier doit pouvoir se soulever librement. • Dans le cas du Ditec Traffic CM à double moteur, les déverrouillages sont raccordés à l'aide du dispositif de la “figure 14”. -
Page 5: Branchements Électriques
4. BranCHementS ÉLeCtriQueS 4.1 Tableau électrique • Insérer, dans le conteneur, les câbles avec les borniers déjà câblés et les brancher aux cartes (fig.17). Loger les câbles dans le chemin de câbles et brancher les connecteurs prédisposés sur le moteur (fig.18). 4.2 Raccordements du tableau électrique / moteur / sécurités •... -
Page 6: Tableau Électronique 5.1 49E - Raccordements
5.1 TABLEAU ÉLECTRONIQUE 49E - RACCORdEMENTS entrÉeS Commande Fonction description N.O Fermeture automatique La fermeture permanente du contact habilite la fermeture automatique. N.O Ouverture Avec le DIP1 sur ON, la fermeture du contact active la manœuvre d'ouverture. Pas-à-pas Avec le DIP1 sur OFF, la fermeture du contact active une manœuvre d'ouverture ou de fermeture en séquence : ouverture - arrêt - fermeture - ouverture. - Page 7 EL07L 00000000000 EL07PW1 00000000000 www.ditec.it Raccordement à compléter par l'installateur RP TC 1 2 3 4 5 6 - LK + POWER 17 14 12 11 0 0 0 1 1 2 3 4 6 8 9 20 41 Rouge...
- Page 8 N.B.: après l'activation de la commande d'arrêt, à la fermeture du contact 1-9, la fermeture 30 s automatique n'est habilitée qu'après une commande d'ouverture totale, partielle ou pas-à-pas. Réglage de l'ouverture partielle du moteur. de 0 à 30 s. 30 s Pour ditec Traffic dip-switch description positionner Fonctionnement de la diP 1 Pas-à-pas...
- Page 9 EL07L EL07PW1 00000000000 00000000000 www.ditec.it RP TC 1 2 3 4 5 6 - LK + POWER 17 14 12 11 0 0 0 1 1 2 3 4 6 8 9 20 41 FuSiBLeS Valeurs dimension Circuit F1 - F2 - F3 8A - 500V 10.3 x 38...
-
Page 10: Inverseur) - Raccordements
5.2 TABLEAU ÉLECTRONIQUE 47E (INVERSEUR) - RACCORdEMENTS entrÉeS Fonction description Commande N.O Fermeture La fermeture permanente du contact habilite la fermeture automatique. automatique N.O Ouverture La fermeture du contact active la manœuvre d'ouverture. N.O Fermeture La fermeture du contact active la manœuvre de fermeture. N.F Sécurité... - Page 11 +F -F U V W P 2.0 OUT1 IN 1 OFF 1 2 3 4 1 11 12 13 41 40 20 9 8 4 3 2 1 1 0 LAMP SOFA1 Blanc Rouge Bleu A933A - 7823B Noire 230 V 50/60 Hz Marron Orange Orange...
- Page 12 rÉgLageS et SignaLiSationS Potentiomètre description Réglage de la durée de la fermeture automatique. de 0 à 30 s. 30 s Réglage de l'ouverture partielle. de 0 à 10 s. 10 s Réglage de la vitesse d'ouverture. Réglage de la vitesse de fermeture. Réglage de la décélération en ouverture.
- Page 13 +F -F U V W OFF 1 2 3 4 1 11 12 13 41 40 20 9 8 4 3 2 1 1 0 LAMP 230 V 50/60 Hz FuSiBLeS Valeurs dimension Circuit F1 - F2 12A - 500V 10.3 x 38 Ligne Monophasée rÉgLage deS FinS de CourSe...
-
Page 14: Réglages Et Mise En Marche 6.1 Vérification Des Sens Du Mouvement
6. VÉriFiCationS et dÉmarrage 6.1 Vérification des sens du mouvement • Amener le panneau à la moitié de sa course environ. • Actionner la porte, en appuyant sur les touches correspondantes, ou vérifier le sens correct du mouvement. • S'il y a lieu, inverser le sens du mouvement en modifiant la séquence des phases, en intervenant sur les fils de ligne en haut de l'interrupteur général. -
Page 15: Recherche Des Pannes
7. reCHerCHe deS PanneS Avant d'effectuer toute opération ou travail à l'intérieur des équipements électroniques, vérifier s'ils danger ont été mis hors tension. Les instructions suivantes s'adressent exclusivement à un personnel qualifié et autorisé. Se conformer attention toujours aux lois et aux normes spécifiques même si cette prescription n'est pas expressément indiquée. Pour les réparations ou les remplacements, utiliser toujours et exclusivement des pièces de rechange originales Entrematic Group AB. -
Page 16: Plan D'entretien
8. entretien (touS LeS 6 moiS) Des contrôles réguliers doivent être effectués par des techniciens qualifiés et spécialement formés par Entrematic Group AB, conformément aux réglementations nationales en vigueur et à la documentation du produit. La fréquence des interventions d’entretien doit répondre aux réglementations nationales en vigueur et à la documentation du produit. Fixation / Montage •... -
Page 17: Consignes Générales De Sécurité
INSTRUCTIONS d’UTILISATION ConSigneS gÉnÉraLeS de SÉCuritÉ Ce manuel d’utilisation est partie intégrante et essentielle du produit et doit être remis à l’utilisateur. Il faut garder le présent document et le remettre à éventuels utilisateurs succédant dans l’usage de l’installation. Cet automation est une “porte à mouvement vertical”. Elle doit être destinée à l’usage pour lequel elle a été conçue. - Page 18 8. entretien (touS LeS 6 moiS) Des contrôles réguliers doivent être effectués par des techniciens qualifiés et spécialement formés par Entrematic Group AB, conformément aux réglementations nationales en vigueur et à la documentation du produit. La fréquence des interventions d’entretien doit répondre aux réglementations nationales en vigueur et à la documentation du produit. Fixation / Montage •...
- Page 19 MOdE d’EMPLOI Classe de service: 5 (minimum 5 ans d’utilisation avec 600 cycles par jour). Utilisation: TRES INTENSIF (pour acces de type industrial et commercial avec utilisation tres intensif). • La classe de service, les temps d'utilisation et le nombre de cycles consécutifs sont donnés à titre indicatif. Ils ont été statistiquement relevés dans des conditions d'utilisation moyenne et peuvent varier d'une application à...
- Page 20 - 20 - 0DT829 2014-06-13...
- Page 21 LiSte deS ComPoSantS référence description Quantité Colonne Gauche Colonne Droite Arbre d'enroulement Bourrelet de sécurité Tablier modulaire Contrepoids Armoire de commande Boîte accessoires - 21 - 0DT829 2014-06-13...
- Page 22 TRAFFIC C TRAFFIC CM SS - SD PH ≤ 4500 PH ≤ 6000 PH ≤ 7000 – PH ≤ 8000 – 1100 PH > 8000 – 1200 traFFiC C Wind Wind Wind traFFiC C traFFiC Cm Ø 8 x 20 Ø...
- Page 23 X = Y±10mm 1/2H TRAFFIC C TRAFFIC CM 200 mm...
- Page 24 PaCking LiSt reference description Quantity Left column Right column Transom Safety edge Modular curtain Counterweight Control unit Hardware box - 24 - 0DT829 2014-06-13...
- Page 25 - 25 - 0DT829 2014-06-13...
-
Page 26: General Safety Precautions
ContentS Chap. topic ............................. Page generaL SaFetY PreCautionS ..................26 teCHniCaL CHaraCteriStiCS ................... 27 meCHaniCaL inStaLLation 3.1 Initial checks ......................... 28 3.2 Fixing the uprights ......................... 28 3.3 Assembling the crosspiece ....................28 3.4 Placing the crosspiece in position ..................28 3.5 Assembling the curtain ...................... -
Page 27: Technical Characteristics
ref. description ref. description Left-hand column cover Gear motor K10 Right-hand column Winding shaft Left-hand column Transmission chain Curtain aluminium profiles Counterweight belt drum Curtain reinforcing tube Manual release lever Control panel Safety edge aluminium profile Photocell LAB4 Safety edge rubber profile Curtain lifting belt Curtain belt attachment Safety edge connection box... -
Page 28: Mechanical Installation
• Using the M8 bolts supplied, fasten the curtain attachment sleeve to the crosspiece (fig.6). • Lower the curtain until it is completely unrolled. For Ditec Traffic C with a modular curtain: adjust the length of the curtain by rolling it onto the hook-up tubing if necessary. -
Page 29: Electric Connections
4. eLeCtriC ConneCtionS 4.1 Control panel • Insert the cables with pre-wired terminal boards in the housing, and connect them to the cards (fig.17). Fit the cables in the conduit and connect the connectors on the motor (fig.18). 4.2 Connecting the control panel / motor / security •... -
Page 30: Electronic Control Panel 5.1 49E - Connections
5.1 QUAdRO ELETTRONICO 49E - COLLEGAMENTI 5.1 49E ELECTRONIC CONTROL PANEL - CONNECTIONS inPutS Command Function description N.O Automatic closing Permanently closing the contact enables automatic closing. N.O Opening With DIP1=ON the closure of the contact activates an opening operation. Step-by-step With DIP1=OFF the closure of the contact activates an opening or closing operation in the following sequence: open-stop-close-open. - Page 31 EL07L 00000000000 EL07PW1 00000000000 www.ditec.it Connection to be completed by installer RP TC 1 2 3 4 5 6 - LK + POWER 17 14 12 11 0 0 0 1 1 2 3 4 6 8 9 20 41...
- Page 32 30 s automatic closing is only activated after a total, partial or step-by-step opening command. Motor partial opening adjustment. From 0 to 30 s. 30 s dip - switch description ditec Traffic diP 1 Control 1-3 function. Step-by-Step Opening dip-switches...
- Page 33 EL07L EL07PW1 00000000000 00000000000 www.ditec.it RP TC 1 2 3 4 5 6 - LK + POWER 17 14 12 11 0 0 0 1 1 2 3 4 6 8 9 20 41 FuSeS Value dimension Circuit F1 - F2 - F3 8A - 500V 10.3 x 38...
-
Page 34: Inverter) - Connections
5.2 47E (INVERTER) ELECTRONIC CONTROL PANEL - CONNECTIONS inPutS Command Function description Automatic closing Permanently closing the contact enables automatic closing. Opening The closure of the contact activates an opening operation. Closing The closing manoeuvre starts when the contact is closed. Reversal safety Opening the safety contact triggers a reversal of the movement (reopening) device... - Page 35 +F -F U V W P 2.0 OUT1 IN 1 OFF 1 2 3 4 1 11 12 13 41 40 20 9 8 4 3 2 1 1 0 LAMP SOFA1 White Blue A933A - 7823B Black 230 V 50/60 Hz Brown Orange Orange...
- Page 36 SignaLS and Setting trimmer description Setting automatic closing time. From 0 to 30 s. 30 s Partial opening adjustment. From 0 to 10 s. 10 s adjust opening speed. Adjust closing speed. Adjust deceleration in opening. Adjust deceleration in closing. It define the exact closing point. dip - switch description Enable adjustment through...
- Page 37 +F -F U V W OFF 1 2 3 4 1 11 12 13 41 40 20 9 8 4 3 2 1 1 0 LAMP 230 V 50/60 Hz FuSeS Value dimension Circuit F1 - F2 12A - 500V 10.3 x 38 monophase line adJuStment Limit SWitCH...
-
Page 38: Check Of The Movement Direction
6. CHeCking and Starting 6.1 Check of the movement direction • Move the panel until it reaches half-way with respect to its stroke. • Open and close the door by pressing the relative push-buttons, and check the correct movement direction. •... -
Page 39: Troubleshooting
7. trouBLeSHooting When working with electrical or electronic controls, make sure that the power source has been locked danger out and tagged according to approved local electrical codes. The following instructions are intended only for qualified personnel, authorized to operate under the Warning owners responsibility. -
Page 40: Maintenance
8. maintenanCe to Be Carried out eVerY 6 montHS Regular inspections should be made according to national regulations and product documentation by a Entrematic Group AB trained and qualified technician. The number of service occasions should be in accordance with national requirements and product documentation. -
Page 41: General Safety Precautions
uSe inStruCtionS generaL SaFetY PreCautionS This user handbook is an integral and essential part of the product and must be delivered to the users. Keep this document and pass it on to any future users. This automation is a “vertical-roll door”; it must be used for the specific purpose for which it was designed. Any other use is to be considered inappropriate and so dangerous. - Page 42 8. maintenanCe to Be Carried out eVerY 6 montHS Regular inspections should be made according to national regulations and product documentation by a Entrematic Group AB trained and qualified technician. The number of service occasions should be in accordance with national requirements and product documentation.
- Page 43 Sweden declare under our sole responsibility that the type of equipment with name / description: TRAFFIC C - TRAFFIC CM Folding high speed door with counterweight With performance levels as declared in the accompanying Declaration of Performance and the product label, and electrical...
- Page 44 Entrematic Group AB Lodjursgatan 10 SE-261 44, Landskrona Sweden www.ditecentrematic.com...
Need help?
Do you have a question about the Traffic C and is the answer not in the manual?
Questions and answers