Table of Contents
Advertisement
Advertisement
Table of Contents

Subscribe to Our Youtube Channel
Related Manuals for Technogym Excite Jog Now


Summary of Contents for Technogym Excite Jog Now
- Page 1 EXCITE Jog Now User manual...
-
Page 2: Table Of Contents
Contents Manufacturer and equipment identification ..........3 Description of the equipment ..............5 Technical data ..................14 Safety devices and notices ..............16 Place of installation ................. 18 Moving the equipment ................19 Levelling ....................20 Electrical connection ................21 Connection to another device .............. -
Page 3: Manufacturer And Equipment Identification
Manufacturer and equipment identification 0476 A - Manufacturer’s name and address F - Serial number and date of manufacture B - Description of product G - Product code C - Electrical specifications H - Tells you to consult the User manual D - Equipment classification I - Certification mark for the USA and Canada E - CE Mark... - Page 4 Manufacturer and equipment identification Jog Now is a class A equipment. In residential environments this equipment may cause radio interference. In this case the user must employ adeguate measures. Equipment with model codes D442M.., D443M.., D442U.., D443U.., DAK2M.., DAK3M.., DAK2U.., DAK3U.. are intended for medical use and have been designed and built for use in outpatient clinics, hospitals, clinics and sport centres, for muscular therapy and rehabilitation.
-
Page 5: Description Of The Equipment
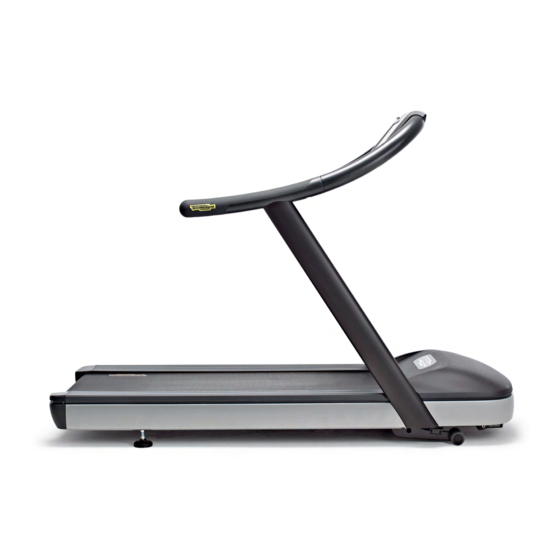
Description of the equipment Control panel Treadmill Side handgrips Central handgrip Sensors Footrests Reading stand Tray TGS key reader Control panel: controls all available functions, from setting up workout programs to viewing messages and related workout information. Jog Now Excite... - Page 6 Description of the equipment Control panel Treadmill Side handgrips Central handgrip Sensors Footrests Reading stand Tray TGS key reader 05156004AA Treadmill: made entirely of rubber, antistatic and vibration-dampened. Jog Now Excite...
- Page 7 Description of the equipment Control panel Treadmill Side handgrips Central handgrip Sensors Footrests Reading stand Tray TGS key reader 0515605AA Side handgrips: can be held when walking with large strides. The luminous signal on the left handgrip lights up at the beginning of the exercise to signal that the equipment is in use; the signal blinks at the end of the exercise to signal that the equipment will shortly be available.
- Page 8 Description of the equipment Control panel Treadmill Side handgrips Central handgrip Sensors Footrests Reading stand Tray TGS key reader Central handgrip: can be held when walking with small strides. The 700 version has sensors for monitoring the heart rate (hand sensor). Jog Now Excite...
- Page 9 Description of the equipment Control panel Treadmill Side handgrips Central handgrip Sensors Footrests Reading stand Tray TGS key reader Central handgrip: can be held when walking with small strides. The 700 version has sensors for monitoring the heart rate (hand sensor). Jog Now Excite...
- Page 10 Description of the equipment Control panel Treadmill Side handgrips Central handgrip Sensors Footrests Reading stand Tray TGS key reader 05156008AA Footrests: you can take a short rest by moving your feet from the treadmill to the foot rests, in the event of fatigue or danger. Jog Now Excite...
- Page 11 Description of the equipment Control panel Treadmill Side handgrips Central handgrip Sensors Footrests Reading stand Tray TGS key reader Reading stand: for standing magazines or books on. Jog Now Excite...
- Page 12 Description of the equipment Control panel Treadmill Side handgrips Central handgrip Sensors Footrests Reading stand Tray TGS key reader Tray: for standing the water bottle or other useful items on during the workout. Jog Now Excite...
- Page 13 Description of the equipment Control panel Treadmill Side handgrips Central handgrip Sensors Footrests Reading stand Tray TGS key reader TGS key reader: for the TGS key (optional). Jog Now Excite...
-
Page 14: Technical Data
Technical data 859 mm 2101 mm (34") (83") 1481 mm (58") Model code DAK2E..., DAK2M..., DAK22..., DAK3E..., DAK3M..., DAK32... Power supply 200÷240 Vac 50/60 Hz Power input 1800 VA Motor peak power 4400 W (6Hp) Weight of equipment 165 kg (364 lb) Maximum user weight 220 kg (485 lb) Speed... - Page 15 Technical data Model code DAK2U..., DAK3U..., DAK2A..., DAK3A... Power supply 100÷240 Vac 50/60 Hz Power input 1800 VA Motor peak power 4400 W (6Hp) Weight of equipment 165 kg (364 lb) Maximum user weight 220 kg (485 lb) Speed 0.4÷20 km/h (0.3÷12 mph) Gradient 0÷15% Noise level...
-
Page 16: Safety Devices And Notices
Safety devices and notices A Fixed guard: guards against access to the inside of the equipment. B Emergency button: stops the equipment immediately in the event of an emergency. If a dangerous situation arises, this button can stop the equipment without having to use the normal controls. On the pushbutton there is a cord with a peg to clip on to the user’s clothing. - Page 17 Safety devices and notices D Main switch: turns the equipment’s power on and off. E Circuit breaker: protects the electrical components of the equipment. When power surges, the protection device opens, thus preventing damage to the electronics inside. arning Please read the adhesive labels on the equipment, which provide information about possible risks and hazards. F The label which can be affixed to the power supply cable states the electrical specifications for the cable.
-
Page 18: Place Of Installation
Place of installation To ensure that exercising with Jog is easy, safe and effective, the place where it is used should comply with certain specific requirements; in particular, before choosing the place where the equipment will be installed, please ensure that the following conditions are satisfied: - the temperature is between +10°C and +25°C;... -
Page 19: Moving The Equipment
Moving the equipment The equipment has two fixed front wheels. To move the equipment, lift it up slightly, as shown in the illustration, and push it forwards and backwards. Do not lift the equipment to high, as this may damage the front frame. Given the weight of the equipment, we recommend that more than one person be involved in moving it. -
Page 20: Levelling
Levelling The equipment is levelled by adjusting the rear foot on the side shown in the illustration: - screw the foot (A) in or out until the frame is in a stable position; - tighten up the lock nut (B) after adjusting. Jog Now Excite... -
Page 21: Electrical Connection
Electrical connection Before connecting the equipment to the mains power supply, ensure that the electrical system specifications comply to binding regulations. Check the mains power supply specifications on the equipment identification label. anger The wall socket must be located in a place where the plugging and unplugging can be done easily and safely. When plugging in, the switch on the equipment must be in the OFF (0) position (i.e. - Page 22 Electrical connection The label above the main switch shows the on and off positions. A - Shows where the switch is. B - Shows which sides the ON and OFF (I and 0) positions are. The ON (I) / OFF (0) positions may vary according to the equipment version.
-
Page 23: Connection To Another Device
Connection to another device The equipment can be connected to an audio/video reception device such as the Cardio Theater. Besides, if the equipment has not TV, it can be connected to a network of devices conforming to the CSAFE protocol. arning The devices connected must comply with international standards. - Page 24 Connection to another device If the equipment has , connect the aerial cable to the equipment and to the wall socket. Use an RF coaxial cable for the connection with an F type of connector for the equipment. The wall socket of the aerial cable must be positioned so that the plug can be easily inserted and removed. A network socket can be found next to the aerial socket for the Ethernet connection.
-
Page 25: Routine Maintenance
The safety of the equipment is assured only on the condition that it is carefully inspected every two weeks for any signs of damage and/or wear. If used for medical purposes, disinfect the hand sensors each time the equipment is used. For maintenance actions not described in this manual, call in the Technogym Technical Support Service. Jog Now Excite... - Page 26 Routine maintenance anger The routine maintenance, adjustment and lubrication jobs must be performed by the Technogym Technical Support Service. Before starting any job, turn the equipment off by switching the switch to the OFF (0) position and unplug the power cable from the wall socket.
- Page 27 Routine maintenance Dust panel The dust panel is positioned between the treadmill and the motor compartment and acts as a guard against external agents pulled in by the treadmill as it runs. Clean the dust panel and the surrounding area every month: remove the guard, extract the panel from its guides and clean it with a vacuum cleaner.
- Page 28 - With the rotating belt in motion at 5 kph press the emergency push button to ensure that the belt stops. If the emergency push button does not work properly place the product out of service and contact Technogym Technical Support Service.
-
Page 29: Aligning The Treadmill
Aligning the treadmill When the equipment is running the treadmill must be centrally aligned in relation to the frame (i.e. the writing on the belt must be equidistant from both sides). If it tends to move to the right or left or is not centrally positioned, it needs aligning. -
Page 30: Troubleshooting
Check that the two keys next to the switch are closed, by pressing them fully down. Power supply cable damaged Contact the Technogym Technical Support Service. The control panel connector has been accidentally disconnected. Contact the Technogym Technical Support Service. - Page 31 Change the chest band. Blocked key on keypad. Data incorrect or unreliable If the problem persists, contact the Technogym Technical Support Service. with equipment Equipment next to source of radio interference (e.g. electrical domestic appliances). running Move the equipment to another place or move the domestic appliances.
-
Page 32: Technical Assistance
0547 650150 - on-site servicing email: support@technogym.com - supply of original spare parts. When you contact the Technogym Technical Support Service you must give the following information: - model, - date of purchase, - serial number, - precise description of the problem. -
Page 33: Storage
Storage If a long period of non-use is expected, you are advised to store the equipment in the following way: - in a clean dry place, with a dust cover; - at a room temperature between -10°C and 70°C and relative humidity between 20% and 90%. For better storage, use the original packing materials. -
Page 34: Switching On And Off
Switching on and off To turn the equipment on, switch the switch to the “ON” position (I). The ON (I) / OFF (0) positions may vary according to the equipment version. The correct positions are given on the label on the equipment. After a quick system check (reset), the equipment is ready for use. - Page 35 Switching on and off To turn the equipment off, switch the main switch to the “OFF” position (0). The ON (I) / OFF (0) positions may vary according to the equipment version. The correct positions are given on the label on the equipment. The equipment must be switched off only at the end of the exercise, when in standby.
-
Page 36: Monitoring The Heart Rate
Monitoring the heart rate The equipment is able to measure heart rate trends, in two different ways: - with a device applied to the central handgrip (hand sensor), that switches on when you grip the handgrip in the sensor region (available in 700 version);... - Page 37 Monitoring the heart rate Heart rate readings will not be accurate near electromagnetic radiation sources (TVs, cellphones, etc.). Should you have any doubts about the accuracy of the readings, contact the Technical Support Service. The following table shows the optimum heart rate levels in relation to age and the goal to be achieved. Theoretical maximum heart rate (100%) is calculated on the basis of age using the formula: 220 - age.
- Page 38 Monitoring the heart rate To read the graph, simply find your age on the horizontal axis and scan up the vertical until you reach the 60%, 70% and 90% values. Aerobic exercise performed at a heart rate between 60% and 70% mainly burns fat as an energy source. When doing aerobic exercise at a heart rate of 70% to 90% the cardiocirculatory component prevails.
-
Page 39: Ergonomic Positioning On The Equipment
Ergonomic positioning on the equipment Step on the treadmill from the rear, looking forward, and put your feet on the footrests on either side of the frame. In this rest position hold on to the side grip with one hand, using the other hand to operate the control panel. - Page 40 Ergonomic positioning on the equipment At a speed of about 6-7 km/h, the fast walking becomes a gentle run, with gradually lengthening steps. The speed will increase gradually as you feel more sure and stable. arning Any distractions in the area around the equipment may cause the user to lose his/her balance. It is the user’s responsibility to ensure that the product being used does not interfere with any other mobile goods during use.
- Page 41 Jog Now Excite_uk-AJ 0SM00421...
Need help?
Do you have a question about the Excite Jog Now and is the answer not in the manual?
Questions and answers