Table of Contents
Advertisement
Advertisement
Table of Contents

Related Manuals for Technogym Artis Run


Summary of Contents for Technogym Artis Run
- Page 1 ARTIS CARDIO User manual...
-
Page 2: Table Of Contents
Contents Contents ..................... 2 Important safety instructions ..............3 Personal safety ..................5 Manufacturer and equipment identification .......... 7 Description of the equipment ..............8 Technical data ..................10 Safety devices and warnings ..............12 Place of installation ................16 Moving the equipment ................ -
Page 3: Important Safety Instructions
Any other use of the equipment is to be considered improper and therefore dangerous. Do not use accessories not recommended by Technogym. Never operate the equipment if it has a damaged cable or plug, if it is not working properly, if it has been dropped or damaged, or dropped into water. In such cases, contact the Technogym Technical Support service. - Page 4 Important safety instructions Do not drag the equipment by the power cable or use the cable cord as a handle. Keep the power cable away from heated surfaces. Keep hands away from moving parts. Never drop or insert any object into any opening. Do not use outdoors.
-
Page 5: Personal Safety
Keep all electrical components, such as the power cable and I/0 switch, away from liquids to prevent electric shocks. Maintain the equipment in good working condition. If there are signs of wear, contact the Technogym Technical Support service. Do not attempt to perform any service on the equipment yourself other than the operations described in the maintenance instructions found in the user manual. - Page 6 Technogym’s written authorization or for failure on your part to use, operate and maintain the products as set out in this User Manual.
-
Page 7: Manufacturer And Equipment Identification
The values stated in the illustration are purely indicative; refer to the label attached to the equipment or the data in "Technical data" section for the correct information. Technogym S.p.A. via Calcinaro 2861, Cesena (FC) Made in Italy RUN ARTIS Model no. -
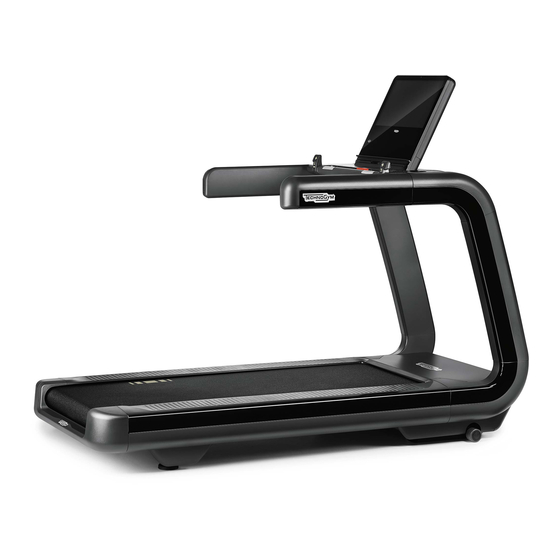
Page 8: Description Of The Equipment
Control panel (A): it allows you to view and control information, settings and contents both for workouts and for entertainment. The tablet-style touch screen interface allows you to include the contents offered by the Technogym App Store. Please see the control panel's manual to see how it works. - Page 9 Description of the equipment Treadmill (H): antistatic and vibration-dampened running surface. Side hand grips (L): for stability when getting on and off the equipment or if the user loses his/her balance; they can be held when walking with long strides. The luminous signal on the left handgrip lights up at the beginning of the exercise to signal that the equipment is in use and the treadmill is moving;...
-
Page 10: Technical Data
Technical data Model code DBK0EU... , DBK0EV... DBK0AU.. , DBK0AV... Power supply 200-240 Vac 50/60 Hz 100-240 Vac 50/60 Hz Peak motor power 5800 W (7.8 Hp) 5800 W (7.8 Hp) Weight of equipment 215 kg (474 lb) 215 kg (474 lb) Maximum user weight 220 kg (485 lb) 220 kg (485 lb) - Page 11 Technical data 2060 mm 885 mm (81") (35") Run Artis...
-
Page 12: Safety Devices And Warnings
Safety devices and warnings Fixed guard (A). Guards against access to the inside of the equipment. STOP button (B). This button can be used to stop the equipment without having to use the normal controls. Emergency switch (C). It has a cord with a peg to clip on to the user’s clothing as shown in the illustration below. Check that the peg grips onto clothing sufficiently well to operate the emergency switch. - Page 13 Safety devices and warnings After finishing working out, put the emergency switch peg back into its slot, as shown in the illustration. Run Artis...
- Page 14 Safety devices and warnings Main switch (D). Turns the equipment’s power on and off. Circuit breaker (E). Protects the electrical components of the equipment. When power surges, the protection device opens, thus preventing damage to the electronics inside. To access the circuit breaker, open panel (F): insert your fingers into the holes and pull. The label (G) which can be attached to the power supply cable states the electrical specifications for the cable.
- Page 15 Safety devices and warnings Marking on the treadmill belt (H) The marking on the two sides of the treadmill belt indicates if the treadmill is moving. In motion light (L) The luminous red signal located on the left handle shows that the treadmill is moving.
-
Page 16: Place Of Installation
Place of installation To ensure that exercising with the equipment is easy, safe and effective, the place where it is used should comply with certain specific requirements; in particular, before choosing the place where the equipment will be installed, please ensure that the following conditions are satisfied: the temperature is between +10°C and +25°C;... -
Page 17: Moving The Equipment
Moving the equipment The equipment has two fixed front wheels. To move the equipment, lift it up slightly, as shown in the illustration, and push it forwards and backwards. To make it easier to move the equipment, we recommend adjusting the belt to its highest gradient. -
Page 18: Levelling
Levelling The equipment is levelled by adjusting the rear foot on the side shown in the illustration: loosen the locknut (B); tighten or loosen the screw (A) until the frame is in a stable position; tighten the lock nut (B) after adjusting. Run Artis... -
Page 19: Electrical Connection
Electrical connection Before connecting the equipment to the mains power supply, ensure that the electrical system specifications comply with current regulations. Check the mains power supply specifications on the label next to the switch. Open panel (A) to reach the label and connector: put your fingers into the holes and pull. - Page 20 Electrical connection Warnings Check the state of the power supply cable periodically. The wall socket must be located in a place where plugging and unplugging can be done easily and safely. When plugging in, the switch on the equipment must be set to position 0 (the equipment must be switched off). The power supply socket must be grounded .
-
Page 21: Connection To Another Device
Connection to another device The equipment can be connected to an audio/video reception device such as the Cardio Theater, as well as to a network of devices conforming to the CSAFE protocol. Warning The devices connected must comply with international standards. - Page 22 Connection to another device If the equipment is fitted with TV, connect the aerial cable to the equipment and to the wall socket. Use an RF coaxial cable for the connection with an F type of connector for the equipment. The wall socket of the aerial cable must be positioned so that the plug can be easily inserted and removed.
-
Page 23: Routine Maintenance
The safety of the equipment is assured only on the condition that it is carefully inspected every two weeks for any signs of damage and/ or wear. If used for medical purposes, disinfect the hand sensors each time the equipment is used. For maintenance operations not described in this manual, call in the Technogym Technical Support Service. Run Artis... - Page 24 Warnings The routine maintenance, adjustment and lubrication jobs must be performed by the Technogym Technical Support Service. Before starting any job, turn the equipment off by switching the switch to the 0 position and unplug the power cable from the wall socket.
- Page 25 If the light flashes during standby, the running surface material is beginning to show signs of wear. If, during standby, the light flashes intermittently with groups of flashes, you must contact the Technogym Technical Support service for maintenance to be carried out on the materials.
-
Page 26: Aligning The Treadmill
Aligning the treadmill When the equipment is running the treadmill must be centrally aligned in relation to the frame; if the treadmill tends to move either to the right or left, or if it is not centrally positioned, it needs aligning. Alignment must be performed with the equipment running. -
Page 27: Troubleshooting
Mains power failure. equipment by plugging in an appliance that definitely works. Power supply cable damaged. Contact the Technogym Technical Support Service. Installation problems with the power supply cable. Check the connection. Check that the two keys next to the switch are closed, by The Circuit breaker is open. - Page 28 Troubleshooting Problem Cause Remedy Move the equipment far enough away to stop signal Other transmitters situated nearby. Problems in monitoring interference (minimum distance between two units 80 cm). heart rate with the chest Find the interference source (e.g. an electrical household band Strong interference sources nearby.
-
Page 29: Technical Assistance
Via Calcinaro 2861, 47521 Cesena Italy on-site servicing tel: +39 0547 56047 supply of original spare parts http://www.technogym.com/Support When you contact the Technogym Technical Support Service you must give the following information: model date of purchase serial number precise description of the problem Warning Work on the equipment by persons unauthorised by Technogym invalidates the warranty. -
Page 30: Storage
Following measures implemented by the member states of the European Union, private citizens resident in the EC can take their used electrical and electronic equipment to authorised collection centres for disposal. If the product is used commercially, contact your reseller or Technogym Customer Service in your country to arrange collection and disposal of the electrical or electronic waste. -
Page 31: Switching On And Off
Switching on and off To turn the equipment on, switch the main switch to the I position. Warning While switching the equipment on, the treadmill may move slightly. After a quick system check (reset), the equipment is ready for use. To turn the equipment off, switch the main switch to 0 position. -
Page 32: Monitoring The Heart Rate
Monitoring the heart rate The equipment is able to measure heart rate trends, in two different ways: with a device applied to the central handgrip (hand sensor), that switches on when you grip the handgrip in the sensor region; with a chest band with a heart rate transmitter (Polar H7). There must be no more than one transmitter within the range of the receiver: otherwise the receiver may receive different signals at the same time and give incorrect heart readings. - Page 33 Monitoring the heart rate The table shows the optimum heart rate levels in relation to age and the goal to be achieved. Theoretical maximum heart rate (100%) is calculated on the basis of age using the formula: Max HR = 207 - 0.7 x age (R. L. Gelish et alii, Med Sci Sports Exerc., 2007 May, 39 (5): 281).
- Page 34 Monitoring the heart rate Warnings During a workout it is very important that your heart rate never goes above 90% of your maximum rate (unless you are an athlete engaged in competitive sport). The sole function of the heart rate monitor is to display the heart rate during exercise and cannot be used for medical cardiac diagnoses of any kind.
-
Page 35: Using The Equipment
Using the equipment Step onto the running surface from the rear looking forwards and put your feet on the footrests on either side of the frame. In this rest position hold on to the side grip with one hand, using the other hand to operate the control panel. When the treadmill starts up, hold on to the side handgrips with both hands and start walking slowly. - Page 36 Using the equipment At a speed of about 6-7 km/h, fast walking becomes a gentle run, with gradually lengthening steps. The speed will increase gradually as you feel more sure and stable. Warnings Any distractions in the area around the equipment may cause the user to lose his/her balance.
- Page 37 Run Artis_en-AD 0SM00829...
Need help?
Do you have a question about the Artis Run and is the answer not in the manual?
Questions and answers