
Subscribe to Our Youtube Channel
Related Manuals for Wirepath WPS-365-DVR


Summary of Contents for Wirepath WPS-365-DVR
- Page 1 WPS-365-DVR 9/16 CHANNEL INSTALLATION AND USERS MANUAL Review manual thoroughly before installation. Retain for future reference.
-
Page 2: Table Of Contents
6.11.1. E-MAIL SETUP 6.11.2. FTP SETUP 6.11.3. ADVANCED NETWORK SETUP 6.12. FACTORY DEFAULT 7. PTZ CONTROL 7.1. OSD CONTROL FOR WIREPATH™ SURVEILLANCE CAMERAS 8. SEARCH/PLAYBACK/ARCHIVE 8.1. SEARCH BY TIME 8.2. SEARCH BY EVENT / LOG DISPLAY 8.3. SMART SEARCH 8.4. SEARCH ARCHIVED FILES 8.5. - Page 3 9. REMOTE ACCESS 9.1. PC REMOTE ACCESS 9.2. PC REMOTE DISPLAY AND OPERATIONS 9.2.1. SPLIT-WINDOW OPTION MENU 9.2.2. CONTROL PANEL 9.2.3. SPLIT-WINDOW PANEL 9.2.4. PLAYBACK PANEL 9.2.5. STATUS PANEL 9.2.6. SEARCH PANEL AND COPY FEATURE 9.2.6.1. SEARCH BY TIME 9.2.6.2. SEARCH BY EVENT 9.2.6.3.
- Page 4 SAFETY INFORMATION • Handle this device with care. Do not strike or shake this device as this may damage it. • Do not expose this device to water or moisture. Moisture may damage the device and also cause electric shock. Do not operate it in wet areas. Take immediate action if the device becomes wet. Turn the power off and refer servicing to qualified service personnel.
-
Page 5: Product Overview
Automation Systems, PC, or Smartphone. With H.264 compression, 960H, D1 / Half D1 / CIF video resolution support and adjustable Frame Per Second record settings the installer can maximize the storage time of the built-in hard drive. Wirepath™ DVR’s professional grade features make them ideal for high-end residential and commercial monitoring applications. -
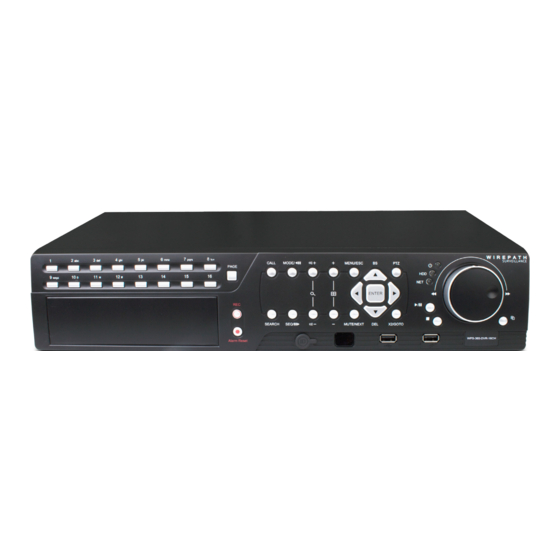
Page 6: Front And Rear Panels And Remote Control
WPS-365-DVR-9CH & 16CH Installation and Users Manual 2. FRONT AND REAR PANELS AND REMOTE CONTROL 2.1. FRONT PANEL 3 4 5 6 7 8 9 10 11 12 13 Alpha-Numeric Buttons (1-16, 0, *, #) Selects the corresponding camera during normal operation and is used for text entry for menus and setup. - Page 7 WPS-365-DVR-9CH & 16CH Installation and Users Manual FRONT PANEL, CONT’D. 3 4 5 6 7 8 9 10 11 12 13 14. Copy Button ( ) Press to copy the current playback images to the internal DVD drive, a second press will stop the copy process.
-
Page 8: Rear Panel
2.2. REAR PANEL 1 2 3 Video Input Connectors (1-9 on WPS-365-DVR-9CH, 1-16 on WPS-365-DVR-16CH) Connect system cameras to these BNC connectors. The corresponding 75 Ω termination must be ON unless the video output terminal is connected. See item 5 below. - Page 9 WPS-365-DVR-9CH & 16CH Installation and Users Manual REAR PANEL, CONT’D. 1 2 3 10. Power Connection (DC IN) Connect the supplied External Power Supply. Acceptable Range: 12V / 8.33A DC 11. CALL-AUX Connectors (CALL-AUX IN/OUT) These connections are not used on this model.
-
Page 10: Remote Control
WPS-365-DVR-9CH & 16CH Installation and Users Manual 2.3. REMOTE CONTROL The remote control has many of the same functions as the front panel buttons. The functions include: Alarm Reset Press to reset alarm. Number Buttons Direct selection of channels, display single view of the selected channel... -
Page 11: Installation
3. INSTALLATION 3.1. POSITIONING THE 365 DVR Wirepath Surveillance DVRs are designed to deliver unsurpassed technology with superior performance. However, where you place the DVR can have a large effect on the performance that you receive, and the life of the unit. Here are some guidelines to follow when installing the DVR. -
Page 12: Connections
WPS-365-DVR-9CH & 16CH Installation and Users Manual 3.2. CONNECTIONS To ensure proper performance and operation of the 365 DVR, it is recommended that all connections and setup be performed by a qualified system installer. 3.2.1. BASIC CONNECTIONS Camera(s) Speakers Amplifier... -
Page 13: Ptz Camera / Automation System Connections
Connect the RS-485 connector to PTZ camera(s) via an appropriate cable. The system supports a variety of PTZ cameras and the OSD menu of Wirepath™ Surveillance cameras. Different PTZ cameras can coexist in a system only if they support the same protocol and baud rate. Make sure to set unique PTZ IDs to the cameras, the DVR and any other PTZ device. - Page 14 *Communication PIN functionality can vary; refer to the manual for your Automation System for proper PIN functionality. IP Control Connections Wirepath™ DVRs provide integration with Automation Systems via Ethernet allowing for control and streaming of video. Connect the Ethernet port to a home automation network.
-
Page 15: Main Screen And Basic Operations
WPS-365-DVR-9CH & 16CH Installation and Users Manual 4. MAIN SCREEN AND BASIC OPERATIONS The following sections (Sections 4-6) relate to the display output from the HDMI, VGA or BNC connection. For Remote Access operation using Internet Explorer see Section 9. -
Page 16: Text Input
WPS-365-DVR-9CH & 16CH Installation and Users Manual 4.1. TEXT INPUT There are certain system settings that the system requires text to be entered, such as system login, camera title setup, etc. Follow the steps below using the front panel or remote control to enter text when prompted to do so by a text box: 1. -
Page 17: Login / Logout
WPS-365-DVR-9CH & 16CH Installation and Users Manual 4.2. LOGIN / LOGOUT There are three password levels in the system; Administrator (highest), Supervisor, and Operator (lowest). If the user does not login to the system, the user will be treated as a Guest and can only view live video display. - Page 18 WPS-365-DVR-9CH & 16CH Installation and Users Manual • SEQ Press this button on the front of the DVR or the remote control to switch to or exit from the sequence display mode. Alternatively use the mouse to select this icon. In sequence mode, each page in the sequence will be shown sequentially for the preset time, and the SEQ icon will be shown in the System Status Bar in the lower-right corner of the screen.
-
Page 19: Digital Zoom
WPS-365-DVR-9CH & 16CH Installation and Users Manual • COPY Press this button on the front panel of the DVR or the remote control to display the Search menu and then copy recorded video to the storage device connected to the USB port. -
Page 20: Main Menu
WPS-365-DVR-9CH & 16CH Installation and Users Manual 5. MAIN MENU Select the MENU icon from the Control Bar or right click the mouse in the display window to activate the main Menu display as shown. In the main Menu display and all subsequent displays, the items enabled are highlighted in Blue, and those disabled in Gray. -
Page 21: Volume Control
WPS-365-DVR-9CH & 16CH Installation and Users Manual The Status display includes: • ALARM RECORDING STATUS Displayed is the portion of the hard drive allocated to recording alarm events and the percentage of that space that is currently full. • NORMAL RECORDING STATUS Displayed is the portion of the hard drive allocated to regular (normal, non-event) recording and the percentage of that space that is currently full. -
Page 22: Video Adjustment
WPS-365-DVR-9CH & 16CH Installation and Users Manual 5.3. VIDEO ADJUSTMENT The Video Adjustment menu allows for the adjustment of Brightness, Contrast, Hue, and Saturation for each video input. Once in the main Menu display, press ▲▼◄► on the front panel of the DVR or remote control to select Video Adjustment and then press ENTER to display the menu as shown. -
Page 23: Display
WPS-365-DVR-9CH & 16CH Installation and Users Manual 5.4. DISPLAY The VGA Display menus allows for adjustment to the VGA and HDMI output of the DVR. Once in the Main Menu display, press ▲▼◄► on the front panel of the DVR or remote control to select VGA Display and then press ENTER to display the menu as shown. -
Page 24: Backup Device
WPS-365-DVR-9CH & 16CH Installation and Users Manual 5.5. BACKUP DEVICE The Backup Device menu allows for backup and recovery of the DVR’s configuration to or from a USB device. This DVR supports a variety of USB 2.0 storage devices including thumb drives and DVD drives. -
Page 25: Software Upgrade
3. Reboot each computer that will be used to access or configure the updated DVR. 4. When the computer restarts, Do Not Open IE. Run the Remove_WPS_IE_Plugin file. 5. Open IE and access the updated Wirepath DVR. Perform Step 2, 3 and 4 for all computers that will be used to access the DVR. -
Page 26: System Shutdown
WPS-365-DVR-9CH & 16CH Installation and Users Manual 5.7. SYSTEM SHUTDOWN This menu is available to Administrators only. Always properly shutdown the DVR before moving it. The hard drive can be damaged if the DVR is moved before shutdown. The DVR will reboot to whatever state it was in when it was properly shut down (ex: split window display, etc). -
Page 27: Setup Menu
WPS-365-DVR-9CH & 16CH Installation and Users Manual 6. SETUP MENU This menu is available to Administrators only. In the Menu display, use the buttons on the front panel of the DVR or remote control, and press ▲▼◄► to select Setup, and then press ENTER. -
Page 28: Pre-Camera Setup
WPS-365-DVR-9CH & 16CH Installation and Users Manual 6.1. PRE-CAMERA SETUP Pre-Camera Setup allows the administrator to define fundamental attributes for connected cameras. In the Setup menu, press ▲▼◄► on the front panel of the DVR or on the remote to change the highlighted option to Pre-Camera, and then press ENTER to display Pre-Camera menu. -
Page 29: Camera Setup
WPS-365-DVR-9CH & 16CH Installation and Users Manual 6.2. CAMERA SETUP The Camera Setup menu allows the administrator to define additional attributes for each camera. In the Setup menu, press ▲▼◄► on the front panel of the DVR or on the remote to change the highlighted option to Camera Setup, and then press ENTER to display the Camera Setup menu. - Page 30 WPS-365-DVR-9CH & 16CH Installation and Users Manual •MOTION SETTINGS Used to set specific actions for when the DVR detects motion. Please refer to Section 6.2.2 for the details. •COVERT If a camera’s covert function is enabled, the video of this camera can only be seen if the user has logged in an Administrator.
-
Page 31: Video Loss Setup
WPS-365-DVR-9CH & 16CH Installation and Users Manual 6.2.1. VIDEO LOSS SETUP Video Loss Setup allows the administrator to define how the system responds when video signal is lost for the camera. In the Camera Setup menu, highlight Settings in Video Loss and press the ENTER button on the front panel of the DVR or remote control to display Video Loss Setup sub menu for the selected camera. - Page 32 WPS-365-DVR-9CH & 16CH Installation and Users Manual • GOTO PRESET The GOTO Preset feature works in conjunction with the Camera To Go setting and defines the preset position the Camera To Go PTZ camera will go to when video signal is lost for this camera.
-
Page 33: Motion Setup
WPS-365-DVR-9CH & 16CH Installation and Users Manual 6.2.2. MOTION SETUP Motion Setup allows the administrator to define how the system responds when motion is detected for the camera. In the Camera Setup menu, highlight Motion Setup and press the ENTER button on the front panel of the DVR or remote control to display the Motion Setup sub menu for the selected camera. - Page 34 WPS-365-DVR-9CH & 16CH Installation and Users Manual Functions in the Sub-menu: • DURATION Set the length of time the buzzer and the corresponding Alarm Out relay will remain triggered once video loss is detected for this camera. The Buzzer and Alarm Out relay will reset immediately once video signal is restored.
-
Page 35: Detection Settings
WPS-365-DVR-9CH & 16CH Installation and Users Manual 6.2.2.1. DETECTION SETTINGS The Detection Setting sub menu is used to customize motion detection settings including the motion detection area(s) and sensitivity. In the Motion Setup menu, highlight Settings in Detection and press the ENTER button on the front panel of the DVR or remote control to display the Motion Detection Settings sub menu for the selected camera. -
Page 36: Alarm Setup
WPS-365-DVR-9CH & 16CH Installation and Users Manual • SEQ / CALL Press these buttons on the front panel of the DVR or remote control to decrease (SEQ) or increase (CALL) the Sensitivity of the motion detection area of this camera from 1 - 10 (1 is least sensitive and 10 is most sensitive). - Page 37 WPS-365-DVR-9CH & 16CH Installation and Users Manual To navigate and operate this menu: • ▲▼◄► Press these buttons on the front panel of the DVR or remote control to select an item. Alternatively use the mouse to select an item. • NUMERIC Press these buttons on the front panel of the DVR or remote control to select an alarm input.
-
Page 38: Seq Display Setup
WPS-365-DVR-9CH & 16CH Installation and Users Manual • LOG By default, the DVR will log when video loss is detected in the Event Log (see Section 8.2). Highlight this setting and press ENTER or +/- to enable or disable this item. Alternatively use the mouse to left-click on this item. - Page 39 WPS-365-DVR-9CH & 16CH Installation and Users Manual To navigate and operate this menu: • ▲▼◄► Press these buttons on the front panel of the DVR or remote control to select an item. Alternatively use the mouse to select an item. • ESC Press the ESC button on the front panel of the DVR or remote control to escape from this menu and return to the main menu.
- Page 40 WPS-365-DVR-9CH & 16CH Installation and Users Manual The following is a brief description of the operations in the sub menu: • ▲▼◄► Press these buttons on the front panel of the DVR or remote control to change the focus camera. Alternatively use the mouse to select the focus camera.
-
Page 41: Scheduled Record Setup
WPS-365-DVR-9CH & 16CH Installation and Users Manual 6.5. SCHEDULED RECORD SETUP The schedule section affects the when and how the DVR records video and audio. However this does not affect outgoing email notifications or alarm outputs. These will occur 24/7 regardless of schedule The Scheduled Record Setup allows the administrator to define when and how video and audio will be recorded. -
Page 42: Scheduled Record - Easy Setup
WPS-365-DVR-9CH & 16CH Installation and Users Manual The following is a brief description for each item in the sub menu and its specific operations: • START Set the start time of this time segment (conditional) in increments of 30 minutes in military time format. The end time of this conditional is implicitly set as the start time of next conditional. Press the +/- buttons on the front panel of the DVR or the remote control to select the desired start time. - Page 43 WPS-365-DVR-9CH & 16CH Installation and Users Manual Recording options include: - Pink: Alarm, Motion and Normal Video and Audio Recording (Default setting) - Purple: Alarm and Motion Video and Audio Recording only - Red: Alarm Video and Audio Recording only...
-
Page 44: Hdd Setup
WPS-365-DVR-9CH & 16CH Installation and Users Manual 6.7. HDD SETUP The HDD Setup allows the administrator to format/clear the hard drive, set Alarm Record partition size and Normal Record partition size, and define the behavior for Alarm Record and Normal Record partition if the hard drive becomes full. - Page 45 WPS-365-DVR-9CH & 16CH Installation and Users Manual The following is a brief description for each item in the sub menu and its specific operations: • Size (GB) The total hard drive storage capacity in GB (gigabytes). NOTE: If the total Alarm Record partition size is zero (0) and the total Normal Record Partition is 100, then Alarm video and audio will NOT be recorded in the Normal Record partition, and only Normal Record video and audio will be saved.
-
Page 46: Hdd Format/Clear
WPS-365-DVR-9CH & 16CH Installation and Users Manual 6.7.1. HDD FORMAT/CLEAR The HDD Format/Clear menu allows the administrator to format and/or clear the hard drive. The administrator can also set the size for the Alarm Record partition and the Normal Record partition. -
Page 47: Advanced Hdd Setup
WPS-365-DVR-9CH & 16CH Installation and Users Manual 6.7.2. ADVANCED HDD SETUP The HDD Failure Action in Advanced HDD Setup allows the administrator to define how the system responds to hard drive failure. The HDD Failure Action will be triggered if there’s no available formatted hard drive detected. - Page 48 WPS-365-DVR-9CH & 16CH Installation and Users Manual The following is a brief description for each item in this menu and its specific operations: • DURATION Set the duration that the Alarm Out relay and the buzzer will remain triggered after the hard drive failure is detected. Press +/- buttons on the front panel of the DVR or on the remote to adjust the time from 3 seconds or 60 minutes or ‘-‘...
-
Page 49: Password Setup
WPS-365-DVR-9CH & 16CH Installation and Users Manual 6.8. PASSWORD SETUP The Password Setup allows the administrator to add new users, delete existing users, and/or modify the user login names, password, and levels of access. And allows automation system access In the Setup Menu display, press ▲▼◄► on the front panel of the DVR or on the remote to change the highlighted option to Password, and then press ENTER to display Password Setup as shown. - Page 50 WPS-365-DVR-9CH & 16CH Installation and Users Manual • ESC Press the ESC button on the front panel of the DVR or remote control to escape from this menu and return to the main menu. Alternatively use the mouse to exit the sub menu by clicking on the “X.” If the contents in this menu have been modified, a Save dialog box will be displayed requesting the user to save the changes.
-
Page 51: Advanced User Setup
WPS-365-DVR-9CH & 16CH Installation and Users Manual • Password Enter a unique Password (numbers only) for each user. Follow the Text Input method described in Section 4.1 to enter this information. • Level Select the appropriate access level (Administrator, Supervisor, Operator, or Customized) for each user. Press +/- buttons on the front panel of the DVR or on the remote control to change this level. - Page 52 WPS-365-DVR-9CH & 16CH Installation and Users Manual The following is a brief description for each item in this menu and its specific operations: Press ENTER or +/- on the front panel of the DVR or on the remote control to check or uncheck each item. Alternatively use the mouse to enable or disable each item.
-
Page 53: System Setup
WPS-365-DVR-9CH & 16CH Installation and Users Manual 6.9. SYSTEM SETUP The System Setup allows the administrator to set the system time, time zone, time synchronization, language, etc. In the Setup Menu display, press ▲▼◄► on the front panel of the DVR or on the remote to change the highlighted option to System, and then press ENTER to display System Setup as shown. - Page 54 WPS-365-DVR-9CH & 16CH Installation and Users Manual - Display Format Select the format used to display the system time in the System Status Bar. Press +/- buttons on the front panel of the DVR or on the remote control to change the format. Alternatively use the mouse to select the format.
-
Page 55: Communication Protocol Setup
WPS-365-DVR-9CH & 16CH Installation and Users Manual 6.10. COMMUNICATION PROTOCOL SETUP The RS-232 Setup allows the administrator to configure control of the DVR from an automation system via the RS-232 DSUB connection. The RS-422/485 Setup allows the administrator to configure DVR control of PTZ camera operation via the RS-422/485 screw terminal connections. - Page 56 WPS-365-DVR-9CH & 16CH Installation and Users Manual RS-422/485 COMPORT A list of available commands and syntax can be found in the RS-232 Protocol document located in the support tab on the product page. To navigate and operate this menu: • ▲▼◄►...
-
Page 57: Network Setup
WPS-365-DVR-9CH & 16CH Installation and Users Manual 6.11. NETWORK SETUP The Network Setup allows the administrator to setup all Ethernet network related parameters. Consultation with the network administrator may be required to set these parameters correctly. In the Setup Menu display, press ▲▼◄► on the front panel of the DVR or on the remote to change the highlighted option to Network, and then press ENTER to display Network Setup as shown. -
Page 58: E-Mail Setup
Enter the DDNS Username if DDNS is used. – Not used unless an existing DDNS other than WirepathDNS service is configured. • DDNS Password Enter the DDNS Password if DDNS is used. – Not used unless an existing DDNS other than Wirepath DNS service is configured. • E-mail Press ENTER on the front panel of the DVR or on the remote to display the E-mail Setup menu. - Page 59 WPS-365-DVR-9CH & 16CH Installation and Users Manual • ESC Press the ESC button on the front panel of the DVR or remote control to escape from this menu and return to the main menu. Alternatively use the mouse to exit the sub menu by clicking on the “X.” If the contents in this menu have been modified, a Save dialog box will be displayed requesting the user to save the changes.
-
Page 60: Ftp Setup
WPS-365-DVR-9CH & 16CH Installation and Users Manual 6.11.2. FTP SETUP FTP Setup allows the administrator to set FTP related parameters. When an event occurs and FTP is enabled for the action, the recorded video and audio for that event will be sent to the FTP server based on the parameters set in this menu. -
Page 61: Advanced Network Setup
WPS-365-DVR-9CH & 16CH Installation and Users Manual 6.11.3. ADVANCED NETWORK SETUP The Advanced Network Setup allows the administrator to set advanced network parameters use for connection from remote devices such as PCs and Smart phones. Consultation with the network administrator may be required for these settings. -
Page 62: Factory Default
WPS-365-DVR-9CH & 16CH Installation and Users Manual levels of QCIF (Fair is the lowest quality while Superfine is the highest quality). If Video Streaming is used, the total system recording rate will be reduced. NOTE: To use Video Streaming in Internet Explorer, the user must select the Extra Video Stream option in the Modify Menu of the Device List (See Section 9.2.8.1). -
Page 63: Ptz Control
WPS-365-DVR-9CH & 16CH Installation and Users Manual 7. PTZ CONTROL The DVR supports a variety of PTZ cameras. The user can easily control PTZ cameras through the operations described in this section if the PTZ cameras have been connected and setup properly. -
Page 64: Osd Control For Wirepath™ Surveillance Cameras
7.1. OSD CONTROL FOR WIREPATH™ SURVEILLANCE CAMERAS Wirepath™ Surveillance Series Analog Cameras offer remote control of the OSD (On Screen Display) menu. This is achieved through the PTZ functions of the DVR. The cameras must be connected to the RS-485 terminals on the DVR and properly configured according to the camera manual. - Page 65 WPS-365-DVR-9CH & 16CH Installation and Users Manual To operate the OSD, use the mouse to select the PTZ Control icon to enter PTZ control mode if the focus camera is a Wirepath Surveillance camera that supports this feature. The asterisk ( ) will change to inverse color to indicate that the camera is now in PTZ control mode and the PTZ Control Bar will be displayed: • PTZ...
-
Page 66: Search/Playback/Archive
WPS-365-DVR-9CH & 16CH Installation and Users Manual 8. SEARCH/PLAYBACK/ARCHIVE This menu is available to Administrators and Supervisors only. There are four ways to search the recorded video and audio for playback: • Search by time • Search by event • Smart Search •... -
Page 67: Search By Time
WPS-365-DVR-9CH & 16CH Installation and Users Manual 8.1. SEARCH BY TIME The Search By Time feature allows the user to search for recorded video and audio based on time. Tip: When the screen is opened the oldest record time is displayed at the bottom labeled as Recorded From To navigate and operate this menu: • ▲▼◄►... -
Page 68: Search By Event / Log Display
WPS-365-DVR-9CH & 16CH Installation and Users Manual 8.2. SEARCH BY EVENT / LOG DISPLAY The Search By Event feature allows the user to search for recorded video and audio based on the type of event recorded by the DVR. The DVR will store up to 6000 of the most recent event logs. There are four different types of event logs: Alarm, Motion, Video Loss, and System. - Page 69 WPS-365-DVR-9CH & 16CH Installation and Users Manual • Copy ( ) Select the COPY button from the front panel of the DVR or on the remote control to backup (copy) the selected type of recorded video (beginning from the Search Time) to the connected backup device. The Backup menu (described in the Archive portion of Section 8.6) will be displayed.
-
Page 70: Smart Search
WPS-365-DVR-9CH & 16CH Installation and Users Manual 8.3. SMART SEARCH The Smart Search feature allows the user to search for motion in a specific area of a video (camera) window. This is helpful to narrow down the search results if only a portion of the video window contains the event in question. - Page 71 WPS-365-DVR-9CH & 16CH Installation and Users Manual • MATCHED FILE LIST The results of the Smart Search will be displayed in the right side of the dialog box. The files are shown from oldest to newest and a page number is shown on the lower-left corner of the dialog box. The user may: 1.
-
Page 72: Search Archived Files
WPS-365-DVR-9CH & 16CH Installation and Users Manual • MODE Press this button on the front panel of the DVR or remote control to Set/Reset the whole video area. Alternatively use the mouse to select this icon. • Press the ESC button on the front panel of the DVR or remote control to escape from this menu and return to the Smart Search menu. -
Page 73: Playback Search Results
WPS-365-DVR-9CH & 16CH Installation and Users Manual 8.5. PLAYBACK SEARCH RESULTS Once playing back video, use the following controls to operate and archive the video and audio: To navigate and operate this menu: MODE • Use the button on the front of the DVR or the remote control to toggle live and playback mode. Playback mode is indicated by a red box around the camera title of the focus camera (the camera being controlled). -
Page 74: Archive (Backup) Search Results
WPS-365-DVR-9CH & 16CH Installation and Users Manual 8.6. ARCHIVE (BACKUP) SEARCH RESULTS Once playing back video from the Search option, use the following controls to archive (backup) the video and audio: The following is a brief description for the operations in the Backup menu: • ▲▼◄►... - Page 75 WPS-365-DVR-9CH & 16CH Installation and Users Manual • END TIME Press the +/- buttons on the front panel of the DVR or on the remote control to modify the Year, Month, Date, Hour, and Minute for the recorded video and audio for the backup without playback of Search by Time.
-
Page 76: Remote Access
WPS-365-DVR-9CH & 16CH Installation and Users Manual 9. REMOTE ACCESS The following section discusses DVR remote viewing and control options from PCs and Smart phones. 9.1. PC REMOTE ACCESS After completing the initial setup, the DVR can be remotely accessed from a PC using a 32bit Internet Explorer web browser. -
Page 77: Split-Window Option Menu
WPS-365-DVR-9CH & 16CH Installation and Users Manual 9.2.1. SPLIT-WINDOW OPTION MENU Right click on any split-window to display the Split-Window Option Menu. The following is a brief description for each item in this menu and its specific operations: • When in a split-window view, expand the focus window camera to fill the entire video window. When in a single-window view, uncheck this item to return to the previous split-window view. -
Page 78: Control Panel
WPS-365-DVR-9CH & 16CH Installation and Users Manual 9.2.2. CONTROL PANEL SEQ. MODE Enables the Sequence Mode defined in the setup. This feature will automatically cycle through the cameras on the display. When SEQ mode enabled recorded playback is unavailable, turn SEQ mode off before playing recorded video. -
Page 79: Split-Window Panel
WPS-365-DVR-9CH & 16CH Installation and Users Manual 9.2.3. SPLIT-WINDOW PANEL Use these icons to select the number of cameras viewed on the display. • 4 AND 9 SPLIT WINDOW ICONS Left-click and hold the mouse over the 4 or 9 split-window icon to toggle to additional pages of cameras. -
Page 80: Status Panel
WPS-365-DVR-9CH & 16CH Installation and Users Manual 9.2.5. STATUS PANEL • CAMERA STATUS Motion indicators for cameras 1-16 (this DVR supports the first 8) - GREEN indicates normal status - RED indicates motion Click on any of these icons to select the corresponding camera to be displayed in the focus window •... -
Page 81: Search Panel And Copy Feature
WPS-365-DVR-9CH & 16CH Installation and Users Manual 9.2.6. SEARCH PANEL AND COPY FEATURE 9.2.6.1. SEARCH BY TIME To playback video starting at a specific time, select the desired time (Year, Month, Date, Hour, Minute and Second) and recorded event type (Alarm, Motion, Video Loss, and Normal) for playback. Click on the Play button to begin the playback of all recorded video beginning at that time. -
Page 82: Search By Event
WPS-365-DVR-9CH & 16CH Installation and Users Manual 9.2.6.2. SEARCH BY EVENT Use the Search by Event feature to search all recorded event types stored on the DVR’s hard drive. Click on the Search by Event icon to display the Search by Event dialog box and the event log. Select the Device (DVR) to search. -
Page 83: Copy Function
WPS-365-DVR-9CH & 16CH Installation and Users Manual 9.2.6.3. COPY FUNCTION Use the Copy function to record live video from the DVR onto the local PC. The performance of this feature is based on bandwidth capacity of the network and the number and size of the files being copied. -
Page 84: Ptz Control Panel
WPS-365-DVR-9CH & 16CH Installation and Users Manual 9.2.7. PTZ CONTROL PANEL If the camera in the focus window is a Pan/Tilt/Zoom camera, use the buttons on the user interface to operate basic PTZ features. For more control, display the PTZ Control Panel by clicking on the PTZ Panel icon. -
Page 85: Device Config
WPS-365-DVR-9CH & 16CH Installation and Users Manual 9.2.8. DEVICE CONFIG The Internet Explorer user interface has the ability to connect to multiple DVRs. DVRs must first be added to the Device List. The following is a brief description for each item in this menu and its specific operations: • ADD Add DVRs to the Device List •... -
Page 86: Modify
WPS-365-DVR-9CH & 16CH Installation and Users Manual 9.2.8.1. MODIFY DVRs in the Device List may be modified using this menu. The following is a brief description for each item in this menu and its specific operations: • NAME Enter a meaningful name for the DVR • ADDRESS Enter the IP address or URL domain name for the DVR. • CONTROL PORT Set the control port for the (DVR) device. The default value is 67 and is auto-populated in menu. -
Page 87: Software Upgrade
WPS-365-DVR-9CH & 16CH Installation and Users Manual 9.2.9. SOFTWARE UPGRADE On occasion it may be necessary to update the DVR’s software to take advantage of new features · Use the Software Upgrade icon to open the Software Upgrade dialog box. The current software version of the connected DVR(s) will be displayed in the Upgrade Status field. -
Page 88: System
WPS-365-DVR-9CH & 16CH Installation and Users Manual 9.3.1. SYSTEM The System Setup allows the administrator to set the system time, time zone, time synchronization, language, etc. The following is a brief description for each item in this menu and its specific operations: • TIME ZONE Select the appropriate time zone. The default setting is Eastern Standard Time. -
Page 89: Password
WPS-365-DVR-9CH & 16CH Installation and Users Manual 9.3.2. PASSWORD The Password Setup allows the administrator to add new users, delete existing users, and/or modify the user names, password, and levels of access The DVR allows up to 18 user accounts. There are three default user levels in the system: • OPERATOR... - Page 90 WPS-365-DVR-9CH & 16CH Installation and Users Manual • Local Guest Level Allows or restricts access to the DVR by Guests accessing the DVR through Local interfaces (DVR GUI via front panel buttons, IR remote control or home automation Ethernet control) without a dedicated Login. The option selected determines the level of access a Guest will have.
- Page 91 WPS-365-DVR-9CH & 16CH Installation and Users Manual • ADV. For Customized access per user setup the Advanced User Setup. Within the menu, options are categorized into groups (Monitor, Search, Setup and Others): - Monitor Channel 1-8 Select Channels (cameras) the user has permission to view.
-
Page 92: Network
WPS-365-DVR-9CH & 16CH Installation and Users Manual 9.3.3. NETWORK The Network Setup allows the administrator to setup all Ethernet network related parameters. Consultation with the network administrator may be required to set these parameters correctly. The following is a brief description for each item in this menu and its specific operations: NET TYPE • Net Type Select the type of network connection of the DVR to the network (DHCP, Static IP or PPPoE). DHCP is enabled by default but a Static IP is recommended. - Page 93 WPS-365-DVR-9CH & 16CH Installation and Users Manual Using the WirepathDNS is easy. Select WirepathDNS from the list and enter the client name or other unique string in the URL. When exiting the Network menu, confirm the changes. A DDNS service is setup automatically. See IE Interface Setup in Appendix E –...
-
Page 94: Pre Camera
WPS-365-DVR-9CH & 16CH Installation and Users Manual 9.3.4. PRE CAMERA Pre-Camera setup allows the administrator to define fundamental attributes for connected cameras. The following is a brief description for each item in this menu and its specific operations: • RESOLUTION Allows individual camera channels to be set for their appropriate recording resolution. Allows for 960H (960x480), D1 (720x480), Half 960H (960x240), Half D1 (720x240), 480x240, and CIF (360x240). -
Page 95: Camera
WPS-365-DVR-9CH & 16CH Installation and Users Manual 9.3.5. CAMERA The Camera setup allows the administrator to define additional attributes for each camera The following is a brief description for each item in this menu and its specific operations: • TITLE Name each camera with a unique identifying name up to eight characters maximum. • MOTION DETECTION Enable or disable motion detection for the selected camera. Default setting enables this feature. -
Page 96: Motion
WPS-365-DVR-9CH & 16CH Installation and Users Manual • EVENT RECORD FPS Set the Frames Per Second Record rate for each camera when events such as motion or alarm inputs trigger the camera to record. Settings for Post Record time determines how long the DVR will record after the event triggers recording. - Page 97 WPS-365-DVR-9CH & 16CH Installation and Users Manual The following is a brief description for each item in this menu and its specific operations: • CAMERA Select the camera to define motion triggered events. • DURATION Set the length of time the buzzer and the corresponding Alarm Out relay will remain triggered once motion is detected for this camera. The buzzer and Alarm Out relay will reset immediately once motion is no longer detected.
-
Page 98: Motion Detection / Privacy Mask
WPS-365-DVR-9CH & 16CH Installation and Users Manual 9.3.7. MOTION DETECTION / PRIVACY MASK Note: Update the DVR to the latest version available on the SnapAV Website to use this feature. 9.3.7.1. MOTION DETECTION Motion detection allows administrator level users to define how the system responds when motion is detected for the camera. -
Page 99: Privacy Mask
WPS-365-DVR-9CH & 16CH Installation and Users Manual 9.3.7.2. PRIVACY MASK Privacy Mask allows administrator level users to define areas of the camera to not be shown in the camera image. There areas will be hidden with black boxes/grids 1. Select the Motion Detection / Privacy Mask tab. -
Page 100: Video Loss
WPS-365-DVR-9CH & 16CH Installation and Users Manual 9.3.8. VIDEO LOSS Video Loss Setup allows the administrator to define how the system responds when video signal is lost for the camera. The following is a brief description for each item in this menu and its specific operations: • CAMERA Select the camera to define video loss triggered events. -
Page 101: Alarm
WPS-365-DVR-9CH & 16CH Installation and Users Manual • LOG By default, the DVR will log when video loss is detected to the Event Log. • E-MAIL This DVR can send an email message to a predefined email address in the event video loss is detected for this camera. - Page 102 WPS-365-DVR-9CH & 16CH Installation and Users Manual • FOCUS CAMERA The camera associated with the alarm input. • DURATION Set the length of time the buzzer and the corresponding Alarm Out relay will remain triggered once the alarm input is triggered. The buzzer and Alarm Out relay will reset immediately once motion is no longer detected.
-
Page 103: Seq Display
WPS-365-DVR-9CH & 16CH Installation and Users Manual 9.3.10. SEQ DISPLAY The SEQ Display Setup allows the administrator to define the displayed pages when in SEQ Display mode. The following is a brief description for each item in this menu and its specific operations: • DEVICE TYPE This DVR only supports Main Monitor • WINDOW TYPE Select the desired amount of windows to display based on the following options. -
Page 104: Schedule
WPS-365-DVR-9CH & 16CH Installation and Users Manual 9.3.11. SCHEDULE The Scheduled Record Setup allows the administrator to define when and how video (and audio) will be recorded. This feature may be useful to increase hard drive storage space by defining what types of events are recorded on specific days of the week. -
Page 105: Easy Schedule
WPS-365-DVR-9CH & 16CH Installation and Users Manual • NORMAL Define if normal video and audio (non-event based video and audio) is recorded. Options include V for Video only, AV for Audio and Video, NO for No Recording, and OFF for recording but no event notification. -
Page 106: E-Mail (Notification)
WPS-365-DVR-9CH & 16CH Installation and Users Manual • NORMAL Select to record 24/7 video and audio. • NO RECORD Select to not record any video or audio and disable all logging and notifications. • OTHER Indicates that a timeframe other than whole hours has been selected in the normal Schedule menu. This other schedule allows times to be selected in 1/2 hour increments 9.3.13. -
Page 107: Rs-232/485
WPS-365-DVR-9CH & 16CH Installation and Users Manual e-mail feature will not be operable. Do not enter generic text in this field. • MAIL TO #1-5 The DVR can send e-mails originated from triggered events to up to five different e-mail addresses. Enter the appropriate e-mail addresses in these fields. • ATTACHMENT This feature offers the ability to attach a picture from the corresponding camera to the e-mail being sent. - Page 108 WPS-365-DVR-9CH & 16CH Installation and Users Manual • DEVICE TYPE Press the +/- buttons on the front panel of the DVR or on the remote control to change the device type Alternatively use the mouse to select the appropriate setting. OPTIONS: PTZ, keyboard, (Recommended) PTZ+keyboard or (Not Available).
-
Page 109: Ftp
WPS-365-DVR-9CH & 16CH Installation and Users Manual 9.3.15. FTP FTP Setup allows the administrator to set FTP-related parameters. When an event occurs and FTP is enabled for the action, the recorded video and audio for that event will be sent to the FTP server based on the parameters set in this menu. -
Page 110: Hdd
WPS-365-DVR-9CH & 16CH Installation and Users Manual 9.3.16. HDD Alarm-triggered video and audio is typically more important than non-even normal video and audio recording in surveillance applications. The DVR is designed to allow the hard drive to be partitioned into an alarm partition and a normal partition. -
Page 111: Display
WPS-365-DVR-9CH & 16CH Installation and Users Manual 9.3.17. DISPLAY The Display settings adjust the video output options as viewed through the VGA and HDMI connections. • VGA/HDMI RESOLUTION Select the desired screen resolution from the drop-down. It is recommended to match the native resolution of the video display being used. -
Page 112: Video Stream (Dual Stream)
WPS-365-DVR-9CH & 16CH Installation and Users Manual 9.4. VIDEO STREAM (DUAL STREAM) This DVR offers two simultaneous video (and audio) streams to allow the DVR to record at a higher resolution while streaming the video to remote devices at a lower resolution. - Page 113 WPS-365-DVR-9CH & 16CH Installation and Users Manual RECOMMENDED SETTINGS: Recommended Settings for typical networks Fiber /Cable DSL / 3G Smartphone Record Setting Compression Normal Normal Normal Record Quality Video Stream Record QCIF Superfine QCIF Fair Notes For the best quality...
-
Page 114: Remote Viewing With A Smartphone
WPS-365-DVR-9CH & 16CH Installation and Users Manual 9.5. REMOTE VIEWING WITH A SMARTPHONE 1. INSTALL THE APPLICATION 1. Install the application 1.1. On iPhone®, iPad®, or iPod touch® A. Access the App StoreSM using iTunes® or your Apple® Device and search for WPS-DVR (WPS-DVR-HD for iPad®). -
Page 115: Remote Display And Operation
WPS-365-DVR-9CH & 16CH Installation and Users Manual 9.5.1. REMOTE DISPLAY AND OPERATION After launching WPS-DVR or WPS-DVR-HD, select the DVR in the Device list to connect. The application will open to a 4 window split screen by default. Use the CH button or double-tap a quadrant in the split screen to view a single camera full screen. - Page 116 WPS-365-DVR-9CH & 16CH Installation and Users Manual • SEARCH OPERATION Search By Time - Select month-day-year- hour-minute of the video to be viewed and press to begin playback. Search By Event – A chronological list of events will be displayed beginning with the most recent event first.
-
Page 117: Warranty
This warranty shall not apply to products which have been abused, modified, disassembled or improperly installed. Products to be repaired under this warranty must be returned to Wirepath™ Surveillance or a designated service center with prior notification and an assigned return authorization number (RA). -
Page 118: Appendix A - Specifications
WPS-365-DVR-9CH & 16CH Installation and Users Manual 11. APPENDIX A – SPECIFICATIONS SECTION FUNCTION WPS-365-DVR-9CH WPS-365-DVR-16CH Hexaplex - Simultaneous Live Hexaplex - Simultaneous Live Multi-Operation View, Record, Playback, Control, View, Record, Playback, Control, System Remote Access, Backup Remote Access, Backup... - Page 119 WPS-365-DVR-9CH & 16CH Installation and Users Manual SECTION FUNCTION WPS-365-DVR-9CH WPS-365-DVR-16CH Network Ethernet 1 RJ-45 10/100/1000Mbps 1 RJ-45 10/100/1000Mbps N-Streaming, RTSP live view, 1 N-Streaming, RTSP live view, 1 Internet Explorer window for Internet Explorer window for unlimited number of DVRs,...
-
Page 120: Appendix B - Menu Structure
WPS-365-DVR-9CH & 16CH Installation and Users Manual 12. APPENDIX B – MENU STRUCTURE Numbers preceding the Menu name are the section numbers for the OSD menu (VGA and BNC output) within this manual. 5 MENU DISPLAY 4.2 LOGIN/LOGOUT 5.1 STATUS DISPLAY 5.2 VOLUME CONTROL... -
Page 121: Appendix C - Hard Drive Recording Table
WPS-365-DVR-9CH & 16CH Installation and Users Manual 13. APPENDIX C – HARD DRIVE RECORDING TABLE Please visit the appropriate product page on www.SnapAV.com to calculate recording times for replaced hard drives with different capacities. -
Page 122: Appendix D - H.264 To Avi Conversion Utility
WPS-365-DVR-9CH & 16CH Installation and Users Manual 14. APPENDIX D – H.264 TO AVI CONVERSION UTILITY Included on the bundled disc is a MS-Windows utility program used to convert native .h.264 files from the DVR to .avi file format to be played back on PCs using Windows Media Player. - Page 123 141027_1000 © 2014 Wirepath Surveillance...
Need help?
Do you have a question about the WPS-365-DVR and is the answer not in the manual?
Questions and answers