
Subscribe to Our Youtube Channel
Related Manuals for Wirepath WPS-100-DVR-8CH


Summary of Contents for Wirepath WPS-100-DVR-8CH
- Page 1 WPS-100-DVR-8CH 8 CHANNEL OWNERS MANUAL Review manual thoroughly before installation. Retain for future reference.
-
Page 2: Table Of Contents
6.10 Network Setup............................54 6.10.1 E-mail Setup..........................55 6.10.2 FTP Setup............................ 57 6.10.3 Advanced Network Setup...................... 58 6.11 Factory Default............................59 7. PTZ CONTROL..............................60 7.1 OSD Control for Wirepath Surveillance Cameras................. 61 8. SEARCH/PLAYBACK/ARCHIVE........................... 63 8.1 Search By Time............................64... - Page 3 8.2 Search By Event / Log Display......................... 65 8.3 Smart Search............................. 66 8.4 Search Archived Files..........................69 8.5 Playback Search Results.......................... 70 8.6 Archive (Backup) Search Results......................71 9. REMOTE ACCESS..............................73 9.1 PC Remote Access........................... 73 9.2 PC Remote Display and Operations....................... 73 9.2.1 Camera Window Option Menu....................
-
Page 5: Safety Information
SAFETY INFORMATION • Handle this device with care. Do not strike or shake this device as this may damage it. • Do not expose this device to water or moisture. Moisture may damage the device and also cause electric shock. Do not operate it in wet areas. Take immediate action if the device becomes wet. Turn the power off and refer servicing to qualified service personnel. • Do not use this device near any heat sources such as radiators, heat registers, stoves or other apparatus that produces heat. • Protect the power cord from being stepped on or pinched particularly at the point where it connects to the device and at the receptacle. • Do not operate this device beyond its specified temperature, humidity or power source ratings. • Use this device in humidity below 85%. • The performance and lifespan of the hard drive is affected when used in high temperatures. It is recommended to use this device within 68ºF ~ 86ºF. • If mounting in a closed space, ventilation should be included. Do not block any ventilation openings. -
Page 7: Product Overview
/ CIF video resolution support and adjustable Frame Per Second record settings the installer can maximize the storage time of the built-in hard drive. Wirepath™ DVR’s professional grade features make them ideal for high-end residential and commercial moni- toring applications. -
Page 8: Panels And Remote Controller
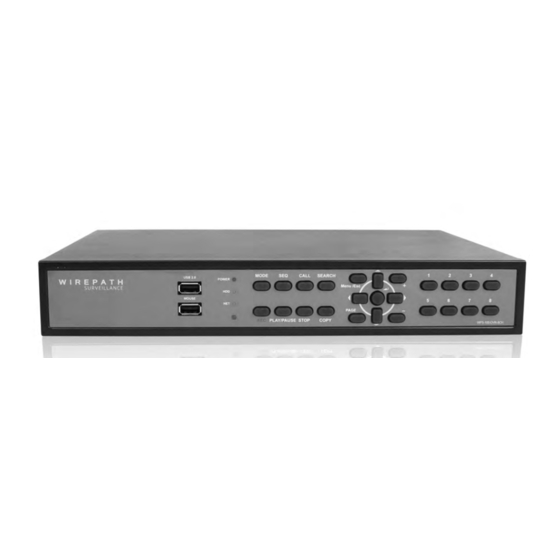
WPS-100-DVR-8CH Installation and Users Manual 2. FRONT AND REAR PANELS AND REMOTE CONTROL 2.1 REAR PANEL 1. Video Input Connectors (1-8) Connect cameras to these BNC connectors. Internal 75Ω termination is always ON. 2. Audio Output Connector (AUDIO OUT) This RCA connector supplies line level audio to an external device, such as an amplifier. Recorded audio will be output from the AUDIO OUT connector during playback, and live audio can be monitored during live viewing. - Page 9 WPS-100-DVR-8CH Installation and Users Manual 8. Alarm Input Connectors (ALARM IN 1-4) Connect to external devices such as motion sensors or door contacts to trigger events. 9. RS-485 Connector Connect to RS-485 compatible PTZ camera(s) or keyboard. Please refer to the manuals supplied with the RS-485 compatible device for correct settings.
-
Page 10: Front Panel
WPS-100-DVR-8CH Installation and Users Manual 2.2 FRONT PANEL 1. USB2.0 Connector Connect to USB 2.0 compatible storage devices such as a USB thumb drive, DVD+RW, etc. 2. LEDs Indicators for POWER, HDD (Hard Disk Drive) and Network access. 3. MODE Button Toggles the main display between LIVE and PLAYBACK mode. On the first press of this button, only the focus... -
Page 11: Remote Controller
WPS-100-DVR-8CH Installation and Users Manual 10. ENTER Button ( This button is used as an “enter” key in most circumstances. When using PTZ control, this button is used to start/stop the selected PTZ control mode. 11. Numeric Buttons (1-8 on the front panel and 1-9, 0, , # on the remote control) Used for camera selection in most cases, these buttons can also be used to enter text and numbers in a way similar to most mobile phones. - Page 12 WPS-100-DVR-8CH Installation and Users Manual 2.3 REMOTE CONTROL The remote control has many of the same functions as the front panel buttons. See the corresponding numbers on page 8-9 for descriptions. The functions include: 3. MODE Button 4. SEQ Button 5.
-
Page 13: Installations
WPS-100-DVR-8CH Installation and Users Manual 3. INSTALLATION The installation connections described below should be made by a qualified system installer. 3.1 BASIC CONNECTIONS Please refer to the following diagram for the connections. Speakers Amplifier Microphone LCD Monitor/Flat Panel TV Camera(s) WPS-100-DVR-8ch Siren CRT Monitor Motion Sensor(s) Automation System Router • CAMERAS Connect the video output from cameras or other composite video sources using coaxial cable to the Video In connectors. Internal 75Ω termination is always ON. -
Page 14: Optional Connections
Connect the RS-485 connector to PTZ camera(s) via an appropriate cable. The system supports a variety of PTZ cameras and the OSD menu of Wirepath™ Surveillance cameras. Different PTZ cameras can coexist in a system only if they support the same protocol and baud rate. Make sure to set unique PTZ IDs to the cameras, the DVR and any other PTZ device. -
Page 15: Main Screen And Basic Operations
WPS-100-DVR-8CH Installation and Users Manual 4. MAIN SCREEN AND BASIC OPERATIONS The following sections (Sections 4-6) relate to the display output from the VGA or BNC connection. For operation using an Internet Explorer web browser see Section 9. The split-window screen, as shown above, is the main screen displayed after system startup. There are several types of split-window screens including 1-Window, 4-Window, 7-Window, 9-Window, (as described in Section 5.7). -
Page 16: Text Input
WPS-100-DVR-8CH Installation and Users Manual 4.1 TEXT INPUT There are certain system settings that the system requires text to be entered, such as system login, camera title setup, etc. Follow the steps below using the front panel or remote control to enter text when prompted to do so by a text box: 1. -
Page 17: Login / Logout
WPS-100-DVR-8CH Installation and Users Manual 4.2 LOGIN / LOGOUT There are three password levels in the system; Administrator (highest), Supervisor, and Operator (lowest). If the user does not login to the system, the user will be treated as a Guest and can only view live video display. - Page 18 WPS-100-DVR-8CH Installation and Users Manual • MODE Use the button on the front of the DVR or the remote control to toggle live and playback mode. Playback mode is indicated by a red box around the camera title of the focus camera (the camera being controlled). If in a split window display, the focus window will first switch to playback mode. A second press...
-
Page 19: Digital Zoom
WPS-100-DVR-8CH Installation and Users Manual • OSD Use the mouse to select the OSD Display icon to enable or disable the following information from appearing in the System Status Bar on the main display; Title, Time, Messages, Status and Rec%. • COPY Press this button on the front panel of the DVR or the remote control to display the Search menu and then copy recorded video to the storage device connected to the USB port. -
Page 20: Main Menu
WPS-100-DVR-8CH Installation and Users Manual 5. MAIN MENU Select the MENU icon from the Control Bar or right click the mouse in the display window to activate the main Menu display as shown. In the main Menu display and all subsequent displays, the items enabled are highlighted in Blue, and those disabled in Gray. -
Page 21: Volume Control
WPS-100-DVR-8CH Installation and Users Manual The Status display includes: • ALARM RECORDING STATUS Displayed is the portion of the hard drive allocated to recording alarm events and the percentage of that space that is currently full. • NORMAL RECORDING STATUS Displayed is the portion of the hard drive allocated to regular (normal, non-event) recording and the percentage of that space that is currently full. -
Page 22: Video Adjustment
WPS-100-DVR-8CH Installation and Users Manual • MUTE Mutes the selected audio input channel. Using the front panel of the DVR or the remote control, press ENTER (or +/-) to check/uncheck this item. The default setting is “-” noting that the channel is not muted. Alternatively use the mouse to enable or disable the mute feature. • VOLUME Adjusts the gain (volume) of the selected audio input channel. Press +/- buttons on the front panel of the DVR or the remote control to change the value (1-10). -
Page 23: Display
WPS-100-DVR-8CH Installation and Users Manual • CALL Press this button on the front panel of the DVR or remote control to reset the video settings for all cameras to factory default values. • MODE Press this button on the front panel of the DVR or remote control to restore the values. -
Page 24: Backup Device
WPS-100-DVR-8CH Installation and Users Manual • NUMERIC Press these buttons on the front panel of the DVR or remote control to change the camera. Alternatively use the mouse to select the desired camera. • MODE Press this button on the front panel of the DVR or remote control to restore Brightness, Contrast, Hue and Saturation values. - Page 25 WPS-100-DVR-8CH Installation and Users Manual • CONNECT/DISCONNECT If the backup device is disconnected (as shown in screen capture above), plug the USB device into the USB 2.0 port and then press ENTER on the front panel of the DVR or on the remote control. Alternatively use the mouse to click on the CONNECT button.
-
Page 26: Software Upgrade
3. Reboot each computer that will be used to access or configure the updated DVR. 4. When the computer restarts, Do Not Open IE. Run the Remove_WPS_IE_Plugin file. 5. Open IE and access the updated Wirepath DVR. Perform Step 2, 3and 4 for all computers that will be used to access the DVR. 6. IE may initially block installation of the DVR Plugin. If so, review the prompt and allow the Plugin to be installed. -
Page 27: System Shutdown
WPS-100-DVR-8CH Installation and Users Manual 5.6 SYSTEM SHUTDOWN This menu is available to Administrators only. Always properly shutdown the DVR before moving it. The hard drive can be damaged if the DVR is moved be- fore shutdown. Whatever state the DVR was in when it was properly shutdown, the DVR will reboot to this state (ex: split window display, etc). -
Page 28: Setup Menu
WPS-100-DVR-8CH Installation and Users Manual 6. SETUP MENU This menu is available to Administrators only. In the Menu display, use the buttons on the front panel of the DVR or remote control, and press ▲▼◄► to select Setup, and then press ENTER. To navigate and operate this menu: • ▲▼◄► Press these buttons on the front of the DVR or remote control to change the highlighted item. -
Page 29: Pre-Camera Setup
WPS-100-DVR-8CH Installation and Users Manual 6.1 PRE-CAMERA SETUP Pre-Camera Setup allows the administrator to define fundamental attributes for connected cameras. In the Setup menu, press ▲▼◄► on the front panel of the DVR or on the remote to change the highlighted option to Pre-Camera, and then press ENTER to display Pre-Camera menu. -
Page 30: Camera Setup
WPS-100-DVR-8CH Installation and Users Manual 6.2 CAMERA SETUP The Camera Setup menu allows the administrator to define additional attributes for each camera. In the Setup menu, press ▲▼◄► on the front panel of the DVR or on the remote to change the highlighted option to Camera Setup, and then press ENTER to display theCamera Setup menu. To navigate and operate this menu: • ▲▼◄► Press these buttons on the front panel of the DVR or remote control to select an item. Alternatively use the mouse to select an item. - Page 31 WPS-100-DVR-8CH Installation and Users Manual •MOTION SETTINGS Used to set specific actions for when the DVR detects motion. Please refer to Section 6.2.2 for the details. •COVERT If a camera’s covert function is enabled, the video of this camera can only be seen if the user has logged in an Administrator. The default setting is disabled.
-
Page 32: Video Loss Setup
WPS-100-DVR-8CH Installation and Users Manual 6.2.1 VIDEO LOSS SETUP Video Loss Setup allows the administrator to define how the system responds when video signal is lost for the camera. In the Camera Setup menu, highlight Settings in Video Loss and press the ENTER button on the front panel of the DVR or remote control to display Video Loss Setup sub menu for the selected camera. - Page 33 WPS-100-DVR-8CH Installation and Users Manual • GOTO PRESET The GOTO Preset feature works in conjunction with the Camera To Go setting and defines the preset position the Camera To Go PTZ camera will go to when video signal is lost for this camera. For more details about preset positions for PTZ cameras, refer to Section 7.
-
Page 34: Motion Setup
WPS-100-DVR-8CH Installation and Users Manual 6.2.2 MOTION SETUP Motion Setup allows the administrator to define how the system responds when motion is detected for the camera. In the Camera Setup menu, highlight Motion Setup and press the ENTER button on the front panel of the DVR or remote control to display the Motion Setup sub menu for the selected camera. - Page 35 WPS-100-DVR-8CH Installation and Users Manual Functions in the Sub-menu: • DURATION Set the length of time the buzzer and the corresponding Alarm Out relay will remain triggered once video loss is detected for this camera. The buzzer and Alarm Out relay will reset immediately once video signal is restored.
-
Page 36: Detection Settings
WPS-100-DVR-8CH Installation and Users Manual 6.2.2.1 DETECTION SETTINGS The Detection Setting sub menu is used to customize motion detection settings including the motion detection area(s) and sensitivity. In the Motion Setup menu, highlight Settings in Detection and press the ENTER button on the front panel of the DVR or remote control to display the Motion Detection Settings sub menu for the selected camera. -
Page 37: Alarm Setup
WPS-100-DVR-8CH Installation and Users Manual • SEQ / CALL Press these buttons on the front panel of the DVR or remote control to decrease (SEQ) or increase (CALL) the Sensitivity of the motion detection area of this camera from 1 – 10 (1 is least sensitive and 10 is most sensitive). Alternatively use the mouse to select this icon and adjust the sensitivity. - Page 38 WPS-100-DVR-8CH Installation and Users Manual To navigate and operate this menu: • ▲▼◄► Press these buttons on the front panel of the DVR or remote control to select an item. Alternatively use the mouse to select an item. • NUMERIC Press these buttons on the front panel of the DVR or remote control to select an alarm input.
-
Page 39: Seq Display Setup
WPS-100-DVR-8CH Installation and Users Manual • LOG By default, the DVR will log when video loss is detected to the Event Log (see Section 8.2). Highlight this setting and press ENTER or +/- to enable or disable this item. Alternatively use the mouse to left-click on this item. - Page 40 WPS-100-DVR-8CH Installation and Users Manual To navigate and operate this menu: • ▲▼◄► Press these buttons on the front panel of the DVR or remote control to select an item. Alternatively use the mouse to select an item. • ESC Press the ESC button on the front panel of the DVR or remote control to escape from this menu and return to the main menu.
-
Page 41: Scheduled Record Setup
WPS-100-DVR-8CH Installation and Users Manual • ESC Press the ESC button on the front panel of the DVR or remote control to escape from this menu and return to the main menu. Alternatively use the mouse to exit the sub menu by clicking on the “X.” If the contents in this menu have been modified, a Save dialog box will be displayed... -
Page 42: Schedule Record Easy Setup
WPS-100-DVR-8CH Installation and Users Manual The following is a brief description for each item in the sub menu and its specific operations: • START Set the start time of this time segment (conditional) in increments of 30 minutes in military time format. The end time of this conditional is implicitly set as the start time of next conditional. Press the +/- buttons on the front panel of the DVR or the remote control to select the desired start time. -
Page 43: Hdd Setup
WPS-100-DVR-8CH Installation and Users Manual Recording options include: - Pink: Alarm, Motion and Normal Video and Audio Recording (Default setting) - Purple: Alarm and Motion Video and Audio Recording only - Red: Alarm Video and Audio Recording only - Blue: Motion Video and Audio Recording only... - Page 44 WPS-100-DVR-8CH Installation and Users Manual To navigate and operate this menu: • ▲▼◄► Press these buttons on the front panel of the DVR or remote control to select an item. Alternatively use the mouse to select an item. • MODE Press this button on the front panel of the DVR or the remote control to Format/Clear the HDDs as described in Section 6.6.1.
-
Page 45: Hdd Format/Clear
WPS-100-DVR-8CH Installation and Users Manual • Duration If HDD Full Action is enabled, set the duration that the Alarm Out relay and the buzzer will remain triggered when the corresponding partition is full. Press +/- buttons on the front panel of the DVR or on the remote to adjust the time from 3 seconds or 60 minutes or ‘-‘ indefinitely until the Alarm Reset button... -
Page 46: Advanced Hdd Setup
WPS-100-DVR-8CH Installation and Users Manual • CALL Press the Call button on the front panel of the DVR or the remote control to Physically Format the hard drive (similar to a “full” Format option found on a PC). A confirmation dialog box will be displayed on the screen. Using the front panel of the DVR or the remote, press ENTER to confirm or ESC to cancel. - Page 47 WPS-100-DVR-8CH Installation and Users Manual To navigate and operate this menu: • ▲▼◄► Press these buttons on the front panel of the DVR or remote control to select an item. Alternatively use the mouse to select an item. • ESC Press the ESC button on the front panel of the DVR or remote control to escape from this menu and return to the main menu.
-
Page 48: Password Setup
WPS-100-DVR-8CH Installation and Users Manual 6.7 PASSWORD SETUP The Password Setup allows the administrator to add new users, delete existing users, and/or modify the user login names, password, and levels of access. And allows automation system access In the Setup Menu display, press ▲▼◄► on the front panel of the DVR or on the remote to change the highlighted option to Password, and then press ENTER to display Password Setup as shown. - Page 49 WPS-100-DVR-8CH Installation and Users Manual “-“ (Default - No Guest Access Allowed Administrator - Provides full access to the DVR allowing for viewing of all cameras and modification to all settings. Use this setting with caution. Supervisor - Provides access to view and control all cameras, Search, Archive and modify basic settings. Operator - Provides access to view and control all cameras. No access to Search or settings is provided.
-
Page 50: Advanced User Setup
WPS-100-DVR-8CH Installation and Users Manual 6.7.1 ADVANCED USER SETUP The Advanced User Setup allows the administrator to setup each user’s detailed access rights to the system To navigate and operate this menu: • ▲▼◄► Press these buttons on the front panel of the DVR or on the remote control to move the focus box. -
Page 51: System Setup
WPS-100-DVR-8CH Installation and Users Manual • SETUP RS-232/422/485 Allows the user access to RS485 setup. • SETUP NETWORK Allows the user access to Network Setup. • SETUP FACTORY DEFAULTS Allows the user to restore factory defaults to all setup related configurations. • SOFTWARE UPGRADE Allows the user upgrade the DVR software. • SHUTDOWN Allows the user to Shutdown the DVR. -
Page 52: Rs485 Setup
WPS-100-DVR-8CH Installation and Users Manual The following is a brief description for each item in this menu and its specific operations: • TIME ZONE Press the +/- buttons on the front panel of the DVR or on the remote control to select the appropriate time zone. Alternatively use the mouse to select the time zone. The default setting is Eastern Standard Time. - Page 53 WPS-100-DVR-8CH Installation and Users Manual To navigate and operate this menu: • ▲▼◄► Press these buttons on the front panel of the DVR or remote control to select an item. Alternatively use the mouse to select an item. • ESC Press the ESC button on the front panel of the DVR or remote control to escape from this menu and return to the main menu.
-
Page 54: Network Setup
WPS-100-DVR-8CH Installation and Users Manual 6.10 NETWORK SETUP The Network Setup allows the administrator to setup all Ethernet network related parameters. Consultation with the network administrator may be required to set these parameters correctly. In the Setup Menu display, press ▲▼◄► on the front panel of the DVR or on the remote to change the high- lighted option to Network, and then press ENTER to display Network Setup as shown. -
Page 55: E-Mail Setup
WPS-100-DVR-8CH Installation and Users Manual Enter the Gateway IP address for the system. • DNS If using DNS, enter the Domain Name Server address for the system. • USERNAME If PPPoE is used, enter the Username for the system. • PASSWORD If PPPoE is used, enter the Password for the system. - Page 56 WPS-100-DVR-8CH Installation and Users Manual To navigate and operate this menu: • ▲▼◄► Press these buttons on the front panel of the DVR or remote control to select an item. Alternatively use the mouse to select an item. • ESC Press the ESC button on the front panel of the DVR or remote control to escape from this menu and return to the main menu.
-
Page 57: Ftp Setup
WPS-100-DVR-8CH Installation and Users Manual 6.10.2 FTP SETUP FTP Setup allows the administrator to set FTP related parameters. When an event occurs and FTP is enabled for the action, the recorded video and audio for that event will be sent to the FTP server based on the parameters set in this menu. -
Page 58: Advanced Network Setup
WPS-100-DVR-8CH Installation and Users Manual 6.10.3 ADVANCED NETWORK SETUP The Advanced Network Setup allows the administrator to set advanced network parameters use for connection from remote devices such as PCs and Smart phones. Consultation with the network administrator may be required for these settings. -
Page 59: Factory Default
WPS-100-DVR-8CH Installation and Users Manual - QCIF Fair = equivalent to a Record Quality of 1 on the Camera tab - QCIF Normal = equivalent to a Record Quality of 4 on the Camera tab - QCIF Fine = equivalent to a Record Quality of 6 on the Camera tab - QCIF Super fine = equivalent to a Record Quality of 9 on the Camera tab 6.11 FACTORY DEFAULT... -
Page 60: Ptz Control
WPS-100-DVR-8CH Installation and Users Manual 7. PTZ CONTROL The DVR supports a variety of PTZ cameras. The user can easily control PTZ cameras through the operations described in this section if the PTZ cameras have been connected and setup properly. -
Page 61: Osd Control For Wirepath Surveillance Cameras
7.1 OSD CONTROL FOR WIREPATH™ SURVEILLANCE CAMERAS Wirepath™ Surveillance 500 and 700 series analog cameras offer remote control of thier OSD (On Screen Display) menu. This is achieved through the PTZ functions of the DVR. The cameras must be connected to the RS485 terminals on the DVR and properly configured according to the camera manual. The DVR must... - Page 62 WPS-100-DVR-8CH Installation and Users Manual To operate the OSD, use the mouse to select the PTZ Control icon to enter PTZ control mode if the focus camera is a Wirepath Surveillance camera that supports this feature. The asterisk ( ) will change to inverse color to indicate that the camera is now in PTZ control mode and the PTZ Control Bar will be displayed: • PTZ...
-
Page 63: Search/Playback/Archive
WPS-100-DVR-8CH Installation and Users Manual 8. SEARCH/PLAYBACK/ARCHIVE This menu is available to Administrators and Supervisors only. There are four ways to search the recorded video and audio for playback: • Search by time • Search by event • Smart Search • Search archived files Use the Search button on the front panel of the DVR or on the remote control to activate the Search Menu. -
Page 64: Search By Time
WPS-100-DVR-8CH Installation and Users Manual 8.1 SEARCH BY TIME The Search By Time feature allows the user to search for recorded video and audio based on time. Tip: When the screen is opened the oldest record time is displayed at the bottom labeled as Recorded From To navigate and operate this menu: • ▲▼◄►... -
Page 65: Search By Event / Log Display
WPS-100-DVR-8CH Installation and Users Manual 8.2 SEARCH BY EVENT / LOG DISPLAY The Search By Event feature allows the user to search for recorded video and audio based on the type of event recorded by the DVR. The DVR will store up to 6000 of the most recent event logs. There are four different types of event logs: Alarm, Motion, Video Loss, and System. -
Page 66: Smart Search
WPS-100-DVR-8CH Installation and Users Manual the selected type of recorded video (beginning from the Search Time) to the connected backup device. The Backup menu (described in the Archive portion of Section 8.6) will be displayed. Alternatively use the mouse to select the COPY button. - Page 67 WPS-100-DVR-8CH Installation and Users Manual To navigate and operate this menu: • MODE Press the Mode button on the front panel of the DVR or on the remote control to begin searching the recorded video and audio based on the selected search Time, Camera, and Motion Area. Alternatively use the mouse to set the parameters and begin the search.
- Page 68 WPS-100-DVR-8CH Installation and Users Manual 2. Press Play (►/II, ► ► ) button on the front panel of the DVR or on the remote control to playback all the selected events. Alternatively use the mouse to select the Play button. 3. Press Copy ( ) button on the front panel of the DVR or on the remote control to backup (copy) all of the selected recorded video and audio events to the connected backup device.
-
Page 69: Search Archived Files
WPS-100-DVR-8CH Installation and Users Manual • MODE Press this button on the front panel of the DVR or remote control to Set/Reset the whole video area. Alternatively use the mouse to select this icon. • Press the ESC button on the front panel of the DVR or remote control to escape from this menu and return to the Smart Search menu. -
Page 70: Playback Search Results
WPS-100-DVR-8CH Installation and Users Manual 8.5 PLAYBACK SEARCH RESULTS Once playing back video, use the following controls to operate and archivethe video and audio: To navigate and operate this menu: MODE • Use the button on the front of the DVR or the remote control to toggle live and playback mode. -
Page 71: Archive (Backup) Search Results
WPS-100-DVR-8CH Installation and Users Manual 8.6 ARCHIVE (BACKUP) SEARCH RESULTS Once playing back video from the Search option, use the following controls to archive (backup) the video and audio: The following is a brief description for the operations in the Backup menu: • ▲▼◄►... - Page 72 WPS-100-DVR-8CH Installation and Users Manual • CAMERAS Press the ENTER or +/- buttons on the front panel of the DVR or on the remote control to select or deselect each of the cameras to be archived. • END TIME Press the +/- buttons on the front panel of the DVR or on the remote control to modify the Year, Month, Date, Hour, and Minute for the recorded video and audio for the backup without playback of Search by Time. The files will be backed-up from the start time to the end time when the user press the COPY...
-
Page 73: Remote Access
WPS-100-DVR-8CH Installation and Users Manual 9. REMOTE ACCESS The following section discusses DVR remote viewing and control options from PCs and Smart phones. 9.1 PC REMOTE ACCESS After completing the initial setup, the DVR can be remotely accessed from a PC using a 32bit Internet Explorer web browser. -
Page 74: Camera Window Option Menu
WPS-100-DVR-8CH Installation and Users Manual 9.2.1 SPLIT-WINDOW OPTION MENU Right click on any split-window to display the Split-Window Option Menu. The following is a brief description for each item in this menu and its specific operations: • 1 -W When in a split-window view, expand the focus window camera to fill the entire video window. When in a single-window view, uncheck this item to return to the previous split-window view. -
Page 75: Split-Window Panel
WPS-100-DVR-8CH Installation and Users Manual 5. AUDIO IN Use the microphone in the PC to send audio to the DVR. An amplifier and speaker must be attached to the Audio Out connection of the DVR to use this function. 6. ARCHIVE MENU Select this icon to save and backup files. 7. SNAPSHOT Select this icon to take a Snapshot of the screen being viewed. A pop-up window will allow this snapshot to be saved to the local PC. -
Page 76: Search Panel And Copy Feature
WPS-100-DVR-8CH Installation and Users Manual • ALARM IN STATUS Status indicators for Alarm Inputs 1-16 (this DVR supports the first 4) - GREEN indicates normal status - RED indicates alarm detection • ALARM OUT Status indicators for Alarm Outputs 1-8 (this DVR supports the first 2) - GREEN indicates normal state - RED indicates triggered state) for the selected DVR. As an Administrator, click on any of these icons to control the corresponding Alarm Output. - Page 77 WPS-100-DVR-8CH Installation and Users Manual The following is a brief description for each item in this menu and its specific operations: • DEVICE Select the appropriate DVR to search • EVENT TYPE Select the event type(s) to search. System events include Login/Logout, e-mail errors, hard drive failures, etc. • SOURCE ID Select the camera ID number(s) to search • PRINT Print the event log to a printer • PRINT TO FILE...
-
Page 78: Search By Pc Video
WPS-100-DVR-8CH Installation and Users Manual 9.2.6.3 SEARCH BY PC VIDEO Search the local PC for stored video files. Once the files have been selected, click on Open. Use the Playback Panel icons to control the video. To exit playback, select the LIVE icon at the bottom of the screen. 9.2.6.4 COPY FUNCTION Use the Copy function to record live video from the DVR onto the local PC. The performance of this feature is based on bandwidth capacity of the network and the number and size of the files being copied. -
Page 79: Ptz Control Panel
WPS-100-DVR-8CH Installation and Users Manual 9.2.7 PTZ CONTROL PANEL If the camera in the focus window is a Pan/Tilt/Zoom camera, use the buttons on the user interface to operate basic PTZ features. For more control, display the PTZ Control Panel by clicking on the PTZ Panel icon. -
Page 80: Modify
WPS-100-DVR-8CH Installation and Users Manual 9.2.8.1 MODIFY DVRs in the Device List may be modified using this menu. The following is a brief description for each item in this menu and its specific operations: • NAME Enter a meaningful name for the DVR • ADDRESS Enter the IP address or URL domain name for the DVR. • CONTROL PORT Set the control port for the (DVR) device. The default value is 67 and is auto-populated in menu. -
Page 81: Software Upgrade
Do Not Open IE Remove_WPS_IE_Plugin 5. Open IE and access the updated Wirepath DVR. Perform Step 2, 3and 4 for all computers that will be used to access the DVR. 6. IE may initially block installation of the DVR Plugin. If so, review the prompt and allow the Plugin to be installed. -
Page 82: System
WPS-100-DVR-8CH Installation and Users Manual 9.3.1 SYSTEM The System Setup allows the administrator to set the system time, time zone, time synchronization, language, etc. The following is a brief description for each item in this menu and its specific operations: • TIME ZONE Select the appropriate time zone. The default setting is Eastern Standard Time. • DAYLIGHT SAVING TIME Enable or disable DST by checking this box. -
Page 83: Password
WPS-100-DVR-8CH Installation and Users Manual 9.3.2 PASSWORD The Password Setup allows the administrator to add new users, delete existing users, and/or modify the user names, password, and levels of access The DVR allows up to 18 user accounts. There are three default user levels in the system: • OPERATOR... - Page 84 WPS-100-DVR-8CH Installation and Users Manual “-“ (Default) - No Guest Access Allowed (Does not prevent access by User with login credentials) Administrator - Provides full access to the DVR allowing for viewing of all cameras and modification to all settings. Use this setting with caution. Supervisor - Provides access to view and control all cameras, Search, Archive and modify basic settings.
- Page 85 WPS-100-DVR-8CH Installation and Users Manual • ADV. For Customized access per user setup the Advanced User Setup. Within the menu, options are categorized into groups (Monitor, Search, Setup and Others): - Monitor Channel 1-8 Select Channels (cameras) the user can monitor.
-
Page 86: Network
WPS-100-DVR-8CH Installation and Users Manual 9.3.3 NETWORK The Network Setup allows the administrator to setup all Ethernet network related parameters. Consultation with the network administrator may be required to set these parameters correctly. The following is a brief description for each item in this menu and its specific operations: • Net Type Select the type of network connection of the DVR to the network (DHCP, Static IP or PPPoE). DHCP is enabled by default but a Static IP is recommended. - Page 87 WPS-100-DVR-8CH Installation and Users Manual • DDNS Username Enter the DDNS username if DDNS is used. – Not used unless an existing DDNS other than WirepathDNS service is configured. • DDNS Password Enter the DDNS password if DDNS is used. – Not used unless an existing DDNS other than WirepathDNS service is configured. • WAP Picture Quality WAP (Wireless Application Protocol) is a simple standard for remote devices (such as Smartphones) to access the DVR. See Section 9.6 for more information on WAP. • Video Stream Video Stream (Dual Streaming) allows the user to choose the resolution and speed the video is delivered to the remote device (see Section 9.4).
-
Page 88: Pre Camera
WPS-100-DVR-8CH Installation and Users Manual 9.3.4 PRE CAMERA Pre-Camera setup allows the administrator to define fundamental attributes for connected cameras. The following is a brief description for each item in this menu and its specific operations: • BEST REC RESOLUTION Select the record resolution for all the cameras connected to the system. This is a global setting. Select D1 for the highest resolution (720x480), Half D1 for medium resolution (720x240), or CIF for lower resolution (360x240). -
Page 89: Camera
WPS-100-DVR-8CH Installation and Users Manual 9.3.5 CAMERA The Camera setup allows the administrator to define additional attributes for each camera The following is a brief description for each item in this menu and its specific operations: • TITLE Name each camera with a unique identifying name up to eight characters maximum. • MOTION DETECTION Enable or disable motion detection for the selected camera. Default setting enables this feature. Note: This has no effect on Smart Search functions. -
Page 90: Motion
WPS-100-DVR-8CH Installation and Users Manual • EVENT RECORD FPS Set the Frames Per Second Record rate for each camera when events such as motion or alarm inputs trigger the camera to record. Settings for Post Record time determines how long the DVR will record after the event triggers recording. - Page 91 WPS-100-DVR-8CH Installation and Users Manual The following is a brief description for each item in this menu and its specific operations: • CAMERA Select the camera to define motion triggered events. • DURATION Set the length of time the buzzer and the corresponding Alarm Out relay will remain triggered once motion is detected for this camera. The buzzer and Alarm Out relay will reset immediately once motion is no longer detected.
-
Page 92: Video Loss
WPS-100-DVR-8CH Installation and Users Manual 9.3.7 VIDEO LOSS Video Loss Setup allows the administrator to define how the system responds when video signal is lost for the camera. The following is a brief description for each item in this menu and its specific operations: CAMERA • Select the camera to define video loss triggered events. • DURATION Set the length of time the buzzer and the corresponding Alarm Out relay will remain triggered once video loss is detected for this camera. The Buzzer and Alarm Out relay will reset immediately once video signal is restored. -
Page 93: Alarm
WPS-100-DVR-8CH Installation and Users Manual • LOG By default, the DVR will log when video loss is detected to the Event Log. • E-MAIL This DVR can send an email message to a predefined email address in the event video loss is detected for this camera. The default setting is disabled. See Section Section 9.3.11 for more information on e-mail. • FTP This DVR can send the recorded video loss event for this camera to a FTP server. - Page 94 WPS-100-DVR-8CH Installation and Users Manual • GOTO PRESET Define the preset PTZ position the Focus Camera will go to if the alarm input is triggered (the focus camera must be a PTZ camera for this feature). For more details about preset positions for PTZ cameras, refer to Section 7. • PRE-RECORD Define how much time the DVR will record before the alarm input is triggered. The Pre Record FPS set in Section 9.3.5 determines the frame rate of this recording Note: Actual pre-record time may be shorter than the value set if the total size of the pre-record video exceeds the pre-record video buffer.
-
Page 95: Seq Display
WPS-100-DVR-8CH Installation and Users Manual 9.3.9 SEQ DISPLAY The SEQ Display Setup allows the administrator to define the displayed pages when in SEQ Display mode. Options include three display types: • 1-Window • 4-Window • 7-Window The following is a brief description for each item in this menu and its specific operations: • DEVICE TYPE This DVR only support Main Monitor • WINDOW TYPE Select 1-W for one camera per page, 4-W for four cameras per page or 7-W for seven cameras per page. -
Page 96: Schedule
WPS-100-DVR-8CH Installation and Users Manual 9.3.10 SCHEDULE The Scheduled Record Setup allows the administrator to define when and how video (and audio) will be recorded. This feature may be useful to increase hard drive storage space by defining what types of events are recorded on specific days of the week. For example if Normal Recording (recall that the DVR is capable of always recording video even without event triggers such as motion or alarm) is not necessary, this feature can be disabled on a daily basis. To further define when and how the DVR records, up to 16 time segments (Conditional 1 – Conditional 16) are available for each day of the week. -
Page 97: Email
WPS-100-DVR-8CH Installation and Users Manual • NORMAL Define if normal video and audio (non-event based video and audio) is recorded. Options include V for Video only, AV for Audio and Video, NO for No Recording, and OFF for recording but no event notification. Note: If both Alarm and Motion are set to OFF, then all video and audio recordings will be considered “normal recording”... -
Page 98: Rs485
WPS-100-DVR-8CH Installation and Users Manual • MAIL FROM Enter the e-mail address of the associated e-mail account. Note: This setting is specific and must match e-mail client settings used to access an e-mail account or the e-mail feature will not be operable. Do not enter generic text in this field. -
Page 99: Ftp
WPS-100-DVR-8CH Installation and Users Manual • MODEL PTZ model (for PTZ and PTZ+Keyboard) refers to the type of the connected devices. The PTZ models supported include Pelco D Protocol Dome, Samsung SCC-641P, Kalatel Cyber Dome, PIH-series, Dynacolor, Bosch AutoDome, Video Trek, etc. The Keyboard models supported include Terminal (EX. VT-100) and Control Protocol. -
Page 100: Hdd
WPS-100-DVR-8CH Installation and Users Manual The following is a brief description for each item in this menu and its specific operations: • SERVER URL Enter the FTP server web/IP address. • FTP PORT Enter the FTP port number. The default value is 21. • USERNAME Enter the username for the FTP server. • PASSWORD Enter the password for the FTP server. -
Page 101: Dual Streaming
WPS-100-DVR-8CH Installation and Users Manual • DURATION Set the duration that the Alarm Out relay and the buzzer will remain triggered when the corresponding partition is full. Set the time from 3 seconds to 60 minutes or ‘-‘ indefinitely until the Alarm Reset button on the remote control is pressed. • ALARM OUT Define which Alarm Output will be triggered when the corresponding partition is full. • BUZZER By default, the internal buzzer is enabled to sound when the corresponding hard drive partition is full. - Page 102 WPS-100-DVR-8CH Installation and Users Manual 2. Adjust the Video Stream accordingly. • RECORD If Record is selected, the PC will match the Best REC Resolution setting found in Pre-Camera tab. The Record setting (with Compression set to Normal, see Section 9.3.4) delivers the best video performance but requires the network to offer the necessary bandwidth capacity.
-
Page 103: Motion Detection / Privacy Mask
WPS-100-DVR-8CH Installation and Users Manual 9.5 MOTION DETECTION / PRIVACY MASK Note: This feature is only available on DVRs with software versions 7.77.53 or higher. Update the DVR to the latest version available on the SnapAV Website to use this feature. -
Page 104: Iphone Remote Control
WPS-100-DVR-8CH Installation and Users Manual 9.6 IPHONE REMOTE CONTROL The following section describes the steps to add the WPS-DVR application to an iPhone, iPod or iPad and how to operate the application. 1. INSTALL THE APPLICATION 1. Access the iTunes App Store using iTunes or your Apple Device and search for WPS-DVR. -
Page 105: Remote Display And Operation
WPS-100-DVR-8CH Installation and Users Manual 9.6.1 REMOTE DISPLAY AND OPERATION After launching WPS-DVR, select the DVR in the Device list to connect. The application will open to a 4 window split screen by default. Use the CH button or double-tap a quadrant in the split screen to view a single camera full screen. Once in full-screen view, a “swipe” feature enables the ability to... - Page 106 WPS-100-DVR-8CH Installation and Users Manual • SEARCH OPERATION Search By Time - Select month-day-year- hour-minute of the video to be viewed and press to begin playback. Search By Event – A chronological list of events will be displayed beginning with the most recent event first. Use the FWD and RWD icons to scroll to more pages of this list.
-
Page 107: Smartphone Remote Control (Other Than Iphone) Using Wap
WPS-100-DVR-8CH Installation and Users Manual 9.7 SMARTPHONE REMOTE CONTROL (OTHER THAN IPHONE) USING WAP The DVR can also be remotely accessed using a web browser installed on a Smartphone that supports xHTML and MJPEG file format, and has a screen resolution of 240x320 or above. To access the DVR, enter the DDNS name or IP address of the DVR in the Location/Address field of the web browser. For most mobile devices, the DVR will automatically redirect to the correct web page by adding the extension /wap.htm (EX. -
Page 108: Warranty
This DVR has a 3-Year Limited Warranty. The warranty includes parts and labor repairs on all components found to be defective in material or workmanship under normal conditions of use. This warranty shall not apply to products which have been abused, modified, disassembled or improperly installed. Products to be repaired under this warranty must be returned to Wirepath™ Surveillance or a designated service center with prior notification and an assigned return authorization number (RA). -
Page 109: Appendix A - Specifications
WPS-100-DVR-8CH Installation and Users Manual APPENDIX A – SPECIFICATIONS System Operating System Embedded Linux 2.6 Input Video Main monitor VGA / BNC Detection Motion, Video loss Audio Input / Output 2 In, 1 Out Compression H.264 Video, ADPCM Audio NTSC–60 / 720*480, 120 / 720*240, 240 / 360*240 Frame rate (FPS) & Resolution... -
Page 110: Appendix B - Menu Structure
WPS-100-DVR-8CH Installation and Users Manual APPENDIX B – MENU STRUCTURE Numbers preceding the Menu name are the section numbers for the OSD menu (VGA and BNC output) within this manual. 5 MENU DISPLAY 4.2 LOGIN/LOGOUT 5.1 STATUS DISPLAY 5.2 VOLUME CONTROL 5.3 VIDEO ADJUSTMENT... -
Page 111: Appendix C - Hard Drive Recording Table
WPS-100-DVR-8CH Installation and Users Manual APPENDIX C – HARD DRIVE RECORDING TABLE Recording Time (in Days) - For Estimation Purposes Only System Storage (GB): 500 Total Recording Rate (FPS) for the DVR Record Quality Resolution Setting 13.9 20.9 15.7 23.6 18.4... -
Page 112: Appendix D - H.264 To Avi Conversion
WPS-100-DVR-8CH Installation and Users Manual APPENDIX D – H.264 TO AVI CONVERSION UTILITY Included on the bundled disc is a MS-Windows utility program used to convert native .h264 files from the DVR to .avi file format to be played back on PCs using Windows Media Player. 1. Insert the CD in the CD-ROM or DVD-ROM drive in the PC and copy the AVI_Converter.exe file to the desktop. Double click the AVI Converter icon to open the utility. -
Page 113: Appendix E - Wirepathdns Setup
WPS-100-DVR-8CH Installation and Users Manual APPENDIX E – WIREPATHDNS SETUP Using the WirepathDNS is easy. Select WirepathDNS from the list and enter the client name or other unique string in the URL. When exiting the Network menu, confirm the changes. A DDNS service is setup automatically. See IE Interface Setup and DVR Local Display Menu Setup below for details on using WirepathDNS. - Page 114 WPS-100-DVR-8CH Installation and Users Manual ACCESSING THE DVR Internet Explorer To access the DVR, the address must be preceded by http://. Example: http://snap.WirepathDNS.com:81/ie.htm The standard port (80) will be used, and does not need to be included in the address. If the port has been changed within router setup, the port number assigned must follow the address.
- Page 115 120503-1430 © 2012 Wirepath Surveillance...
Need help?
Do you have a question about the WPS-100-DVR-8CH and is the answer not in the manual?
Questions and answers