Advertisement
Advertisement
Table of Contents

Subscribe to Our Youtube Channel
Related Manuals for Renogy LYCAN 5000 Power Box


Summary of Contents for Renogy LYCAN 5000 Power Box
- Page 1 LYCAN 5000 Power Box RPB4835OA-48LFPA12S Version 1.0 Quick Guide...
-
Page 2: Table Of Contents
Contents Accessory List .......................01 Wiring Diagram ......................02 Product Overview ....................03 Installation ......................05 Turning On ......................07 Charging ........................08 Powering Appliances ..................... 11 Bluetooth Pairing ....................19 Turning Off ......................20 *Capacity Expansion .....................22 Maintenance ......................24... -
Page 3: Accessory List
Accessory List IEC C19 to NEMA 5-20P Power Quick Guide × 1 Keys × 2 Cable × 1 LYCAN 5000 Power Box RPB4835OA-48LFPA12S Version 1.0 Quick Guide RJ45 Plug Waterproof Housing Handle Bar Screws × 4 Handle Bar × 1 ×... -
Page 4: Wiring Diagram
This Quick Guide contains important installation, operation, and maintenance instructions for Lycan 5000 Power Box. Please read the guide carefully before using. z Please refer to the full user manual of LYCAN on renogy.com for more detailed instructions. z Illustrations in the Quick Guide are for reference only. -
Page 5: Product Overview
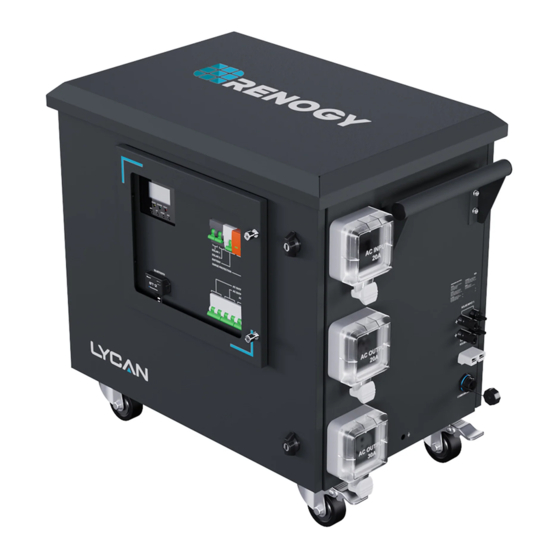
Product Overview Item Item Solar Inverter Charger Display Viewing Window (Including Indicators and Buttons) Solar Input Circuit Breaker 1 Bluetooth Module Solar Input Circuit Breaker 2 AC Output Circuit Breaker (20A) Battery Circuit Breaker AC Output Circuit Breaker (30A) Surge Protection Device AC Input Circuit Breaker (20A) Front Door Locks AC Outlet (30A) - Page 6 Product Overview Item Item Solar Connector 1 Grounding Hole Anderson Connector (Including Dust Solar Connector 2 Cover) RJ45 Jack (Including Waterproof Handle Bar (Pre-Installed) Housing) Back Door Locks Vent Cover Handle Bar (Installation Required) Swivel Casters z Please inspect the unit for any visible damage including cracks, dents, deformation, and other visible abnormalities before installation.
-
Page 7: Installation
Installation Recommended Tools Phillips Screwdriver Wrench (10mm) Wrench (12mm) (#2) z Make sure that the Handle Bar is installed firmly on LYCAN. z Allow at least 1 foot of space behind the Vent Cover for efficient heat dissipation. z Install LYCAN at ground level on a flat surface. - Page 8 Installation Connect the ring terminal of a grounding cable (not included) to the grounding hole of LYCAN with the screws removed from the fixing bracket. STEP-1.7 Connect the bare wire end of the grounding cable to the grounding busbar (PE) of an AC load center (not included) or a grounding rod (not included).
-
Page 9: Turning On
LYCAN may not be operating properly and needs troubleshooting if the following occurs after turning LYCAN on. Please refer to the full user manuals of relevant products on renogy.com for troubleshooting instructions. z 48V 50Ah Smart Lithium Iron Phosphate Battery: The indicator of the battery lights up red, flashes red, or does not light up. -
Page 10: Charging
Please note that modifying the parameters outside the specified range can lead to irreversible damage to LYCAN and voids the warranty. Please refer to the full user manual of LYCAN on renogy.com for more information. AC Charging... - Page 11 Charging Solar Charging Solar Array 1 Solar Array 2 STEP-3.6 STEP-3.7 Connect the solar panels (sold separately) in series and/or Loosen the captive screws to parallel to form solar arrays. Connect the solar arrays to the Solar open the Viewing Window. Connectors of LYCAN.
- Page 12 Press the Solar Inverter Charger UP and DOWN Buttons to turn the page and view detailed charging status. Please refer to the full user manual of 48V 3500W Solar Inverter Charger on renogy.com for more instructions. z Additional protection devices including DC ground fault circuit interrupters, DC arc fault circuit interrupters, and rapid shutdown devices (not included) may be required to comply with the local and state codes for solar systems.
-
Page 13: Powering Appliances
Powering Appliances z LYCAN can power appliances at temporary sites, in permanent off-grid homes, and during emergencies with Power Strips, AC Load Centers, and Transfer Switches respectively. Please refer to the corresponding instructions based on actual applications. z Please fully charge LYCAN prior to first use. Temporary Power Supply Recommended Accessories *Power Strip... - Page 14 Powering Appliances The Solar Inverter Charger Powered by Bypass AC Powered by Batteries AC/INV Indicator lights up yellow when the appliances INPUT INPUT are powered by bypass AC. BYPASS The Solar Inverter Charger 100% 100% AC/INV Indicator flashes yellow when the appliances AC/INV CHARGE FAULT...
- Page 15 Powering Appliances Off-Grid Living Recommended Accessories *AC Load Center and AC *NEMA TT-30P to Bare Wire Circuit Breakers Adapter Cable z For a safe and reliable installation, it is recommended that the installation be carried out by a trained and licensed electrician.
- Page 16 Powering Appliances Off-Grid Living STEP-5.4 STEP-5.5 STEP-5.6 Connect the plug end of the Replace the cover to the Loosen the captive screws to Adapter Cable to the 30A AC AC Load Center. Push the open the Viewing Window. Outlet of LYCAN. switches toward the center of the AC Load Center to close all the AC Circuit Breakers.
- Page 17 Powering Appliances Emergency Backup Recommended Accessories *Reliance Controls 306A Pro/ *NEMA TT-30P to Tran 2 Manual Transfer Switch NEMA L14-30R Adapter Cable z For a safe and reliable installation, it is recommended that the METER 1 installation be carried out METER 2 by a trained and licensed LINE...
- Page 18 Powering Appliances Emergency Backup z Connect the Transfer Switch to 120VAC circuits in the AC load center ONLY. z The current ratings of the AC circuit breakers in the Transfer Switch shall not exceed the current ratings of the corresponding AC branch circuit breakers in the AC load center. z With a pre-installed double-pole AC branch circuit breaker, the circuits A and B of the Transfer Switch shall not be connected to the 120VAC circuits of the AC load center.
- Page 19 Powering Appliances Emergency Backup METER 1 METER 2 METER 2 METER 1 LINE LINE LINE LINE STEP-6.10 STEP-6.11 Connect the 30A AC Outlet of LYCAN to the power inlet of the Twist the receptacle end of the Transfer Switch with the Adapter Cable (sold separately). Adapter Cable clockwise to lock it into place.
- Page 20 Powering Appliances Emergency Backup z LYCAN can be used as an uninterruptible power supply (UPS) with an automatic transfer switch. z Please close the Viewing Window and tighten the captive screws after completing the steps above. z The continuous loads shall not exceed 24A, and the noncontinuous loads shall not exceed 30A. z Leave LYCAN plugged into a wall outlet at all times to keep it topped off and ready to power appliances during an emergency.
-
Page 21: Bluetooth Pairing
Please scan the QR code on the last page of the Quick Guide to download the DC Home app. INFORMATION For more information, please visit www.renogy.com c please ensure that your changer is lithium lron phosphate compatible before use. -
Page 22: Turning Off
Turning Off STEP-8.1 STEP-8.2 Disconnect solar and AC inputs from LYCAN. Open the Front Door Locks with the included Keys and rotate the wing knobs counterclockwise by 90° to open the front door. STEP-2.3 STEP-8.3 STEP-8.4 STEP-8.5 Rock the switch on the bottom of Push the switches down to Open the Back Door Locks the solar inverter charger to the... - Page 23 Turning Off z Please close the front door and back door, rotate the wing knobs clockwise by 90°, and lock the Front Door Lock and Back Door Lock after turning LYCAN off. z If LYCAN is not going to be used for a long time, and neither solar nor AC power are available to keep LYCAN topped off, please turn LYCAN off to prevent the batteries from overdischarging.
-
Page 24: Capacity Expansion
Required Accessories Renogy 48V 50Ah Smart Anderson Connector to Ring Lithium Iron Phosphate Battery Terminals Adapter Cable z ONLY connect Renogy 48V 50Ah Smart Lithium Iron Phosphate Batteries to LYCAN for capacity expansion. Connecting other brands or models of batteries to LYCAN can damage LYCAN and/or the batteries. - Page 25 *Capacity Expansion Install the included RJ45 Plug Waterproof Housing on one end of a Ethernet cable. STEP-9.5 Connect the UP communication port of the first battery to the RJ45 Jack of LYCAN. z CAT5 or above Ethernet cables are required. STEP-9.6 Screw the RJ45 Plug Waterproof Housing into the...
-
Page 26: Maintenance
Maintenance Fan Operation z Clean the fans regularly. The accumulation of debris and dust can block the fans and affect the heat dissipation of LYCAN. z The parameters of thermostat have been preset. No additional STEP-10.1 STEP-10.2 parameter setting is The fans are located at the The thermostat is located next required. - Page 27 Charge LYCAN at least once every 3 months to prevent it from overdischarging. z Fully charge LYCAN when it is taken out of storage. z Keep the keys properly. If the keys are lost, please visit renogy.com for help.
- Page 28 Renogy Power PLUS Renogy Power Plus allows you to stay in the loop with upcoming solar energy innovations, share your experiences with your solar energy journey, and connect with like-minded people who are changing the world in the Renogy Power Plus community.
- Page 29 Visit renogy.com to find the full User Manual or get more support. Visit renogy.com to find the full User Manual or get more support via "Contact Us". Your voice matters! Scan the QR code to submit your feedback on the product.
Need help?
Do you have a question about the LYCAN 5000 Power Box and is the answer not in the manual?
Questions and answers