Table of Contents
Advertisement
Quick Links
Advertisement
Table of Contents

Related Manuals for Renogy PHOENIX 200


Summary of Contents for Renogy PHOENIX 200
- Page 1 PHOENIX 200 Portable Power Station Version A0...
- Page 3 PHOENIX 200 Portable Power Station (RPS2220AA) DISCLAIMER • Renogy makes no warranty as to the accuracy, sufficiency, or suitability of information in the User Manual because continuous product improvements are going to be made. • Renogy assumes no responsibility or liability for losses or damages, whether direct, indirect, consequential, or incidental, which might arise out of the use of information in the User Manual.
- Page 4 Important Safety Instructions Please save these instructions. The User Manual provides important operation and maintenance instructions for PHOENIX 200 Portable Power Station. Please read the User Manual carefully before operation and save it for future reference. Failure to observe the instructions or precautions in the User Manual can result in electrical shock, serious injury, or death, or can damage PHOENIX, potentially rendering it inoperable.
- Page 5 • Please use PHOENIX in accordance with its input and output specifications. • DO NOT expose PHOENIX to flammable or harsh chemicals or vapors. • DO NOT expose PHOENIX to strong electrostatic fields, strong magnetic fields, or radiation. • Please ensure that no water sources including downspouts, sprinklers, or faucets are above or near PHOENIX.
-
Page 6: Table Of Contents
Table of Contents Product Overview Identification of Parts Package Content LCD Display Operation Turning On/Off Charging Powering Devices Timeout Settings Maintenance Cleaning Storage Troubleshooting Specifications - 04 -... -
Page 7: Product Overview
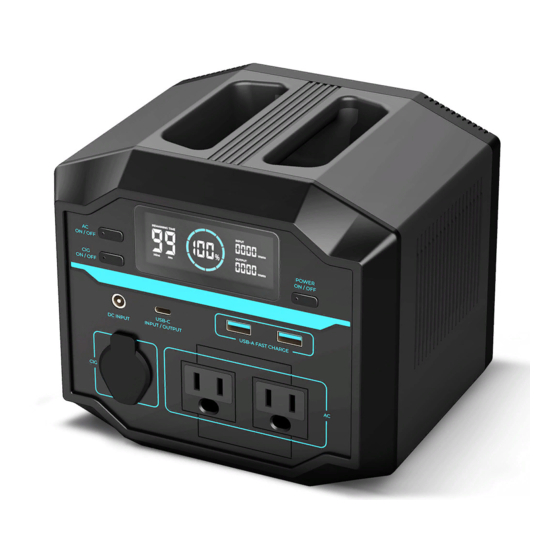
Product Overview Identification of Parts ③ ② ① ④ ⑤ ⑧ ⑥ ⑦ ⑨ United States/Canada/Japan Europe/South Korea China United Kingdom Australia - 05 -... -
Page 8: Package Content
③ ⑧ AC On/Off Button USB-A Fast Charge Ports ④ ⑨ CIG On/Off Button AC Outlet(s) ⑤ DC Input Port Package Content PHOENIX 200 AC Adapter AC Power Cable Portable Power Station Car Charge Cable User Manual - 06 -... -
Page 9: Lcd Display
LCD Display Icon Name Description Indicates the current battery level. As the PHOENIX charges, the ring will light up clockwise with the increasing percentage, and the endmost ring segment will fast flash. Once PHOENIX is fully charged, all the Battery Level ring segments will light up and remain solid. - Page 10 Icon Name Description CIG Port Status Indicates the on/off status of the CIG Port. High Temperature Indicates the protection related to high temperatures. Protection Low Temperature Indicates the protection related to low temperatures. Protection Battery Protection Indicates the protection related to the internal battery. Current Protection Indicates the protection related to current.
-
Page 11: Operation
(40°C). • DO NOT use damaged accessories to charge PHOENIX as it might cause electric shock. • ONLY use Renogy approved accessories to charge PHOENIX. • DO NOT charge PHOENIX immediately after a long heavy run. • Please charge PHOENIX immediately when the battery level drops below 10% to prevent overdischarge. - Page 12 • The operating voltage of the solar panel shall exceed 10V, and the open circuit voltage shall NOT exceed 25V. • DO NOT connect multiple solar panels in series. • PHOENIX automatically limits the input power. It is allowed and recommended to charge PHOE- NIX with a solar panel rated above 60W to account for the energy conversion loss.
- Page 13 Car Charging • Start the car engine. • Connect the DC Input Port of PHOENIX to the CIG port in the car with the included Car Charge Cable. PHOENIX will start charging automatically. • Please ensure that the car battery is 12V. The 24V car battery might damage PHOENIX. USB-C Charging •...
-
Page 14: Powering Devices
Powering Devices • DO NOT discharge PHOENIX at high temperatures above 140°F (60°C) or low temperatures below -4°F (-20°C). The recommended discharge temperature range is between 23°F (-5°C) and 113°F (45°C). • PHOENIX can provide a total output power of up to 278W. Please allocate the output power rationally. -
Page 15: Timeout Settings
Car Powered Devices • Short press the CIG On/Off Button with PHOENIX on to turn on the CIG Port. Connect the device to the CIG Port. The CIG Port will start powering the device. • Long press the CIG On/Off Button for 3 seconds to turn off the CIG Port. The CIG Port will stop powering the device. - Page 16 AC Outlets Timeout • When the devices draws low or no power from the AC Outlets for 1 hour, the AC Outlets will turn off automatically to save energy. • Long press the Power On/Off Button and AC On/Off Button at the same time for 3 seconds with the AC Outlets on to disable the AC Outlets timeout.
-
Page 17: Maintenance
Maintenance Cleaning • Remove all the connections from PHOENIX. • Turn off PHOENIX. • Clear the leaves, debris, and dust from the fans of PHOENIX. • Clean the casing of PHOENIX with a soft dry cloth. • Keep the area around PHOENIX clean and dry. •... -
Page 18: Troubleshooting
Troubleshooting • If PHOENIX does not operate properly, refer to the table below for possible causes and correc- tive steps. • If the corrective steps do not work, contact our customer service through renogy.com/con- tact-us/. Possible Icon Pattern Corrective Steps Causes •... - Page 19 Possible Icon Pattern Corrective Steps Causes • Disconnect the device from the USB-C Input/Output USB-C Output Port. Slow Flash Overvoltage/ • Reconnect the device to the USB-C Input/Output Port. Undervoltage • Contact us for help if the icons persist. • Disconnect the device from the USB-C Input/Output Port.
- Page 20 Possible Icon Pattern Corrective Steps Causes • Check if the fan inlet and outlet are blocked. Inverter High • Cool down PHOENIX to the room temperature. Slow Flash Temperature • Short press the AC On/Off Button with the LCD Display lit up to release the protection.
-
Page 21: Specifications
Specifications General Dimension 7.48 x 6.10 x 6.99 inch / 190 x 155 x 170 mm Weight 5.29 lbs. / 2.4 kg 32°F~104°F / 0°C~40°C (Recommended) Charge Temperature 32°F~131°F / 0°C~55°C (Extreme) 23°F~113°F / -5°C~45°C (Recommended) Discharge Temperature -4°F~140°F / -20°C~60°C (Extreme) Storage Temperature 32°F~113°F / 0°C~45°C Battery... - Page 22 FCC STATEMENT This device complies with Part 15 of the FCC Rules. Operation is subject to the following two conditions: (1) This device may not cause harmful interference, and (2) This device must accept any interference received, including interference that may cause undesired operation.
- Page 24 RENOGY.COM Renogy reserves the right to change the contents of this manual without notice. 5050 S Archibald Ave, Ontario, CA 91762 909-287-7111 www.renogy.com support@renogy.com 苏州高新区科技城培源路1号5号楼-4 400-6636-695 https://www.renogy.cn support@renogy.cn https://www.renogy.jp supportjp@renogy.com https://ca.renogy.com supportca@renogy.com https://au.renogy.com supportau@renogy.com https://uk.renogy.com supportuk@renogy.com https://de.renogy.com supportde@renogy.com...
Need help?
Do you have a question about the PHOENIX 200 and is the answer not in the manual?
Questions and answers
My phoenix 200 won't seem to charge. One the LCD screen above where it says 0%, there is a fast blinking bar. The photo shows the bar that is fast blinking I can't charge with the wall port or the USB. Can you help?