Advertisement
Quick Links
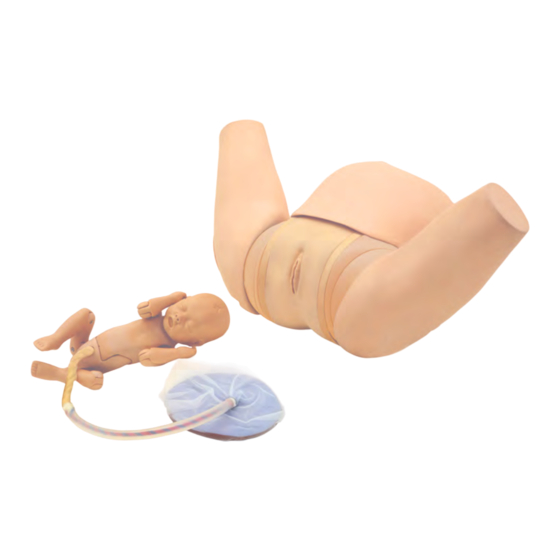
MW36
Vaginal Delivery Assistance Simulator
Do not mark on the model and other
Caution
components with pen nor leave printed
materials contacted on surface.
Ink marks on the models cannot be removed.
Instruction
Manual
Contents
Introduction
●
Manufacturerʼs Note
Before You Start
●
Set Includes/ Precautions
Handling and Storage
●
Preparation
●
Training
●
After Training
●
P.1
P.2
P.3
P.4〜P.9
P.10〜P.11
P.12
Advertisement

Related Manuals for Kyoto Kagaku MW36


Summary of Contents for Kyoto Kagaku MW36
- Page 1 Do not mark on the model and other Caution components with pen nor leave printed materials contacted on surface. Ink marks on the models cannot be removed. MW36 Vaginal Delivery Assistance Simulator Instruction Manual Contents Introduction P.1 ● Manufacturerʼs Note P.2 Before You Start ● Set Includes/ Precautions Handling and Storage P.3 ● Preparation P.4〜P.9 ● Training P.10〜P.11 ● After Training P.12 ● ...
- Page 3 Introduction Manufacturerʼs Note Vaginal Delivery Assistance Simulator has been developed for advancing the skills in Midwifery, and facilitates the training in Vaginal Delivery Assistance. ■ Features ○ The material of genitalia skin excels in elasticity, durability and resilience, and offers life-like realistic training skills from perineal protection to expulsion of fetus and placenta. ○ It facilitate acquiring of skills based on the anatomical knowledge by observing the location of anatomically correct vaginal canal, ischia spine, pubic joint and pelvis. ■ Training Skills ・Delivery assistance for different delivery positions (dorsal, all-fours) ・Perineal protection, anal sphincter protection ・Delivery of fetus (forceps delivery, vacuum extraction) ・Clamping, tying and cutting of the umbilical cord ・Delivery of placenta ・Inspection of velamen ・Procedure of urinary catheterization Read before use Do not use this simulator for the other purpose. The manufacturer cannot be held responsible for any accident or damage resulting from any other use, or any use not in accordance with the enclosed instructions. ※ The new soft resin is employed for one of materials, which excels in elasticity, durability and resilience.The proper use and storage are required in accordance with the cautions in P.3 of this manual.
- Page 4 Before You Start Set Includes/ Precautions Set Includes Before you start, ensure that you have all components listed below. maternal body 1 genitalia unit 1 fetus 1 placenta 1 umbilical cord 1 umbilical cords 3 for omphalotomy velamen sheet 5 lubricant(150 lm) 3 talcum powder 1 1 Fitting parts for thighs 6 Instruction manual Thighs are not attached to the body at the time of receipt. k ʻ DOs and DON Ts ● Handle the manikin and the components ● Do not let ink from pens, newspapers, with care.
- Page 5 Storage and Handling of Genitalia Unit, Placenta, Precaution and Umbilical cords for omphalotomy. PLEASE READ : ■ Always follow the handling and storage instruction below, to keep the material with its elasticity and durability. ○ AFTER USE Apply talcum powder on the parts below, cover them with included storage bag or in a vat . umbilical cords placenta genitalia unit for omphalotomy ○ Do not hold the placenta by holding an umbilical cord. × The placenta is to be sticked firmly on the flat place. Hold the placenta itself to move it to the other place. ○ Do not let the parts contact with other resin items and printed materials. These soft material of the parts may be deformed by contact with other resin items and marked by contact with printed material and they cannot be repaired. ○ Maintain proper temperature, humidity and avoid direct sunlight of the storage room of simulators. Be sure to monitor the indication sticker on the storage box of the product. Store the simulator below 60 degrees C. Change the storage place immediately when the temperature indicator shows color circles as below. ※The color circles are irreversible. Before turned After turned 3F60 年 月貼付 3F60 年 月貼付...
- Page 6 Preparation Assembly of Thighs Assembly of Thighs 1. Before the first use, thighs need to be attached to the maternal body. Ensure that you have all necessary components below and identify left /right mark engraved in the round pit of each thigh. Maternal body Thigh (R) Plate Washer Fly nut (white) Fitting parts for thighs *For clearer understanding, the abdominal cover, the R genitalia unit and the covers for the pits of the thighs are removed in the photos in this Thigh (L) page. Right thigh Left thigh 2. Put the bolt at the left/right hip joint area of the maternal body through the opening of the respective thigh. Then put the plate and the washer in this order and fix them together with the fly nut over the washer. Washer Bolt *Take not that the flat side of the washer faces the plate. *Lift the thigh facilitates fastening the nut tightly.
- Page 7 Preparation Assembly of Thighs Assembly of Thighs 3. Attach the covers for the pits of the thighs. Orient the cover fitting the match-mark lines “―“ on the walls of the covers and the pit. Match-mark line on the wall of the cover. Match-mark line on the wall of the pit. *The covers are common for lift and right. *Spreading included talcum powder facilitate inserting the covers. 4. Assemble both legs with the same process to complete the assembly.
- Page 8 Preparation Setting up the Fetus 1. Setting up the Fetus Prepare the fetus, placenta, umbilical cord, umbilical cords for omphalotomy, velamen sheet, vat and lubricant. Fetus Placenta Umbilical Cord Velamen Sheet Umbilical Cord Lubricant for Omphalotomy 2. Take out the placenta from the storage bag to attach umbilical cord. Connect the screw side of umbilical cord to the placenta and turn it clockwise to fix. 3. Insert the umbilical cord into 4. Take out the umbilical cord for omphalotomy from the storage bag. the hole located at the center Reverse the tip of it to show the hook, and engage it to the hook of the velamen sheet. at the umbilical cord from the placenta.
- Page 9 Preparation Setting up the Fetus 5. Loosen the white screw to remove the plate on the fetal abdomen, and take out the clip from there. 6. Pinch the tip of umbilical cords for omphalotomy with the clip. Put it back to the fetal abdomen, and fix umbilical cords for omphalotomy to the abdomen by the plate with the white screw. ※Place the clip in the direction shown in the above picture. 7. Fetus is ready for training.
- Page 10 Preparation Lubrication Before training, apply lubricant to the genitalia unit, placenta, and umbilical cords for omphalotomy completely. 1. Put the assembled fetus in the vat included in the set. Apply lubricant to it entirely including the velamen sheet and the placenta. 2.Apply lubricant to the internal surface ※The genitalia unit can be lubricated of the genitalia unit, too. after attaching to the maternal body. Assembly of the Maternal Body 1.Remove the abdominal cover from the body.The abdominal cover and body are attached with four magnets.The abdominal cover can be removed it by lifting.
- Page 11 Preparation Assembly of the Maternal Body 2. Attach two nails of genitalia unit to two pits located under part of maternal body, and push on the top of the unit to fix. *Be careful not to pinch your finger between the maternal body and the genitalia unit. 3. Put back the abdominal cover to the maternal body, and set the fetus in it to complete set-up. *Always put the placenta on the vat during the training.
- Page 12 Training Birth Positions Key Features Training can be conducted in two birth positions: dorsal and all-fours position. Dorsal position All-fours position 《Key Features》 ・Direct observation of the motion of fetus in delivery to understand the spatial relationship between pelvis and fetus. ・Genitalia unit has excellent elasticity and resilience and birth cannel is optimal size for the fetus, which allows to deliver the fetus by a little pushing force holding the handle lightly. ・ Pelvis has pubic symphysis and ischial spines, which facilitates understanding of the spatial relationship between pelvis and fetus. pubic symphysis ischial spine ischial spine coccyx pelvis Station zero, the line that connect ischial spines can be recognized.
- Page 13 Training Training Skills Training skills ○ Perineal protection ○ Delivery assistance ○ Delivery of fetus ○ Clamping, tying and cutting of umbilical cord ○ Delivery of placenta ○ Inspection of velamen and placenta...
- Page 14 After Training After Training ○ Remove the genitalia unit 1. Lift the abdominal cover to remove it 2. Pull back the top of the genitalia unit frame from the maternal body. to remove from the body. ○ Disassembling the fetus 1. Disengage the umbilical cord and placenta in reverse order of set-up. (See P.4-P.5) ○ Cleaning and storage 1. Wipe the lubricant left on the fetus, umbilical cord, placenta and genitalia unit away with wet paper tissue. If necessary, wash them by tap water, and dry them well naturally. After completely dried the components, apply talcum powder to each of them. 2. Genitalia unit, placenta and umbilical cord for omphalotomy are made of special soft resin. It is required to store them either in the storage bag or on the vat after training. ※If these parts are stored touching with other resin products or printed matter, the dent or ink might be left on the skin, and will become irremovable.
- Page 16 11417-020 (for perineorrhaphy) For inquiries and service, please contact your distributor or KYOTO KAGAKU CO., LTD. The contents of the instruction manual are subject to change without prior notice. No part of this instruction manual may be reproduced or transmitted in any form without permission from the manufacturer.
- Page 17 モデル表面に印刷物などが直接触れないよう にしてください。 樹脂表面にインクが吸収されて消えなくなります。 MW36 分娩介助シミュレータ 取扱説明書 目 次 はじめに P.1 ● 製品の特長とご注意 P.2 ご使用の前に ● セット内容・ご使用上の注意 取扱のご注意 P.3 ● 準 備 P.4〜P.9 ● 実 習 P.10〜P.11 ● 後片付け P.12 ● ...
- Page 19 はじめに 製品の特長とご注意 このたびは、当社の「分娩介助シミュレータ」をお買い上げいただき、誠にありがとう ございます。 本製品は母性・助産技術の向上を目的に開発されたモデルです。分娩介助に関する実習 教材としてご使用ください。 ■ 特 長 ○ 外陰部に伸縮性、復元性、耐久性に優れた新素材を採用。会陰保護から胎児・胎盤の娩出まで、 より生体に近い演習が 行えます。 ○ 正確な産道・坐骨棘・恥骨結合・尾骨を再現、骨盤と胎児の位置関係を目で確認しながら、解剖 の理解に基づく手技の習得が可能です。 ■ 実習項目 ・分娩体位別介助法 ・胎児の娩出 ・胎盤の娩出 (仰臥位・膝手位) (紺子分娩・吸引分娩) ・卵膜の確認 ・会陰、 肛門保護 ・臍帯の結紮・切断 ・導尿カテーテルの挿入手順 必ずお読みください 本来の使用目的以外にはご使用にならないでください。また、取扱説明書に記載された方法以外 でのご使用による万一の破損や事故に関して、当社は責任を負いかねますのでご了承ください。 ※ 製品の一部に伸縮性と復元性、耐久性に優れた特殊軟質樹脂を使用しております。 取扱説明書 P3 の注意事項をお読みいただき、適切な使用、保管をお願いいたします。...
- Page 20 ご使用の前に セット内容・使用上のご注意 セット内容 ご使用の前に、 構成品が全て揃っているかご確認ください。 モデル本体 1 (腹部カバー付) 外陰部ユニット 1 (納品時は別途梱包) 胎児モデル 1 胎盤モデル 1 臍帯 1 切断用臍帯 3 卵膜 5 潤滑剤 3 タルカムパウダー 1 ( パフ付) バット 1 脚取り付け用部品 6 取扱説明書 ※脚は取り外して梱包されています。 ● 取り扱いにご注意ください。 ● 水又は中性洗剤で拭き取ってください。 特殊軟質及び硬質樹脂を使用しており、また重量 汚れは水又は中性洗剤で拭きとってください。...
- Page 21 外陰部ユニット、胎盤モデル、切断用臍帯の 取扱のご注意 取扱い及び保管方法に関するご注意 必ずお読みください! ■ 外陰部ユニット、胎盤モデル、切断用臍帯の取扱い及び保管方法に関するご注意 伸縮性と復元性、耐久性に優れた特殊な軟質樹脂を使用しております。 下記の注意事項を必ずお読みいただき、適切な取扱いと実習後の保管をお願いいたします。 ○ 実習後は外陰部ユニット、胎盤モデル、切断用臍帯はタルカムパウダーを塗布し、 付属の不織布の袋に入れるか、付属のバットに入れて保管してください。 胎盤モデル 切断用臍帯 外陰部ユニット ○ 臍帯を持って胎盤を持ち上げないでください。 × 平滑な面に置いた胎盤は、素材の特性 上吸着しやすい為、移動の際は胎盤の 端を一旦持ち上げて浮かせてから移動 してください。 ○ 他の樹脂製品や印刷物が直接触れないようにしてください。 他の樹脂製品や印刷物が接触した状態で保管されますと、表面に型が残ったり、印刷物のインクが 吸収され、消えなくなる場合があります。 ○ 適切な温度・湿度で、直射日光を避けて保管してください。 外箱に適切な保管温度の目安となる警告用シールが貼付してあります。 気温が 60℃以下の場所で保管してください。 60℃以上になると左端の○印のマークが緑色に変色しますので、すみやかに保管場所を移動して ください。 ※1度変色したシールは元の色に戻りません。 発色前 発色後 3F60 年 月貼付 3F60 年 月貼付...
- Page 22 腰部モデルへの脚の取り付け 準 備 脚の取り付け 脚の取り付け 1. 脚はモデル本体の腰部モデルと別に梱包されています。 取り付けの前に、 必要な部品と脚の左右 ( 凹部に L,R の刻印があります) を確認してください。 腰部モデル 脚(R) ワッシャー プレート 蝶ナット (白) 取り付けに使用する部品 R 脚(L) 右脚 左脚 ※説明のため、 腹部カバー、 外陰部ユニット、 左右の脚カバーは取り外しています 2. 腰部モデルから出ているボルトに脚を通し、 プレート (白)➡ワッシャーの順に取り付け蝶ナットで固定します。 プレート (白)側に ワッシャー 腰部モデル のボルト ※ワッシャーの向きに注意してください。 ※脚を上部に上げて蝶ネジを締めるとしっかり固定できます。 ※蝶ネジの締め過ぎにご注意ください。...
- Page 23 腰部モデルへの脚の取り付け 準 備 脚の取り付け 脚の取り付け 3. 脚カバーを取り付けます。 脚と脚カバーそれぞれに 「ー」 の印がありますので、 位置を合わせてはめ込みます。 脚カバーの印 脚の印 ※脚カバーは左右共通です。 ※取り付けが固い場合は、 付属のパウダーをつけて頂く ことで滑りが良くなり、 はめ込み易くなります。 4. 反対側も同様に固定して脚の取り付けは完了です。...
- Page 24 準 備 胎児モデルの組立 1. 胎児モデルの準備 胎児モデル、胎盤モデル、臍帯、切断用臍帯、卵膜、バット、潤滑剤を用意します。 胎児モデル 胎盤モデル 臍帯 卵膜 バット 切断用臍帯 潤滑剤 2. 胎盤モデルを専用の収納袋から取り出し、臍帯を取り付けます。 臍帯は先端がねじになっている方のリングを時計方向に回して胎盤に固定します。 3. 卵膜の中央に穴が開いている 4. 切断用臍帯を専用の収納袋から取り出し、片側の先端部を ので、そこに臍帯を通します。 裏返してフックを出し、そこに臍帯の金具を取り付けます。...
- Page 25 準 備 胎児モデルの組立 4. 胎児モデル腹部の白いネジを緩め、中に入っているクリップを取り出します。 5. クリップで切断用臍帯の先端を挟み、胎児モデル腹部凹部にクリップを戻して白いネジで切断用臍帯 を固定します。 ※クリップを胎児モデルの腹部凹部にクリップを戻す際は、クリップの向きにご注意ください。 6. 胎児モデルの準備は完了です。...
- Page 26 準 備 潤滑剤の塗布 実習前に必ず胎児モデル、胎盤モデルと卵膜、外陰部ユニットの内側に潤滑剤を充分に塗布 してください。 1. 付属のバットに、胎盤モデルを取り付けた胎児モデルを置き、潤滑剤を塗布します。 潤滑剤は、胎児モデル全体と胎盤モデル上の卵膜部分に塗布します。 2. 外陰部ユニットの内側にも潤滑剤を塗布 ※モデル本体に取り付けてから塗布いただいても します。 構いません。 モデル本体の組立 1. モデル本体の腹部カバーをはずします。カバーは 4 か所のマグネットでボディに固定されており、 上部に持ち上げることで取り外すことができます。...
- Page 27 準 備 モデル本体の組立 2. 外陰部ユニット下部2箇所の凸部をモデル本体の凹部に差し込み、そのまま上部を押さえると固定 されます。 注:外陰部ユニットとボディの隙間に指を挟まないようご注意ください。 3. ボディの腹部カバーを元に戻し、胎児 モデルを腹部にセットして準備は完了 です。 ※胎盤モデルは必ず付属のバットに 入れて実習を行ってください。...
- Page 28 実 習 分娩体位・モデルの特長 分娩体位・モデルの特長 実習は仰臥位、膝手位で行うことができます。 仰臥位 膝手位 《モデルの特長》 ・骨盤と胎児の位置関係を目で確認しながら、娩出時における胎児の動きを確認する事が可能。 ・伸縮性、復元性に優れた外陰部と胎児のサイズに適した産道を設定。ボディのハンドル部を軽く 押さえながら小さな力で胎児を娩出する事が可能。 ・胎児との位置関係を理解するための坐骨棘、 恥骨結合を再現。 恥骨結合 坐骨棘 坐骨棘 尾骨 骨盤 坐骨棘を結んだステーション0 の認識が可能...
- Page 29 実 習 実習項目 実習項目 ○ 会陰、肛門保護 ○ 分娩介助 ○ 胎児の娩出 ○ 臍帯の結紮、切断 ○ 胎盤の娩出 ○ 胎盤・卵膜の確認...
- Page 30 後片づけ 後片付け ○ 外陰部ユニットの取り外し 1. 腹部カバーを持ち上げ、ボディ本体からはずし 2. 外陰部ユニットのフレーム上部を手前に引いて ます。 ボディから取り外します。 ○ 胎児モデルの分解 1. 組立と逆の手順で、臍帯、胎盤モデルを取り外します。(P4〜P5を参照) ○ 各部の清掃と保管 1. ウエットティッシュ等で胎児モデル、臍帯、卵膜、外陰部ユニットに付着した潤滑剤を拭き取り ます。水道水で洗い流していただいても構いませんが十分に乾燥させてください。 乾燥後、各部品に付属のタルカムパウダーを塗布します。 2. 外陰部ユニット、胎盤モデル、切断用臍帯は特殊軟質 樹脂を使用しておりますので、保管時は付属の不織 布の袋に入れるか、実習に使用したバットに入れて 保管してください。 注:他の樹脂製品や印刷物と一緒に保管されますと 長時間接触した他の樹脂製品が変質したり、印刷 物のインクが吸収されて消えなくなります。...
- Page 32 モデル表面に印刷物などが直接触れないようにしてください。 樹脂表面にインクが吸収されて消えなくなります。 コード 品 名 コード 品 名 外陰部ユニッ ト 交換部品 切断用臍帯 10本組 11415-030 11416-030 (内診、 分娩介助共通) 11416-010 胎児モデル 卵膜 5枚組 11416-040 胎盤モデル 11416-020 11415-020 潤滑剤 助産演習用 3本組 外陰部ユニット 胎児モデル 胎盤モデル (内診、 分娩介助共通) 卵膜 5枚組 切断用臍帯10本組 潤滑剤 (助産演習用) コード 品 名 別売部品 外陰部ユニッ ト 11417-020 (会陰縫合用) 外陰部ユニット...
Need help?
Do you have a question about the MW36 and is the answer not in the manual?
Questions and answers