Advertisement
Quick Links
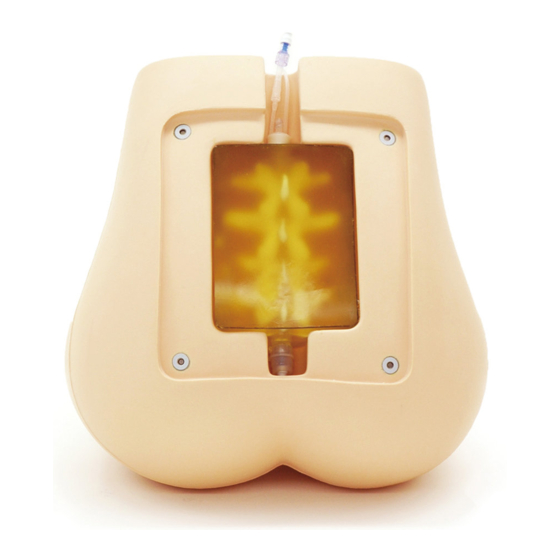
M43E
Ultrasound Compatible Lumbar Puncture/
Epidural Simulator
Ultrasound compatible puncture block is anatomically correct and o ers realistic image of ultrasound.
It includes lumbar vertebrae, spinous process, superior articular process, transverse process, epidural
space and spinal dura mater.
Features
●
1. Ultrasonic landmarks of lumbar spine can be visualized.
2. Replacement parts are durable for multiple procedures.
3. This simulator can be positioned in the upright or lateral position.
4. Translucent block makes the needle trace visible.
5. The lumbar region model provides a platform for wide training opportunities, by adding
interchangeable training blocks for landmark and uoroscopic procedures.
*
Epidural space is designed to be lled with water for better sonographic imaging. Skip this process if you
would like to perform loss of resistance technique.
Instruction
Manual
Contents
Please read
●
General information
Preparation
●
Before training
Training
●
After training
●
P.1
P.2-6
P.7
P.8-10
Advertisement

Related Manuals for Kyoto Kagaku M43E


Summary of Contents for Kyoto Kagaku M43E
- Page 1 M43E Ultrasound Compatible Lumbar Puncture/ Epidural Simulator Instruction Manual Contents Please read ● General information Preparation ● P.2-6 Before training Training ● After training P.8-10 ● Ultrasound compatible puncture block is anatomically correct and o ers realistic image of ultrasound.
-
Page 2: Please Read
Please read General information Set includes Before your first use, ensure that you have all components listed below. ① Lower torso manikin ② Ultrasound puncture pad ③ Ultrasound skin cover ④ Irrigation bottle ⑤ Syringe ⑦ ⑥ Stand ⑦ Irrigator bag ⑧... -
Page 3: Before Training
Before training Preparation Remove the puncture pad 1 *Product is packaged as shown on the left. 1. Disengage the magnets and remove the skin 2. Remove the clear plastic sheet slowly from one cover from the manikin. side of the puncture pad. * Be sure to hold the magnets. - Page 4 Before training Preparation Prepare the stand 2 1. Assemble the stand. 2. Hang the irrigator bag on the stand. Preparation of the US puncture pad (Lumbar puncture) 3 Ultrasound puncture pad Plug for the syringe Plug for the syringe (for subarachnoid space) (for epidural space) Connector to the irrigator bag...
- Page 5 Preparation Before training Preparation of the US puncture pad (Lumbar puncture) 3 2. Fill the irrigator bag with water until the 3. Connect the syringe to the plug for subarachnoid space surface reaches to the 200mL line. on the opposite side of the irrigator bag tube. Insert the syringe, turn clockwise and lock in place.
- Page 6 Preparation Before training 4 Preparation of the US puncture pad (Epidural) * Epidural space is designed to be lled with water for better sonographic imaging. Skip this process if you would like to perform loss of resistance technique. 1. Open the lid and fill the bottle with water till 1/3 of its hight.
- Page 7 Preparation Before training 5 Set the puncture pad in the manikin 1. Hold the puncture pad by the plastic edges and insert into the lower torso manikin. * Be careful not to fold the tubing. 6 Attach the skin cover to the lower torso manikin 1.
- Page 8 Training 1 Place the lower torso manikin on a support base ventral side The higher side comes to the head head end end of the manikin. dorsal side head end higher lower The sitting position support base is designed to come the front end of the lower torso manikin.
-
Page 9: After Training
After Training 1 1 After Training 1. Wipe off any remaining ultrasound gel from 2. Remove the ultrasound skin cover. the skin or manikin using wet tissues. a. Disengage the magnets at the two adjacent corners. Be sure to hold the magnets and not to pull by the skin. - Page 10 After Training 1 After Training Remove water from subarachnoid space ● 4. Connect a syringe filled with air to the plug for 5. Open the clamp. subarachnoid space of the puncture pad. 6. Slowly push air from the syringe into the water-filled 7.
- Page 11 After Training 1 After Training Cleaning and Storage ● 10. Remove the tube attached to the puncture pad. 12. Cover the surface of the puncture pad with 11. Please be sure to wipe all remaining ultrasound gel on the ultrasound puncture pad with wet a clear plastic sheet and press out any remaining air between the sheet and pad.
- Page 12 Ink marks on the models will be irremovable. For inquiries and service, please contact your distributor or KYOTO KAGAKU CO., LTD. The contents of the instruction manual are subject to change without prior notice. No part of this instruction manual may be reproduced or transmitted in any form without permission from the manufacturer.
- Page 13 モデル表面に印刷物などが直接触れないよう にしてください。 樹脂表面にインクが吸収されて消えなくなります。 M43E 超音波ガイド下腰椎・硬膜外穿刺シミュレータ 取扱説明書 Contents 目 次 ご使用の前に ● ご使用前の確認とご注意 準備 P.2-6 ● 実習 ● 後片付け P.8-10 ● このたびは、当社の「超音波ガイド下腰椎・硬膜外穿刺シミュレータ 」をお買い上げいただき、 誠にありがとうございます。本製品は、超音波ガイド下での腰椎・硬膜外穿刺手技をトレーニング できるシミュレーションモデルです。医学教育用の実習教材としてご使用ください。 特 長 ● ・超音波ガイド下で腰椎穿刺に必要なランドマークを確認することができます。 ・側臥位・座位の実習姿勢が設定できます。 ・半透明な穿刺パッ ドのため、 針の走行を直接確認できます。 ※ 明瞭な画像を得るため、硬膜外腔に水を入れる仕様になっています。抵抗消失法を実習される場合は、 この注水手順を省略してご使用ください。...
- Page 14 ご使用の前に ご使用前の確認とご注意 セット内容 ご使用の前に、 構成品が全て揃っているかご確認く ださい。 モデル本体 超音波用穿刺パッ ド 超音波用模擬皮膚 硬膜外穿刺用ボトル e. シリンジ f. スタンド g. 貯水袋 h. 専用固定台 : 側臥位用 専用固定台 : 座位用 専用ケース 取扱説明書 ※ 超音波ガイド下実習には必ず超音波用模擬皮膚をご使用く ださい。 ※ モデル本体は別売の「M43B 腰椎・硬膜外穿刺シミュレータ ルンバールくんⅡ」と共通です。 ● 取扱いにご注意ください。 ● 中性洗剤、石鹸水で拭き取ってください。 特殊軟質樹脂を使用しているため、無理な脱着・取扱 モデルの汚れは、中性洗剤又は石鹸水を含ませた いをされた場合、破損の原因となります。 布で拭き取ってください。シンナーなどの有機溶 剤は、絶対に使用しないでください。...
- Page 15 準 備 穿刺パッドの取り外し 1 ※納品時は写真のようにセットされています。 1. 模擬皮膚の磁石部をはずし、 モデル本体から 2. 穿刺パッド表面に貼ってある保護用透明 模擬皮膚を取り外します。 シートを片方からゆっくりとはがします。 ※ 模擬皮膚は、写真のように必ず両手でマグネット部を持って取り外してください。 ※ 模擬皮膚を持って取り外さないでください。 3. 穿刺パッドはプラスチックの縁を両手で持って モデル本体から持ち上げてはずします。 2...
- Page 16 準 備 2 スタンドの組立 2. 貯水袋をスタンドにセットします。 1. スタンドを組み立てます。 3 超音波用穿刺パッドの準備(腰椎穿刺) ● 超音波用穿刺パッド シリンジ接続用プラグ(くも膜下腔) シリンジ接続用プラグ (硬膜外腔) 貯水袋接続用 コネクター (くも膜下腔) 硬膜外用ボトル 接続用コネクター 1. 貯水袋のチューブの先端を超音波穿刺パッドの 貯水袋接続用コネクターに接続します。 ※実習中にチューブがはずれないよう、チューブ はコネクターにしっかり差し込んでください。 チューブはここまで 差し込みます 穿刺 パッド 3...
- Page 17 準 備 3 超音波用穿刺パッドの準備(腰椎穿刺) 2. 貯水袋の 200mL の線のところまで水を 3. 穿刺パッドの貯水袋を接続した逆側のくも膜下腔用 入れます。 のプラグに空のシリンジを接続します。シリンジの 先端をプラグに押し込みながら、時計方向に回して 接続します。 200mL 4. チューブコックを開けます。 押し込みながら時計方向に回転 穿刺 パッド チューブコックを開く はずす場合は逆回転 シリンジ 5. シリンジをゆっくり引いて、貯水袋の水を穿刺パッドの中に注入します。パッド内のくも膜下腔 チューブ内に気泡が残らないよう、パッドを少し傾けて、シリンジをゆっくり引き続けてください。 パッドの裏側を見ると、くも膜下腔チューブ内に気泡が残っているかを確認できます。 6. チューブコックを閉じます。 7. シリンジを半時計方向に回転させ穿刺パッドから 取り外します。 チューブコックを閉じる 4...
- Page 18 準 備 超音波用穿刺パッドの準備(硬膜外穿刺) 4 ※ 明瞭な画像を得るため、硬膜外腔に水を入れる仕様になっています。抵抗消失法を実習される場合は、 この注水手順を省略してご使用ください。 1. 硬膜外用ボトルの蓋をはずし、 ボトル内にΙ/3 程度水を入れます。それから蓋を閉めます。 蓋の開け閉めはボトルを回して行ってください。 ※ 蓋側を回すとチューブが破損する恐れがあります。 蓋側 2. 硬膜外用ボトルのチューブの先端を、 穿刺パッド 3. 空のシリンジを穿刺パッドの硬膜外腔用の の硬膜外腔用のコネクターに接続します。 プラグに接続します。シリンジは時計方向に回 して接続します。 シリンジ はずす場合は逆回転 穿刺パッド 4. ゆっくりとシリンジを引いて、パッド内の硬膜 押し込みながら時計方向に回転 外腔のチューブ内に水を入れます。チューブ 5. シリンジを反時計方向に回して、穿刺パッド 内に気泡が残らないよう、パッドを少し傾け から取り外します。 てシリンジをゆっくり引き続けてください。 5...
- Page 19 準 備 5 超音波用穿刺パッドの挿入 1. 穿刺パッドのプラスチックの縁を持ち、モデル 本体内に挿入します。 ※ チューブを挟み込んだり、折り曲げたりしないよう注意してください。 6 超音波用模擬皮膚の取り付け 1. 模擬皮膚の裏側の記号 (L :左, R :右、 ↑ :上 ) 2. まず模擬皮膚の2ヶ所のコーナーを磁石でモデル でモデル本体に合わせる方向を確認します 本体に取り付けます。次に手で皮膚を押さえ、皮膚 とパッドの間に気泡が残らないようにしながら逆側 の2ヶ所の磁石で皮膚を固定します。 ※ 方向を合わせる記号は模擬皮膚裏面に表示しています。 ※ 時間がたつと穿刺パッド 表面の接着性が弱くなって きます。 その場合は超音波用ゼリー をパッドの表面に塗布して 皮膚が密着しやすいように してください。 ※ 実習後保管される前に残った ゼリーは完全に拭き取って ください。ゼリーが残った まま乾燥すると、パッドや 皮膚などが傷んでしまう場合...
- Page 20 実 習 1 専用固定台にモデル本体をセット 腹側 頭側 高いほうが頭側です 背側 頭側 高い 高い 低い 低い 座位用の固定具は、高くなっているほうの端を モデルの前端に合わせるように配置します。 腹側 腹側 高いほうが腹側です 背側 高い 高い 低い 低い 2 実 習 実習項目 超音波用皮膚は皮膚マーカーを使用でき、消すこともできます。 超音波ガイド下腰椎穿刺 ○ 超音波用皮膚以外には使用しないでください。インクが消せなくなります。 超音波ガイド下硬膜外穿刺 ○ 髄液採取・髄圧測定 腰椎穿刺 ● ○ 実習中は貯水袋のチューブコックは 開けたままの状態にしてください。 ※貯水袋の水が無くなった場合は 補充してください。 硬膜外穿刺 ●...
- Page 21 後片付け 1 1 後片付け 1. 模擬皮膚やモデル本体に残ったゼリーはウェット 2. 模擬皮膚を取り外します。 ティッシュ等できれいに拭き取ってください。 ① 模擬皮膚の2ヶ所の磁石部分を持って はずし、皮膚を持ち上げます。 ※皮膚を持って取り外さないでください。 ② 模擬皮膚はゆっくりとをはずしてください。 ※ 作業は必ず両手で行ってください。残っている 2ヶ所の磁石も一つづつはずしてください。 3. 穿刺パッドはプラスチックの縁をもって、 ※皮膚を引っぱってはずさないでください。 モデル本体より取り出してください。 8...
- Page 22 後片付け 1 後片付け くも膜下腔からの水の排出 ● 4. 空気を溜めたシリンジを穿刺パッドのくも膜下腔用 5. チューブコックを開きます。 のシリンジ接続用プラグに接続します。 6. ゆっくりとシリンジ内の空気を押し出し、パッド内 7.チューブコックを閉じます。 の水を排出します。パッド内の水が無くなるまで 作業を行ってください。 硬膜外腔からの水の排出 ● 8. 超音波用ボトル内の水を排出します。ボトルの 蓋はボトル側を回してはずしてください。 9. 空のシリンジを穿刺パッドの硬膜外腔用のシリンジ接続用プラグに接続します。ゆっくりと シリンジを引いて、パッド内の水が無くなるまで作業を行ってください。 9...
- Page 23 後片付け 1 後片付け 清掃と保管 ● 10. 穿刺パッドに接続していたチューブを取り外します。 11. 穿刺パッドに付着しているゼリーをウェット 12. 穿刺パッドの表面に透明シートをかぶせます。 テュッシュ等できれいに拭き取ります。 パッド表面とシートの間に空気が残らない ようにしてください。 ※ 穿刺パッドに付着しているゼリーは水で洗い流し、きれいに拭き取ってください。ゼリーが残っていると パッド表面で層をつくり超音波画像に悪い影響を与えます。 また、拭き取る場合は強くこすったりしないでください。表面に傷が付いたり、超音波画像に影響を与える 可能性があります。 13. 貯水袋の水を廃棄します。 14. 透明シートをかぶせた穿刺パッドをモデル 本体に入れて保管してください。...
- Page 24 モデル表面に印刷物などが直接触れないようにしてください。 樹脂にインクが吸収されて消えなくなります。 ・本製品についてのお問い合わせや不具合等ございましたら、お手数ですがお買い上げの販売店、もしくは下記 (株) 京都科学まで御連絡ください。 URL http://www.kyotokagaku.com e-mail rw-kyoto@kyotokagaku.co.jp ● ● ■ 本社・工場 ■ 東京支店 〒612 -8388 京都市伏見区北寝小屋町15番地 〒113-0033 東京都文京区本郷三丁目26番6号 TEL:075- 605 -2510 (直通) NREG本郷三丁目ビル2階 FAX:075 -605 - 2519 TEL:03-3817-8071 (直通) 2018.04 FAX:03-3817-8075...
Need help?
Do you have a question about the M43E and is the answer not in the manual?
Questions and answers