Table of Contents
Advertisement
Quick Links
MW8
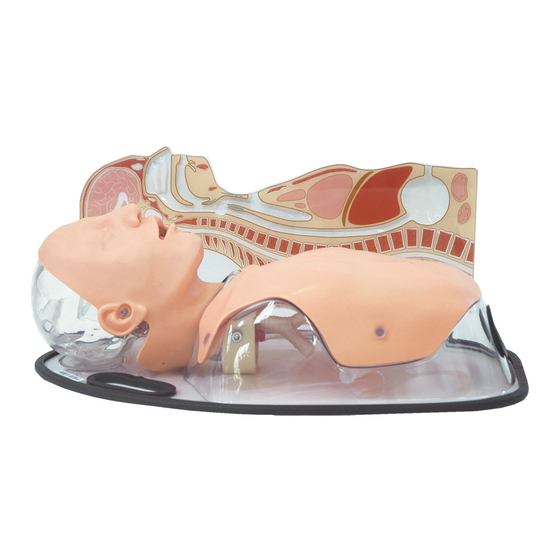
経管栄養シミュレータ
(経鼻・経口・胃ろう)
Tube Feeding Simulator
(NG, OG and PEG)
取扱説明書
Instruction
Manual
目 次/Contents
● 日本語取扱説明書
English Manual
●
モデル表面に印刷物などが直接触れないよう
にしてください。
樹脂表面にインクが吸収されて消えなくなります。
Caution
Don't mark on the model and other components
with pen or leave printed materials contacted on
their surface.
Ink marks on the models will be irremovable.
P.1∼P.14
P.17∼P.30
Advertisement
Table of Contents

Related Manuals for Kyoto Kagaku MW8


Summary of Contents for Kyoto Kagaku MW8
- Page 1 モデル表面に印刷物などが直接触れないよう にしてください。 樹脂表面にインクが吸収されて消えなくなります。 Caution Don’t mark on the model and other components 経管栄養シミュレータ with pen or leave printed materials contacted on their surface. (経鼻・経口・胃ろう) Ink marks on the models will be irremovable. Tube Feeding Simulator (NG, OG and PEG) 取扱説明書 Instruction Manual 目 次/Contents...
- Page 2 モデル表面に印刷物などが直接触れないよう にしてください。 樹脂表面にインクが吸収されて消えなくなります。 経管栄養シミュレータ (経鼻・経口・胃ろう) 取扱説明書 目 次 ● はじめに P.1 製品の特徴とご使用上の注意 P.2 ● ご使用の前に セット内容 ● 実習の準備(ベッドでの実習) P.3∼P.4 ● 実習の準備(テーブルでの実習) P.5∼P.6 ● 実習にあたって P.7∼P.8 ● ご使用後の後片付け P.9∼P.13 ● 故障かなと思ったら P.14...
- Page 3 はじめに 製品の特徴とご使用上の注意 はじめに このたびは、当社の「経管栄養シミュレータ」をお買い上げいただき、まことにありが とうございます。本製品は、経管栄養法(経鼻・経口・胃ろう)手技上達を目的とした シミュレーションモデルです。医学・看護教育の実習教材としてご使用ください。 必ずお読みください 本来の使用目的以外にはご使用にならないでください。また、取扱説明書に記載された方法以外 でのご使用による万一の破損や事故に関して、当社は責任を負いかねますのでご了承ください。 特 長 半座位の姿勢で、カテーテルの挿入や栄養剤投与といった実習が可能です。 経鼻栄養カテーテルや胃ろうカテーテルの位置確認に関する実習は、心窩部での気泡音聴取 や注入器での胃液の吸引が可能です。 (実際の胃液を吸引する事はできません) 解剖学的に正確な内部構造を再現し、本体の透明部分からは目視により、経鼻・経口より のカテーテルルートや位置の確認を可能にしました。 実際に使用されている栄養剤の注入が可能です。 ● 取り扱いにご注意ください。 ● 中性洗剤又はアルコールで拭き取って ください。 特殊軟質樹脂を使用していますので、落下や モデルの汚れは水又は中性洗剤で、汚れが落 強い衝撃を与えると破損の原因となります。 ちにくい場合はアルコールで拭き、ベビーパウ また皮膚部の脱着の際、無理な負荷がかかり ダーを塗布しておいてください。シンナーなど ますと破損しますので十分ご注意ください。 の有機溶剤は絶対に使用しないでください。 ● 印刷物をモデル表面におかないで ● ボールペンやサインペンで書き込まな ください。 いでください。 モデル表面に印刷物などが直接触れないよう サインペン、ボールペンなどでモデルに書き にしてください。 込むと、インクが吸収されて消えなくなりま 樹脂にインクが吸収されて消えなくなります...
- Page 4 ご使用の前に セット内容 セット内容と各部の名称 ご使用の前に、構成品が全て揃っているかご確認ください。 経管栄養胸部シートは肋骨や ※ g 肺、心臓、気管などの位置を 透明シートに表示したもので、 皮膚をはずしたモデル本体に かぶせて、解剖学的な骨格や 臓器の位置関係を確認できる 実習前の事前学習用のシート です。 モデル本体 1台 f. 経管栄養ルートモデル 1台 支持台(30°設定) 1式 g. 経管栄養胸部シート 1点 排水用ホース 1点 潤滑剤 1点 漏斗 1点 取扱説明書 e. ディスポカップ 1点 2...
- Page 5 実習の準備 準備(ベッドでの実習) ベッドでの実習 1 1. 排水用ホースをモデル本体の胃のホース接続部に接続します。 (ア)まずモデル本体より皮膚部をはずして胃の部分が見えるようにします。 (イ)次にモデル本体の手前側を少し持ち上げ、胃を片手で持って本体側面から排水用ホースを つなぎます。排水用ホースは根元までしっかり差し込んでください。 (この時、本体を持ち上げたところに箱など(例:ティッシュペーパーの箱など)を差し込 で作業をしていただくと、本体内部の胃が持ちやすくなります。 ) 排水ホースの接続時に、胃を持ったままモデル本体の外枠を持ち上げないで ください。 胃と胃ろう部の蓋が外れてしまう恐れがあります。 2. ベッドを 30 度に拳上し、それからモデル本体をセットしてください。 30° 3...
- Page 6 実習の準備 準備(ベッドでの実習) ベッドでの実習 1 3. 排水用ホースをバケツに入れてください。バケツは別途準備してください。 4. 胃に水を注入します。皮膚を取り外してから漏斗を胃ろう部の穴に差し込み、水約 300 ㏄ 入れてください。胃に水を注入後、取り外した皮膚をボディに取り付けると準備終了です。 4...
- Page 7 実習の準備 準備(テーブルでの実習) 2 1. 排水用ホースをモデル本体の胃のホース接続部に接続します。 (※ここまでは P3「ベッドでの実習」と同じ作業です。 ) 皮膚部をはずします。 モデル本体の下に箱などを差し込みます。 胃の部分を持ち。排水ホースを差し込みます。 皮膚をモデル本体に取り付けます。 排水ホースの接続時に、胃を持ったままモデル本体の外枠を持ち上げ 胃と胃ろう部の蓋が外れてしまう恐れがあります。 ないでください。 2. 支持台を組み立てます。 三角形の板 2 枚を平行に並べて、切り込み 2 か所に支持用固定具を取り付けます。 3. 作成した支持台の上にシミュレータを置いてください。この時、 ○印部分が支持具に あたるようにして、モデル本体を三角形の角度に合わせて置いてください。 5...
- Page 8 実習の準備 準備(テーブルでの実習) 2 4. 排水用ホースをバケツに入れてください。バケツは別途準備してください。 5. 胃に水を注入します。皮膚を取り外してから漏斗を胃ろう部の穴に差し込み、水約 300 ㏄ 入れてください。胃に水を注入後、取り外した皮膚をボディに取り付けると準備終了です。 6...
- Page 9 実習にあたって 実習手順・ご注意 経鼻経管栄養法 1 1. カテーテル挿入 経鼻栄養カテーテルを挿入するときは、カテーテルとモデル本体の鼻腔内に潤滑剤を十分 に塗布してください。不十分だと挿入が困難になります。潤滑剤は付属のものをご使用くだ さい。ゼリー状の潤滑剤などは内部で乾燥凝固して残留する事がありますので使用しないで ください。 カテーテルは 14Fr を使用してください。14Fr よりも太いカテーテルを使用 しますと、挿入困難になることがあります。 このモデルは、挿入の長さ約 50cm で胃に到達するよう設計されています。 カテーテルのテープ固定を実習される場合、モデル本体の皮膚は樹脂製のため、カテーテル 全周を巻き込む固定方法(Ω型固定)はできません。 頬部のテープ固定としては、皮膚の上に土台としてテープを 1 枚貼付した上に、カテーテルを 固定する方法が可能です。 1. テープを剥離ライナー(台紙)の切り目が横になるようにおきます(横に伸びる方向です) 。 それから縦 5cm× 横 4.5cm のサイズとなるよう、テープを 2 枚カットします。そのうちの 1 枚をひと回り小さく切ります。 (おおよそ縦 4.5cm× 横 4cm になります。 ) 2.
- Page 10 実習にあたって 実習手順・ご注意 胃ろう法 1. 胃ろうカテーテルの固定 このシミュレータでは、カテーテルは シリンジ5ml程度の空気量で固定し てください。蒸留水や水などの液体は 使用しないでください。 (※5ml の数値は二プロ社製の 20Fr のボタン型 バルーンカテーテルを使用した場合の目安です。 他社の製品をご使用の場合はカテーテルが抜け ない程度に空気を注入してください。 ) 栄養剤注入後の処理 1. 栄養剤注入後の処理 経鼻経管栄養法、胃ろう法のどちらも続けて栄養剤注入実習を行う時は、栄養剤 1 パックを 注入するたびに、胃の中に貯留している液体を廃棄してください。その際には、まずモデル 本体をベッドの端の方に寄せて、両手でモデル本体を手前側に傾け、排水ホースより胃の中 の栄養剤を排出してください。それからモデルを元の状態に戻し皮膚をはずしてから、改め て水約 300 ㏄を胃の中に注入してください。 8...
- Page 11 ご使用後の後片付け 後片付け 胃の中の栄養剤や水の排出 実習後は胃の中にたまっている栄養剤や水を排出します。 (ベッドでの実習の場合) まずモデル本体をベッドの端の方に寄せて、両手でモデル本体を持ち、モデル本体を手前側に 傾け、排水ホースより胃の中の栄養剤を排出してください。 (机での実習の場合) 支持台の上に設置しているモデル本体を両手で持ち、モデル本体を手前側に傾け、排水ホース より胃の中の栄養剤を排出してください。 モデル本体を持ち上げ傾ける場合は十分に注意して行ってください。 モデル本体に2か所持ち手部分を設けていますのでご活用ください。 9...
- Page 12 ご使用後の後片付け 後片付け 栄養カテーテル内の洗浄 2 栄養剤を注入したカテーテルやチューブを本体より取り外す前に、簡単な洗浄をしてください。 (経鼻栄養カテーテルの場合) カテーテルチップ型シリンジで、経鼻栄養カテーテル内に微温湯を注入しカテーテル内を きれいにしてください。洗浄後、経鼻栄養カテーテルをモデル本体より抜去します。 (胃ろう栄養カテーテルの場合) 胃ろう接続チューブにカテーテルチップ型シリンジをつなぎ、微温湯を注入してチューブや カテーテル内をきれいにしてください。洗浄後、胃ろう接続チューブやカテーテルをモデル 本体より抜去します。 固定した胃ろうカテーテルの場合には、シリ ンジをカテーテルのバルブにゆっくり差し込 み、 バルーン内の空気を抜き取り、完全に収 縮させます。 そしてゆっくりと慎重に引っ張り、抜去して ください。...
- Page 13 ご使用後の後片付け 後片付け 胃の中の洗浄と排水ホースの取り外し 3 カテーテルの抜去後、改めて胃の中を微温湯で洗浄します。モデル本体を手前側に傾け排水し ます。排水用ホースから栄養剤が混じっていない透明な液体がでるまで胃の中を洗浄してく ださい。洗浄後排水用ホースを取り外します。 (ベッドの場合) (机の場合) 洗浄後排水用ホースの取り外しはフラットな テーブル上にモデル本体を移動してからの方 が作業は楽に行えます。 排水ホースの取り外し時に、胃を持ったままモデル本体の外枠を持ち 上げないでください。 胃と胃ろう部の蓋が外れてしまう恐れがあります。...
- Page 14 ご使用後の後片付け 後片付け 構成部品の取り外し 4 1.胃ろう部を反時計回りに回転して、胃部より取り外してください。 2. 次にボディの片側を持ち上げ隙間をつくり、食道部を頸部から取り外します。この時片手で 頸部を支え、もう一方の手で食道部を持ち、ひっぱりながら食道部をはずします。 3.食道側と胃側のワンタッチジョイント部を持ち、胃部を引っ張って取り出してください。 胃ろう部 胃部 モデル本体 食道部 取り外した構成部品 洗浄に関して 部品をふり洗いし、充分乾燥させてください。必要時、次亜塩素酸ナトリウム(ミルトンなど) で消毒をしてください。(消毒時間や方法は消毒剤のホームページなどをご参考ください)。...
- Page 15 ご使用後の後片付け 後片付け 部品のセット 5 1. 胃を取り付けます。食道部チューブの下方向がアールになるように持ちます。食道側の ワンタッチジョイントと胃部を持ち、胃の穴に食道部をカチッというまで差し込みしっかり 固定してください。 正しい取り付け方向 誤った取り付け方向 2. 食道部を頸部に差し込むように取り付けます。この時片手で頸部を支え、もう一方の手で 食道部を持ちしっかり差し込みます。次に胃部を片手で持ち、胃ろう部を時計回りに回転 して胃部に取り付けます。 3. 皮膚を取り付ければセット完了です。各部品のセットはそれぞれ洗浄後十分に乾燥させて から行ってください。...
- Page 16 故障かな? 修理依頼前の確認 と思ったら ご使用中にトラブルが発生した場合は、下の表にしたがって確認して下さい。それでも解決しない 場合は、お買い上げの販売店もしくは㈱京都科学(TEL075-605-2510 又は 03-3817-8071)まで ご連絡ください。 症状 原因 対策・対処 カテーテル径が、推奨している 実習用の栄養チューブは14Fr、胃瘻カテー カテーテルよりも太い。 テルは20Frを使用してください。 カテーテルが挿入でき ない。 カテーテルに潤滑剤を塗布して カテーテルとシミュレータの鼻腔内に、 いない。 当社が指定する潤滑剤をご使用ください。 胃に水を注入していない。 胃に水を約300㏄注入してください。 胃ろうカテーテルを空気でバルーン固定して 胃ろうカテーテルを空気でバル 気泡音が聞こえない。 ください。 ーン固定 していない。 食道部の取り付け角度が誤って 食道部の取り付け角度を確認し、再度食道 いる。 部と胃部を取り付けてください 胃液の吸引ができない。 胃に水を注入していない。 胃に水を約300㏄注入してください。 栄養剤を1パック注入するたびに、モデル 胃液を吸引できるが、 前回の実習で使用した栄養剤が 本体を手前側に傾けて、胃に貯留している 濁った色である。...
-
Page 17: Table Of Contents
Caution Don’t mark on the model and other components with pen or leave printed materials contacted on their surface. Ink marks on the models will be irremovable. Tube Feeding Simulator (NG, OG and PEG) Instruction Manual Contents Introduction ● Set includes/DOs and DON’Ts P.16 Before you start ●... -
Page 18: Introduction
Manufacturer s note ’ This Tube Feeding model (MW8) is a training model for teaching and learning Tube Feeding (Intranasal, Oral and PEG) technique in medical and nursing situation. This training model is designed for training in medical and nursing education. -
Page 19: Set Includes/Dos And Don'ts
Before You Start Set includes Set Includes Before your first use, ensure that you have all components listed below. g Male Torso 1 piece Tube Feeding routes model 1 piece Tube Feeding chest sheet Support Base 1 piece 1 piece Silicone-based lubricant 1 piece Drain Hose... -
Page 20: Preparation (On The Bed
Preparation Training on the bed Training on the bed 1 1.Connect the drain hose to stomach parts of the torso model. 1) Remove the skin on the body in order to see the stomach parts inside. 2) Hold the right side of the torso model and put something (e.g. tissue box) among the left side of the model and the table. -
Page 21: Preparation (On The Table
Preparation Training on the bed Training on the bed 1 3. Put the end of the drain hose into the bucket. 4. Fill the water in the stomach. Insert the funnel into PEG hole and ll about 300cc water. Attach the skin on the model. - Page 22 Preparation Training on the table 2 1.Connect the drain hose to stomach parts of the torso model. 1) Remove the skin on the body in order to see the stomach parts inside. 2) Hold the right side of the torso model and put something (e.g. tissue box) among the left side of the model and the table.
- Page 23 Preparation Training on the table Training on the table 2 4. Put the end of the drain hose into the bucket. 5. Fill the water in the stomach. 1) Insert the funnel into PEG hole and ll about 300cc water. 2) Attach the skin on the model.
-
Page 24: Training Procedure
Training Training procedure Intranasal tube feeding 1 1.Inserting catheter Spray the silicone-based lubricant to catheter and also cavity of nose. Shortage of lubricant will cause it di cult to insert catheter. Do not use the jelly lubricants or other one because it will be dried and remain in the model. We recommend 14 Fr catheters suits for this model. - Page 25 Training Training procedure PEG procedure 1. Fixing PEG catheter Fix the balloon catheter for PEG by about 5ml air. Do not use water or any liquid. 5 ml is the guide value for our recommended balloon catheter for PEG “NIPRO 20Fr PEG button catheter”. For other catheter, ll the air not to remove the catheter from PEG hole.
-
Page 26: After Training
After Training After Training Drain the content in the stomach Drain the content in the stomach when the training nish. 1) Move the model to the edge of the bed or table. 2) Hold the model with both hand and tip to drain the content. (Training on the bed) (Training on the table) - Page 27 After Training After Training Cleaning the catheter 2 Before pull out the catheter, do pre-cleaning the catheter and tube. (NG tube) Inject the mild hot water to NG tube by syringe and clean the inside of catheter. Then, pull out the NG tube from the torso model.
- Page 28 After Training After Training Cleaning the stomach and remove the drain hose 3 After catheters removed, clean the stomach with mild hot water. Repeat cleaning the stomach until the water does not include nutrients. Then, remove the hose from the stomach part. (Training on the bed) (Training on the table) Removing the stomach part is easier...
- Page 29 After Training After Training Dismantling the parts 4 1. Dismantle the stomach by twisting the PEG part in counterclockwise. 2. Hold the cervical part from under the model and pull the esophagus from cervical part. 3 .Remove the esophagus from the stomach. PEG part stomach model torso...
- Page 30 After Training After Training Setting the parts 5 1. Attach the stomach with esophagus as photos below. 2. Insert the esophagus into the cervical part steadily. Then attach the PEG part to the stomach by twisting in clockwise. 3.
-
Page 31: Trouble Shooting
Trouble Trouble shooting shooting Quick check-up before calling the customer service. Use the table if you have problems using the simulator. Look in this section for a description of the problem to find a possible solution. FAQ s Q. Cannot insert the catheter. A1. - Page 32 Don’t mark on the model and other components with pen or leave printed Caution materials contacted on their surface. Ink marks on the models will be irremovable. ・For inquiries and service, please contact your distributor or KYOTO KAGAKU CO., LTD. URL http://www.kyotokagaku.com e-mail rw-kyoto@kyotokagaku.co.jp ●...
Need help?
Do you have a question about the MW8 and is the answer not in the manual?
Questions and answers