Table of Contents
Advertisement
Quick Links
MW10
Cardiology Patient Simulator "K" ver.2
● Production Supervision
Japanese Educational Clinical Cardiology Society
Instruction
Manual
Table of Contents
●
Included parts
●
●
③ Softwares
Simulation Software Operation
② Select Simlulator "K" unit to operate
Playlist Maker Operation
① Select "Playlist maker"
Warnings
●
Turn off main power
●
P.1
P.2-3
P.4-6
P.7-9
P.10-11
P.12-13
P.14-16
P.17
P.18-22
P.23-24
P.25
P.26
Advertisement
Table of Contents

Related Manuals for Kyoto Kagaku MW10


Summary of Contents for Kyoto Kagaku MW10
-
Page 1: Table Of Contents
MW10 Cardiology Patient Simulator “K” ver.2 ● Production Supervision Japanese Educational Clinical Cardiology Society Instruction Manual Table of Contents ● Introduction Before use Warning/ Caution P.2-3 Included parts P.4-6 Included parts Parts names and functions Training Skills P.7-9 Training skills of Simulator “K” Training skills content of Simulator “K” ●... -
Page 2: Introduction
Introduction ● Before use MW10 Cardiology Patient SImulator “K” ver.2 is designed for medical education training. Please do not use the product for other purposes. Any other use not in accordance with the enclosed guidelines is strongly discouraged.The manufacturer holds no no responsi- bility for any accidents or damages resulting from such use. For questions regarding this simulator, please contact our distributor in your area or KYOTO KAGAKU. Our contact information can be found on the back cover of this manual. ● Features ・Sounds are recorded from actual patients and played using a high quality sound system. ・ An actual stethoscope can be used. ・88 examples of comprehensive simulation of patients with heart diseases and arrhythmias. ・Up to five cardiology simulators can be controlled by one wireless tablet. ・The error indicator facilitates maintenance of the system to keep Simulator “K” in its best condition. -
Page 3: Warning/ Caution
This can lead to a major fire hazard. This can lead to fire hazards and/or Please contact your local distributor or electrocution. Kyoto Kagaku Co., LTD for repairs. Please do not handle the power cord with wet Please keep flammable materials away from hands. - Page 4 Introduction Caution Caution ● ● Please do not apply excessive force or If you are moving the Simulator “K”, carefully pressure onto the model. lift by the handle. Please do not lift by the body and arm. Prease prevent applying force onto the model to avoid damages.
-
Page 5: Included Parts
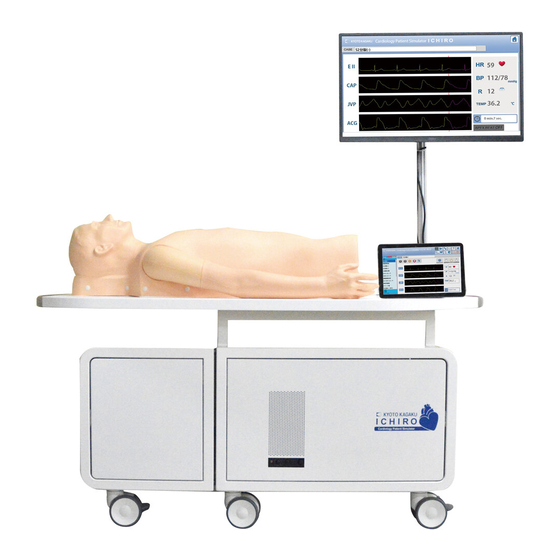
Introduction Included Parts Included Parts Before you first use the Simulator “K” , ensure all components listed below are included in the unit. The Compressor 1 Male torso Controller-PC table 1 External speaker these 2 sets are built in controller-PC table and are not removable. 1 Set of PC/keyboard/mouse 1 LCD monitor 1 Control PC 1 Rib sheet 1 Storage cover 4 Textbooks Instruction Manual... -
Page 6: Parts Names And Functions
Introduction Parts Names and Functions Parts Names and Functions of the unit LCD monitor ■ Displays patient information such as the electrocardiogram and the heart rate. The siplay on the monitor can be changed with t h e C o n t r o l P C t o a d j u s t f o r v a r i o u s curricula or student levels. - Page 7 Introduction Product Details Parts names and functions of the control PC ■ Touch-panel monitor ■ Power supply board (rear) To charge the Control PC, insert the power cable into its power supply board. ■ Keyboard ■ Control PC power Please lightly tap twice onthe panel...
-
Page 8: Training Skills
Training Training Skills Training Skills of Simuloator “K” Right Carotid Artery Left Carotid Artery Right Jugular Vein Left Jugular Vein Bronchial Sound Auscultation Area A P Aortic area A Pulmonic area P T Tricuspid area T Apex Beat Mitral area M M Vesicular Murmur Right Median Artery Left Median Artery Abdominal Respiration Right Radial Artery Left Radial Artery Femoral Artery Training Skills Content of Simulator “K” Cardiology Patient Simulator "K" has two variations of cardiological examination training systems, MODE 1 and MODE 2, MODE 1 (36 cases)... - Page 9 Introduction Training Skills Heart Sounds and Murmurs In all cases, listening can be performed at the four primary cardiac auscultation sites (Aortic, Pulmonic, Tricuspid and Mitral). Auscultation of first sound (S1) and second sound (S2) can be learned in relation to synchronized electrocardiogram, arterial pulses and jugular venous waves. ● Auscultation area A Aortic area Pulmonic area P T Tricuspid area M Mitral area Monitoring Screen Dynamic Charts of Electrocardiogram (ECG), Jugular Venous Pulse (JVP), Carotid Arterial Pulse (CAP) and Apex Cardiogram (ACG) can be displayed. Ecah chart can be freeze-framed for in-depth learning. Case explanation windows for self-directed learning are provided. Play Pause Phonocardiogram Tracheal and bronchial breath sounds and abdominal movement are simulated to facilitate understanding of respiratory related phenomena such as Rivelo -Carvallo sign, respiratory splitting and timing of murmurs.
- Page 10 Training Training Skills Palpation of Pulse at 8 sites Observation of Jugular Veins The carotid, medial, radial and femoral arteries Pulsation of jugular venous waves can be can be palpated at eight sites on the manikin. observed on both sides. The strength and timing Slight variations of the arterial pulse waves under of “a” and “v” waves vary with cases. different cardiac conditions or arrythmias can be detected by palpation. Palpation of Cardiac Impulses Cardiac impulses can be palpated at sites of Right Ventricle, Left Ventricle and Dilated Left Ventricle. Training Skills Content of Simulator “K” Mode2 2)Electrocardiogram 1)Auscultation of heartsound Same as Mode1. The monitor will only display the Same as Mode1 electrocardiogram and heartbeat.
- Page 11 Preparation Preparation Turn on the main power. 1) Connect the power cable to the outlet. ■ Control System s Main power ʼ ー:Power is ON ○ : Power is OFF Outlet Right side ■ Power plug 2)Turn on the control system s main power. ʼ ■ Control System s Main power ʼ ー:Power is ON ○ : Power is OFF Right side...
-
Page 12: Preparation Training
Preparation Preparation Training Software 2 Turn on the control PC power 1)Turn on the control PC power on the right side. ■Control PC power switch Please confirm that the battery is charged before turning on the power. NOTES If the PC is out of battery power, connect the power cable to the control PC. *It is possible to use the control PC while it is connected to a power cable. ■ Power supply ※On the rear 2)The launch screen will be opened as shown below. -
Page 13: Operation Of The Software
Training Operation of the software 3 Confirming the wireless systems Please varify the icon of the wireless connection. *Default is set to wireless. Charactoristics of the wireless and the wired systems ■ Cable is unneccessary ■ Easy to transfer the control PC ■ Based on ambient environment such as other radio waves. - Page 14 Training Operation of the software 5 Softwares Simulator “K” has two softwares, “K2 Simulation” and “Playlist Maker.” P.14 ■ Starting up K2 Simulation software Simulator “K” Simulation Software All funstions of “K” are managed by this software. P.17 ■ Starting up Playlist Maker Playlist Maker “Playlist” of cases can be created. To create a playlist, 1)...
-
Page 15: ① Start Up Simulation Software
Training Operation of the software Start up simulation software FromTop Menu, please select “K2 simulation” icon. Select simulator “K” unit to operate Please tap a unit to operate and tap “OK.” “Blue” : The unit you have selected. “Orange”:The unit already connected to another control PC and cannnot be selected. “Grey” : The unit has not been selected or cannot select. Multiple operation P.18... -
Page 16: ③ Error-Checking System
When errors are detected, the following screen is displayed. ■ Confirmation of artery and venous system ■ Confirmation of heartbeat and respiratory sound ■ Confirmation of apex beat 2)When errors are detected, the following screen is displayed. Please confirm the error-checking results. If they are not “Normal, please contact your nearest retailer or KYOTO KAGAKU Co., Ltd. for error results. -
Page 17: ④ Start Up Simulation Software
Training Operation of the software 4 Start up simulation software Error-checking has been completed, and the software is ready to begin. For additional information on how to operate the Simulator “K” POINT Simulation Software, tap on the button. -
Page 18: ② Start Up "Playlist Maker
Training Operation of the software Select “Playlist Maker” Please tap “Playlist Maker” icon. Start up playlist maker Playlist maker is ready to use. For additional information on how to operate the POINT Simlator ”K” Simulation Software, tap on the button. -
Page 19: Multi-Unit Operation
Training Multi-unit operation Multi-unit operation ● To begin a synchronized multi-unit operation: Select the simulator units that will be used. They will be numbered from 1 to 5. (Simulator units already selected will be highlighted blue.) ● To operate multiple simulator units separately: Procedures will differ from that of multiunit operation under the same program. -
Page 20: ② Select Multiple Units To Operate
Training Multi-unit operation Select multiple units to operate When starting the simulation software, the screen below will appear. Then, please select units to operate. “Blue” : The unit you have selected. “Orange”:The unit already connected to another control PC and cannnot be selected. “Grey” : The unit have not selected or cannot select. Multiple operation example 1) For example, you are operating 5 Simulator “K” units. 2) 4 of the 5 units (“1”,“2”,“3”,“5”) are currently connected to the control PC. ① You are starting a synchronized operation with “1”,”2” and “5”. Please tap “1” ,” 2” and “5” icons, and the numbers will light in blue. Please confirm that “3” is the only number lighted in orange. - Page 21 Training Multi-unit operation If you want to cancel the synchronized operation with“5”, ② ① Please tap the number “5” to cancel selection. ② Please confirm that “1” and “2” are the only numbers lighted in blue. Blue: The unit you have selected. Grey: The unit you did not select or cannot select. ① Orange: The unit already connected to another control PC. (You cannot select this unit now) Then you want to operate unit “3”. ③ ① Please tap the numbers “1” and “2” to cancel selecting. ② Please tap the number “3” to select. Grey: The unit you did not select or cannot select. Blue: The unit you have selected. ② ① ① Orange: The unit already connected to another control PC. (You cannot select this unit now) Next page...
- Page 22 Training Multi-unit operation ④ You are starting a synchronized operation with “1”, “2” and “5” again. Unit “1” and “2” have been managed by synchronized operation, while, unit “5” was canceled from synchronized operation (example②). To make a synchronized operation with “1” , “2” and “5” again, please operate this way: 1)Please cancel selecting Unit “3” . ( “3” lights in orange.) ① Please stop the case. ② Unit “3” is canceled from selection. ① ② 2)Please stop the cases of unit “1” , “2” and “5” . ① Please select unit “1” and “2” ② Please stop the case. ② ① ① ③ Please cancel selecting unit “1” and “2” . ③ ③ ④ Please select unit “5” . ⑤ Please stop the case. ⑤ ④ 3) Please select unit “1” , “2” and “5” . 4) The units are ready to simulate a new case.
- Page 23 Training Multi-unit operation WARNING 1 For example, if you select units 3 and 5 with control PC B, you cannnot select those units with control PC A. In this case, turn off control PC B to disconnect the units 3 and 5. They should be able to connect with control PC A. WARNING 2 If you are working with a multi-unit operation, please do not attempt to select the same unit from various control PCs. Ex ) ① Control PC A selects Unit 1 ② Control PC A begins operating Unit 1 ③ Control PC B selects Unit 1 Control PC (A) Please beware of mistakes such as step ③. Two control PCs selecting the same unit may lead to system complications and data loss. Control PC (B)
-
Page 24: After Training
After training Exit K2 simulation software Exit simulation software 1)Please tap on the “Exit” icon at the right top. “Do you want to exit?” message appears. Please select “Yes.” 2)Please tap on the “Exit” icon at the top menu. “Do you want to exit?” message appears. Please select “OK.”... -
Page 25: ② Exit Playlist Maker
After training Exit playlist maker Exit playlist maker Please tap on the “Exit” icon at the right top. 1)Please tap on the “Exit” icon at the right top. 2)Please tap on the “Exit” icon at the right top. “Do you want to exit?” message appears. Please select “OK.”... - Page 26 After training Turn off main power 2 ʼ Turn off control system s main power Turn off control system s main power on the right side. ʼ ■ Control Systemʼs Main power ー:Power is ON ○ : Power is OFF Right side...
-
Page 27: Maintenance
Trouble Shooting Guide Maintenance Storage Trouble shooting Guide Please contact us. Storage ■Store the manikin covered with the cloth. ■Store the training set at room temperature, away from heat, moisture and direct sunlight. Storage under the temperature above 50 degrees C may reduce the performance quality of the simulator. - Page 28 Do not mark on the model and its components MW10 Caution with a pen or leave printed materials in contact with the model surface. Ink marks on the model are Cardiology Patient Simulator “K” ver.2 not removable. The contents of the instruction manual are subject to change without prior notice. No part of this instruction manual may be reproduced or transmitted in any form without permission from the manufacturer. Please contact manufacturer for extra copies of this manual which may contain important updates and revisions.
Need help?
Do you have a question about the MW10 and is the answer not in the manual?
Questions and answers