Table of Contents
Advertisement
Quick Links
MW14
Difficult Airway Management Simulator
Demonstration Model
Caution
Instruction
Manual
Contents
●
●
●
●
●
●
●
Do not mark on the model and other components
with pen nor leave printed materials contacted
on surface.
Ink marks on the models cannot be removed.
P. 1
P. 2
P. 3
P.4
P. 5
P. 6
P. 7
P.16
Advertisement
Table of Contents

Related Manuals for Kyoto Kagaku MW14


Summary of Contents for Kyoto Kagaku MW14
-
Page 1: Table Of Contents
Caution Do not mark on the model and other components with pen nor leave printed materials contacted on surface. Ink marks on the models cannot be removed. MW14 Difficult Airway Management Simulator Demonstration Model Instruction Manual Contents Introduction P. 1 ●... -
Page 3: Introduction
Should you have any questions on this simulator, please feel free to contact our distributor in your area or KYOTO KAGAKU at any time. (Our contact address is on the back cover of this manual) DOs and DON’Ts... -
Page 4: Before You Start
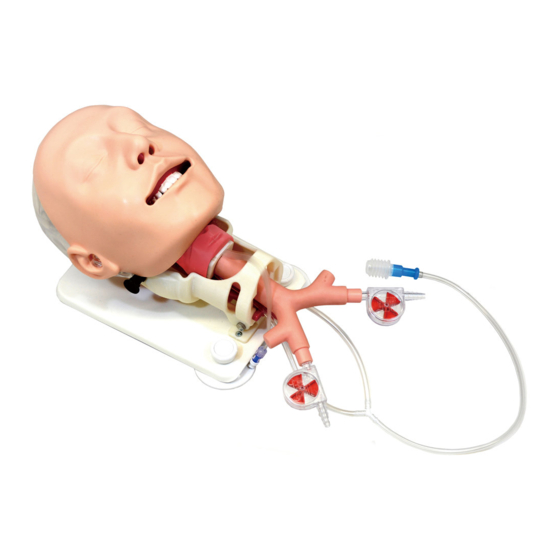
Before You Start Set includes Set Includes Before you start, ensure that you have all components listed below. d a. Torso body d. Syringe (50mL) b. Upper incisors 1 bag for model, instruction manual c. Lubricant Consumable code name code name parts Replacement tongue Ⅱ... -
Page 5: Before Training
Before training Check points before training 1 Check points before training 1. Open the mouth of the model to check the installation condition of the tongue. Ensure that the tongue has not fallen out from the pin. (When the product is delivered, the tongue has already been installed on the model.) The pin is fixed to the jaw side. -
Page 6: Preparation
Preparation Setting of DAM (Neck Flexibility) Neck Flexibility Change the range of motion of the neck with the black level-switching knobs on the both sides of the neck of the model. Turn the knobs while pulling them to the outside to adjust the depth to which the knobs are inserted. You can select either of two levels of difficulty: normal neck and rigid neck. -
Page 7: Setting Of Dam (Degree Of The Mouth Opening)
Setting of DAM Preparation (Degree of the Mouth Opening) Degree of the Mouth Opening Set the mouth opening limitation with the black level-switching knob on the top of the head of the model. Move the knob up or down while pulling it, and then release it on either of the indicated level lines to lock the setting. -
Page 8: Setting Of Dam (Neck Exibility)
Setting of DAM Preparation (Tongue Edema) Tongue Edema To adjust the condition of the swollen tongue, inject/extract air to/from the tongue by using the attached syringe to change the size of the tongue. The size of the tongue can be set in two levels: normal tongue and swollen tongue. 1. -
Page 9: Setting Of Dam (Laryngospasm)
Setting of DAM Preparation (Laryngospasm) Laryngospasm By pressing the pump on the end of the tube attached to the main body, you can simulate the laryngospasm. 1. The condition of laryngospasm is simulated while the pump is being pressed. The condition returns to normal when the pump is released. -
Page 10: Training
Training skills Training Fixation of the model Conduct any training on a table with a at and smooth surface. Turn the sucker xing knobs installed in two positions on the base of the model clockwise to x the model on the table. Turn them counter-clockwise to remove When removing the model, the model. - Page 11 Training Training skills 3 Intraoral Intubation with Laryngoscope Setting the head at "sni ng position", intubation with laryngoscope can be performed. The upper incisors are removable with excess force. Put enough lubricant to the model before inserting the tracheal tube. For nasotracheal airway, spray the lubricant in the cavitas nasi and the tube.
- Page 12 Training Training skills Success-Failure Confirmation Successful tube tip placement can be con rmed with the rotation of the fan. Intubation by the Video Laryngoscope 6 Put enough lubricant to the video laryngoscope and the oral cavity before training. Securing the Tracheal Tube Do not leave the tapes on the model.
-
Page 13: Replacement Of The Consumable Parts
Replacement of the Upper Incisors consumable parts Tongue Upper Incisors 1 Widen the mouth and then place the protruded part behind the part where the incisor component is installed into the groove on the upper jaw. Then push up the incisor component toward the front direction until you hear a "click"... - Page 14 Replacement of the Tongue consumable parts Tongue 2 2. Remove the face mask from buttons at ears and then remove the mask from the head.. 3. Disconnect the transparent tube and bronchi part by pulling the bronchi part.Then disconnect the tube for laryngospasm.
- Page 15 Replacement of the Tongue consumable parts Tongue 2 5. Disengage the lower part of the throat from the tongue xing part, then pull down the tongue component to detach. It becomes easy to pull out the whole tongue component when the tongue is pushed into the mouth while pulling it out.
- Page 16 Replacement of the Tongue consumable parts Tongue 2 6. After con rming the tongue direction, insert half of it into the throat from the opening. Insertion is more easily facilitated by applying training model lubricant on it. 7 . Push the tongue component into the throat from the throat side. Open the mouth, hold the tongue when a certain portion of it comes into the oral cavity, then pull it until the tip of the tongue touches the incisors.
- Page 17 Replacement of the Tongue consumable parts Face Mask Tongue 2 9. Connect the laryngospasm tube. 10. Connect the bronchus component. 11. Set the mask on the face. 12. Fit the both of the ear holes on the mask to the head of the model. 3...
-
Page 18: After Training
After Training After Training Clean and remove the lubricant on the face with water or diluted detergent. Talcum powder may be used on the face mask after use to preserve suppleness of the skin and prevent it from being stained. Before storage, ensure that model is dry. - Page 20 Don’t mark on the model and other components with pen or leave printed Caution materials contacted on their surface. Ink marks on the models will be irremovable. ・For inquiries and service, please contact your distributor or KYOTO KAGAKU CO., LTD. URL http://www.kyotokagaku.com e-mail rw-kyoto@kyotokagaku.co.jp ●...
- Page 21 MW14 モデル表面に印刷物などが直接触れないよう にしてください。 DAM シミュレータ 樹脂表面にインクが吸収されて消えなくなります。 デモンストレーションモデル 取扱説明書 目 次 ● はじめに 製品の特徴とご使用上の注意 ● ご使用の前に セット内容 ● 実習の準備 実習前の確認 ● 実習にあたって 正常と困難気道症例の設定 ( 頸部後屈) P.4 ( 開口制限) P.5 P.6 ( 舌の肥大) ( 喉頭痙攣) P.7 ● 実 習 実習時のご注意と実習項目 P.8∼P.10 ● 消耗品の交換...
- Page 23 はじめに 製品の特徴とご使用上の注意 はじめに このたびは、当社の「DAM シミュレータ デモンストレーションモデル」をお買い上げ いただき、誠にありがとうございます。本製品は、必要最小限のコンパクト・軽量設計で DAM のフルトレーニングが可能なモデルです。教育実習のほかセミナーや医療器具のデモン ストレーションなどにもご利用いただけます。 特 長 ● コンパクト・軽量設計のため、持ち運びが容易です。 ● 頸部後屈・開口障害・舌肥大・喉頭痙攣などの症例を切り替えることで、様々な挿管困難状況 を設定でき、レベルと目的に応じたトレー ニングが可能です。 ● 喉頭鏡を使用した実習以外に、バッグバルブマスク法を含め、 経鼻挿管、ビデオ喉頭鏡による 挿管、ラリンジアルマスクによる換気、ファイバー挿管などの実習も可能です。 ● 気管支先端のファンの回転で換気を確認できるため、デモンストレーションに有効です。 必ずお読みください 本来の使用目的以外にはご使用にならないでください。また、取扱説明書に記載された方法以外 でのご使用による万一の破損や事故に関して、当社は責任を負いかねますのでご了承ください。 ● 取り扱いにご注意ください。 ● 中性洗剤又はアルコールで拭き取って ください。 特殊軟質樹脂及び硬質樹脂を使用していますの で、落下や強い衝撃を与えると破損の原因となり モデルの汚れは水又は中性洗剤で、汚れが落ち ます。 また皮膚部の脱着の際、無理な負荷がかか にくい場合はアルコールで拭き、ベビーパウダー りますと破損しますので十分ご注意く ださい。 を塗布しておいてください。シンナーなどの 有機溶剤は、絶対に使用しないでください。...
- Page 24 ご使用の前に セット内容 セット内容と各部の名称 ご使用の前に、 構成品が全て揃っているかご確認く ださい。 d モデル本体 1体 シリンジ (50mL) 1点 ・・・・・・・・・・・・・・・・・・ ・・・・・・ 上顎側切歯 3点 専用バッグ ・・・・・・・・・・・・・・・・・・ 取扱説明書 (1点はモデル本体に取付済、2点は破損時の交換用) トレーニングモデル用潤滑剤 1点 ・・・・・ コード番号 部品名 コード番号 部品名 消耗品 11392-010 上顎側切歯 10個セット 11229-050 トレーニングモデル用 一覧 潤滑剤 1点 11393-020 マスクⅡ(デモ・気管支用) 1点 11392-080 舌Ⅱ 2個組...
- Page 25 実習の準備 実習前の確認 モデル本体の確認 1 1. モデル本体の口を開き、舌の設置状況を確認します。 舌先端裏側が下顎にあるピンから抜けていないかを確認します。 ( 納品時はあらかじめ舌がモデル本体に取り付けてあります) 下顎に取り付けてあるピン 2. 次にモデル本体の舌部固定部と喉部が正しくセットされているかを確認します。 セットが不具合の状態 (※分かりやすくするため気管支部を外して撮影) 舌固定部 ( 白色) 気管支部 舌固定部 ( 白色) 舌 舌部 左記の 部のかみ合わせが正しくはまって 喉部 ( 赤色 ) 舌部の透明パイプ いないと実習時に舌がずれてしまいます。...
- Page 26 正常と困難気道症例の設定 実習にあたって ( 頸部後屈) このシミュレータは、頸部の角度や口の開口、舌の大きさ、喉頭痙攣などを、正常の状態のほか 段階的な困難気道症例の設定が可能です。納品時は全て正常の状態に設定しています。 頸部後屈の設定 頸部後屈は正常と頸部後屈困難の設定が可能です。 モデル本体の頸部側面 ( 左右)にあるレベル切り替え用の黒いノブで頸部の可動域を変更します。 ノブを左右外側に引っ張りながら回転させ、差し込み深さを変更します。 1. 正常の場合はノブを写真のように緑のシールが見える位置に合わせます。必ず左右両側を 同じ設定にしてください。 頭部側 黒いノブ 頭部側 黒いノブ 緑色のシール 緑色のシール 緑色のシール 三角形が 三角形が 交差した かみ合わ 状態 さった状態 頸部後屈 正常状態 困難状態 2. 頸部後屈困難の状態に切り替える場合は、ノブを引っ張りながら回して、三角形の脚部が 本体側の受け具と同じ方向になるようにします。次に緑のシールが見えなくなるまでノブを 内側に押し込みます。頭部を下の写真の矢印の方向に戻す事でも設定のロックがかかります。 左右のノブは、必ず同じ設定で実習を行ってください。 左右を異なるレベル位置に設定し実習を行うと、破損や故障の原因になります。 正常 頸部後屈困難 4 ...
- Page 27 正常と困難気道症例の設定 実習にあたって ( 開口制限) 開口制限の設定 開口制限は Easy (Normal) [ 正常 ]、Intermediate [ 開口困難レベル1]、Difficult [ 開口困難レベル2] の 3 段階の設定が可能です。 モデル本体の頭部上部にあるレベル切り替え用の黒いノブで開口制限を設定します。ノブを手前 側に引っ張りながら上下させ、表示してあるレベルライン上で、ノブから手を放してロックします。 1.正常の場合はノブを Easy (Normal) の位置に合わせます。 2. 開口困難状態に切り替える場合は、黒いノブを手前に引っ張りながらノブを下方に移動させ Intermediate もしくは Difficult の位置に合わせます。 ( Intermediate ) ( Di cult ) 正常...
- Page 28 正常と困難気道症例の設定 実習にあたって ( 舌の肥大) 舌の肥大 の設定 舌の肥大は正常と巨大舌の設定が可能です。 設定は、付属のシリンジを使用し、舌に空気を注入・排出して舌の大きさを変化させます。 1. 舌に空気を注入しない状況が正常の状態です。 2. 巨大舌の設定は、あらかじめ付属のシリンジに 20mL の空気を入れ、モデル本体の頸部に ある平型のチューブに接続します。シリンジはロック方式になっており、シリンジの先端 をチューブのコネクターに差し込み、時計まわり方法にシリンジを回して接続します。空気 を注入し舌を巨大舌状態にしたら、シリンジを逆方向にまわしてチューブからはずします。 シリンジ シリンジ コネクター コネクター モデル本体側のチューブ モデル本体側のチューブ 差し込んで時計まわりに回して接続 反時計まわりに回して外す 3. 舌を正常の状態に戻すには、空気を抜いたシリンジをチューブに接続し、シリンジで 舌に たまっている空気を抜いて、舌の大きさを正常にします。 正常 巨大舌 6 ...
- Page 29 正常と困難気道症例の設定 実習にあたって ( 喉頭痙攣) 喉頭痙攣の設定 正常と喉頭痙攣状態の設定が可能です。 喉頭痙攣の設定は、本体に付属しているチューブの先のポンプ部を指で押して設定します。 1. ポンプを押した状態が喉頭痙攣で、指を離すと正常の状態に戻ります。 ポンプから指を離すと正常状態になります。 ポンプを指で押すと喉頭痙攣の状態になります。 ※写真は説明を解りやすくするため舌部をモデル本体から取り出した撮影しています。 正常 喉頭痙攣 7...
- Page 30 実 習 実習時のご注意と実習項目 モデルの固定 実習は平らで平滑なテーブル上で 行ってください。 モデル本体のベースに取り付けら れた固定用吸盤の 2 箇所のノブを 時計まわり回してテーブルに固定 します。取り外す時は逆方向に回 取り外す時はベース裏面にも して取り外します。 吸盤が一つ付いていますので 爪等で吸盤をうかせてはずし ます。 1 気道の確保 頭部後屈・顎先挙上法、下顎挙上法の 実習を行います。 2 バッグバルブマスク法 正しい位置にバッグバルブマスクを あて、バック換気の実習を行います。 気管支の先端についているファンの 回転で送気が確認できます。 8...
- Page 31 実 習 実習時のご注意と実習項目 気管チューブの挿入 3 スニッフィング・ポジションにして、喉頭鏡 で確認しながら気管チューブの挿入実習を行 います。 喉頭鏡の操作不良による歯への圧迫が前歯の 破損で確認できます。 気管チューブ挿入実習の際には、モデル本体と気管チューブの挿入部に、付属のトレーニング モデル用潤滑剤を塗布しておきます。 経口より挿入実習の場合 経鼻より挿入実習の場合 気管チューブの挿入部 気管チューブ挿入実習にあたっては、喉頭鏡はマッキントッシュ型(曲型)ブレードサイズ No.3 を、気管チューブは内径 7.0、7.5 ㎜を推奨し ます。 潤滑剤は付属のものをご使用ください。ゼリー状の潤滑剤などは内部で乾燥凝固して残留 する事がありますので使用しないでください。 ラリンジアルマスクの挿入 4 ラリンジアルマスク挿入実習の際には、モデル本体の口腔内とラリンジアルマスクの挿入部に トレーニングモデル用潤滑剤を塗布してから行ってください。 ラリンジアルマスク挿入実習にあたっては、 下記のサイズのものを推奨します。 LMA シュープリーム サイズ 3 i-gel サイズ 3 ○印のサイズを推奨 9...
- Page 32 実 習 実習時のご注意と実習項目 挿管後の確認 気管チューブの挿管後はバッグバルブマスク での送気を、気管支の先端についているファン の回転で確認できます。 6 ビデオ喉頭鏡による気管挿管 ビデオ喉頭鏡を使用して声門を確認しながら気管挿管の実習を行います。 ビデオ喉頭鏡による気管挿管実習の際には、 モデル本体の口腔内とビデオ喉頭鏡の挿入部 に付属のトレーニングモデル用潤滑剤を塗布 してから行ってください。 気管チューブの固定 テープ固定をされる際には、マルチポア™ 粘着性綿布伸縮包帯またはマルチポア™ドライサージ カルテープ(共に 3M 社製品)を推奨します。 テープ固定 THOMAS 固定 テープを貼ったままの状態で片付けないでください。長時間貼ったままの状態にすると、 モデル本体の表面にテープの粘着剤が吸着し、ベタつきがとれなくなってしまいます。...
- Page 33 消耗品の交換 上顎側切歯、舌の交換 1 上顎側切歯の交換 口を広げて、切歯の取付部後ろ側の出っ張りを 上顎の溝にひっかけます。 続いて切歯を手前側にパチンと音がするまで押し 上げ、上顎に切歯を固定します。 2 舌の取り外し 1. 頚部後屈の困難レベルを正常の状態に設定します。次に開口制限の困難レベルを Easy (Normal) に設定します。 (それぞれ困難度レベルを正常に戻す手順は P4 ∼ P5 を参照ください。 ) 緑色のシール 黒いノブを回して緑のシールが見える正常の位置 黒いノブを移動させ Easy(Normal) の位置に設定 に設定...
- Page 34 消耗品の交換 舌の交換 舌の取り外し 2 2. 左右の耳の留め具からマスクをはずし、頭部よりマスクを取りはずします。 3. 気管支をはずします。次に喉頭痙攣用チューブをはずします。 4. 舌の片側を引っぱり穴を広げて、下顎に付い ているピンから舌をはずします。...
- Page 35 消耗品の交換 舌の交換 舌の取り外し 2 5. 喉部下部を少し引っぱりながら舌固定部を引き出すようにして引っ掛かり部をはずし、舌部を 下方に引き抜きながら、途中で口部から舌部を中に押し込んでおくと、舌部全体が抜けやすく なります。 舌 舌固定部 喉部 ( 白色) ( 赤色) 気管支部 舌部の透明 パイプ 舌部を喉部から取り外す場合は、ゆっくりと 丁寧に行ってください。無理に引っ張ったり すると破損の原因になります。...
- Page 36 消耗品の交換 舌の交換 舌の取り付け 3 1. 新しい舌を用意し、舌の向きを確認して喉部の中に半分くらいまで挿入します。あらかじめ トレーニングモデル用潤滑剤を舌部に塗布しておくと挿入しやすくなります。 2. ある程度舌部を喉部に挿入したら、口を開き口腔内に出てきた舌の部分を持ち、舌の先端を切歯 にあたる位置にくるまで引っ張ります。この時、舌の中に設置している舌肥大用空気袋がずれない ように注意します。 舌肥大用空気袋 3. 喉部下部を広げて、舌固定部の引っ掛かり部をはめ込みます。周囲から見てしっかりはまって いるか確認してください。 舌 舌固定部 ( 白色) 喉部 ( 赤色) 気管支部 舌部の透明 パイプ 舌部設置不具合の例 4. 舌先端部の穴の片方をピンの片側のエッジに被せ、反対方向に舌をひっぱるようにすると 穴が広がってピンに被さり、舌が下顎側に固定されます。 引っぱる ( 取付時 ) 引っぱる ( 取り外し時 ) 舌...
- Page 37 舌の交換 消耗品の交換 マスクの交換 舌の取り付け 3 5. 喉頭痙攣用チューブを接続します。 6. 気管支部を接続します。 7. 頭部にマスクをかぶせます。 8. 左右の耳の留め具にマスクの穴を通します。 マスクの交換 4 1. マスクのの交換も舌の交換で行ったように 耳の留め具からマスクを取り、新しいマスク と交換します。...
- Page 38 後片付け 後片付け 実習終了後は、水または中性洗剤でモデル本体の汚れや塗布した潤滑剤などをきれいに 拭き取り、マスク部はベビーパウダーを塗布して、十分乾燥させてから保管してください。...
- Page 40 http://www.kyotokagaku.com e-mail rw-kyoto@kyotokagaku.co.jp ■本社・工場 ■東京支店 〒612-8388 京都市伏見区北寝小屋町15番地 〒113-0033 東京都文京区本郷三丁目26番6号 TEL:075-605-2510 (直通) NREG本郷三丁目ビル2階 FAX:075-605-2519 TEL:03-3817-8071 (直通) FAX:03-3817-8075 2018.04...
Need help?
Do you have a question about the MW14 and is the answer not in the manual?
Questions and answers