Table of Contents
Advertisement
Quick Links
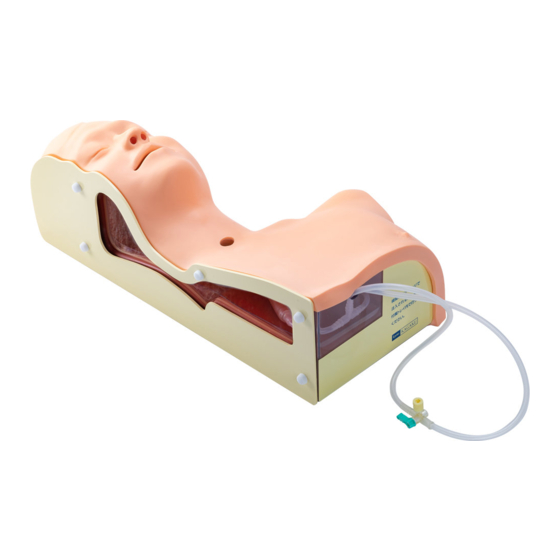
M85
Airway Suction Trainer
吸引シミュレータ Qちゃん
Caution
Instruction
Manual
取扱説明書
Contents /目 次
●
English Manual
● 日本語取扱説明書
Do not mark on the model and other components
with pen nor leave printed materials contacted on
its surface.
Ink marks on the models cannot be removed.
モデル表面に印刷物などが直接触れないようにし
てください。
樹脂表面にインクが吸収されて消えなくなります。
P.2∼P.7
P.8∼P.14
Advertisement
Table of Contents

Summary of Contents for Kyoto Kagaku M85
- Page 1 Caution Do not mark on the model and other components with pen nor leave printed materials contacted on its surface. Ink marks on the models cannot be removed. モデル表面に印刷物などが直接触れないようにし てください。 樹脂表面にインクが吸収されて消えなくなります。 Airway Suction Trainer 吸引シミュレータ Qちゃん Instruction Manual 取扱説明書 Contents /目 次 ●...
-
Page 2: Table Of Contents
Caution Don’ t mark on the model and other components with pen or leave printed materials contacted on their surface. Ink marks on the models will be irremovable. Airway Suction Trainer Instruction Manual Contents Introduction Manufacturer’s Note/Dos and Don’ts Before You Start Set Includes Before Training Preparation... -
Page 3: Introduction
DOs and DON Ts Manufacturer s Note ’ M85 Airway suction trainer is designed to facilitate understanding and training of suction catheter insertion and temporary airway suction. Do not use the trainer for any other purpose. Please read the instruction manual before use. -
Page 4: Before You Start
Lubricant 1 piece 1 piece Product Code Part Name Consumables 11229-070 Simulated sputum/simulated watery stool 11229-020 Replacement skin with trachea for M85 1 piece replacement Catheter for M85 11229-040 2 piece parts 11229-050 A bottle of lubricant for M85 1 piece... -
Page 5: Before Training
Before training Preparation Please note: It is recommended to ll the simulated sputum on the provided tray to avoid any stain from the liquid. Preparation 1 2. Pour the simulated sputum 1. Open the simulated sputum 3. Fill the syringe with to the accessory bottle. -
Page 6: Aftertraining
After Training Remove the skin on Airway Suction Trainer Remove the skin on Airway Suction Trainer 1 1. Close the three-way tap. 2. Detach the side plate by removing the screws. 3. Remove the skin on Airway Suction Trainer from the base. Be cautious not to spill the liquid from the openings. -
Page 7: Wash The Skin On Airway Suction Trainer
After Training Wash the skin on Airway Suction Trainer Reinstall the skin on Airway Suction Trainer Wash the skin on Airway Suction Trainer 2 1. Open the three-way tap. 2. Inject the water into the tube by the syringe to eject the simulated sputum. 3. - Page 8 After Training Re-install the Skin on Airway Suction Trainer Re-install the Skin on Airway Suction Trainer 3 2. Set the end of nasal/ trachea tube to the outside of the manikin through the notch on the transparent plastic wall. Make sure not to tuck the tube between the skin and the base. Place the end of the trachea unit along the inner side of the transparent plastic wall.
- Page 9 モデル表面に印刷物などが直接触れないよう にしてください。 樹脂表面にインクが吸収されて消えなくなります。 吸引シミュレータ Qちゃん 取扱説明書 目 次 ● はじめに 製品の特長とご使用上の注意 P.10 ● ご使用の前に セット内容 ● 実習の準備 P.11 準備 ● 後片付け P.12∼P.14 皮膚部の取り外し 皮膚部の洗浄 皮膚部のセット...
- Page 10 はじめに 製品の特長とご使用上の注意 はじめに このたびは吸引シミュレータをご購入いただきありがとうございます。本製品は、一時 的吸引法の理解を深め、実際の手技の上達を目的としたシミュレーションモデルです。 医学・看護教育用の補助機器としてご使用下さい。 特 長 1. 一時的吸引法(口鼻腔内吸引・気管内吸引)の習得ができます。 2. 介護職員等による、痰の吸引等の手技の教育・研修にご利用いただけるモデルです。 3. 模擬痰を使って実際に痰を吸引するトレーニングできます。鼻腔内と口腔内から、気管部は 気管切開部からカテーテルを挿入して吸引を行います。 4. 内部構造をリアルに再現、シミュレータ本体の側面は透明なため、カテーテル挿入時に長さ の確認を行うことができ、内部のカテーテル挿入の様子を確認しながらシミュレーションで きるので、グループでの実習にも最適です。 5. カテーテルの先端を着色していますので、カテーテルの動作の確認ができます。 6. モデル部の皮膚は脱着可能で、シミュレーションが終了したら取り外して水洗いでき、メン テナンスが簡単です。 ● 取り扱いにご注意ください。 ● 中性洗剤又はアルコールで拭き取って ください。 落下や強い衝撃を与えると破損の原因となり モデルの汚れは水又は中性洗剤で、汚れが落ち ます。また皮膚部の脱着の際、無理な負荷が にくい場合はアルコールで拭き、ベビーパウダ かかりますと破損しますので十分ご注意くだ ーを塗布しておいてください。シンナーなどの さい。 有機溶剤は、絶対に使用しないでください。 ● 印刷物をモデル表面におかないで ● ボールペンやサインペンで書き込まな ください。...
- Page 11 ご使用の前に セット内容 セット内容と各部の名称 ご使用の前に、 構成品が全て揃っているかご確認く ださい。 ト レ イ 1点 モデル本体(約W450×D230×H150mm) 1台 模擬痰 (150ml×3袋 / ボトル ) カテーテル 1式 2点 トレーニングモデル用潤滑剤 1点 1点 シリンジ(50ml) 取扱説明書 1点 コード番号 部品名 消耗品 11229-070 模擬痰 / 模擬水様便 一覧 11229-020 皮膚(気管部付) 1点 11229-040 カテーテル 2本組 11229-050 トレーニングモデル用...
- Page 12 実習の準備 準 備 準 備 1 1. 切れ込みから模擬痰の封を 2. 付属のボトルに模擬痰を 3. 付属シリンジに模擬痰を 開封します。 注ぎます。 注入します。 4. 本体から出ているチューブ(2本)の先端にある三方活栓にシリンジを差し込み、これから 実習されるポイント(気管または咽頭部)にコックを切り替えて、適量の模擬痰を注入して ください。 (注)上記の作業を行う際、必ず、付属トレイ内で行ってください。 5. カテーテルと軟質特殊樹脂との摩擦により、カテーテルの挿入がしにくい時は潤滑剤スプレー を鼻腔、口腔、気管切開部に軽く吹き付けてください。カテーテルの挿入を助けます。 模擬痰について ● 模擬痰は材料の特性上、粘度が変わる事があります。この場合 粘度が高い時:少量の水を入れ、割り箸等で良く撹拌し粘度を調整してください。 ● 模擬痰は長時間、空気に触れると乾燥しますので、使用後は必ず、容器の蓋を強く締め、密閉してください。 ● 模擬痰は着色されていますので、シーツ、衣類等に付きますと落ちませんので十分注意してください。...
- Page 13 後片付け 皮膚部の取り外し 皮膚部の取り外し 1. 三方活栓のコックを閉じるの位置にします。 2. 側面用アイボリー板の白いネジ(5 個付き)をはずします。 3. 本体から皮膚をはずします。このとき、チューブ内に残っている模擬痰が三方活栓からこぼれ ないように、三方活栓のコックを切り替えるか、キャップをしてください。また、口、鼻および 気管切開部からも模擬痰がこぼれる恐れがあるので十分注意し皮膚をはずしてください。 (注)頭部から皮膚をはずすと、はずし易くなります。 (注)万一、モデル内に模擬痰がこぼれたら、本体に備え付けの透明成形台をはずし、洗い流してください。...
- Page 14 皮膚部の洗浄 後片付け 皮膚部のセット 皮膚部の洗浄 2 1. 三方活栓を開いてシリンジでチューブ内に水を注入し、模擬痰を排出してください。 2. 口、鼻および気管切開部より水洗いしてください。このときは、三方活栓のコックを切り 替えて外部に放出できるようにしてください。 (注)三方活栓が差し込まれているチューブをはずすと、より早く 洗浄できます。 3. 洗浄できましたら、皮膚を十分乾燥させてください。 (陰干し) (注)実習終了後、本体内部およびチューブ内に残っている模擬痰は、 長時間放置されますと、乾燥し洗浄し難くなりますので、 速やかに洗浄してください。 皮膚部のセット 3 本体に皮膚をセットします。この時、 1. 皮膚を本体からはずす時と同様に、頭部からセットされるとし易くなります。 2. 口腔・気管部を本体内部の形状に合わせてセットしてください。この時、鼻腔用チューブ が本体の形状に沿っているか確認してください。...
- Page 15 後片付け 皮膚部のセット 皮膚部のセット 3 3. チューブ 2 本を本体後方の透明板のくぼみから出します。この時、咽頭部からのチューブ の走行に注意し、皮膚と本体との間に挟まることが無いよう、口腔・気管部に沿わしてく ださい。また、気管支からのチューブが引っ張られていないか確認してください。チューブ ジョイント(T)の部分を本体後方の透明板内側に沿わせる様にしてください。 4. 皮膚を本体の形状に合わせ、本体底面の 5. 皮膚を本体透明板の形状に合わせ、セット マジックテープで皮膚を留めてください。 してください。 5. 側面用アイボリー板で押さえ込むようにし、穴を合わせて白いネジで固定してください。 (5 ヶ所) (注)強く締めすぎると破損しますので注意してください。...
- Page 16 2017.12...


Need help?
Do you have a question about the M85 and is the answer not in the manual?
Questions and answers