Table of Contents
Advertisement
S4 Series Training Manual
This manual is produced to support the training package provided by
Datatool (UK) Ltd
Due to the sensitive nature of its contents, Datatool (UK) Ltd specifically
forbid its contents to be copied or reproduced and transmitted to any third
party without the prior permission in writing of Datatool (UK) Ltd.
Any person(s) found to be in breach of this may find themselves removed
from the list of Datatool registered installers and subject to prosecution.
Contact details for Datatool (UK) Ltd
Tel: 0870 165 2414
Fax: 0870 165 2240
e-mail:
info@datatool.co.uk
Website: www.datatool.co.uk
Advertisement
Table of Contents

Subscribe to Our Youtube Channel
Related Manuals for Datatool S4 Series


Summary of Contents for Datatool S4 Series
-
Page 1: Pin Learn Procedure Annex
This manual is produced to support the training package provided by Datatool (UK) Ltd Due to the sensitive nature of its contents, Datatool (UK) Ltd specifically forbid its contents to be copied or reproduced and transmitted to any third party without the prior permission in writing of Datatool (UK) Ltd. -
Page 2: Table Of Contents
Index S4 installation Technical specifications Page 3 Specifying the system Page 4 The Datatool website Pre installation checks Page 5 Stripping the machine Page 6 Planning the installation Page 6-8 The S4 installation tester (fitting the alarm harness) Page 9-13... -
Page 3: Technical Specifications
S4 Series alarm technical specifications Construction Nylon outer casing, with metal end cone protecting the siren. The housing contains the PCB which is fully potted, so protecting the PCB itself from; attack, water ingress and component failure through vibration. Each product can easily be distinguished by the colour of seals between the alarm sections as follows:... -
Page 4: Specifying The System
Due to the design of the S4 series it is possible to configure the system in several ways. It is wise to discuss the options available with the customer when discussing the system. Some of the features may not be applicable to certain markets due to local regulations (e.g. -
Page 5: The Datatool Website
Datatool (UK) Ltd and can be used by each dealer to act as a profit maker or sales incentive. A very simple upgrade of the S4 system is by the addition of the Datatool S4 tagging upgrade kit (Pt. No. 02000127). This kit is very specific and must only be sold to customers who are purchasing an S4 insurance approved system. -
Page 6: Stripping The Machine
Stripping the machine As stated above, the Datatool website carries information for many machines on parts removal for alarm installation. Always take extreme care when removing and storing panels from the machine to ensure they do not get damaged. Always note the size, type and position of any fixing you remove. It is very easy to forget what goes where. - Page 7 Led mounting methods and positions Where possible the position of the system LED should be agreed with the owner, prior to installing. Method 1. Method 2 Warning: When fitting into an LED tail light take care not to damage LED PCB Method 3.
- Page 8 Where applicable, the method of immobilisation for the machine should be selected and the wiring configured accordingly. The methods available are shown in annex 4 at the rear of this manual. Access the wiring harness at the most suitable place(s) and identify the wires you are going to connect to using suitable safe test equipment.
-
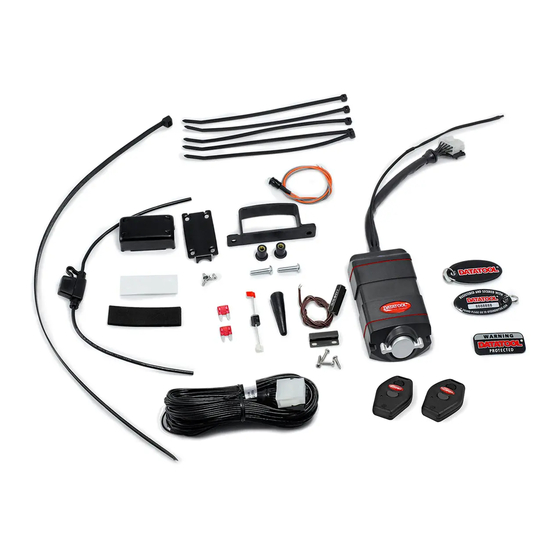
Page 9: The S4 Installation Tester (Fitting The Alarm Harness)
All the wires of the S4 series of alarms are BLACK. The colours below relate to the colour of the tags towards the end of the wires. For ease of explanation the wiring descriptions below are grouped as per the recommended order for connection. - Page 10 Using the installation tester. The following section covers the basic actions to be carried out and the test to be conducted after the connections have been made. It describes the result you should get. If you don’t get this result it then describes the probable cause and how to identify/cure the ‘fault’. In certain cases it carries on to describe further testing you should carry out to finally confirm the connection you have made is correct or further actions you may need to do to deal with secondary issues.
- Page 11 3. The Engine cut (White and White/Green, DC cut) or (White and White/Red, AC cut)(S4 Red and Yellow only) Identify the method of immobilisation being used, either DC ignition (wire cut to immobilise) or AC ignition (wire earthed to immobilise) and connect as below. For the techniques, see the annex 4 ‘immobilisation methods’ at the end of this manual.
- Page 12 5. The Indicator connections (2 x Pink tagged wires)(All S4 models) Connect one pink wire to the machine’s left indicator circuit and the other to the right. • With the indicators of the machine cancelled and the ignition turned off; press the INDICATOR switch on the test box.
- Page 13 The System LED connections (Orange and Grey tagged wires)(All S4 units) Connect the Grey and Orange wires to the same colour wires of the LED either by a soldered connection or suitable connectors, as suits the installation. Press the LED switch on the test box to ON. Look at the installed alarm LED; it should light when the switch is ON. If it does not light it is possible you have connected the LED in reverse.
-
Page 14: What The Wires Do
What the wires do Main positive and negative connections N.B. All S4 alarm systems are designed to work on 12 volt NEGATIVE earth machine. Do not install this product to a POSITIVE earth machine. The main positive and negative connections are the most important wires of any alarm system as they supply the power to make most of the other functions work. - Page 15 MUST be taken into account. The S4 Green product only gives insurance benefits if fitted onto a machine already complying with category 2 immobilisation. Please visit www.thatcham.org for the latest listings or contact Datatool. The wire to be immobilised is cut and rejoined via the White and White/Green wires. The White/Red wire is not used.
- Page 16 When the immobiliser circuit is armed the engine kill wire will be earthed out via the immobiliser circuit and hence will not run. Please note: Whilst this method of immobilisation works it is not as secure as the DC immobilisation above. Datatool recommend the DC immobilisation method is used where possible (even on AC type machines).
- Page 17 On certain machines if you choose a different ignition switched supply to the one recommended by Datatool (e.g. Aprilia canbus based models) there may be a few seconds delay before the lit goes out. This is quite normal on this type of machine and simply delays the arming period of the alarm by the time it takes for the ignition control relay of the machine to reset.
- Page 18 The Indicator connections (2 x Pink tagged wires) The alarm system should be connected to the Left and Right indicator positive feeds. Do not connect to the negative wire of the indicator. On some machines you may only be able to make the rear or front indicators operate without the inclusion of extra diodes into the indicator outputs of the alarm system.
- Page 19 If more than one area is to be protected, extra magnets and switches are available through Datatool, this is a chargeable extra. Extra magnets may also be needed if the pillion seat is used and the customer has a separate tailpiece. If several switches are to be used they must be run in series, not parallel.
- Page 20 Accessory Loop Side Stand Trigger Garage Protection kit (Pt. No. 02012006)
- Page 21 The Green/Yellow tagged wire gives 500mA of positive output only when the siren is sounding. This can be use to drive an additional siren (Pt. No. 02012004) or a paging/text system such as the Datatool Text alert (Pt. No. 08000200). Any such items are not part of the standard installation and therefore should be treated as extras and charged accordingly.
-
Page 22: Combining The Ignition Key With The Remote Control
If you are in any doubt regarding the conversion, the techniques required for most manufacturers key types are detailed on www.datatool.co.uk. Datatool (UK) Ltd cannot be held responsible for damage to ignition keys or transponder chips. Should the owner require a combined ignition key and remote control for the S4 C4 Yellow it is possible to purchase S4 C1 Red remote control and code it to the S4 Yellow alarm. - Page 23 7. Now drill a 3.5 mm hole completely through the key blade using the mark left by the 2 mm drill. 8. Replace the fillet onto the key blade and cut any excess metal beyond the fillet (see photo left). The key will then be as photo right.
-
Page 24: Credit Card (Quick Start) Instructions
Certain sections of this manual are specific to you the installer only. Therefore this manual must never be copied, transmitted or passed to any third party without the express permission of Datatool (UK) Credit card instructions The text below is the wording supplied on the credit card instructions and should be used as a prompt when demonstrating the system to the customer initially. -
Page 25: The Unique Internal Transponder Id Tag
If the certificate is not fully completed it will be returned to YOU the dealer to be correctly filled out. If you are passing the certificate to the customer to send to us at Datatool (UK) it is important you tell the customer they MUST send the fully completed top copy of the certificate to us within the 30 day period. -
Page 26: The Remote Control
We would recommend that you upgrade the tagging system by fitting either a special Datatool S4 tagging upgrade kit designed specifically to complement the S4 and upgrade the tagging of the machine to insurance standards or Gold tagging kit to uniquely identify other major components of the machine, further reducing its desirability to the potential thief. -
Page 27: Changing The Remote Control Battery S4 Red And Green
Changing the remote control battery Models S4 C1 Red and S4 C221 Green Each remote control contains a single long-life lithium battery (CR1616). This battery will normally last at least 12 months. Normal range for the remote control is around 10 metres. As the battery within the remote comes to the end of its life you will notice a reduction in its range and the battery should be replaced. -
Page 28: Changing The Remote Control Battery S4 Yellow
Changing the remote control battery Model S4 C4 Yellow Use a small coin placed in the recess between the two case halves near the key attachment hole to split the casings. Lift the circuit board from the rubberised seal and remove the CR2032 Lithium cell from its holder noting the polarity. -
Page 29: Arming The System
Arming the system Passive arming Unless the unit has been placed in ‘winter’ mode, the system always passively arms 45 seconds after the ignition is turned off. When the ignition is turned OFF the LED will light continuously and after 40 seconds emit a set increasing rate beeps follow by the LED changing to flashing to indicate the system has armed. -
Page 30: Disarming The System
Disarming the system To disarm the system from the armed state, simply press the Grey button on the remote control. The unit will then flash the indicators once to indicate it has been disarmed. Remember to turn the ignition on within 45 seconds or the system will auto re-arm in the same state as it was armed prior to disarming. -
Page 31: 'Sleep' Mode
Note: If the machine is connected to a float charger such as the Datatool Battery Conditioner the alarm will never see a reduced voltage and so will not go to sleep. This is a major advantage over competitors systems many of which also go to sleep after a number of days so leaving the machine unprotected. -
Page 32: The Pin Override System
The PIN override system ALL Datatool S4 alarms have a PIN disarming feature. As a new product there is no PIN number programmed into the alarm, therefore we strongly recommend the customer enters their chosen 4 digit number as one of their first priorities. -
Page 33: Disarming The System With The Pin
Disarming the system with the PIN If the transmitter is lost or damaged, or the transmitter battery is flat, the system can be overridden by the previously entered four digit PIN (Personal Identification Number) used in conjunction with the ignition switch. The PIN procedure can only be used after a full alarm reaction has been initiated. -
Page 34: Adding Extra Remote Controls
(Please note: The code 0000 cannot be used, so if a PIN has not previously been entered and both remote controls have been lost, the alarm unit will have to be returned to Datatool to be cleared and have new remote controls coded to it). This is a chargeable service. Contact Datatool for the current charge. -
Page 35: Customising The System (Customer Switches)
Customising the system A quick guide to the programming functions is at annex 2 at the rear of this manual Before you can change the settings of the alarm you must first: Teach the alarm a PIN (page 32) Carry out a transmitter learn (an existing transmitter can be used) (page 34) Turn the ignition OFF wait for two beeps and then back ON within 15 seconds of the transmitter learn. -
Page 36: Engineer Switch Entry
Software switch 3 Engineer switches A quick guide to the engineer switch functions is at annex 3 at the rear of this manual The following features must only be accessed by the dealer. This information must not be passed to the customer. -
Page 37: Engineer Switch Table
Any S4 series transmitters which are to be used must be re-coded in using the transmitter learning procedure described in the owner’s manual. This can be done either by the engineer or the customer but it is advisable for the engineer to do this as the customer may forget. - Page 38 Return to system default settings (Engineer switch 2) The factory default settings have been selected as the optimum for most installations and legal requirements. In most instances these settings should not need to be changed. However sometimes changes may be made to ‘customise’ the system to meet the requirements of the customer, local legal requirements or the installation.
-
Page 39: Movement Sensor Adjust
Movement sensor adjust (Engineer switch 4) (S4 Red and Green only) 4 stages of movement detection are available to enable the alarm to be adjusted for over/under sensitivity. The default setting is 3 degrees and for most machines this will ensure the alarm system triggers as the machine is moved from the side stand to the upright position. -
Page 40: Nudge Sensor Adjust
Nudge sensor adjustment (Engineer switch 5) The nudge sensor has 10 stages of adjustment with the factory default set at level 8. The level of sensitivity to impacts can be set via engineering software switch 5. Should the owner wish to temporarily exclude the nudge sensor (and movement sensor on the S4 Red and Green) they can do this by either allowing the system to passive arm as an immobiliser only or by arming the alarm in ferry mode. -
Page 41: Panic On/Off
Panic On/Off (Engineer software switch 7) The factory default for panic is set to ON. Local conditions in certain countries may dictate panic MUST not be enabled (please refer to local regulations). To disable the panic, select software switch 7 by pressing both buttons of the remote when you hear 7 beeps. A triple beep will be heard and the LED will be ON. -
Page 42: Extending The Security
Garage security The alarm system can be extended to give protection to a garage whilst the machine is parked within it via the Datatool garage security kit (Pt. No. 02012006). The garage security kit comprises of 3 magnetic reed switches specifically designed for domestic installation, a dedicated high quality connector to link the switch system to the machine and all the cabling/clips required to carry out the installation in most domestic applications. -
Page 43: How To Remove The Machine's Battery/Winter Mode
Datatool Fortress ground anchors. As batteries discharge naturally, we would again suggest you advise the customer on the benefits of using the Datatool Battery conditioner (Pt No. 02012011) to maintain the condition of their battery during the stand up period. -
Page 44: Service Support
Service support The follow tables are provided on the Datatool website for owner assistance. Fuller explanations of some of the items are contained AFTER the ABC type tables. Fault finding (As simple as A B C) Transmitter based issues A. Symptom B. - Page 45 Alarm based issues A. Symptom B. Problem C. Cure Alarm sounds for no apparent reason. Machine or alarm problem. Disarm the alarm using the transmitter. If triggered, on disarm the alarm will sound one long “beep” and then a series of between one and seven “beeps”.
- Page 46 Please note: Installation or machine based problems do not come under the Datatool warranty system. If you suspect this type of problem you are advised to contact your installing dealer to arrange inspection/repair. Datatool cannot be held responsible for any issues relating to machine or installation based problems.
-
Page 47: Current Usage
Current usage S4 Red and Green products Average current (sampling 10mins ) Voltage Disarm 2.85mA 12.0 V IGN ON 118.2mA 12.0 V 2.897mA 12.0 V Sleep mode level 1 2.233mA 11.5 V Sleep mode level 2 2.218mA 10.5 V Sleep mode level 3 2.216mA 9.8 V Winter mode... -
Page 48: False Alarms
False alarms Most ‘false alarms’ do not originate from the alarm itself, but are because the system reacting quite correctly to an external stimulus. All the S4 range contain diagnostic systems to assist you in fault diagnosis. The first and simplest is each time the alarm is disarmed it will give a long tone followed by a number of short beeps if it has been triggered. - Page 49 False alarm fault finding chart Problem Check Result Cure Loss of power 1. Fuse Blown Check cause, repair and replace fuse (Not S4 Yellow) 2. Fuse Not Blown Is there power to the fuse? Q. Is there Check Earths to the alarm power to the Check connection block of alarm and pins within fuse?
-
Page 50: Running Faults
If you are convinced the cause is the alarm you can try substituting the head unit but we would recommend you to try the test box before this and contact Datatool (or your local distributor or manufacturer) if you bought the system through them. -
Page 51: Transmitter Problems
Transmitter design The S4 series transmitter is state of the art when it comes to design and reliability. It is fully approved to FCC and DTI standards and is waterproof. It also does not contain switches as buttons as these are known to collapse with age. -
Page 52: The Dattrac Warranty Returns System
The S4 Warranty system (Dattrac)(UK Only) Datatool offer a limited 3 year parts warranty to the initial owner of the S4 security system installed to the original machine only. Remote controls carry a 12 month warranty. Misused or vandalised units will not be treated as warranty. The warranty period extends to the end of the normal warranty period of the original installed and registered system only. - Page 53 Entering a PIN number Coding new transmitters, changing siren tones, passive arming selection And movement/shock adjustment Example PIN learn Number being learnt 1426 Ignition Ignition Ignition Ignition Ignition ON within 5 seconds LED on bike Press both buttons Press GREY button Flashes rapidly Simultaneously within 10 seconds For 3 seconds...
- Page 54 Coding new transmitters, changing siren tones, passive arming selection and movement/shock adjustment It will not be possible to follow the procedures below without first having registered a PIN number to the alarm system Press Grey button on transmitter or enter PIN number to disarm alarm Turn Ignition switch ON, OFF, ON, OFF, ON (within 7 seconds) Enter PIN number (after last number has been entered a long tone will be heard) Turn ON Ignition switch then press Grey button on a new or existing transmitter...
- Page 55 Engineer Switch Press both Method of altering setting and accepting buttons to number enter desired Toggle to desired switch To exit Engineer switches at any time turn Ignition switch off for at least 15 seconds Switch Engineer Switch 1 Erase OTHER transmitter Both buttons (A double beep will be heard) to erase all transmitters codes except for the one being used...
- Page 56 S4 Series Immobilisation Systems DC Immobilisation The wire to be immobilised is cut and rejoined via the White and White/Green wires. The White/Red wire is not used. Connections of the White and White/Green are not load sensitive so can be reversed.
- Page 57 Annex 3 P/N 02005140 Issue 2 Annex 5 © Copyright Datatool 2007...
Need help?
Do you have a question about the S4 Series and is the answer not in the manual?
Questions and answers