Table of Contents
Advertisement
Quick Links
INSTRUCTION MANUAL
HEM-9000AI
•
Thank you for purchasing the Omron HEM-9000AI unit.
•
Read all of the instructions in the instruction manual before you operate the unit.
•
Retain the instruction manual for future reference when operating the unit.
Non-Invasive
Blood Pressure Monitor
with Augmentation Index (AI)
Advertisement
Table of Contents

Related Manuals for Omron HEM-9000AI


Summary of Contents for Omron HEM-9000AI
- Page 1 Non-Invasive Blood Pressure Monitor with Augmentation Index (AI) • Thank you for purchasing the Omron HEM-9000AI unit. • Read all of the instructions in the instruction manual before you operate the unit. • Retain the instruction manual for future reference when operating the unit.
-
Page 2: Table Of Contents
Warnings and Precautions ...................... 7 Care and Maintenance ......................11 Package Contents ........................12 Accessories ..........................13 Introduction to the HEM-9000AI....................14 General Preparation Component Names/Descriptions ..................15 Connecting the Main Unit and AI Pulse Wave Measurement Unit ........16 Inserting the Memory Card ....................16 Turning on the power, and checking the time/date ..............17... - Page 3 Table of Contents Print Printing Measurement Results .................... 42 Print Sequential Pulse Waves While Measuring ..............43 Memory Retrieval Show All Data List ......................44 ID Search ..........................45 Data Detail .......................... 47 Trend Graph ........................48 Adding and Modifying Blood Pressure Measurement Values ..........50 Registering ID Information ID Registration ........................
-
Page 4: Indications
17-50 cm (7-20 inches), and to calculate radial augmentation index (AI). The HEM-9000AI is intended for use in physicians’ offices, hospitals, clinics and other medical facilities where non-invasive blood pressure and radial AI measurements/calculations are performed on patients and invasive measurement is contraindicated. -
Page 5: Disclaimer
1. Maintenance or repair by any person other than Omron or an authorized agent of Omron. 2. Use of products or supplies manufactured or distributed by a party other than Omron unless purchased from Omron. -
Page 6: Warnings
Warnings GIVE PARTICULAR ATTENTION TO ALL SAFETY PRECAUTIONS Warning signs and graphic symbols are intended for the safe and correct use of the product, and to prevent harm or damage to you and others. Symbols and definitions are as follows: Indicates a possibility that people will suffer death or serious injury resulting WARNING from incorrect use. -
Page 7: Warnings And Precautions
Warnings and Precautions WARNING Clinical • Do not use unless you are a healthcare worker. • Do not use for monitoring vital signs in an intensive care unit. • The device has a safety mechanism built in to prevent pressure from rising above 300mmHg. - Page 8 • Do not disassemble or modify this device. • Electric shock, fire, failure or malfunction might result. • Do not use with any cuffs except those provided by Omron specifically for this device and model. • It might cause incorrect measurement results.
- Page 9 • During measurement, do not unplug the connector that connects the AI measurement to the main unit. • Measurement will not be possible. • Do not use a cellular phone or a radio transceiver in the room where this device is located. • Malfunction might result. Omron Healthcare Professional Services 1-877-216-1336...
- Page 10 • Malfunction might result. • Do not use this unit in a vehicle, such as an ambulance. • Do not use any printer paper other than the printer paper provided by Omron specifically for this device and model. • Damage to the printer might result.
-
Page 11: Care And Maintenance
Care and Maintenance ■ Maintenance prior to use 1. Check this device regularly. 2. When not in use for a long time, ensure that this device functions correctly and safely before using it. • Check all cord, cable and tube connections. •... -
Page 12: Package Contents
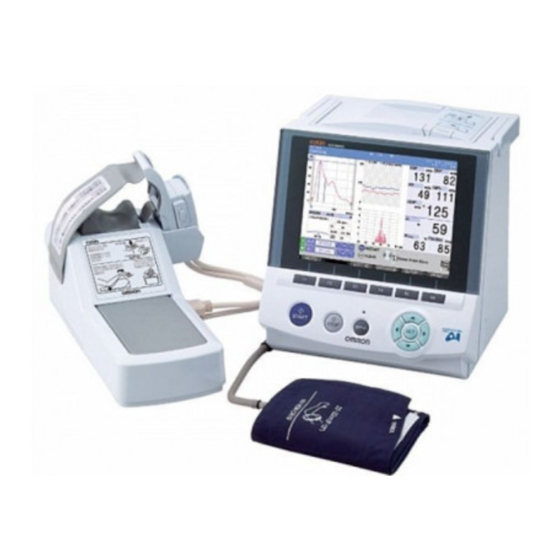
Package Contents MAIN UNIT AI Pulse Wave Measurement Unit Main Unit (display unit) (Including the AI pulse wave sensor unit) ACCESSORIES (Included and Sold Separately) Connection Cable Air Tube 39 1/3" Cuff / Bladder Set Model: HEM-9000-CABLE Model: HEM-TUBE-100X (4 sizes - S, M, L and XL) See additional cuff size information on Page 10. -
Page 13: Accessories
Model: HEM-TUBE-100X/ 130X Model: HEM-9000-KEYBOZ • Wheeled Cart • Memory Card (128MB) (with basket to place cuff) Model: HEM-9000-IC128 Model: HEM-9000-STANDZ • Printer Paper (5 Roll Set) Model: HEM-9000-PAPER To purchase accessories or replacement parts call Omron Healthcare Professional Services at 1-877-216-1336... -
Page 14: Introduction To The Hem-9000Ai
Introduction to the HEM-9000AI Functional Description The Omron Non-Invasive Blood Pressure Monitor with AI, HEM-9000AI, has been developed for blood pressure measurement and AI calculations. Blood pressure measurement is obtained via digital oscillometric method using a blood pressure cuff. An accompanying AI calculation is made based on several components of the patient’s pulse wave, which is obtained... -
Page 15: General Preparation
General Preparation Component Names/Descriptions The material used in the front of the panel is PMMA Function keys... -
Page 16: Connecting The Main Unit And Ai Pulse Wave Measurement Unit
General Preparation Connecting the Main Unit and AI Pulse Wave Measurement Unit Inserting the Memory Card Make sure that the power switch is in the OFF position. [Fig. 1] Insert the air plug of the proper blood pressure cuff in the air connector on the left side of the main unit (refer to detailed instructions on [Fig. -
Page 17: Turning On The Power, And Checking The Time/Date
General Preparation Turning on the power, and checking the time/date Plug the female end of the power cord into the back of the main unit. Then plug the male end of the power cord into a standard 2 pole - 3 conductor - grounded U.S. -
Page 18: Setting The Date And Time
General Preparation Setting the Date and Time Press the F5 key on a screen where F5 [SETUP] appears at the bottom. [Fig. 1] The setup screen will be displayed. Move the [ ] cursor in the upper-left part of the screen up or down using the [▲▼] buttons to select "DATE/ TIME"... - Page 19 General Preparation Setting the Date and Time To change the [DATE] under [DATE / TIME]: Move the [ ] cursor to [DATE] and press the SET button or the [ ] button. [Fig. 4] Move the [ ] cursor using the [ ] button to select the item (month/day/year) under [SETTING VALUE] to change.
-
Page 20: Setting The Blood Pressure/Ai Measurement Method And Registering Id Information
General Preparation Setting the Blood Pressure/AI Measurement Method and Registering ID Information Setting the Blood Pressure/AI Measurement Methods There are three methods for blood pressure measurement: Single, Average - 2 times, and Average - 3 times. The default setting is [SINGLE]. To change this setting, follow the instructions on page 59. -
Page 21: Loading Printer Paper
[Fig. 9] Load the specially designed printer paper into the holder in the direction shown in the diagram. [Fig. 10] * Make sure you use Omron ® printer paper, refer to page 12. Load the printer paper as shown in the diagram. -
Page 22: Measurement Preparation
Select a cuff according to the circumference of the patient’s arm. [Fig. 1] Length Cuff Name 17 - 22cm Omron Cuff / Bladder Set S Cuff / Bladder Set XL 7" - 9" 22 - 32cm Omron Cuff / Bladder Set M 9"... - Page 23 * If after wrapping, INDEX, printed on the cuff, is misaligned with RANGE, select a different, more appropriate size cuff according to the circumference of the arm, and wrap again. * If not wrapped with appropriate cuff, the arm might become numb, or the HEM-9000AI might not be able to measure blood pressure correctly.
-
Page 24: How To Apply The Ai Pulse Wave Sensor Unit
Measurement Preparation How to Apply the AI Pulse Wave Sensor Unit Proper posture Adjust the height of the chair to align the height of the wrist with the height of the heart. By sitting back and keeping the back straight, the arm will naturally be straight. [Figs. - Page 25 Measurement Preparation How to Apply the AI Pulse Wave Sensor Unit The Best Points for Taking an AI Measurement [Fig. 18] With the palm up, take the reading from the artery next to the protrusion of the radius on the thumb side. The best point is right next to the radius protrusion where the pulse is the strongest.
- Page 26 Measurement Preparation How to Apply the AI Pulse Wave Sensor Unit Locate the radial artery by palpation. Once you have located the radial artery, use a commercially-available, non-permanent felt tip marker to mark the spot on the artery which will be best for your AI pulse wave measurement.
-
Page 27: Post-Measurement
Post - Measurement How to Remove the AI Pulse Wave Sensor Unit Check that measurements are complete. [Fig. 27] Push down the slide stops on both sides and return the sensor to its original position. Put the AI pulse wave sensor back in the storage clip. -
Page 28: Selecting The Measurement Method
Selecting the Measurement Method Selecting the Measurement Method This device has the following three measurement options: AI + blood pressure measurement below), blood pressure measurement ( below), and AI measurement ( below). Change the measurement option by pressing the F1 key [MODE] until the desired option is selected [Fig. -
Page 29: Measuring Ai + Blood Pressure Together
AI + Blood Pressure Measurement Measuring AI + Blood Pressure Together This section explains how to simultaneously measure AI and blood pressure using both arms. To measure AI and blood pressure alternately, follow the instructions on page 61 to change the AI measurement sequence. - Page 30 AI + Blood Pressure Measurement Measuring AI + Blood Pressure Together How to incorporate the Tonogram display for a more accurate measurement: A tonogram shows the output of an AI pulse wave sensor. The positional relationship of the AI pulse wave sensor and an artery can be estimated from a tonogram.
- Page 31 AI + Blood Pressure Measurement Measuring AI + Blood Pressure Together As the AI pulse wave sensor pressure becomes stable, the pulse wave will be displayed at the upper left corner of the screen, and the actual measurement will begin. [Fig.
- Page 32 AI + Blood Pressure Measurement Measuring AI + Blood Pressure Together A beep will sound when the data has been saved. The dark blue message [COMPLETE] will be displayed at the lower left corner of the screen. [Fig. 7] The beep will not sound if it is set to OFF using the settings menu.
- Page 33 AI + Blood Pressure Measurement Measuring AI + Blood Pressure Together Press the [ ] buttons to display results from each pulse wave measurement. Example: If 36 waveforms are measured: 35/36 36/36 AVG 1/36 2/36 The pulse wave number is displayed below the waveform (in the center lower-left part of the screen).
-
Page 34: Blood Pressure Measurement
Blood Pressure Measurement Blood Pressure Measurement This mode is for using the device solely as a blood pressure monitor. There are three blood pressure measurement options: [SINGLE], [AVERAGE - 2 TIMES], [AVERAGE - 3 TIMES]. Refer to “How to Change the Measurement Settings” on page 59. [SINGLE]: Measures blood pressure only once and displays the results. - Page 35 Blood Pressure Measurement Blood Pressure Measurement The pulse wave level is displayed with a bar during measurement. [Fig. 5] [Fig. 5] Once measurement complete the buzzer will Systolic blood sound and the results will pressure value appear. [Fig. 6] Diastolic blood Deflation is automatic.
-
Page 36: Auscultation
Blood Pressure Measurement Auscultation When selecting blood pressure measurement, it is possible to take the reading using auscultation. Apply the blood pressure cuff around the [Fig. 1] patient’s arm. [Fig. 1] Press the F2 key [AUTO MANU] on the [BP MEASUREMENT] screens to bring up [MANUAL] on the display. - Page 37 Blood Pressure Measurement Auscultation The pressure will begin to decrease once the optimal pressurization value is reached. [Fig. 5] * Once deflation has started, you can reinflate by pressing START (START OF MEASUREMENT) button. * If you wish to facilitate deflation after deflation has started, press the F1 key [DEFLATE].
-
Page 38: Ai Measurement
AI Measurement AI Measurement This mode measures only AI. Attach the AI pulse wave sensor unit to the left wrist. (Refer to “How to Apply the AI Pulse Wave Sensor Unit” on pages 24-26.) Check that the patient's name and ID appear in the upper-left part of the screen. - Page 39 AI Measurement AI Measurement The applied pressure will become constant and a pulse wave will form in the upper-left part of the screen. Instruct the patient not to move while the measurement is in progress. Body movements and vibrations can cause a measurement error to occur.
- Page 40 AI Measurement AI Measurement Press the [ ] buttons to display results from each measurement. Example: If 35 waveforms are measured: 34/35 35/35 AVG 1/35 2/35 The pulse wave number is displayed below the waveform (in the center lower-left part of the screen).
-
Page 41: Changing Magnification And Scroll Speed
AI Measurement Changing Magnification and Scroll Speed Changing the Sequential Pulse Wave Graph Magnification during AI Measurement: Press the [▲▼] keys to change the sequential pulse wave graph magnification. The default display is standard magnification [x1] The setting can be switched from among four options. -
Page 42: Print
Print Printing Measurement Results The instructions below will help you print the information displayed on the screen. When [F6 PRINT] is displayed as a function key, you can print the contents of the screen by pressing the F6 key. You can print measurement results after each measurement is completed, or after retrieving the measurement results. -
Page 43: Print Sequential Pulse Waves While Measuring
Print Print Sequential Pulse Waves While Measuring To print sequential pulse waves displayed on the screen while measuring AI, follow the steps below. Press F6 Key [PRINT] on the screen during AI measurement. [Fig. 5] During AI measurement, press the F6 key [PRINT]. [CANCEL PRINT] is displayed on the F6 key during printing. -
Page 44: Memory Retrieval
Memory Retrieval Show All Data List It is possible to retrieve saved results. Also, trend graphs for each patient can be displayed and blood pressure measurement results can be added and modified. These functions can be used to manage data for a patient undergoing multiple examinations. Press the F4 key [DATABASE]. -
Page 45: Id Search
Memory Retrieval ID Search The registered ID numbers can be used to search for a specific patient’s measurement results. Press the F2 key [ID SEARCH] on the [DATABASE-ALL DATA-] screen. [Fig. 3] As a result, the ID search screen will be displayed. [Fig. - Page 46 Memory Retrieval ID Search NOTE: When the specific ID number is not registered, the following message is displayed: [The ID’s data was not found]. [Fig. 7] [Fig. 7] If you accidentally input a wrong ID number, repeat step...
-
Page 47: Data Detail
Memory Retrieval Data Detail Displays a patient’s detailed measurement results (from a single measurement). On the [DATA BASE-ALL DATA-] or [PATIENT DATA] List screens, move the [ ] cursor to a data entry to access more detailed data from that measurement. [Fig. 8] The total number of data entries and the current data number displayed are shown in the lower left. -
Page 48: Trend Graph
Memory Retrieval Trend Graph Identifies trends within an individual patient’s multiple measurements. Press the F4 key [TREND GRAPH] on the 1 DAY [ALL DATA] or [PATIENT DATA] screens, or press the SET button on the [DETAILS] screen. A trend over a 1-day time will be displayed. - Page 49 Memory Retrieval Trend Graph Press the F6 key to print the trend graph. [Figs. 13-14] [Fig. 13] [Fig. 14] Press the SET button to return to the Data Details screen. Press the F1 key to return to the default screen.
-
Page 50: Adding And Modifying Blood Pressure Measurement Values
Memory Retrieval Adding and Modifying Blood Pressure Measurement Values It is possible to modify blood pressure measurement results from AI blood pressure measurements or add blood pressure measurement results to AI measurements. It is not possible to modify blood pressure measurement results obtained in blood pressure measurement mode. -
Page 51: Registering Id Information
Registering ID Information ID Registration The patient's [ID], [NAME], [BIRTH DATE], [GENDER], [HEIGHT], [WEIGHT] and [NOTES] can be registered in the ID information screen. Once the patient’s ID information is registered, changes in the measurement results can be tracked continuously. Register the ID information before taking measurements. - Page 52 Registering ID Information ID Registration How to Enter Text Press the [ ] buttons to select the desired characters. Press the [ ] button to move the selector up. Press the [ ] button to move the selector down. Press the [ ] button to move the selector to the left.
- Page 53 Registering ID Information ID Registration How to Register an ID [Fig. 4] A text selection box will appear in the upper-right part of the screen. The ID field can be entered using capital letters, numbers, symbols or spaces. The field can contain up to 20 characters.
- Page 54 Registering ID Information ID Registration How to Register a Gender [Fig. 8] For the gender field, select either “Male” or “Female” from the text selection box area in the upper-right part of the screen. Press the SET button to accept the entry. Once entry is complete, press the F6 key [NEXT FIELD] to move to the height/weight registration.
-
Page 55: Retrieval
Registering ID Information Retrieval It is possible to use a patient's ID to retrieve registration information if his/her registration is already complete. Press the F3 key on a screen where this button is displayed to enter the ID Input screen. [Fig. -
Page 56: Modifications
Registering ID Information Modifications It is possible to use a patient’s ID to retrieve and modify registration information if his/her registration is already complete. Press the F3 key to return to the ID Entry screen. [Fig. 16] [Fig. 16] Enter the ID and press the F6 key [NEXT FIELD]. [Fig. -
Page 57: Configuration Options
Configuration Options How to Change the Setup You can change the HEM-9000AI’s initial setup according to your needs. Memory card ejection and initialization can also be performed under this setup process. Press the F5 key [SETUP]. [Fig. 1] [Fig. 1] The [SETUP] screen is displayed. -
Page 58: How To Change The Settings
Configuration Options How to Change the Settings MEASUREMENT (TEST) LENGTH MEASUREMENT MEASUREMENT SEQUENCE PRINTING NORM TABLES REPORTS AI P75 MEASUREMENT AVERAGE ONLY MEMORY CONTENTS MEMORY ERRORS MEASUREMENTS BRIGHTNESS AUTO OFF TIMER DISPLAY/SOUND cm • kg HEIGHT/WEIGHT UNIT ft, in • lbs mmHg PRESSURE UNIT 2005/12/31 (yyyy/mm/dd) -
Page 59: How To Change The Measurement Settings
Configuration Options How to Change the Measurement Settings Blood pressure measurements, AI measurements, AI + blood pressure measurements and results printouts can be changed. Enter the Settings screen. (Refer to page 57 for details on “How to Change the Setup”.) Move the [ ] cursor to [METHOD] under the [MENU] column and press the SET or [ ] button. - Page 60 Configuration Options How to Change the Measurement Settings To change the amount of time between blood pressure measurements When selecting [AVERAGE - 2 TIMES] or [AVERAGE - 3 TIMES], it is possible to set the interval between blood pressure measurements. 1 Move the cursor to [AVERAGE - INTERVAL TIME].
- Page 61 Configuration Options How to Change the Measurement Settings To change the [MEASUREMENT SEQUENCE] under [AI + BP]: 1 Move the cursor to [MEASUREMENT SEQUENCE]. [Fig. 10] 2 Press the SET or [ ] button to move the cursor to [SETTING VALUE]. [Fig.
-
Page 62: How To Change Settings For Memory Contents
Configuration Options How to Change Settings for Memory Contents It is possible to change the content of data to be saved. Enter the Settings screen. (Refer to page 57 for details on “How to Change the Setup”.) Move the [ ] cursor to [MEMORY CONTENTS] under the menu column and press the SET or [ ] button to move the [ ] cursor to [SETTING LIST]. -
Page 63: How To Change Display/Sound Settings
Configuration Options How to Change Display/Sound Settings You can change the brightness of the LCD display, or turn the sound [ON]/[OFF]. Enter the Settings screen. (Refer to page 57 for details on “How to Change the Setup”.) Move the [ ] cursor to [DISPLAY/SOUND] under the menu column and press the SET or [ ] button to move the [ ] cursor to "SETTING LIST". - Page 64 Configuration Options How to Change Display/Sound Settings To change the [HEIGHT/WEIGHT UNIT] under [DISPLAY]: 1 Move the cursor to [HEIGHT/WEIGHT UNIT]. [Fig. 6] 2 Press the SET or [ ] button to move the cursor to [SETTING VALUE]. [Fig. 7] 3 Move the cursor to the desired setting, selecting from [cm •...
- Page 65 Configuration Options How to Change Display/Sound Settings To change the [BEEP SOUND] under [SOUND]: 1 Move the cursor to [BEEP SOUND]. [Fig.10] 2 Press the SET or [ ] button to move the cursor to [SETTING VALUE]. 3 Move the cursor to the desired setting, from [ON] or [OFF] under [SETTING VALUE].
-
Page 66: How To Change The Clock Settings
Configuration Options How to Change the Clock Settings It is possible to change the date and time settings and display. Enter the SETUP screen. (Refer to page 57 for details on “How to Change the Setup”.) Move the cursor to [DATE/TIME] under the menu column and press the SET or [ button to move the cursor to "SETTING LIST". -
Page 67: Memory Card
Configuration Options Memory Card If it becomes necessary to change the memory card once it becomes nearly full, it is possible to copy patient ID information that is already registered on the old card to the new card. Only the ID information will be copied. The measurement results will not be copied. Enter the Setup screen. - Page 68 (capacity 128MB). If PULSE WAVE DATA is turned on, the data for approximately 320 30 sec measurements can be saved. * Do not use any memory cards except those recommended by Omron. 3 Press the F1 key to return to the default screen.
-
Page 69: Returning To The Default Settings
Configuration Options Returning to the Default Settings It is possible to restore the system settings to the default settings. Enter the Settings screen. (Refer to page 57 for details on “How to Change the Setup”.) Move the cursor to [INITIALIZE] under the menu column and press the SET or [ ] button to move the cursor to “Setting List”. -
Page 70: Keyboard
Configuration Options Keyboard A keyboard for the HEM-9000AI is sold separately. The keyboard offers the same functionality as the buttons in front of the main unit, or the character palette on the screen. How to connect the keyboard Connect the keyboard to USB connector 1 or 2 on the back of the main unit. -
Page 71: Calibration Measurement
Calibration Measurement Checking the Accuracy of the Blood Pressure Display You will need: (1) A mercury blood pressure monitor that is accurately adjusted (including a rubber bulb)*. (2) T-tube (3) 2 air tubes (4) Something to wrap a cuff around such as a sturdy tube (strong material that is not damaged or deformed by inflation) * Even a mercury blood pressure monitor might cause an error in measurement due to a lack of mercury in the mercury tank, dirt on the glass tube or clogging of the glass tube cap. -
Page 72: How To Execute A Test Measurement
Press the F1 key to return to the default screen. Check result (1) Under AAMI SP10:2002, the inspection tolerance (the pressure accuracy before shipment) of the blood pressure meter is set to be within ±3mmHg. (2) If the calibration results go beyond ±3mmHg, contact Omron Healthcare Professional Services. -
Page 73: Validation Study
1. AI Sensor An invasive clinical comparison of the radial AI between the Omron HEM-9010AI (the prototype model of the HEM-9000AI that has the identical AI sensor structure and the same measurement algorithm) and a legally marketed invasive catheter sensor was conducted. - Page 74 • The correlation coefficient of the displayed AI values between the two devices was 0.76, and the average difference between the Omron AI and that of the predicate device was negative (-) 5.0 percent (%) with a standard deviation of 10.9 percent (%), indicating substantial equivalence in the AI values.
-
Page 75: Introduction To Troubleshooting
(4) Contact Omron Healthcare Professional Services. The HEM-9000AI will identify several operator or user errors. As the display screen notifies users of errors, the errors will be categorized on screen as blood pressure measurement errors or AI errors. Screen prints will also categorize errors as blood pressure or AI related. -
Page 76: Error List
Error List Error Codes for Blood Pressure Measurement Error No Error Name Error Message Error Content Action Required cuff pressure Blood pressure monitor was not achieved within error. Inflation Error • Is the air tube connecting the cuff and the allotted time after Cuff will not inflate. - Page 77 Error List Error Codes for AI Pulse Wave Measurement Error No Error Name Error Message Error Content Action AI Pulse Wave Sensor Unit Malfunction AI pulse wave sensor unit • Turn off the power. Check the pulse AI Pulse Wave error.
- Page 78 Error List Error Codes for AI Pulse Wave Measurement Error No Error Name Error Message Error Content Action AI pulse wave • An error occurred in the AI pulse The AI pulse wave Flash ROM measurement unit error. wave measurement unit. measurement unit has Aberration failed.
- Page 79 Action Main unit error. Turn off the power.Turn the power back on. If the problem is not resolved, contact the Omron Healthcare Professional Services Turn off main power supply switch. Blood pressure monitor error. Turn off the power.Turn the power back on. If the problem is not resolved, contact the Omron Healthcare Professional Services Turn off main power supply switch.
-
Page 80: Specifications
Specifications Name Omron Non - Invasive Blood Pressure Monitor with Augmentation Index HEM-9000AI Power Supply AC100V - 240V 50/60Hz 150VA Electric Shock Protection Type Class I Temperature and Humidity: Use +10 - +40°C / 15 – 85%RH Temperature and Humidity: Storage -20 - +60°C / 10 –... -
Page 81: Limited Warranty
Omron will repair or replace (at our option) within a reasonable period of time any item returned to us within the warranty period. The following information is required: •... - Page 82 8. Omron reserves the right to withhold approval of a warranty claim pending visual inspection of the alleged defect. Omron's sole responsibility shall be to repair or replace the product within the terms stated alone. OMRON SHALL NOT BE LIABLE FOR ANY LOSS OR DAMAGE OF ANY KIND, INCLUDING...
-
Page 83: Notes Page
Notes... - Page 84 Manufactured by Omron Healthcare Made in Japan Distributed by: OMRON HEALTHCARE, INC. 1200 Lakeside Drive Bannockburn, Illinois 60015 www.omronhealthcare.com © 2005 Omron Healthcare, Inc. World Rights Reserved HEM9000AI Rev B 1649711-2B...
Need help?
Do you have a question about the HEM-9000AI and is the answer not in the manual?
Questions and answers