
Related Manuals for Mytee Speedster LTD


Summary of Contents for Mytee Speedster LTD
- Page 1 User Manual Speedster LTD ® Model: LTD3, LTD3-LX, LTD5-LX, LTD12 REV. 5/21/20 13655 Stowe Dr. Poway, CA 92064 • P: (858) 679-1191 • F: (858) 726-6005...
- Page 2 Congratulations on the purchase of your new Speedster® LTD Carpet Extractor. As technology continues to develop you can work confidently knowing that both Mytee Products and its employees are equally dedicated to developing with the industry and its advances. Like any other piece of machinery or technology, the Speedster® LTD also requires proper maintenance and care to keep the product working over extended use.
-
Page 3: Table Of Contents
Table of Contents Important Safety Information At a Glance 1.1 - Technical Specifications 1.2 - Included with the Speedster® LTD 1.3 - Speedster® LTD Features 1.5 - Switch Plate Machine Operation 2.1 - Powering the Speedster® LTD 2.2 - Connecting Vacuum & Solution Hoses 2.3 - Filling the Solution Tank 2.4 - Switching on the Speedster®... -
Page 4: Important Safety Information
This machine must be grounded. If it should malfunction When and if calling Mytee for support, please have your or break down, grounding provides a path of least resis- Model and Serial Number available for faster assistance. - Page 5 Important Safety Information To reduce the risk of fire, electrical shock, or injury: 18. The voltage and frequency indicated on the name 1. Read all instructions before using equipment. plate must correspond to the wall receptacle supply voltage. 2. Use only as described in this manual. Use only manu- 19.
-
Page 6: At A Glance
11 gallon capacity (approx.) Solution Tank Solution Tank 11 gallon capacity (approx.) 11 gallon capacity (approx.) Vacuum Vacuum Dual exclusive Mytee® LX™ Vacuum Dual 3-stage, 200 CFM, 130” water lift Motors Motors Motors - 225-250 CFM, 182” water lift Solution Pump Solution Pump 500 PSI, 1.5 GPM... -
Page 7: Included With The Speedster® Ltd
1 - At a Glance 1.2 - Included with the Speedster® LTD H141V Cuff-Lynx™ (2” Female Cuff-Lynx™ x H110V Cuff-Lynx™ (2” Female Cuff-Lynx™ x 1.5” Female Hose) 2” Female Hose) H375 Hose Hanger H226 Drain Spout... -
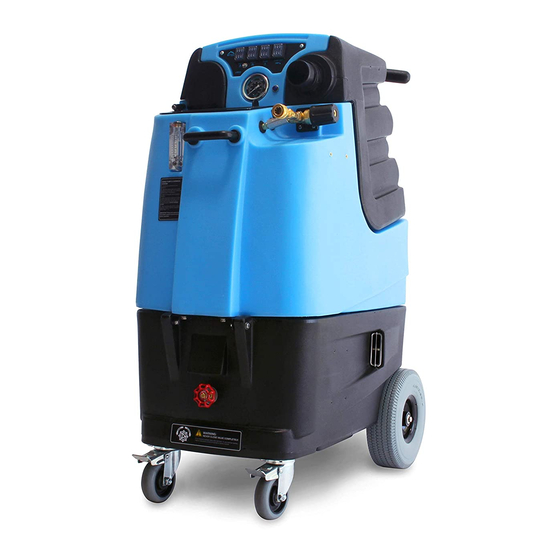
Page 8: Speedster® Ltd Features
1 - At a Glance 1.4 - Speedster® LTD Features LTD3-LX shown as example 1. Push handle 12. Front lift handle 2. Loading Buddy wheels (Included with LX™ Models) 13. Quick connect fitting for solution line 3. Clear recovery tank lid featuring prime valve 4. -
Page 9: Switch Plate
1 - At a Glance 1.5 - Switch Plate HEATER 1 ONLY HEATERS 1 & 2 LTD3 shown as example 1. Vacuum switches. 5. Heater indicator lights. Each light illuminates when the 2. Pump switch. corresponding heater is on (not installed on 3. -
Page 10: Machine Operation
2 - Machine Operation Before Operating 2.2 - Connecting Vacuum & Solution Hoses Take the included mesh IMPORTANT: Do not pull on hoses in filter bag and place it over order to move the unit. Only use the the pump-out filter inside appropriate handles. -
Page 11: Switching On The Speedster® Ltd
2 - Machine Operation 2.4 - Switching on the Speedster® LTD IMPORTANT: If chemical injection will not be used, make Units Without Heater (LTD5-LX, LTD12) sure the chemical injector is closed by turning the knob all After a cleaning tool is connected and the solution tank is the way clockwise. -
Page 12: Emptying The Recovery Tank
2 - Machine Operation 2.8 - Emptying the Recovery Tank Empty the recovery tank by attaching the H226 45˚ drain elbow to the drain spout in back. Lift up the dump valve and empty the tank into a bucket or drain. Rinse out the recovery tank using the wash hose inside the solution tank. -
Page 13: Machine Maintenance
Inspect spray pattern for clogging. 3.4 - System Maintainer If clogged, remove spray tips and Weekly flushing of the solution system with Mytee® soak them in a recommended liquid System Maintainer helps keep lines clean and prevents neutralizer for up to six hours. To... -
Page 14: Available Accessories
Jet Wand Carpet Wand 14” Speed Wand 8400 - 4” Stainless 8700 - Stainless Steel 8400P - Air Lite™ 8400DX - Mytee Dry™ Steel Upholstery Tool Crevice Tool Upholstery Tool Upholstery Tool 8903 - Wand Style Spinner® 8904 - T-Handle Spinner®... -
Page 15: Troubleshooting
5 - Troubleshooting 5.1 - Vacuum Troubleshooting Lid on tank is loose and is Make sure the lid is tight. causing air leakage. Vacuum is not turning on. Possible Cause Solution Vacuum blows water out the exhaust. Vacuum may not be getting Check the electrical con- Possible Causes Solutions... - Page 16 If there are no entirely. is turned on for a brief leaks, run Mytee’s System instant in order to verify Maintainer™ (Part # 3601) cause. The remedy is to through the machine to install a new check valve.
- Page 17 140°F water. Loose electrical Check all electrical con- connection. nections, including power Heater has hard water Run Mytee System cord and harness. Maintainer™ (Part # 3601) buildup inside, leading to lost efficiency. through the machine Automatic sensor has...
- Page 18 Mytee Products, Inc. 13655 Stowe Dr. Poway, CA 92064 www.mytee.com © 2020 Mytee Products, Inc. Printed in the USA...
Need help?
Do you have a question about the Speedster LTD and is the answer not in the manual?
Questions and answers