Table of Contents
Advertisement
Quick Links
Advertisement
Table of Contents

Related Manuals for Excalibur RF-51-eDp


Summary of Contents for Excalibur RF-51-eDp
- Page 1 RF-51-eDp Deluxe 2-way Oem Upgrade & Range extender July 22, 2014 Operation guide...
-
Page 2: Table Of Contents
Table Of Contents Controller & Transmitter Overview..............3 The 2-Way Controller ................3 The 1-Way Transmitter ................3 Controller & Transmitter Functions ............... 4 Other Remote Start Features ............... 8 Low Battery/Low Temp Automatic Starting ..........8 Pit-Stop Feature ..................8 Security System Features ................ -
Page 3: Controller & Transmitter Overview
Controller & Transmitter Overview THe 2-wAY CONTROLLeR Controller part number: 159-03 (w/ 2 CR2032 batteries) “start” Call your dealer or visit www.caralarm.com to order button replacement transmitters. Controller battery replacement: “trunk” Slide the back cover (do not pry up) off the back of the button case in the direction of the arrow. -
Page 4: Controller & Transmitter Functions
Controller & Transmitter Functions LOCk / ARm: Press and release the “LOCK” button. • THE SIREN WILL CHIRP & THE PARKING LIGHTS WILL FLASH ONCE. • UPON RECEIVING CONFIRMATION FROM YOUR SYSTEM, THE CON- TROLLER WILL SHOW THE LOCK/ARM ICON AND BEEP ONCE NOTe: pReSSINg LOCk TwICe IN 5 SeCONDS STARTS THe pARkINg TImeR. - Page 5 Controller & Transmitter Functions (cont’d) TRUNk ReLeASe / CHANNeL 2: Press the “TRUNK” button for 3 seconds. • THE SYSTEM WILL DISARM AND THE TRUNK WILL OPEN (IF EQUIPPED). • UPON RECEIVING CONFIRMATION FROM YOUR SYSTEM, THE CONTROLLER WILL PLAY THE TRUNK RELEASE ANIMATION AND BEEP TWICE.
- Page 6 Controller & Transmitter Functions (cont’d) pANIC: Press & hold the “LOCK” or “UNLOCK” button for 3 seconds. • THE HORN WILL SOUND AND THE DOORS WILL LOCK OR UNLOCK DEPENDING WHICH BUTTON IS PRESSED. NOTE: PANIC MAY NOT BE AVAILABLE ON ALL VEHICLES •...
- Page 7 Controller & Transmitter Functions (cont’d) AUXILIARY FUNCTIONS 1-4: The actual operation of these functions will vary from car to car. They are designed to operate extra vehicle functions like automatic sliding doors or motorized hatches. Aux 1-4 are virtual outputs only available on certain vehicles when this system is integrated with the vehicle’s data network.
-
Page 8: Other Remote Start Features
Other Remote Start Features LOw BATTeRY/LOw Temp AUTOmATIC STARTINg This feature will automatically start the engine if the vehicle battery drops below 11 volts or the interior temperature drop to 15 degrees fahrenheit. You must activate these features each time you park your car to use them. -
Page 9: Security System Features
Security System Features LAST DOOR LOCkINg/ARmINg This system can be configured to arm automatically when all the vehicle’s doors are closed (see programmable feature #2). When all of the doors are closed after driving the vehicle, it will start a 30 second countdown (indicated by a fast flashing status light). -
Page 10: Using The Valet Switch
Using The Valet Switch The valet switch is a push button built into the window mount antenna. It is used to perform emer- gency override and system programming (see inside of back cover for programming). emeRgeNCY OVeRRIDe If you were to lose or break your controller, you’d need to perform an emergency override to disarm the system. -
Page 11: Multi-Car Operation (2-Way Controller Only)
The Status Light (cont’d) ZONe VIOLATION ReCALL (ReD LIgHT): If a zone is violated while the system is locked/armed, the RED status lights will flash a number of times to indicate exactly which zone(s), has been violated. It will store the last 2 violated circuits and continually repeat the flash pattern until the system is disarmed &... -
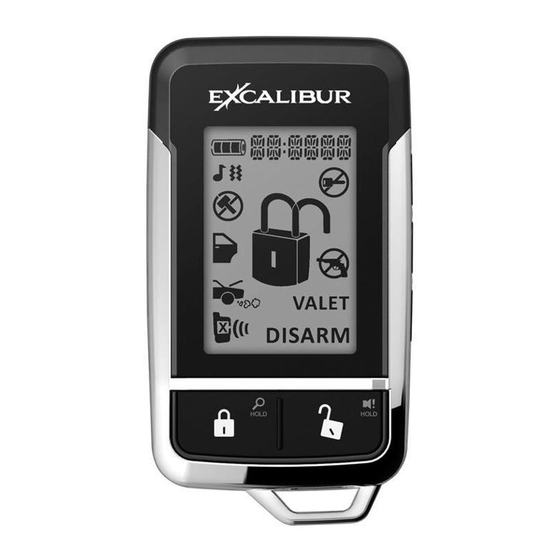
Page 12: Controller Options
Controller Options LCD SCReeN ICONS melody/Vibrate Battery Level Clock / Timer Sensor Remote Start Trigger Shutdown Door Trigger Carjack mode Hood Trigger Valet mode Remote Start Indicator Alarm Status In Range Indicator IN-RANge INDICATOR All primary commands sent to the system have a confirmation response that is sent to the control- ler to indicate that the command was successful. -
Page 13: Setting The Clock
Controller Options (cont’d) SeTTINg THe CLOCk 1) Press the “P” button for 5 seconds to access the controller features. The controller will beep twice. 2) Press and release the “P“ button once to select the clock (hour digits will flash). 3) Press the “TRUNK“... -
Page 14: Parking Timer & Remote Start Timer
Controller Options (cont’d) pARkINg TImeR & RemOTe START TImeR The controller has 2 convenient timer functions. The PARKING TIMER tells you how long you’ve been parked in case you are at a parking meter or other parking areas with time restrictions. The REMOTE START TIMER tells you how long your engine has been running in remote start mode. -
Page 15: Programming Features
programming Features Step 1 Turn the ignition key “ON”, then “OFF” Step 2 Within 5 seconds of step 1, press the valet switch 5 times to access user features (10 times to access installer features). ~ The antenna will beep and the status light will turn on. Step 3 Within 10 seconds of step 2, press the valet switch the number of times corresponding with the desired feature’s number. - Page 16 User programmable Features (cont’d) Feature #3 - Automatic Re-locking (press “lock” button to program) (press “unlock” button to program) - DeFAULT enhanced (press “trunk” button to program) “Automatic Re-locking”, described on page 9, re-locks the alarm if accidentally unlocked. Enhanced auto re-lock allows you to cancel the rearming sequence by pressing unlock a 2nd time within 5 seconds.
- Page 17 BLANK PAGE...
- Page 18 BLANK PAGE...
-
Page 19: Programmable Features Matrix
programmable Features matrix Feature Programming: Ignition on, off, press valet 5 times Lock Button Unlock button Trunk button ”START” button # Feature 1 Ignition Lock/Unlock Lock only Unlock only 2 Last Door Locking 3 Automatic Relocking Enhanced 4 Unlock w/ Trunk Release On 5 Remote Start Activation 1 press 2 presses... - Page 20 This device complies with FCC Rules part 15. Operation is subject to the following two conditions, (1) This device may not cause harmful interference and, (2) This device must accept any interference that may be received, including interference that may cause undesired operation. The manufacturer is not responsible for any radio or TV interference caused by unauthorized modifi cations to this equipment.
Need help?
Do you have a question about the RF-51-eDp and is the answer not in the manual?
Questions and answers