Table of Contents
Advertisement
Available languages
Available languages
Quick Links
Tyčový vysavač 3v1
Tyčový vysávač 3v1
Odkurzacz pionowy 3w1
Rúdporszívó 3 az 1-ben
Bezvadu putekļusūcējs "trīs vienā"
3in1 Rod Vacuum Cleaner
CZ
SK
PL
VP4201
HU
LV
EN
Stabstaubsauger 3in1
Aspirateur balai 3 en 1
Aspirapolvere verticale 3 in 1
Aspiradora vertical 3 en 1
Aspirator cu tijă 3 în 1
IT
DE
FR
ES
RO
Advertisement
Table of Contents

Related Manuals for Concept2 VP4201


Summary of Contents for Concept2 VP4201
- Page 1 Aspirateur balai 3 en 1 Tyčový vysávač 3v1 Aspirapolvere verticale 3 in 1 Odkurzacz pionowy 3w1 Aspiradora vertical 3 en 1 Rúdporszívó 3 az 1-ben Aspirator cu tijă 3 în 1 Bezvadu putekļusūcējs “trīs vienā” 3in1 Rod Vacuum Cleaner VP4201...
- Page 2 VP4201...
-
Page 3: Důležitá Bezpečnostní Upozornění
• Nesahejte na spotřebič vlhkýma nebo mokrýma rukama. • Nevkládejte žádné předměty do otvorů. Nepoužívejte spotřebič, je-li ucpán jakýkoli jeho otvor. • Dbejte zvýšené opatrnosti při vysávání na schodech. • Jestliže dojde k ucpání sacího otvoru spotřebiče, vypněte spotřebič VP4201... - Page 4 Čištění a údržbu prováděnou uživatelem nesmějí provádět děti, pokud nejsou starší 8 let a pod dozorem. Děti mladší 8 let se musí držet mimo dosah spotřebiče a jeho přívodu. Děti si se spotřebičem nesmějí hrát. Nedodržíte-li pokyny výrobce, nemůže být případná oprava uznána jako záruční. VP4201...
-
Page 5: Popis Výrobku
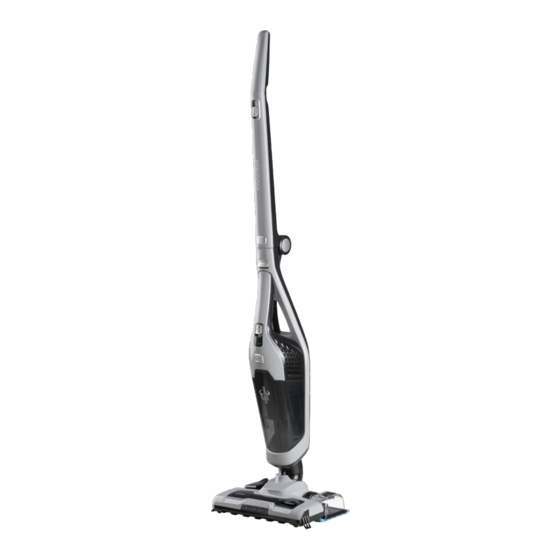
3 Tlačítko ke sklopení rukojeti 15 Větrací otvory 4 Tlačítko pro uvolnění ručního vysavače 16 Hubice 5 Sklopný kloub 6 Přístup k bodu připojení nabíječky é 7 Háček pro štěrbinovou hubici 8 Hlavní hubice 9 Tlačítko pro uvolnění hlavní hubice í VP4201... -
Page 6: Návod K Obsluze
Svítí dva zelené čtverečky - středně nabitá baterie, Svítí tři zelené čtverečky - plně nabito. Když se baterie zcela vybije, indikátor bude po dobu 20 sekund blikat a poté se automaticky vypne. 8. Před každým použitím vysavače doporučujeme vyprázdnit nádobku na nečistoty. POUŽITÍ RUČNÍHO VYSAVAČE VP4201... - Page 7 2. Naplňte vodou. Lze použít čistou desinfekci bez příměsí a vonných silic (Obr. 6). 3. Nasaďte mopovací textilii (Obr. 7). 4. Nasaďte vysavač na nádržku na vodu (Obr. 8). 5. Přepínacím tlačítkem (E) smáčejte mopovací textilii dle potřeby. Obr. 5 Obr. 6 Obr. 7 Obr. 8 VP4201...
-
Page 8: Čištění Filtru
9. Nasaďte plastovou krytku, přidržte horní část a otáčením zámku po směru hodinových ručiček ji zajistěte. Obr. 9 Obr. 10 Obr. 11 Obr. 12 Obr. 13 USKLADNĚNÍ VYSAVAČE Vysavač lze bezpečně zavěsit pomocí držáku k uchycení na zeď, který je dodáván s výrobkem. Zabráníte tak převrhnutí výrobku a následnému poškození. VP4201... -
Page 9: Ochrana Životního Prostředí
Při potřísnění pokožky ji ihned jemně omyjte vodou a mýdlem a vyhledejte lékařské ošetření. Tento výrobek splňuje veškeré základní požadavky směrnic EU, které se na něj vztahují. Změny v textu, designu a technických specifikací se mohou měnit bez předchozího upozornění a vyhrazujeme si právo na jejich změnu. VP4201... -
Page 11: Dôležité Bezpečnostné Upozornenia
• Nesiahajte na prístroj vlhkými alebo mokrými rukami. • Do otvorov nevkladajte žiadne predmety. Nepoužívajte spotrebič, ak je upchatý nejaký jeho otvor. • Dbajte na zvýšenú opatrnosť pri vysávaní na schodoch. • Ak dôjde k upchatiu sacieho otvoru spotrebiča, spotrebič vypnite a pred VP4201... - Page 12 Domáce čistenie a údržbu nesmú robiť deti, ak nedosiahli 8 rokov a nemajú nad sebou dozor. Deti do 8 rokov veku sa nesmú zdržiavať v dosahu spotrebiča ani jeho prívodu. Deti sa so spotrebičom nesmú hrať. Ak nedodržíte pokyny výrobcu, prípadná oprava sa neuzná ako záručná. VP4201...
- Page 13 3 Tlačidlo na sklopenie rukoväte 15 Vetracie otvory 4 Tlačidlo na uvoľnenie ručného vysávača 16 Hubica 5 Sklopný kĺb 6 Prístup k bodu pripojenia nabíjačky é 7 Háčik pre štrbinovú hubicu 8 Hlavná hubica 9 Tlačidlo na uvoľnenie hlavnej hubice é VP4201...
-
Page 14: Návod Na Obsluhu
Svietia dva zelené štvorčeky - stredne nabitá batéria, Svietia tri zelené štvorčeky - plne nabité. Keď sa batéria úplne vybije, indikátor bude 20 sekúnd blikať a potom sa automaticky vypne. 8. Pred každým použitím vysávača odporúčame vyprázdniť nádobu na nečistoty. VP4201... - Page 15 2. Naplňte vodou. Možno použiť čistú dezinfekciu bez prímesí a vonných silíc (obr. 6). 3. Nasaďte mopovaciu textíliu (obr. 7). 4. Nasaďte vysávač na nádržku na vodu (obr. 8). 5. Prepínacím tlačidlom (E) namočte mopovaciu textíliu podľa potreby. obr. 5 obr. 6 obr. 7 obr. 8 VP4201...
-
Page 16: Vyprázdnenie Nádoby Na Nečistoty
9. Nasaďte plastový kryt, pridržte hornú časť a otáčaním zámku v smere hodinových ručičiek ju zaistite obr. 9 obr. 10 obr. 11 obr. 12 obr. 13 SKLADOVANIE VYSÁVAČA Vysávač možno bezpečne zavesiť na stenu pomocou držiaka na uchytenie, ktorý sa dodáva s výrobkom. Zabránite tak prevrhnutiu výrobku a následnému poškodeniu. VP4201... -
Page 17: Ochrana Životného Prostredia
Tento výrobok spĺňa všetky základné požiadavky smerníc EÚ, ktoré sa naň vzťahujú. Zmeny v texte, vzhľade a technických špecifikáciách môžu nastať bez predošlého upozornenia a na tieto zmeny si vyhradzujeme právo. VP4201... - Page 19 Należy chronić go przed bezpośrednim działaniem promieni słonecznych oraz wilgocią. • Nie wolno dotykać urządzenia wilgotnymi lub mokrymi rękami. • Nie wolno wkładać w otwory jakichkolwiek przedmiotów. Nie wolno używać urządzenia, jeżeli jakikolwiek jego otwór jest zatkany. VP4201...
- Page 20 Przeprowadzane przez użytkownika czynności w ramach czyszczenia i konserwacji nie mogą być wykonywane przez dzieci, chyba że ukończyły one 8 lat i są pod nadzorem. Dzieci poniżej 8 lat należy trzymać z dala od urządzenia VP4201...
-
Page 21: Opis Produktu
12 Wskaźnik ładowania 5 Przechylny przegub 13 Pojemnik na zanieczyszczenia 6 Dostęp do punktu ładowania ładowarki 14 Wskaźnik ładowania 7 Haczyk na dyszę szczelinową 15 Otwory wentylacyjne 8 Główna dysza 16 Dysza 9 Przycisk do zwolnienia głównej dyszy ć ć ć VP4201... -
Page 22: Instrukcja Obsługi
Jeśli świecą się dwa zielone kwadraciki - bateria jest średnio naładowana, Jeśli świecą się trzy zielone kwadraciki - w pełni naładowana. Jeśli bateria zostanie całkowicie rozładowana, wskaźnik będzie migał przez 20 sekund, a później automatycznie się wyłączy. 8. Przed każdym korzystaniem z odkurzacza zalecamy opróżnienie pojemnika na nieczystości. VP4201... - Page 23 2. Wlej wodę. Można użyć czystego środka dezynfekcyjnego, bez dodatków i olejków zapachowych (Rys. 6). 3. Załóż włókninę mopa (Rys. 7). 4. Połącz pojemnik na wodę z odkurzaczem (Rys. 8). 5. Za pomocą przełącznika (E) zanurzaj włókninę mopa wg potrzeby. Rys. 5 Rys. 6 Rys. 7 Rys. 8 ę VP4201...
- Page 24 PRZECHWYWANIE ODKURZACZA Odkurzacz można bezpiecznie zawiesić za pomocą uchwytu do mocowania na ścianę, który dostarczono z produktem. Zapobiegniesz w ten sposób przewróceniu produktu i następnemu uszkodzeniu. 1. Wybierz odpowiednie miejsce w Twoim gospodarstwie domowym, w którym chcesz zawiesić odkurzacz. VP4201...
-
Page 25: Ochrona Środowiska
W przypadku zetknięcia ze skórą, natychmiast delikatnie omyj skórę wodą z mydłem i zasięgnij porady lekarza. Produkt spełnia wszystkie stosowne wymagania podstawowe, nakładane na niego przez dyrektywy Tekst, wygląd i specyfikacja techniczna mogą ulec zmianie bez uprzedniego powiadomienia, do czego zastrzegamy sobie prawo. VP4201... -
Page 27: Fontos Biztonsági Figyelmeztetések
• Ne tegyen semmilyen tárgyat a nyílásokba. Ne használja a készüléket, ha bármelyik nyílása eldugult. • Legyen különösen óvatos, ha lépcsőn porszívóz. • Ha a készülék szívónyílása eldugul, kapcsolja ki a készüléket és távolítsa el a szennyeződéseket, mielőtt újra bekapcsolja. VP4201... - Page 28 és tisztítást gyerekek nem végezhetik, ha nem idősebbek 8 évnél, és nincsenek felügyelet alatt. A 8 évnél fiatalabb gyerekeket tartsa távol a készüléktől és a vezetékektől. Gyermekeknek tilos a készülékkel játszani. Ha nem tartja be a gyártó utasításait, az esetleges javításra nem vonatkozik a jótállás. VP4201...
-
Page 29: A Termék Leírása
14 Töltéskijelző 3 A fogantyú lehajtására szolgáló gomb 15 Szellőzőnyílások 4 A kézi porszívó kioldására szolgáló gomb 16 Fúvóka 5 Behajtható csukló 6 Hozzáférés a töltőcsatlakozó ponthoz 7 Kampó a résfej számára 8 Főfej 9 A főfej kioldógombja ó VP4201... -
Page 30: Használati Útmutató
Két zöld négyszög világít - közepesen van feltöltve akkumulátor, Három zöld négyszög világít - teljesen fel van töltve. Ha az akkumulátor teljesen lemerül, a jelzőfény 20 másodpercig villog, majd automatikusan kikapcsol. 8. A porszívó minden használata előtt javasolt kiüríteni a szennyeződésgyűjtő edényt. VP4201... - Page 31 2. Töltse meg vízzel. Használhat sima, adalékoktól és illóolajoktól mentes fertőtlenítőt (6. ábra). 3. Illessze fel a mopot (7. ábra) 4. Tegye a porszívót a víztartályra (8. ábra). 5. A kapcsológombbal (E) szükség szerint nedvesítse meg a mopot. 5. ábra 6. ábra 7. ábra 8. ábra VP4201...
- Page 32 12. ábra 13. ábra A PORSZÍVÓ TÁROLÁSA A porszívót a termékhez mellékelt tartó segítségével biztonságosan fel lehet akasztani a falra. Így megakadályozhatja, hogy a termék felboruljon és megsérüljön. 1. Válasszon ki a háztartásában egy megfelelő helyet, ahová a porszívót felakasztaná. VP4201...
- Page 33 Ha a sérült akkumulátor vagy elem kifolyik, a kijutó folyadék lúgos jellegű. Ha bőrrel érintkezik, azonnal mossa le vízzel és szappannal, és menjen orvoshoz. Ez a termék megfelel az összes vonatkozó EU irányelv követelményeinek. A szövegben, a kivitelben és a műszaki jellemzőkben előzetes figyelmeztetés nélkül sor kerülhet változtatásokra, minden módosításra vonatkozó jog fenntartva. VP4201...
-
Page 35: Svarīgi Drošības Norādījumi
• Nepieskarieties ierīcei ar mitrām vai slapjām rokām. • Neievietojiet ierīces atverēs dažādus priekšmetus. Nelietojiet putekļsūcēju, ja ir aizsprostota kāda no atverēm. • Lietojot putekļsūcēju uz kāpnēm, esiet īpaši piesardzīgi. • Ja ir nosprostota ierīces sūkšanas atvere, izslēdziet putekļsūcēju un pirms VP4201... - Page 36 Lietotāja veikto ierīces tīrīšanu un apkopi nedrīkst veikt bērni, kas jaunāki par 8 gadiem un neatrodas pieaugušo uzraudzībā. Bērni, kas ir jaunāki par 8 gadiem, nedrīkst atrasties ierīces un tās vada tuvumā. Neļaujiet bērniem rotaļāties ar šo ierīci. Ražotāja norādījumu neievērošanas dēļ var tikt atteikts garantijas remonts. VP4201...
-
Page 37: Ierīces Apraksts
2 Āķis montāžai pie sienas 14 Uzlādes indikators 3 Roktura noliekšanas taustiņš 15 Ventilācijas atveres 4 Rokas putekļsūcēja atbrīvošanas taustiņš 16 Sprausla 5 Saliekamais savienojums 6 Piekļuve lādētāja savienojuma punktam 7 Āķis rievotajai sprauslai 8 Galvenā sprausla 9 Galvenās sprauslas atbrīvošanas taustiņš VP4201... -
Page 38: Lietošanas Instrukcija
Izgaismoti divi zaļie kvadrātiņš – vidēji uzlādēts akumulators, Izgaismoti trīs zaļie kvadrātiņš – pilnībā uzlādēts akumulators. Kad akumulators ir pilnībā izlādējies, indikators mirgo 20 sekundes un pēc tam automātiski izslēdzas. 8. Pirms katras putekļsūcēja lietošanas reizes iesakām iztukšot netīrumu tvertni. VP4201... - Page 39 2. Piepildiet ar ūdeni. Var izmantot tīru dezinfekciju bez piedevām un ēteriskām eļļām (6. att.) 3. Uzlieciet tīrīšanas drānu (7. att.) 4. Uzstādiet putekļsūcēju uz ūdens tvertnes (8. att.) 5. Izmantojiet pārslēgšanas taustiņu (E), lai pēc vajadzības samitrinātu tīrīšanas drānu. 5. att. 6. att. 7. att. 8. att. VP4201...
- Page 40 9. Uzlieciet plastmasas pārsegu, pieturiet augšdaļu un pagrieziet slēdzeni pulksteņrādītāja virzienā, lai to nofiksētu 9. att. 10. att. 11. att. 12. att. 13. att. PUTEKĻSŪCĒJA UZGLABĀŠANA Putekļsūcēju var droši pakarināt, izmantojot sienas stiprinājumu, kas pievienots ierīcei. Tas novērsīs izstrādājumu apgāšanos un bojājumus. 1. Izvēlieties piemērotu vietu savās mājās, kur vēlaties piekārt putekļsūcēju. VP4201...
-
Page 41: Vides Aizsardzība
Ja ir notikusi bojātā akumulatora vai bateriju noplūde, iztecējušais šķīdums ir sārmains. Pēc saskares ar ādu nekavējoties to viegli nomazgājiet ar ziepēm un vērsieties pēc medicīniskas palīdzības. Šis izstrādājums atbilst visām piemērojamo ES direktīvu pamatprasībām. Izmaiņas tekstā, konstrukcijā un tehniskajās specifikācijās var tikt veiktas bez iepriekšēja brīdinājuma, un mēs paturam tiesības veikt šīs izmaiņas. VP4201... -
Page 43: Important Safety Precautions
• Do not insert any objects into the openings. Do not use the appliance if any of the openings is clogged. • Take extra caution when vacuuming on stairs. • If the appliance intake is clogged, switch off the appliance and remove VP4201... - Page 44 8 years old and under supervision. Children aged under 8 years of age must be kept away from the appliance and its power cord. Do not let children play with the appliance. Damages from failure to follow the manufacturer's instructions are not covered by the warranty. VP4201...
-
Page 45: Product Description
14 Indicator light 3 Handle folding button 15 Ventilation holes 4 Hand-held vacuum cleaner release button 16 Nozzle 5 Hinged joint 6 Access to the charger connection point 7 Hook for slotted nozzle 8 Main nozzle 9 Main nozzle release button VP4201... - Page 46 Three green squares are lit - fully charged. When the battery is completely dead, the indicator will be flashing for 20 seconds and then turn off automatically. 8. We recommend emptying the dirt container before each use of the vacuum cleaner. VP4201...
-
Page 47: Using The Hand-Held Vacuum Cleaner
3. Put on the mop fabric (Fig. 7). 4. Put the vacuum cleaner on the water tank (Fig. 8). 5. Use the toggle button (E) to wet the mop fabric as needed. Fig. 5 Fig. 6 Fig. 7 Fig. 8 VP4201... -
Page 48: Emptying The Dirt Container
The vacuum cleaner can be securely hung using the wall mount that comes with the product. This will prevent the product from tipping over and getting damaged. 1. Choose a suitable place in your home where you want to hang the vacuum cleaner. VP4201... -
Page 49: Service Centre
The product meets all the necessary requirements of the EU directives applicable to the specific product. Changes in text, design, and technical specifications are subject to change without prior notice and we reserve the right to change them. VP4201... -
Page 51: Wichtige Sicherheitshinweise
• Halten Sie das Gerät abseits von den Wärmequellen, wie Heizkörper, Öfen, usw. Schützen Sie es vor der direkten Sonneneinstrahlung, sowie vor der Feuchtigkeit. • Berühren Sie das Gerät nicht mit feuchten oder nassen Händen. • Legen Sie keine Gegenstände in die Öffnungen hinein. Benutzen Sie das VP4201... - Page 52 • Berühren Sie die angetriebenen beweglichen Teile des Geräts während des Betriebs nicht. • Reparieren Sie das Gerät nicht selbst. Wenden Sie sich an eine autorisierte Werkstatt. • Dieses Gerät können Kinder ab dem 8. Lebensjahr und Personen mit den erniedrigten physischen oder mentalen Fähigkeiten oder mit den VP4201...
- Page 53 8 Jahre und unter keiner Aufsicht sind. Kinder bis zum 8. Lebensjahr müssen außerhalb der Reichweite des Geräts und dessen Zuleitung gehalten werden. Kinder dürfen mit dem Gerät nicht spielen. Bei der Nichteinhaltung der Anweisungen des Herstellers kann eine eventuelle Reparatur nicht als Garantiereparatur anerkannt werden. VP4201...
- Page 54 2 Haken zur Befestigung an die Wand 13 Schmutzbehälter 3 Taste zum Klappen des Handgriffs 14 Ladezustandsanzeige 4 Handstaubsauger-Entriegelungstaste 15 Lüftungsöffnungen 5 Kippgelenk 16 Düse 6 Zutritt zum Anschlusspunkt des Ladegeräts 7 Haken für die Schlitzdüse 8 Hauptdüse 9 Hauptdüse-Entriegelungstaste VP4201...
-
Page 55: Vor Dem Ersten Gebrauch
Es leuchten zwei grüne kleine Quadrate - mittelgeladene Batterie. Es leuchten drei grüne kleine Quadrate - vollgeladen. Wenn sich die Batterie vollständig auslädt, wird die Anzeige für die Dauer von 20 Sekunden blinken und danach wird sie automatisch ausgeschaltet. VP4201... - Page 56 3. Setzen Sie die Mopp-Textilie auf (Abb. 7). 4. Setzen Sie den Staubsauger auf den Wasserbehälter auf (Abb. 8). 5. Feuchten Sie die Mopp-Textilie mittels der Umschalttaste (E) laut Bedarf an. Abb. 5 Abb. 6 Abb. 8 Abb. 7 VP4201...
- Page 57 8. Schieben Sie danach das andere kantige Ende der Bürste ein. 9. Setzen Sie die Kunststoffkappe auf, halten Sie den oberen Teil an und sichern Sie ihn durch das Drehen des Schlosses im Uhrzeigersinn ab. Abb. 9 Abb. 10 Abb. 11 Abb. 12 Abb. 13 VP4201...
- Page 58 5. Jedes Mal, wenn Sie das Produkt nicht nutzen, hängen Sie es an die Wandhalter auf. Hinweise Der Staubsauger ist mit einem Haken ausgerüstet, der sich an dessen Rückseite befindet. Auf diesen Haken können Sie die Schlitzdüse aufhängen und so deren Verlust vermeiden. VP4201...
- Page 59 Dieses Produkt erfüllt sämtliche Grundanforderungen der EU-Richtlinien, die sich darauf beziehen. Lebensmittel sind Die Änderungen im Text, im Design und in den technischen Spezifizierungen können ohne vorherigen Hinweis geändert werden, und wir behalten uns das Recht auf deren Änderungen vor. VP4201...
- Page 61 • N’insérer aucun objet dans les voies d’entrée. Ne pas utiliser l’appareil lorsque les voies d’entrée sont bloquées. • Soyez très prudents lorsque vous nettoyez les escaliers. • Si les voies d’entrée sont bloquées, arrêter l’appareil et enlever tout VP4201...
- Page 62 Maintenir l’appareil et le cordon d’alimentation hors de portée des enfants de moins de 8 ans. Ne pas laisser les enfants jouer avec l’appareil. En cas de non-respect des recommandations du fabricant, la garantie concernant la réparation est annulée. VP4201...
-
Page 63: Description Du Produit
14 Inicateur de charge 4 Bouton de déblocage de l’aspirateur à main 15 Trous de ventilation 5 Joint pliant 16 Bec 6 Accès au port de charge 7 Crochet de suceur 8 Buse principale 9 Bouton de déblocage de la buse principale VP4201... -
Page 64: Avant La Première Utilisation
Trois indicateurs carrés verts sont allumés - complètement chargés. Lorsque la batterie est complètement déchargée, l'indicateur clignote pendant 20 secondes puis il s'éteint automatiquement. 8. Il est recommandé de vider le bac à poussière avant chaque utilisation de l'aspirateur. VP4201... - Page 65 3. Mettre le tissu de la vadrouille (Fig. 7). 4. Monter le balai sur le réservoir d'eau (Fig. 8). 5. Utiliser le bouton à bascule (E) pour mouiller le tissu de la vadrouille si nécessaire. Fig. 5 Fig. 6 Fig. 7 Fig. 8 VP4201...
-
Page 66: Nettoyer Le Filtre
Cela empêchera le produit de basculer et de causer des dommages. 1. Choisir un endroit approprié où entreposer l'aspirateur en le fixant sur le mur. 2. Marquer au crayon la position souhaitée du trou de vis sur le mur. Il est recommandé de suspendre l'aspirateur de VP4201... -
Page 67: Protection De L'environnement
Si la batterie ou la pile libère un liquide, celui-ci est toujours alcalin. Lors du contact avec la peau, lavez-la immédiatement en douceur à l’eau savonneuse et consultez un médecin. Ce produit satisfait aux exigences élémentaires des directives CE applicables. Le fabricant se réserve le droit d’effectuer les modifications du texte, design et spécifications techniques sans information préalable. VP4201... - Page 69 • Tenere l’apparecchio lontano dalle fonti di calore quali radiatori, stufe etc. Proteggere contro i raggi del sole diretti e contro l’umidità. • Non utilizzare l’apparecchio se si hanno le mani bagnate. • Non inserire alcun oggetto negli orifizi sull’apparecchio. Non accendere l’apparecchio se otturato un orifizio qualsiasi. VP4201...
- Page 70 8 anni o se non presente una persona esperta. I bambini d’età inferiore a 8 anni devono stare lontani dalla portata dell’apparecchio e dal suo cavo di alimentazione. L’apparecchio non è un giocatolo e come tale deve essere utilizzato. VP4201...
-
Page 71: Descrizione Del Prodotto
5 Giunto pieghevole 14 Indicatore di ricarica 6 Accesso alla porta di collegamento del caricabatterie 15 Fori di aerazione 7 Gancio per la bocchetta a lancia 16 Bocchetta 8 Bocchetta principale 9 Pulsante per lo stacco della bocchetta principale VP4201... - Page 72 Risultano accesi tre quadretti verdi - ricarica completa. Quando la batteria è del tutto scarica, l’indicatore lampeggerà per 20 secondi e poi si spegne automaticamente. 8. Prima di ogni uso dell’aspirapolvere svuotare il contenitore per la raccolta delle impurità. VP4201...
- Page 73 2. Caricare l’acqua. Può essere utilizzato il disinfettante puro senza additivi e essenze profumate (Fig. 6). 3. Applicare il mop in tessuto (Fig. 7). 4. Montare l’aspirapolvere sul contenitore per l’acqua (Fig. 8). 5. Con il pulsante commutatore (E) bagnare il mop in tessuto quanto serve. Fig. 5 Fig. 6 Fig. 7 Fig. 8 VP4201...
-
Page 74: Pulizia Del Filtro
1. Scegliere un luogo opportuno nella casa per appendere l’aspirapolvere. 2. Con una matita fare segno sul muro dove operare il foro per metterci dentro la vite. Si consiglia di appendere VP4201... -
Page 75: Protezione Dell'ambiente
Se la tale soluzione viene a contatto con la cute, lavare il posto colpito con il sapone sotto l’acqua corrente e rivolgersi al medico. Il presente prodotto rispetta tutti i requisiti elementari stabiliti dalle normative UE inerenti. Il produttore si riserva di apportare le modifiche ai testi relativi al prodotto, al suo disegno e alle relative specifiche tecniche senza preavviso. VP4201... -
Page 77: Advertencias Importantes De Seguridad
• Tenga especial cuidado al aspirar en escaleras. • Si se obstruyese el orificio de succión, apague el artefacto y retire la obstrucción antes de volverlo a usar. • Para instalar accesorios, limpiar o en caso de avería, apague el artefacto VP4201... - Page 78 Los niños menores de 8 años deben mantenerse fuera del alcance del artefacto y su cable. Los niños no deben jugar con el artefacto. En caso de incumplimiento de las instrucciones del fabricante, cualquier reparación no será reconocida por la garantía. VP4201...
-
Page 79: Descripción Del Producto
4 Botón para liberar la aspiradora de mano 15 Orificios de ventilación 5 Articulación plegable 16 Boquilla 6 Acceso al conector de carga 7 Gancho para boquilla para rincones 8 Boquilla principal 9 Botón para liberar la boquilla principal VP4201... -
Page 80: Manual De Uso
Dos cuadrados verdes encendidos: Batería por la mitad Tres cuadrados verdes encendidas: Carga completa Cuando la batería se agota por completo, el indicador parpadea por 20 segundos y se apaga automáticamente. 8. Antes de cada uso, se recomienda vaciar el colector de polvo. VP4201... - Page 81 2. Cargue agua. Puede usarse desinfectante puro sin aditivos ni aromatizantes (Fig. 6). 3. Monte el paño (Fig. 7). 4. Monte la aspiradora en el tanque de agua (Fig. 8). 5. Use el botón E) para el paño según sea necesario. Fig. 5 Fig. 6 Fig. 7 Fig. 8 VP4201...
-
Page 82: Limpieza Del Filtro
2. Marque con un lápiz en la pared la posición para el tornillo. Se recomienda colgar la aspiradora de manera que esté encima del piso. 3. Use el tipo de gancho adecuado para su pared. Fig. 14 4. Atornille el gancho en la pared en la dirección ilustrada en la figura 14. VP4201... - Page 83 El producto cumple con todos los requisitos básicos de las directivas UE aplicables. El fabricante se reserva el derecho de realizar cambios en el texto, el diseño y las especificaciones técnicas. VP4201...
- Page 85 ș.a.m.d. Feriți-l de radiațiile solare directe sau umezeală. • Nu atingeți aparatul cu mâinile ude sau umede. • Nu introduceți niciun fel de obiecte în orificii. Nu utilizați aparatul dacă este înfundat oricare din orificiile acestuia. • Aveți grijă deosebită atunci când aspirați pe scări. VP4201...
- Page 86 Copiii sub 8 ani trebuie să mențină distanța de siguranță față de aparat și cablu de alimentare. Copiii nu au voie să se joace cu aparatul. La nerespectarea instrucțiunilor producătorului, eventuala reparație nu poate fi recunoscută ca reparație de garanție. VP4201...
-
Page 87: Descrierea Produsului
15 Orificii de aerisire 4 Buton pentru eliberarea aspiratorului de mână 16 Duză 5 Articulație de rabatare 6 Acces la punctul de conectare a încărcătorului 7 Cârlig pentru dusă spații înguste 8 Duză principală 9 Buton pentru eliberarea duzei principale VP4201... -
Page 88: Instrucțiuni De Utilizare
Sunt aprinse două pătrățele verzi - baterie este încărcată mediu, Sunt aprinse trei pătrățele verzi - încărcare completă. Atunci când bateria se descarcă complet, indicatorul va pâlpâi timp de 20 de secunde, apoi se oprește automat. 8. Recomandăm să goliți recipientul pentru impurități înaintea fiecărei utilizări a aspiratorului. VP4201... - Page 89 2. Umpleți cu apă. Poate fi utilizat un produs de dezinfecție curat, fără adaos de ulei volatil (Fig. 6). 3. Puneți textilul pentru mop (Fig. 7). 4. Fixați aspiratorul pe rezervorul de apă (Fig. 8). 5. Cu ajutorul butonului de comutare (E) udați textilul mopului după necesitate. Fig. 5 Fig. 6 Fig. 7 Fig. 8 VP4201...
-
Page 90: Depozitarea Aspiratorului
Aspiratorul poate fi suspendat în siguranță cu ajutorul suportului pentru prindere pe perete care este livrat cu produsul. Astfel preveniți răsturnarea și deteriorarea ulterioară a produsului. 1. Alegeți un loc potrivit în casa dumneavoastră unde doriți să suspendați aspiratorul. VP4201... -
Page 91: Protecția Mediului
La contactul cu pielea spălați imediat ușor cu apă și săpun și apelați la un medic. Acest produs îndeplinește toate cerințele de bază ale Directivei UE relevante. Modificările textului, a designului și a specificațiilor tehnice pot fi făcute fără o atenționare prealabilă. Ne rezervăm dreptul la efectuarea acestor modificări. VP4201... - Page 93 Záruční podmínky Záručné podmienky Karta gwarancyjna Garanciális feltételek Garantijas talons Warranty Certificate Garantiebedingungen Conditions de garantie Condizioni di garanzia Condiciones de garantía Condiții de garanție...
-
Page 94: Záruční Podmínky
Je-li však požadavek na výměnu k obsluze výrobku, výrobku nebo jeho součásti vzhledem k povaze vady • k závadě došlo vlivem mechanického, tepelného nebo neúměrný, zejména lze-li vadu odstranit bez zbytečného VP4201... - Page 95 Reklamace včetně odstranění vady musí být vyřízena bez zbytečného odkladu, nejpozději do 30 dnů ode dne uplatnění reklamace, pokud se prodávající nebo Podrobnosti o produktu Model: Výrobní číslo: Datum prodeje: Razítko a podpis prodejce: VP4201...
-
Page 96: Záručné Podmienky
Ak je však požiadavka na výmenu obsluhu výrobku, výrobku alebo jeho súčasti vzhľadom k povahe vady • k vade došlo vplyvom mechanického, tepelného neúmerná, najmä ak je možné vadu odstrániť bez VP4201... - Page 97 Do email: info@my-concept.sk tejto lehoty sa nezapočítava doba primeraná podľa www: www.my-concept.sk druhu výrobku potrebná k odbornému posúdeniu vady. Reklamácia vrátane odstránenia vady musí byť vybavená Podrobnosti o produktu Model: Výrobné číslo: Dátum prodeja: Pečiatka a podpis prodejca: VP4201...
- Page 98 Gwarancja nie ma zastosowania w przypadkach, Rozpatrywanie reklamacji w których: • nie zostały dotrzymane warunki w zakresie instalacji, W przypadku wystąpienia wady, którą można usunąć, obsługi oraz konserwacji produktu, wymienione konsument ma prawo do bezpłatnego, terminowego w instrukcji obsługi produktu, i właściwego usunięcia wady. VP4201...
- Page 99 Okres ten www: www.my-concept.pl nie obejmuje czasu wymaganego do oceny właściwych ekspertów. Usunięcie wad powinno odbyć się bez Dane produktu Model: Numer fabryczny: Data sprzedaży: Pieczątka i podpis sprzedawcy: VP4201...
-
Page 100: Garanciális Feltételek
üledékek miatt optikai vagy funkcionális változásokra az eladónál érvényesítheti a garanciális jogait, akinél került sor, a terméket vásárolta. • ha letelt a termék valamely alkatrészének, pl. akkumulátor, izzó stb. élettartama A javításra való jog a vásárlás helyszínén vagy valamelyik márkaszervizben érvényesíthető, amelyek listája VP4201... - Page 101 Megjegyzés: A szállítás során megsérült termék reklamációjára a szállítmányozó reklamációs szabályzata vonatkozik. Gyártó Jindřich Valenta – Concept Vysokomýtská 1800, 565 01 Choceň Cseh Köztársaság tel: +420465471400 fax: +420 465 473 304 email: servis@my-concept.cz www: www.my-concept.com VP4201...
- Page 102 ķēdes utt.) vai kam ir iekšējs īssavienojums. akumulatoram, spuldzēm utt., ir beidzies kalpošanas Šo garantijas noteikumu izpratnē par defektu neuzskata laiks. bojājumu vai parametru izmaiņas, ko izraisījusi normāla darbība vai nolietojums (piemēram, dabisks veiktspējas samazinājums). VP4201...
- Page 103 Patērētājam ir tikai tās tiesības, ko nosaka likums. www: www.verners.lv Piez.: Uz sūdzībām par bojājumiem, kas ir radušies izstrādājuma transportēšanas laikā, attiecas transportētāja sūdzību iesniegšanas nolikumi. Izstrādājuma raksturojums: Modelis: Izstrādājuma numurs: Pārdošanas datums: Pārdevēja paraksts un zīmogs: VP4201...
-
Page 104: Warranty Terms
While filing their complaint, the customer must indicate the noted defect and identify the preferred complaint application method. VP4201... - Page 105 Czech Republic customer. tel.: +420 465 471 400 fax +420 465 473 304 Company ID No. 13216660 email: servis@my-concept.cz www: www.my-concept.com Product data Model: Production number: Date of purchase: Seal and signature of vendor: VP4201...
- Page 106 Falle, dass es durch nicht sachgemäße Benutzung nicht beschädigt wurde und die Lebensdauer Reklamationsverfahren nicht abgelaufen ist. Kann der reklamierte Mangel beseitigt werden, hat der Verbraucher das Recht auf eine kostenlose, zeit- und ordnungsgemäße Beseitigung des Mangels. VP4201...
- Page 107 Ersatztermine vereinbart werden. Jindřich Valenta – Concept Vysokomýtská 1800, 565 01 Choceň Tschechische Republik Ident.-Nr.: 13216660 Tel.: + 420 465 471 400, Fax: +420 465 473 304, E-Mail: servis@my-concept.cz www: www.my-concept.com Produktdetails Modell: Herstellernummer: Verkaufsdatum: Stempel und Unterschrift des Verkäufers: VP4201...
-
Page 108: Conditions De Garantie
à titre gratuit et dans La garantie est exclue si (notamment) : un délai prévu. • les conditions de l´installation, d´utilisation ou d´entretien du produit indiquées dans le manuel Si cela n´est pas disproportionné en tenant compte d´emploi n´ont pas été respectées, VP4201... - Page 109 TVA n° 13216660 compliquée pour le consommateur. tél.: + 420 465 471 400, fax: +420 465 473 304, email: servis@my-concept.cz www: www.my-concept.co Détails du produit Modèle : Numéro de série : Date de l´achat : Cachet et signature du vendeur : VP4201...
-
Page 110: Condizioni Di Garanzia
Se, considerata la natura del difetto, non si tratta di una funzionamento ed uso corretto del prodotto riportate pretesa inadeguata, l’utente può richiedere la fornitura nel manuale d’uso del prodotto stesso; di un prodotto privo dei difetti (la sostituzione), oppure • il danneggiamento è di natura meccanica termica, VP4201... - Page 111 Repubblica Ceca problemi all’utente stesso. C.F. 13216660 tel.: + 420.465.471.400, fax: +420.465.473.304. email: servis@my-concept.cz www: www.my-concept.com Dettagli sul prodotto Modello: Numero di matricola: Data di vendita: Timbro e firma del produttore: VP4201...
-
Page 112: Condiciones De Garantía
Si se tratase de un defecto corregible, el consumidor descritas en el manual, tendrá derecho a que el defecto sea corregido sin cargo • que el defecto hubiese resultado de daños mecánicos, y de manera oportuna y apropiada. térmicos o químicos, cortocircuitos, sobretensión en VP4201... - Page 113 CIF 13216660 dificultades considerables. tel.: + 420 465 471 400, fax: +420 465 473 304, email: servis@my-concept.cz www: www.my-concept.com Detalles del producto Modelo: Número de serie: Fecha de venta: Sello y firma del vendedor: VP4201...
- Page 114 Garanția este exclusă în cazurile în care (în special): gratuită, la timp și reglementară a defecțiunii. • nu au fost respectate condițiile de instalare, exploatare și deservire a produsului, care sunt menționate în manualul de utilizare, VP4201...
- Page 115 + 420 465 471 400, fax: +420 465 473 304, probleme semnificative. email: servis@my-concept.cz Vânzătorul, service-ul autorizat sau muncitorul desemnat www: www.my-concept.com Date despre produs Model: Numărul de fabricație: Data vânzării: Ștampila și semnătura unității de vânzare: VP4201...
- Page 116 Seznam servisních míst Zoznam servisných stredisiek Wykaz punktów servisovych Szolgáltatók listáját Popis uslužnih mjesta...
- Page 117 Česká republika Název Ulice PSČ Město Telefon/Fax E-mail Jindřich Valenta Vysokomýtská 1800 565 01 Choceň 465 471 400 servis@my-concept.cz CONCEPT 465 473 304 Slovenská republika Názov Ulica PSČ Mesto Telefón/Fax E-mail SERVIS ABC s.r.o. Štefánikova 50 949 03 Nitra 037/6526063 info@servisabc.sk D-J service s.r.o.
- Page 118 Jindřich Valenta – Concept Vysokomýtská 1800, 565 01 Choceň Tel.: +420 465 471 400, Fax: +420 465 473 304 www.my-concept.cz ELKO Valenta – Slovakia, s.r.o. Hurbanova 1563/23, 911 01 Trenčín Tel.: +421 326 583 465, Fax: +421 326 583 466 www.my-concept.sk CONCEPT POLSKA sp.
Need help?
Do you have a question about the VP4201 and is the answer not in the manual?
Questions and answers