Table of Contents

Related Manuals for StarTech.com MBLTVSTNDEC


Summary of Contents for StarTech.com MBLTVSTNDEC
- Page 1 Mobile Cart with Display Rotation - Integrated Cable Management Actual product may vary from photos User Manual SKU#: MBLTVSTNDEC For the latest information and specifications visit www.startech.com/MBLTVSTNDEC Manual Revision: 06/18/2021...
- Page 2 This manual may make reference to trademarks, registered trademarks, and other protected names and/or symbols of third-party companies not related in any way to StarTech.com. Where they occur these references are for illustrative purposes only and do not represent an endorsement of a product or service by StarTech.com, or an endorsement of the product(s) to which this manual...
-
Page 3: Safety Statements
Säkerhetsåtgärder • Installation och/eller montering får endast göras av behöriga yrkespersoner och enligt gällande lokala förordningar för säkerhet och byggnormer. To view manuals, videos, drivers, downloads, technical drawings, and more visit www.startech.com/support... -
Page 4: Warning Statements
• Dra inte åt skruvarna för hårt när du monterar produkten. Om du måste ta i när du skruvar åt kan du sluta skruva åt. • Det krävs två personer för att montera produkten. Försök inte montera produkten och installera utrustning utan hjälp. To view manuals, videos, drivers, downloads, technical drawings, and more visit www.startech.com/support... - Page 5 • Rijd de wagen niet over snoeren, kabels of ongelijke oppervlakken. • Voordat u de wagen gaat verplaatsen, moet u de zwenkwielen ontgrendelen. 注意 • 必ず取扱説明書に従って本製品の組み立てを行って下さい。 • 最初に取扱説明書を最後まで読み、 本製品の組み立て方をすべて理解して から組み立て作業を始めて下さい。 • 本製品で定められた最大積載重量を超えないようにして下さい。 最大積載 重量をオーバーした場合、 怪我をする恐れや器物破損の恐れがあります。 • マルチメディア棚の総耐荷重:5kg To view manuals, videos, drivers, downloads, technical drawings, and more visit www.startech.com/support...
- Page 6 • Assicurarsi di aver installato correttamente tutte le apparecchiature prima di procedere alla regolazione del prodotto. To view manuals, videos, drivers, downloads, technical drawings, and more visit www.startech.com/support...
- Page 7 • Capacidade de carga de la bandeja multimídia: 5 kg • Capacidade de carga de suporte para TV: 70 kg • Não deixar as crianças trepar neste produto ou utilizar este produto sem a devida supervisão. To view manuals, videos, drivers, downloads, technical drawings, and more visit www.startech.com/support...
- Page 8 • Asegúrese de que ha instalado todo el equipo correctamente antes de efectuar ajustes de este producto. To view manuals, videos, drivers, downloads, technical drawings, and more visit www.startech.com/support...
- Page 9 • Bewegen Sie den Wagen nicht über Leitungen, Kabel oder unebenes Gelände. • Stellen Sie sicher, dass die Rollen entriegelt sind, bevor Sie den Wagen in Bewegung setzen. To view manuals, videos, drivers, downloads, technical drawings, and more visit www.startech.com/support viii...
-
Page 10: Table Of Contents
Attach the VESA Extension Arms to the VESA Mounting Plate..........13 Attach the VESA Mounting Plate to a TV ..................15 Mounting the TV............................17 Set the Tilt of the TV ..........................18 To view manuals, videos, drivers, downloads, technical drawings, and more visit www.startech.com/support... - Page 11 Rotate the TV .............................. 19 Cable Management ..........................20 Attach the Rear Cover ..........................21 Operation ....................22 Adjust the Tilt of the TV ........................... 22 Move the Mobile Cart Assembly......................23 To view manuals, videos, drivers, downloads, technical drawings, and more visit www.startech.com/support...
-
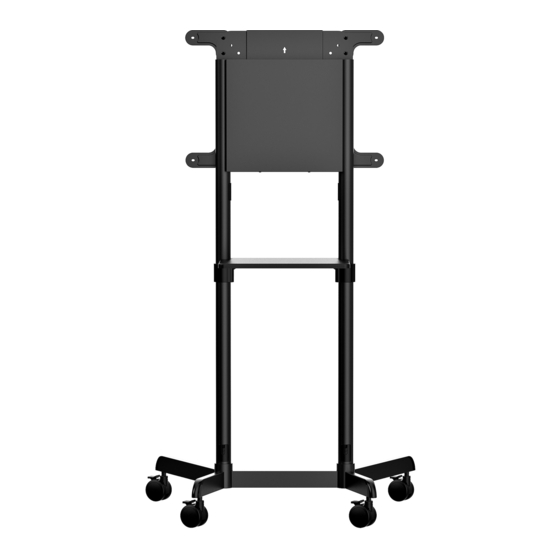
Page 12: Product Diagram
Product Diagram Front View VESA Extension VESA Extension Arms (L) Arms (R) Upper Columns Base Columns Casters To view manuals, videos, drivers, downloads, technical drawings, and more visit www.startech.com/support... -
Page 13: Back View
Back View VESA Mounting Plate VESA Extension Arms Rear Bracket Cover Equipment Shelf Shelf Brackets Base To view manuals, videos, drivers, downloads, technical drawings, and more visit www.startech.com/support... -
Page 14: Product Dimensions
Product Dimensions Front View To view manuals, videos, drivers, downloads, technical drawings, and more visit www.startech.com/support... -
Page 15: Product Information
Qty: 1 Qty: 2 Qty: 1 Qty: 1 Rear Bracket VESA Extension VESA Extension Cable Covers Cover Arms (L) Arms (R) Qty: 4 Qty: 1 Qty: 2 Qty: 2 To view manuals, videos, drivers, downloads, technical drawings, and more visit www.startech.com/support... - Page 16 M6 x 12 mm M8 x 20 mm M6 x 8 mm M6 x 18 mm Screws Screws Screws Screw Qty: 16 Qty: 8 Qty: 8 Qty: 1 M8 x 8 mm Cable Clip Cable Clips M6 Wrench Screws Holders Qty: 5 Qty: 1 Qty: 8...
-
Page 17: Requirements
Rectangular Small Spacers Washers Qty: 8 Qty: 1 Qty: 8 Qty: 4 Requirements For the latest requirements, please visit www.startech.com/MBLTVSTNDEC TV x 1 • Phillips Head Screwdriver x 1 • Scissors x 1 • Needle-Nose Pliers x 1 • (Optional) Media Device (e.g. DVD Player) x 1... -
Page 18: Technical Specifications
200 x 200 mm 300 x 300 mm 350 x 350 mm 400 x 200 mm 400 x 400 mm 600 x 200 mm 600 x 400 mm To view manuals, videos, drivers, downloads, technical drawings, and more visit www.startech.com/support... - Page 19 Tilt Range 0° or +5° Rotation 0° ~ +90° Cable Management To view manuals, videos, drivers, downloads, technical drawings, and more visit www.startech.com/support...
-
Page 20: Installation
Casters. (Figure 2) (For uneven surfaces) Flip the Base upside down and use the Wrench to adjust the Nut located on each Caster. To view manuals, videos, drivers, downloads, technical drawings, and more visit www.startech.com/support... -
Page 21: Attach The Base Columns To The Base
Base and into both Base Columns and partially tighten, using the 5 mm Hex Key. These M8 x 20 mm Screws will be tightened in another installation step. To view manuals, videos, drivers, downloads, technical drawings, and more visit www.startech.com/support... -
Page 22: Attach The Upper Columns To The Base Columns
Shelf Bracket with the inward facing holes on both Base Columns. Insert two M6 x 12 mm Screws into the inward facing holes in both Base Columns and tighten, using an appropriately sized Phillips Head Screwdriver. To view manuals, videos, drivers, downloads, technical drawings, and more visit www.startech.com/support... -
Page 23: Install The Front Cover And Equipment Shelf
Cart. (Figure 5.1) Thread all four M6 x 12 mm Screws through the holes in the Front Cover and into the Upper Columns then tighten, using a Phillips Head Screwdriver. To view manuals, videos, drivers, downloads, technical drawings, and more visit www.startech.com/support... -
Page 24: (Optional -- For Tvs With 600 X 200 Mm Or 600 X 400 Mm Spaced Vesa Mounting Holes) Attach The Vesa Extension Arms To The Vesa Mounting Plate
400 mm Spaced VESA Mounting Holes) Attach the VESA Extension Arms to the VESA Mounting Plate VESA Mounting Plate M8 x 8 mm VESA Screws Extension Arms 5 mm Hex Key Figure 6 To view manuals, videos, drivers, downloads, technical drawings, and more visit www.startech.com/support... - Page 25 Place a Rectangular Washer over each VESA Mounting Hole. Thread the appropriately sized M-Type Screws (e.g. M5 x 14 mm Screws) through the Rectangular Washers, VESA Mounting Plate, (Optional) Spacers, and into the TV. To view manuals, videos, drivers, downloads, technical drawings, and more visit www.startech.com/support...
-
Page 26: Attach The Vesa Mounting Plate To A Tv
Place the TV on a padded surface, screen side down, so the back of the TV is accessible. (Figure 7) (Optional) Identify and remove the pre-installed VESA Hardware from the back of the TV. To view manuals, videos, drivers, downloads, technical drawings, and more visit www.startech.com/support... - Page 27 Warning! Do not overtighten the M-Type Screws. If any unexpected resistance is encountered while fastening these Screws, immediately stop and attempt to use a different length of M-Type Screw. To view manuals, videos, drivers, downloads, technical drawings, and more visit www.startech.com/support...
-
Page 28: Mounting The Tv
(Completed this step with Two People) Lift the TV, tilt the top backwards slightly, and hook the top of the VESA Mounting Plate onto the top two M8 x 20 mm Screws, installed in step 1. To view manuals, videos, drivers, downloads, technical drawings, and more visit www.startech.com/support... -
Page 29: Set The Tilt Of The Tv
VESA Mounting Plate and into the Upper Columns and tighten, using the 5 mm Hex Key. Tighten the top two M8 x 20 mm Screws, using the 5 mm Hex Key. To view manuals, videos, drivers, downloads, technical drawings, and more visit www.startech.com/support... -
Page 30: Rotate The Tv
Nuts on the VESA Mounting Plate, using the M10 Wrench. (Figure 10) (Decrease the torque required to rotate the TV) loosen the Nuts on the VESA Mounting Plate, using the M10 Wrench. To view manuals, videos, drivers, downloads, technical drawings, and more visit www.startech.com/support... -
Page 31: Cable Management
Phillips Head Screwdriver. (Figure 11) Cable Management Cable Clip Cable Holders Clips Figure 12 Cable Management Figure 13 Slots - Panels Needle-Nose Pliers Figure 14 Figure 15 To view manuals, videos, drivers, downloads, technical drawings, and more visit www.startech.com/support... -
Page 32: Attach The Rear Cover
Route the Cables through the Cable Management Slots in the Columns. Peel the plastic backing off the Cable Clip Holders and stick them to the desired locations within the VESA Mounting Plate. (Figure 12) Note: Excess slack can be coiled and secured using two Cable Clips. -
Page 33: Operation
Mounting Plate with the holes in the Upper Columns. Insert two M8 x 20 mm Screws through the holes in the VESA Mounting Plate and into the Upper Columns. Tighten, using the 5 mm Hex Key. To view manuals, videos, drivers, downloads, technical drawings, and more visit www.startech.com/support... -
Page 34: Move The Mobile Cart Assembly
Grip the TV and the Upper Columns and slowly move the Mobile Cart Assembly, using two people. Ensure caution is exercised around corners or when navigating over bumps and/or uneven ground. Lock the Brakes on the Casters. To view manuals, videos, drivers, downloads, technical drawings, and more visit www.startech.com/support... - Page 35 Limitation of Liability In no event shall the liability of StarTech.com Ltd. and StarTech.com USA LLP (or their officers, directors, employees or agents) for any damages (whether direct or indirect, special, punitive, incidental, consequential, or otherwise), loss of profits, loss of business, or any pecuniary loss, arising out of or related to the use of the product exceed the actual price paid for the product.
- Page 36 Hard-to-find made easy. At StarTech.com, that isn’t a slogan. It’s a promise. StarTech.com is your one-stop source for every connectivity part you need. From the latest technology to legacy products — and all the parts that bridge the old and new — we can help you find the parts that connect your solutions.
Need help?
Do you have a question about the MBLTVSTNDEC and is the answer not in the manual?
Questions and answers