Advertisement
Quick Links
PR-2 HALF RACK
Product may vary slightly from the item pictured due to model upgrades
Read all instructions carefully before using this product. Retain this owner's manual for future
reference.
NOTE: This manual may be subject to updates or changes. Up to date manuals are available through our website at
www.lifespanfitness.com.au
Advertisement

Related Manuals for LifeSpan CORTEX PR-2


Summary of Contents for LifeSpan CORTEX PR-2
- Page 1 PR-2 HALF RACK Product may vary slightly from the item pictured due to model upgrades Read all instructions carefully before using this product. Retain this owner’s manual for future reference. NOTE: This manual may be subject to updates or changes. Up to date manuals are available through our website at www.lifespanfitness.com.au...
- Page 2 TABLE OF CONTENTS IMPORTANT SAFETY INSTRUCTIONS PARTS LIST ASSEMBLY INSTRUCTIONS WARRANTY PR-2 HALF RACK...
- Page 3 1. IMPORTANT SAFETY INSTRUCTIONS WARNING - Read all instructions before using this machine. Install the product on a flat level surface Place your unit on a solid, level surface when in use Never allow children on or near the machine. ...
- Page 4 ITEM NO. NAME Qty. PR2-1 Main Base Frame 4.948 PR2-2 Right Base Frame 4.489 PR2-3 Left Base Frame 4.489 PR2-4 Tall Vertical Frame 6.611x2 PR2-5 Short Vertical Frame 2.827x2 PR2-6 Lat Support 4.033 PR2-7 Center Cross Support 1.498x2 PR2-8 Plate Support 0.725x2 PR2-9 Dip Frame...
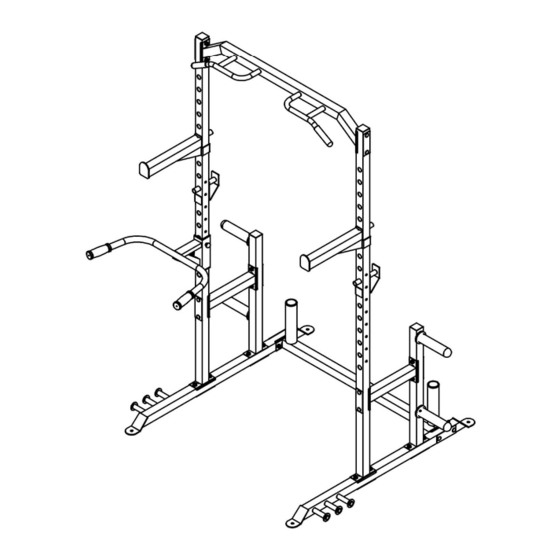
- Page 5 PR-2 HALF RACK...
- Page 6 3. ASSEMBLY INSTRUCTIONS STEP 1 1. Attach the Tall Vertical Frame (4#) and Short Vertical Frame (5#) to the Right Base Frame (2#). Secure it with: 2x Strengthen Board (10#) 4x Carriage Bolt M10*70mm (16#) 4x Washer 10 (14#) 4x M10mm Aircraft Nut (15#) 2.
- Page 7 STEP 2 Attach the Tall Vertical Frame (4#) and Short Vertical Frame (5#) to the Left Base Frame (3#). Secure it with: -2x Strengthen Board (10#) -4x Carriage Bolt M10*70mm (16#) -4x Washer 10 (14#) -4x M10mm Aircraft Nut (15#) Attach the Tall Vertical Frame (4#) and Short Vertical Frame (5#) to the Center Cross Support (7#).
- Page 8 STEP 3 1. Attach P and Q to the Main Base Frame (1#). Secure it with: - 2x Strengthen Board (10#) - 4x Carriage Bolt M10*70mm (16#) - 4x Washer 10 (14#) - 4x M10mm Aircraft Nut (15#) 2. Tighten all nuts and bolts. PR-2 HALF RACK...
- Page 9 STEP 4 1. Plug the Dip Frame (9#) into the Tall Vertical Frame (4#). You can choose the left side or right side. Secure with Lock Knob (18#) and Push the Ball Pin (25#) into the holes on Tall Vertical Frame (4#). Power Rack PR-2...
- Page 10 STEP 5 1. Attach the Lat Support (6#) to the left and right Tall Vertical Frame (4#). Secure it with: 2x Strengthen Board (10#) 4x Carriage Bolt M10*70mm (16#) 4x Washer 10 (14#) 4x M10mm Aircraft Nut 2. Tighten all the bolts and nuts.
- Page 11 STEP 6 1. Plug the 2x Bar Support (8#) into the Left and Right Tall Vertical Frame (4#). 2. Plug the 2x Bar Rest (19#) into the Left and Right Tall Vertical Frame (4#). Power Rack PR-2...
- Page 12 4. WARRANTY AUSTRALIAN CONSUMER LAW Many of our products come with a guarantee or warranty from the manufacturer. In addition, they come with guarantees that cannot be excluded under the Australian Consumer Law. You are entitled to a replacement or refund for a major failure and compensation for any other reasonably foreseeable loss or damage.
Need help?
Do you have a question about the CORTEX PR-2 and is the answer not in the manual?
Questions and answers