
Subscribe to Our Youtube Channel
Related Manuals for EIBENSTOCK BST 152/53


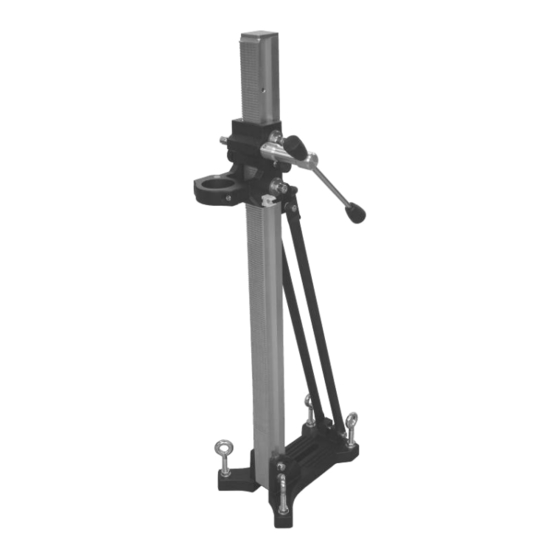
Summary of Contents for EIBENSTOCK BST 152/53
- Page 1 EIBENSTOCK Vakuum Technik Originalbetriebsanleitung……1 - 11 Original Instructions.....12 - 22 Diamantbohrständer Diamond Drill Rigs BST 152 / 53 BST 152 BST 152 S BST 152 / 60...
- Page 2 DEUTSCH Wichtige Sicherheitshinweise Warnzeichen Warnung vor allgemeiner Gefahr Warnung vor gefährlicher elektrischer Spannung Warnung vor heißer Oberfläche Maschine, Bohrkrone und Bohrständer sind schwer – Vorsicht Quetschgefahr Reiß- bzw. Schneidgefahr Zu Ihrem Schutz sollten Sie folgende Schutzmaßnahmen treffen Gehörschutz benutzen Augenschutz benutzen Schutzhelm benutzen Schutzhandschuhe benutzen Schutzschuhe benutzen...
- Page 3 Technische Daten Diamantbohrständer BST 152/53,60; BST 152; BST 152 S Maße: 330 x 240 x 1040 mm Säulenlänge: 1000 mm Gewicht: 11 kg Maximaler Bohrdurchmesser: 152 mm Neigung: 0° bis 45° Schlittenbremse: Arretierung in der Endlage: Aufnahme des Motors BST 152/53/60: Halsspannung Ø...
- Page 4 Bestimmungsgemäßer Gebrauch Der Diamantbohrständer BST 152 / 53 (60) ist für Diamantkernbohrgeräte mit einem Spannhalsdurchmesser von 53 (60) mm ausgelegt. Der Diamantbohrständer BST 152 S ist für Diamantkernbohrgeräte mit spezieller Schnellspannaufnahme (Schwalbenschwanz) ausgelegt. Der Diamantbohrständer BST 152 ist für Diamantkernbohrgeräte mit Befestigung mittels Montageplatte ausgelegt.
- Page 5 Befestigung des Bohrständers Befestigung durch Dübel in Beton Für Mauerwerk sind Rawl- Dübel zu verwenden. Zeichnen Sie sich die Position der Befestigungs- bohrung auf der zu bohrenden Fläche an. Bohren Sie ein Loch (Ø 15) 50 mm tief (A), in das der Dübel M12 (B) eingesetzt werden soll;...
- Page 6 Verbinden Sie den Bohrständer mit der Vakuumplatte und die Vakuumpumpe mit Hilfe des Vakuumschlauchs mit dem Stecknippel der Vakuumplatte. Bringen Sie den Bohrständer mit der Vakuumplatte in die richtige Position und schalten Sie die Pumpe ein. Überprüfen Sie, ob alle vier Nivellierschrauben in der Fußplatte ganz zurück gedreht sind und ein Unterdruck von mind.
- Page 7 Befestigung der Kernbohrmaschine Tragen Sie Schutzhandschuhe! Vorsicht beim Einsetzen der Maschine, Quetschgefahr! BST 152/53 – BST 152/60 Fahren Sie den Maschinenhalter (2) soweit nach oben bis der Arretierbolzen (5) in der Säule einrastet. Entfernen Sie die beiden Innensechskantschrauben M8 (3) und nehmen Sie die Spannschelle (4) ab.
- Page 8 BST 152 Fahren Sie den Maschinenhalter so weit nach oben, bis dieser in der Endlage einrastet. Öffnen Sie mit Hilfe des Drehkreuzes die Arretierung der Montageplatte. Entnehmen Sie diese und verbinden Sie sie wie nachfolgend beschrieben mit der Kernbohrmaschine. Zum Lieferumfang gehört eine Montageplatte, eine Passfeder 10 mm und 4 Innensechskantschrauben M8 x 30.
- Page 9 Inbetriebnahme Um die Bohreinheit sicher zu betreiben, beachten Sie bitte folgende Hinweise: Angaben zum Einsatzort Befreien Sie den Einsatzort von allem, was den Arbeitsvorgang behindern könnte. Achten Sie auf ausreichende Beleuchtung des Einsatzortes. Halten Sie die angegebenen Bedingungen für den Anschluss an die Stromversorgung ein.
- Page 10 Nach dem Bohren ist die Säule wieder in die 90° Position zu bringen. Die Skala an der Zahnsäule erleichtert Ihnen die Einstellung des Bohrwinkels. Bohren Sie am Anfang sehr langsam, da die Krone nur mit einem Bruchteil ihrer Schnittfläche ins Material greift. Wenn Sie zu schnell oder mit einem zu hohen Druck bohren kann die Krone verlaufen.
-
Page 11: Fehlersuche
Pflege und Wartung Halten Sie den Bohrständer immer sauber, insbesondere die Bohrsäule mit der Verzahnung und den 4 Gleitstücken im Maschinenhalter . Um die Leichtgängigkeit der Ritzelwelle zu gewährleisten ist diese etwas zu ölen. Für den einwandfreien Betrieb des Bohrständers müssen die Gleitstücke des Maschinenhalters spielfrei an der Bohrsäule entlang gleiten. - Page 12 Schäden, die durch Material- oder Herstellfehler entstanden sind, werden unentgeltlich durch Reparatur oder Ersatzlieferung beseitigt. Beanstandungen können nur anerkannt werden, wenn der Diamantbohrständer unzerlegt an den Lieferer oder eine Eibenstock-Vertragswerkstatt gesandt wird. Konformitätserklärung Es ist erforderlich, dass die in diesem Bohrständer betriebene Maschine ( z.B.: EHD 2000 S, EBM 162/3 P oder ETN 152/3 P) den in den technischen...
-
Page 13: Important Instructions
ENGLISH Important Instructions Important instructions and warning notices are allegorated on the machine by means of symbols: Warning: general precaution Warning: dangerous voltage Warning: hot surface Tool, drill bit and rig are heavy – Caution: risk of squashing Danger of tearing or cutting During work you should wear goggles, ear protectors, protective gloves, and sturdy work clothes! Wear ear protection... - Page 14 Technical Characteristics Diamond Drill Rigs BST 152/53,60; BST 152; BST 152 S Measures: 330 x 240 x 1040 mm Length of the column: 1000 mm Weight: 11 kg Max. drilling diameter 152 mm Inclination: 0° - 45° Carriage brake: Locking in top position: Fixture of the motor BST 152/53/60: Collar clamping Ø...
- Page 15 Application for Indented Purpose The diamond drill rig BST 152/53 (60) is made for diamond core drills with a collar diameter from 53 (60). The diamond drill rig BST 152S is made for diamond core drills with a special quick connection fixture (dovetail).
- Page 16 Fastening of the Drill Rig Fastening by means of dowels in concrete For brickwork, Rawl-Dowels must be used. Mark the position of the drill holes for the fastening on the surface to be drilled. Drill a hole (Ø 15) 50 mm deep (A), into which the dowel M12 (B) is to be placed;...
- Page 17 Connect the drill rig with the vacuum plate and the vacuum pump by means of the vacuum tube with the male coupling of the vacuum plate. Get the drill rig with the vacuum plate in the correct position and switch on the pump.
- Page 18 Fixing the Core Drill Motor Wear protective gloves! Caution! When mounting the machine, risk of squashing. BST 152/53 – BST 152/60 Move the machine holder (2) upwards until the locking pin (5) locks in the column. Remove both Allen screws M8 (3) and take off the clamp (4).
- Page 19 BST 152 Move the machine holder upwards until it locks in the final top position. Use the turnstile to open the locking device of the mounting plate. Remove it and connect it to the core drill motor as described subsequently. The tool is supplied with a mounting plate, a 10 mm fitting key and 4 Allen screws M8x30.
- Page 20 Operations In order to operate the tool safely, please observe the following notes: Details of the work area Keep the work area free of everything which could obstruct operations. Provide for adequate illumination of the work area. Adhere to the regulations concerning the power connection. ...
- Page 21 After drilling put the column back in the 90°position. The scale on the toothed column makes adjusting the drilling angle easier. At the beginning, drill very slowly, since the drill bit does only starts cutting with a fraction of the cut surface in the material. If you drill too fast or with too much pressure, the drill bit could get jammed.
- Page 22 Care and Maintenance Always keep the drill rig clean, especially the column with the toothing and the 4 sliding pieces in the machine holder. In order to allow the free movement of the pinion shaft, it should be slightly lubricated.
- Page 23 Complaints will be accepted only if the tool is returned in non-dismantled condition to the manufacturer or an authorized Eibenstock service centre. Konformitätserklärung It is necessary that the machine (f. e. EHD 2000 S, EBM 162/3 P or ETN 152/3 P) used in this drill rig comply with the requirements which are described in the specifications of the drill rig (f.
- Page 24 Ihr Fachhändler Your distributor Vakuum Technik GmbH Am Steinbächel 3 08309 Eibenstock...
Need help?
Do you have a question about the BST 152/53 and is the answer not in the manual?
Questions and answers