Table of Contents
Advertisement
Advertisement
Table of Contents

Related Manuals for Electrolux EOB3454AAX


Summary of Contents for Electrolux EOB3454AAX
- Page 1 EOB3454AAX EOB3454AOX Oven User Manual...
-
Page 2: Table Of Contents
14. ENERGY EFFICIENCY.................. 31 WE’RE THINKING OF YOU Thank you for purchasing an Electrolux appliance. You’ve chosen a product that brings with it decades of professional experience and innovation. Ingenious and stylish, it has been designed with you in mind. So whenever you use it, you can be safe in the knowledge that you’ll get great results every time. -
Page 3: Safety Information
ENGLISH SAFETY INFORMATION Before the installation and use of the appliance, carefully read the supplied instructions. The manufacturer is not responsible for any injuries or damages that are the result of incorrect installation or usage. Always keep the instructions in a safe and accessible location for future reference. -
Page 4: Safety Instructions
Always use oven gloves to remove or put in • accessories or ovenware. Before carrying out any maintenance, disconnect the • appliance from the power supply. Ensure that the appliance is switched off before • replacing the lamp to avoid the possibility of electric shock. - Page 5 ENGLISH be replaced, this must be carried out • Do not use the appliance as a work by our Authorised Service Centre. surface or as a storage surface. • Do not let mains cables touch or • Open the appliance door carefully. come near the appliance door, The use of ingredients with alcohol especially when the door is hot.
- Page 6 2.4 Care and cleaning • The type of light bulb or halogen lamp used for this appliance is for WARNING! household appliances only. Do not Risk of injury, fire, or use it for house lighting. damage to the appliance.
-
Page 7: Product Description
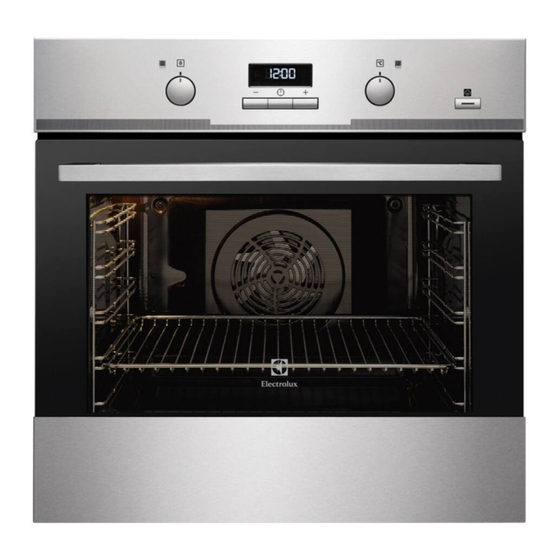
ENGLISH 3. PRODUCT DESCRIPTION 3.1 General overview Control panel Knob for the heating functions Power lamp / symbol Display Control knob (for the temperature) Temperature indicator / symbol Plus Steam Heating element Lamp Cavity embossment Shelf support, removable Shelf positions 3.2 Accessories •... -
Page 8: Before First Use
4.2 Display A. Clock functions B. Timer C. Clock function 5. BEFORE FIRST USE WARNING! For function: True Fan Refer to Safety chapters. Cooking PLUS refer to "Daily use" chapter, Setting the function: True Fan Cooking To set the Time of day refer PLUS". - Page 9 ENGLISH 6.3 Heating functions Oven func‐ Application tion Oven func‐ Application tion This function is de‐ signed to save energy The oven is off. during cooking. For the Moist Fan cooking instructions re‐ Baking Off position fer to "Hints and tips" chapter, Moist Fan Bak‐...
- Page 10 The maximum capacity of the cavity embossment is 250 ml. Oven func‐ Application Fill the cavity embossment with water tion only when the oven is cold. To bake pizza. To make CAUTION! intensive browning and Do not refill the cavity a crispy bottom.
-
Page 11: Clock Functions
ENGLISH 7. CLOCK FUNCTIONS 7.1 Clock functions table Clock function Application TIME OF DAY To set, change or check the time of day. DURATION To set how long the appliance operates. To set when the appliance deactivates. TIME DELAY To combine DURATION and END function. MINUTE MIND‐... -
Page 12: Using The Accessories
Appliance turns on automatically later on, The Minute Minder starts automatically works for the set DURATION time and after 5 seconds. stops at the set END time. At the set time 3. When the set time ends, an acoustic an acoustic signal sounds. -
Page 13: Additional Functions
ENGLISH 2. Put the wire shelf on the telescopic Small indentation at the top runners and carefully push them into increase safety. The the oven. indentations are also anti-tip devices. The high rim around the shelf prevents °C cookware from slipping of the shelf. -
Page 14: Hints And Tips
10. HINTS AND TIPS Baking cakes WARNING! Do not open the oven door before 3/4 of Refer to Safety chapters. the set cooking time is up. If you use two baking trays at the same The temperature and baking... - Page 15 ENGLISH Food Water in the cavity Temperature (°C) Time (min) embossment (ml) Plum cake, apple 100 - 150 160 - 180 30 - 60 pie, cinnamon rolls baked in a cake mould. Frozen ready meals Preheat the empty oven for 10 minutes. Use the second shelf position.
- Page 16 Food Top / Bottom Heat True Fan Cooking Time Com‐ (min) ments Tempera‐ Shelf po‐ Tempera‐ Shelf po‐ ture (°C) sition ture (°C) sition Short‐ 3 (2 and 20 - 30 In a cake bread mould dough Buttermilk 60 - 80 In a 26 cm cheese‐...
- Page 17 ENGLISH Food Top / Bottom Heat True Fan Cooking Time Com‐ (min) ments Tempera‐ Shelf po‐ Tempera‐ Shelf po‐ ture (°C) sition ture (°C) sition Biscuits / 140 - 150 2 and 4 35 - 40 In a baking pastry tray stripes - two levels...
- Page 18 Food Top / Bottom Heat True Fan Cooking Time Com‐ (min) ments Tempera‐ Shelf po‐ Tempera‐ Shelf po‐ ture (°C) sition ture (°C) sition Rye bread 190 30 - 45 In a bread Bread 2 (2 and 25 - 40 6 - 8 rolls in a bak‐...
- Page 19 ENGLISH Food Top / Bottom Heat True Fan Cooking Time Com‐ (min) ments Tempera‐ Shelf po‐ Tempera‐ Shelf po‐ ture (°C) sition ture (°C) sition English 50 - 60 On a wire roast beef, shelf rare English 60 - 70 On a wire roast beef, shelf...
- Page 20 Food Quantity Time (min) Pieces Quantity 1st side 2nd side (kg) Fillet steaks 12 - 15 12 - 14 Beef steaks 10 - 12 6 - 8 Sausages 12 - 15 10 - 12 Pork chops 12 - 16...
- Page 21 ENGLISH Food Tempera‐ Time (min) Food Tempera‐ Time (min) ture (°C) ture (°C) Knuckle of 160 - 180 120 - 150 Chicken, 190 - 210 50 - 70 veal, 1.5 - 2 poulard, 1 - 1.5 kg Duck, 1.5 - 180 - 200 80 - 100 Lamb...
- Page 22 Food Accessories Temperature Shelf po‐ Time (min) (°C) sition Sponge flan flan base tin on wire 35 - 45 base shelf Victoria Sand‐ baking dish on wire 35 - 50 wich shelf Poached fish, baking tray or dripping 35 - 45 0.3 kg...
- Page 23 ENGLISH 10.7 Defrost Food Quantity Defrosting Further defrost‐ Comments (kg) time (min) ing time (min) Chicken 100 - 140 20 - 30 Place the chicken on an upturned saucer placed on a large plate. Turn halfway through. Meat 100 - 140 20 - 30 Turn halfway through.
- Page 24 Food Temperature Time (h) Shelf position (°C) 1 position 2 positions Apple slices 60 - 70 6 - 8 1 / 4 Pears 60 - 70 6 - 9 1 / 4 10.9 Information for test institutes Tests according to IEC 60350-1.
-
Page 25: Care And Cleaning
ENGLISH Food Function Acces‐ Shelf Tem‐ Time (min) Comments sories posi‐ pera‐ tion ture (°C) Fatless‐ True Fan Wire 2 and 40 - 60 Use a cake ponge Cooking / shelf mould (26 cm di‐ cake Fan Cook‐ ameter). Diago‐ nally shifted. - Page 26 11.5 Removing the shelf If you have nonstick accessories, do not clean them using aggressive agents, supports sharp-edged objects or a dishwasher. It can cause damage to the nonstick To clean the oven, remove the shelf coating. supports. Moisture can condense in the oven or on CAUTION! the door glass panels.
- Page 27 ENGLISH WARNING! Make sure that the oven is cool before you touch it. There is a risk of burns. 11.7 Removing and installing door The oven door has two glass panels. You can remove the oven door and the internal glass panel to clean it. Read the whole "Removing and installing door"...
-
Page 28: Troubleshooting
7. Hold the door trim (B) on the top When installed correctly the door trim edge of the door at the two sides and clicks. push inwards to release the clip seal. Make sure that you install the internal glass panel in the seats correctly. - Page 29 ENGLISH Problem Possible cause Remedy The oven does not heat The necessary settings are Make sure that the settings not set. are correct. The oven does not heat The fuse is blown. Make sure that the fuse is the cause of the malfunc‐ tion.
-
Page 30: Installation
12.2 Service data plate is on the front frame of the oven cavity. Do not remove the rating plate If you cannot find a solution to the from the oven cavity. problem yourself, contact your dealer or an Authorised Service Centre. -
Page 31: Energy Efficiency
(blue and brown cables). from the Safety chapters. This appliance is supplied with a main plug and a main cable. 14. ENERGY EFFICIENCY 14.1 Product Fiche and information according to EU 65-66/2014 Supplier's name Electrolux... - Page 32 EOB3454AAX Model identification EOB3454AOX Energy Efficiency Index 95.3 Energy efficiency class Energy consumption with a standard load, con‐ 0.93 kWh/cycle ventional mode Energy consumption with a standard load, fan- 0.81 kWh/cycle forced mode Number of cavities Heat source Electricity...
- Page 33 ENGLISH product to your local recycling facility or contact your municipal office.
- Page 34 www.electrolux.com...
- Page 35 ENGLISH...
- Page 36 www.electrolux.com/shop...
Need help?
Do you have a question about the EOB3454AAX and is the answer not in the manual?
Questions and answers