
Related Manuals for Dog trace d–control 640


Summary of Contents for Dog trace d–control 640
- Page 1 d–control 640, 1040, 1640 Electronic vibration training collar d–control 642, 1042, 1642 Electronic vibration training collar – set for two dogs User’s guide...
- Page 2 Thank you for purchasing the product DOGtrace™ d–control from VNT electronics s.r.o., Czech Republic. We would like to ask you for reading this manual carefully before using the unit and keeping it for future use. EC Declaration of Conformity Guideline R&TTE 1999/5/CE The manufacturer: VNT electronics s.r.o.
-
Page 3: Table Of Contents
Contents Introduction ............... . 4 Delivery contents . -
Page 4: Introduction
Introduction Do you need to have your dog under control all the time? Do you want to train and breed it easily, quickly, precisely, and effi ciently? Electronic training system DOGtrace™ d–control consisting of transmitter and collar will help you train your dog with effi ciency incomparable to other methods. -
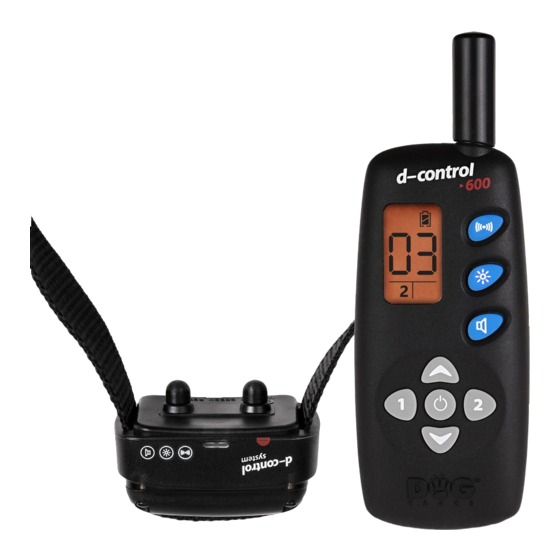
Page 5: Product Description
Product description REMOTE CONTROLLER COLLAR WITH STRAP LCD PANEL DESCRIPTION REMOTE CONTROLLER 1 – Vibration button, 2 – Light button, 3 – Sound signal button, 4 – Illuminated LCD display, 5 – Vibration mode selection button, 6 – Switch on/off button, 7 – Receiver selection (dog 1, dog 2) button. COLLAR WITH THE STRAP 1 –... -
Page 6: Battery Installation And Replacement
Battery installation and replacement INSTALLATION (REPLACEMENT) OF THE BATTERY IN THE RECEIVER (COLLAR) Remove 4 screws of the receiver housing cover plate with a cross-head screwdriver. Install the 3V lithium CR2 battery. Mind the correct polarity indicated on the receiver PCB with “+“... - Page 7 INSTALLATION (REPLACEMENT) OF THE BATTERY IN THE REMOTE CONTROLLER Remove the cover of the battery compartement and insert 2 LR6 alcaline batteries. Mind the correct polarity marked in the battery compartement. Replace the cover and tighten the screw. Checking the battery status Look at the LCD display to check the battery status: Fully charged battery: full battery symbol shines in the LCD permanently in on state.
-
Page 8: Turning On/Off
Turning ON/OFF TURNING THE REMOTE CONTROLLER ON/OFF Turning on: Press down the On/Off button on the remote controller for 1 second. Turning on is indicated by lighting up of the LCD display. Switching off : Again, press down the On/Off button for 1 second. Turning off... -
Page 9: Programming (Matching) Of The Remote Controller And The Receiver
Programming (matching) of the remote controller and the receiver Every remote controller has its own RF operational code. Programming of the remote controller with the receiver (collar) will be accomplished during the fi rst use of the DOGtrace™ d–control set or with a new remote controller or a receiver (when one or the other is lost). -
Page 10: How To Use The Remote Controller
REPROGRAMMING OF YOUR RECEIVER The receiver can be programmed repeatedly without restraint either using the same remote controller or with another (see the section Programming /matching/ of your remote controller and receiver). ADVICE: It is possible to program an unlimited number of receivers to one transmit- ter, which is possible to use for training of several dogs at the same time. - Page 11 Mode setting is done using buttons (vibration mode setting) on the remote controller. Transmission symbol appears on the remote controller LCD display. A red LED diode on the receiver is lit permanently. Button – lighting the collar A red LED diode inbuilt in the collar emits very intensive fl ashes which are stronger than by common light collars.
- Page 12 Control buttons – vibration mode setting The buttons are used for quick setting of vibration and light modes which are displayed on the LCD in numbers 0–4 (vibration modes) and 0–7 (light modes). Control buttons The buttons are used for dog selection. A diff erent impulse level can be set for each dog. It remains saved even after selection switching to the other dog.
-
Page 13: For The Best Results
For the best results Training orders you send to your dog are transmitted from the transmitting unit to the collar equipped with the receiver on radio waves. The propagation of radio waves is infl uenced by a series of factors and under normal conditions the range of this unit is about 600–1600 meters (depending on geographic conditions and surroundings). -
Page 14: Getting Started
Getting started The trainer’s elementary knowledge in training dogs is the prerequisite for using the training collar. If you do not have this knowledge, we recommend you to turn to a training centre, a cynology club, or a school for dogs where you will learn the basic communication with your dog. - Page 15 Sound signal It is only up to you how you use it. It depends on the method you wish to train your dog with. With the sound signal you can: Send a sound warning to your dog when it is doing something inappropriate. Catch the attention of your dog.
-
Page 16: Advice
Advice With the DOGtrace™ collars it is extremely easy and quick to teach the dog: To walk along without a dog-lead. To call in reliably (”To me“, ”Come to me“ commands). To interrupt an inappropriate activity (”Fie“, ”You mustn’t“). To unteach bad habits during daily coexistence with people, such as taking food from the table, jumping at people, pawing, undesirable barking, etc. -
Page 17: Hints For Using
Hints for using Do not place your remote controller close to objects sensitive to magnetic fi elds that might get damaged and be out of repair. Do not put your d–control in places exposed to high temperatures. It is necessary to replace the batteries every two years and also in the case that the set is not used for a long time. -
Page 18: Troubleshooting
Troubleshooting Before you start considering your unit to be faulty: Read this Service Instruction manual once again and make sure that the problem is not caused by weak batteries or by incorrect application. Check to see if the batteries are positioned correctly with regard to their polarity. If a problem persists, try to initialize the system by removing the battery from the battery holders in the receiver, then use a metal tool (e.g. -
Page 19: Warranty
Warranty DOGtrace™ provides the product with warranty for possible manufacture faults to the extent of two years from the date of purchase. The manufacturer does not take responsibility for damage to the instrument caused by incorrect use, unauthorized repairs and dismantling. The warranty does not cover the following items: Batteries New straps... -
Page 20: Technical Data
Technical data TRANSMITTER Weight ........175 grams (without battery) Range . - Page 21 T R O U B L E S H O O T I N G...
Need help?
Do you have a question about the d–control 640 and is the answer not in the manual?
Questions and answers